You’ve been there. You spin up a new project and ask your AI coding assistant to get the environment ready. It confidently reaches for pip install. It guesses at package names. It tries to install cv2 when it should know to look for opencv. The YAML it generates is technically valid, but it ignores your .condarc, pulls from the wrong channels, and breaks the moment it touches your actual system.
For all the ways AI tools have transformed how we write Python, environment management remains broken. Because your AI assistant is operating blind. It has no awareness of what conda environments you have, what packages are already installed, what your channel policies are, or how to resolve dependencies against your real system state. This is why we are introducing Anaconda MCP, a unified gateway that makes any MCP-compatible AI tool fully conda-aware.
Why AI Tools Keep Getting Conda Wrong
The problem isn’t that these tools are bad at Python. They’re excellent at it. The problem is that conda environment management requires structured, system-specific knowledge that no amount of training data can substitute for.
Your environment state is local. An AI assistant has no idea what’s installed in your conda environments, what Python version you’re running, or what build variants are present on your platform. Without that, dependency resolution is guesswork.
Channel ordering also matters. If your organization uses a private channel or has specific channel priority rules in .condarc, an AI tool without access to that config will happily pull from defaults or conda-forge in the wrong order. In enterprise settings, this can mean quietly pulling packages from unapproved sources.
Then there’s the dependency graph, build provenance, and PyPI-to-conda name mappings. This information lives in rich, structured metadata that isn’t meaningfully accessible through a web search. That’s why your AI assistant installs cv2 instead of opencv, or tries to pip-install something that ships as part of a conda meta-package.
The result is that even experienced teams end up treating AI environment suggestions as a first draft that needs heavy manual correction. For less experienced developers, it’s often just broken.
What Anaconda MCP Changes
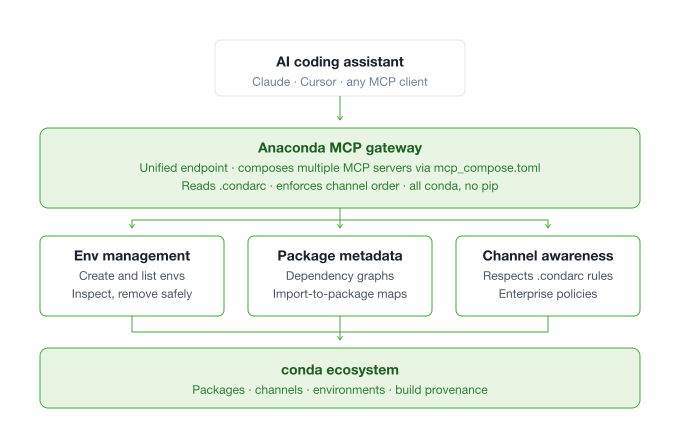
Anaconda MCP is a unified MCP (Model Context Protocol) gateway that composes multiple underlying MCP servers into a single endpoint. Once configured, any MCP-compatible AI tool (Claude Desktop, Cursor, VS Code Copilot, and others) gains direct access to the full conda ecosystem. This includes your actual environment state, your channel config, and the structured package metadata needed for real dependency resolution.
With Anaconda MCP your AI assistant can query your conda environments and enumerate installed packages, create environments using the correct conda packages from the right channels with proper dependency resolution, and respect your .condarc so that channel ordering and policies are enforced. All of this is done while ensuring that all operations go through conda.
The junior developer asking Claude to set up a data science environment now gets the same correct, production-appropriate result that a conda power user would produce manually, because they’re both working with the same underlying knowledge.
See It in Action
The best way to understand Anaconda MCP is to watch it handle the situations that are confusing in other approaches. Here are three scenarios from a demo repo we created, each mapping to a real, recurring frustration in data science workflows.
Scenario 1: The Messy Script
You’ve inherited a Python script from a colleague, pulled one from GitHub, or vibe-coded something that you now need to actually run. There’s no requirements.txt, no environment.yml, just imports and optimism.
Take image_analyzer.py from the demo repo. It imports cv2, numpy, sklearn, PIL, matplotlib, and skimage. If you try to run it cold, you immediately hit:
$ python image_analyzer.py
ImportError: No module named 'cv2'

$ conda install cv2
ERROR: The following packages are not available from current channels...
So you google it, and find that the conda package is opencv (not cv2 or opencv-python). You install it, run again, and the next import fails. Repeat.
With Anaconda MCP configured and filesystem access pointed at your project directory, you instead say:
“I have a Python script at ~/projects/messy_scripts/image_analyzer.py that I need to run. Can you create a conda environment with all the dependencies it needs?”
Claude reads the file, identifies every import, and resolves them to the correct conda package names:
| Import | Conda package |
|---|---|
cv2 | opencv |
sklearn | scikit-learn |
PIL | pillow |
skimage | scikit-image |
numpy, matplotlib | (map directly) |
It creates an environment named image-analysis, installs everything, and tells you exactly how to activate and run it. The script runs on the first try, producing test_image.png and analysis_result.png. No googling. No trial and error. What used to take 15–30 minutes takes 3–5.
The same workflow applies to data_pipeline.py in the demo repo. This is a heavier ML script pulling in xgboost, lightgbm, scipy, seaborn, and more. Same experience: one prompt to a working conda environment.
Scenario 2: The Package Explorer
Sometimes you just need to understand what environments exist, what’s installed, and how two environments differ to know what you’re working with.
Instead of context-switching to a terminal and running conda env list and conda list -n <env>, you get real answers in the conversation. Claude queries your actual environment state because it’s pulling directly from conda, not making guesses. You can verify any of it yourself with conda env list and the output will match.
Scenario 3: The Cleanup Crew
Stale environments accumulate. After a few months of project work you may have a dozen that served their purpose and are now just taking up disk space.
Claude surfaces everything and helps you identify candidates: demo environments, one-off test setups, anything that looks disposable. When you’re ready:
“Show me all my conda environments. I want to clean up environments I don’t need anymore.”
Claude confirms which environment you want to remove, calls the deletion, and reports back when it’s done. In practice, destructive operations go through an explicit confirmation step: the assistant identifies candidates, you decide what to remove, and it acts on your instruction.
Getting Set Up
This should take you about five minutes. Anaconda MCP is currently supported on macOS, Linux, and Windows with single-command setup available for Claude Desktop, Claude Code, Cursor, VSCode, OpenCode, and Windsurf.
The fastest path is the setup.sh script in the demo repo. Run it from the repo directory and it handles everything automatically: prerequisite checks, dedicated demo environment creation, Claude Desktop configuration, and a summary of next steps. If you’d rather set things up manually, here’s what it’s doing under the hood:
Step 1: Install
conda create --name anaconda-mcp anaconda-mcp
conda activate anaconda-mcp
Step 2: Configure Claude Desktop
anaconda mcp setup --client claude-desktop
This command automatically writes the correct JSON configuration to your Claude Desktop config file. No manual JSON editing required.
Step 3: Restart Claude Desktop
Quit and relaunch. The Anaconda MCP tools will appear in Claude’s tool list. You can verify everything is working by asking: “List my conda environments.”
A Note on Filesystem Access
To let Claude read your project files (and run the “messy script” scenario above), filesystem access needs to be configured in Claude Desktop. The setup.sh script in the demo repo handles this by configuring Claude’s access to the demo directory. Once you’re ready to move beyond the demo, you can update your local claude_desktop_config.json to give Claude access to other files.
For full configuration reference (including manual JSON setup, custom config file paths, and Python interpreter options) see the Anaconda MCP documentation.
What’s Next
Anaconda MCP is extensible by design. The gateway architecture means that as new MCP servers and Skills come online covering more of the package metadata layer, model inference, and anaconda.org, they’ll become available through the same unified endpoint. You configure once and benefit continuously.
This release is the first step in a broader investment in making AI coding tools work with the conda ecosystem rather than around it. Anaconda has spent more than a decade building the infrastructure that data scientists and ML engineers rely on. Anaconda MCP is how that infrastructure becomes accessible in the age of AI-assisted development.
Try It
The best way to understand what this unlocks is to run it against one of your own projects.
- Demo repo: automated setup script, sample scenarios, everything you need to get started
- Documentation: full setup guide and CLI reference