Anaconda Platform
7.0.0 is available through a limited early access program. Contact your Anaconda Technical Account Manager (TAM) if you’re interested in adopting the latest version.Visibility and management of CVE features depend on your assigned role. Only users with Read permissions for CVE can view CVE information.
Why trust Anaconda?
Anaconda regularly pulls its CVE databases from the National Vulnerability Database (NVD) and the US National Institute of Standards and Technology (NIST) to minimize the risk of vulnerable software in our applications and web pages. Anaconda has an extensive and well-established process for curating CVEs, assessing whether or not Anaconda built are affected by any CVEs, determining which versions in our are affected, and mitigating the vulnerability.Understanding CVEs
Here’s what you need to know to make the right decisions regarding CVEs for your organization:Common Vulnerability Scoring System (CVSS)
Standards for determining the severity of a CVE have evolved systematically through multiple iterations. The Common Vulnerability Scoring System (CVSS), established in 1999, provides a standardized mathematical framework for quantifying vulnerability characteristics. Following its initial implementation, CVSS 2.0 was released in 2007, introducing a structured metric-based approach. The framework underwent significant refinement in 2015 with CVSS 3.0, which incorporated enhanced contextual factors to more accurately reflect real-world vulnerability impact. In 2023, CVSS 4.0 was released, providing a comprehensive redesign that addresses contemporary security challenges. This latest version implements an expanded nine-metric base scoring system. CVSS 4.0 also provides improved assessment capabilities for modern deployment architectures, including cloud environments, containerized applications, and supply chain dependencies.CVE scores
Software developers refer to CVE databases and scores to minimize the risk of using vulnerable components (packages and binaries) in their applications or web pages. CVE scores and ratings fall into one of 5 categories: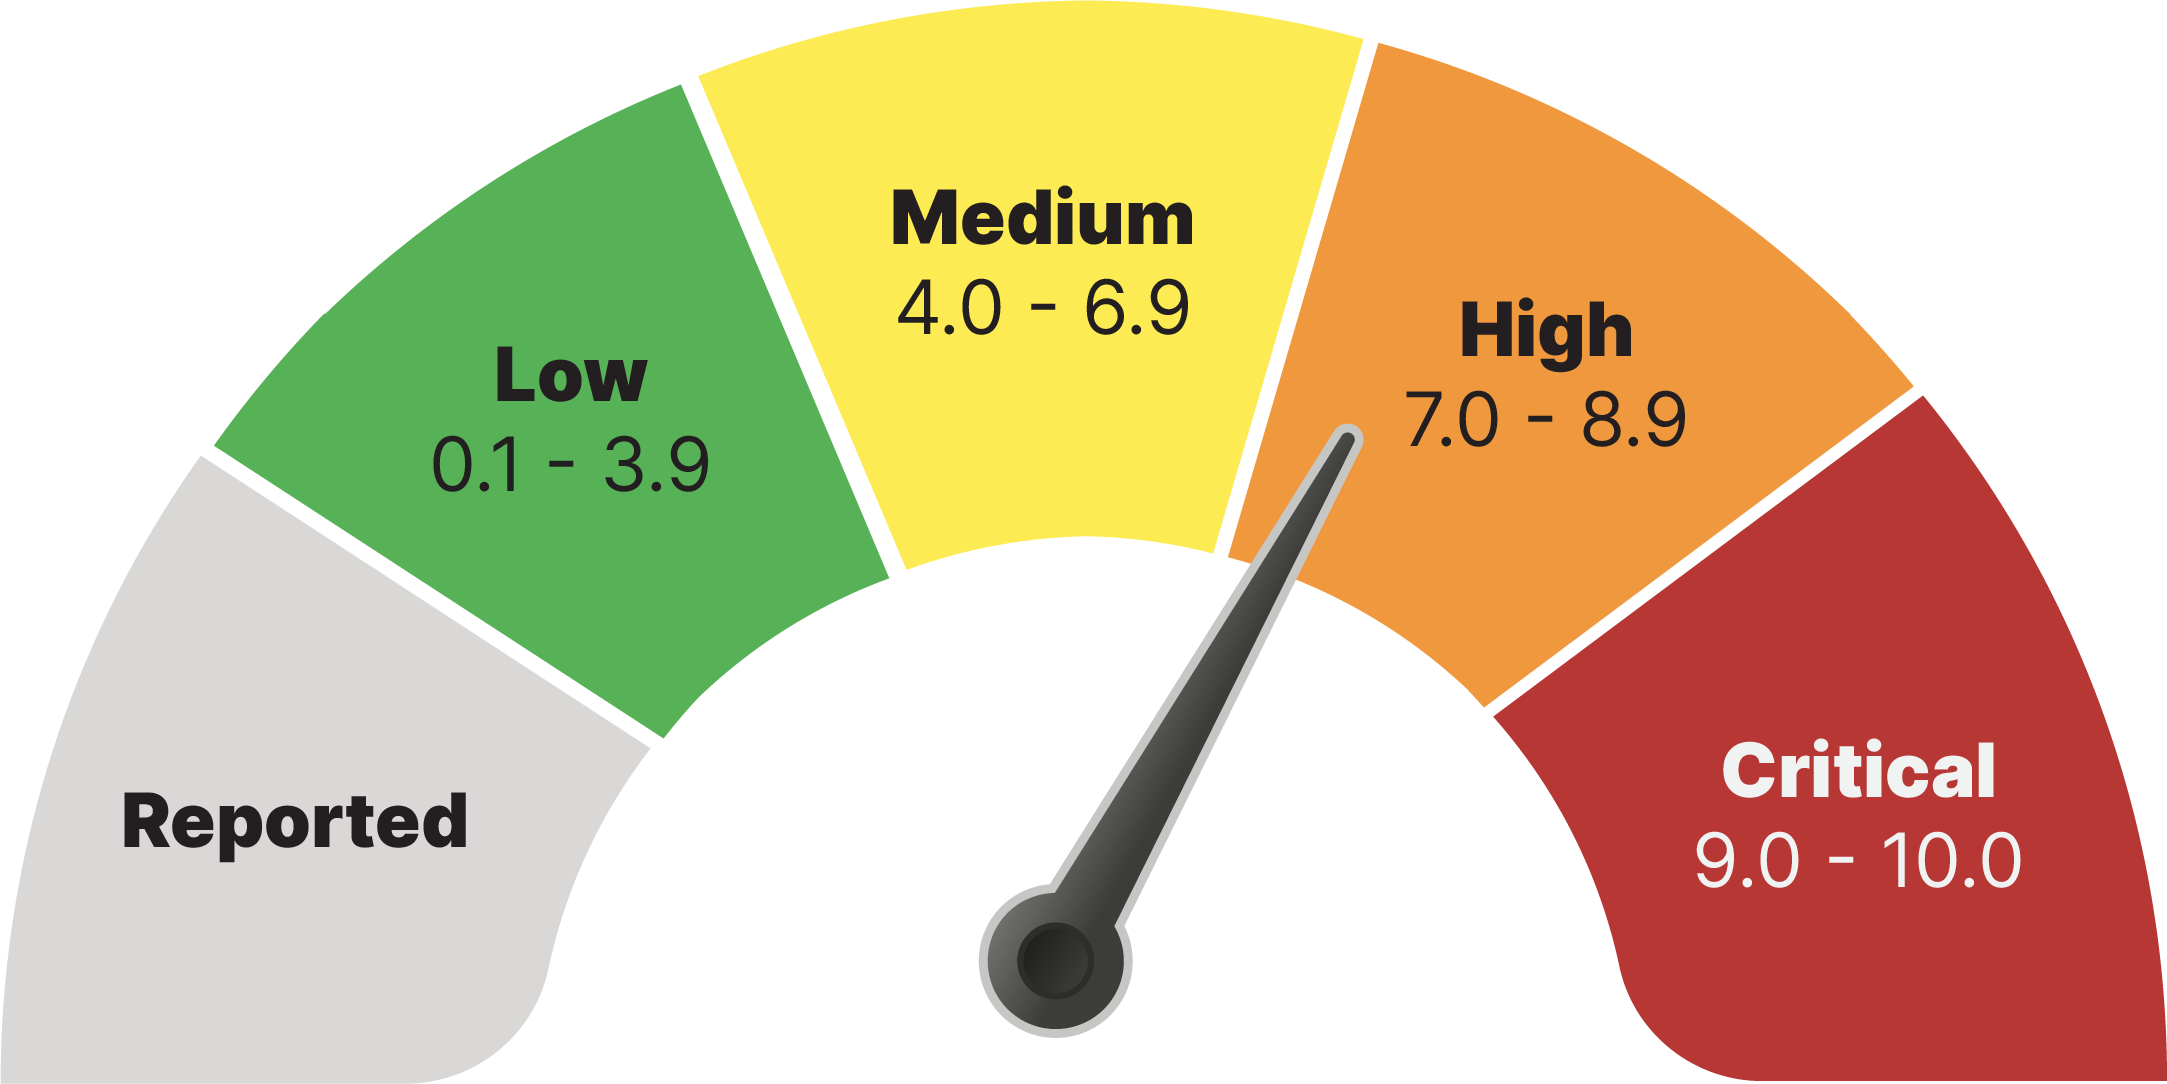
CVE curation
Each CVE undergoes a rigorous curation process that evaluates its impact on packages in our repository. Each curated package receives additional metadata detailing the nature of the CVE, a package signature, and a CVE status. A checkmark next to a CVE score indicates that the CVE has undergone curation.Because packages can be affected by multiple CVEs, a single curated CVE does not guarantee a package is fully secure. If multiple CVEs exist for a package, ensure that each CVE is either cleared, mitigated, or otherwise determined to be non-impactful.
CVE statuses
CVEs are assigned a status category as a result of the Anaconda curation process. CVE status categories include:- Reported: The vulnerabilities identified in this package have been reported by NIST but not reviewed by the Anaconda team.
- Active: The vulnerabilities identified in this package are active and potentially exploitable.
- Cleared: The vulnerabilities identified in this package have been analyzed and determined not to be applicable.
- Mitigated: The vulnerabilities identified in this package have been proactively mitigated in this build through a code patch.
- Disputed: The legitimacy of the vulnerabilities identified in this package is disputed by upstream project maintainers or other community members.
To view this information in Anaconda Platform, select the information icon beside CVE Status in the or package views.
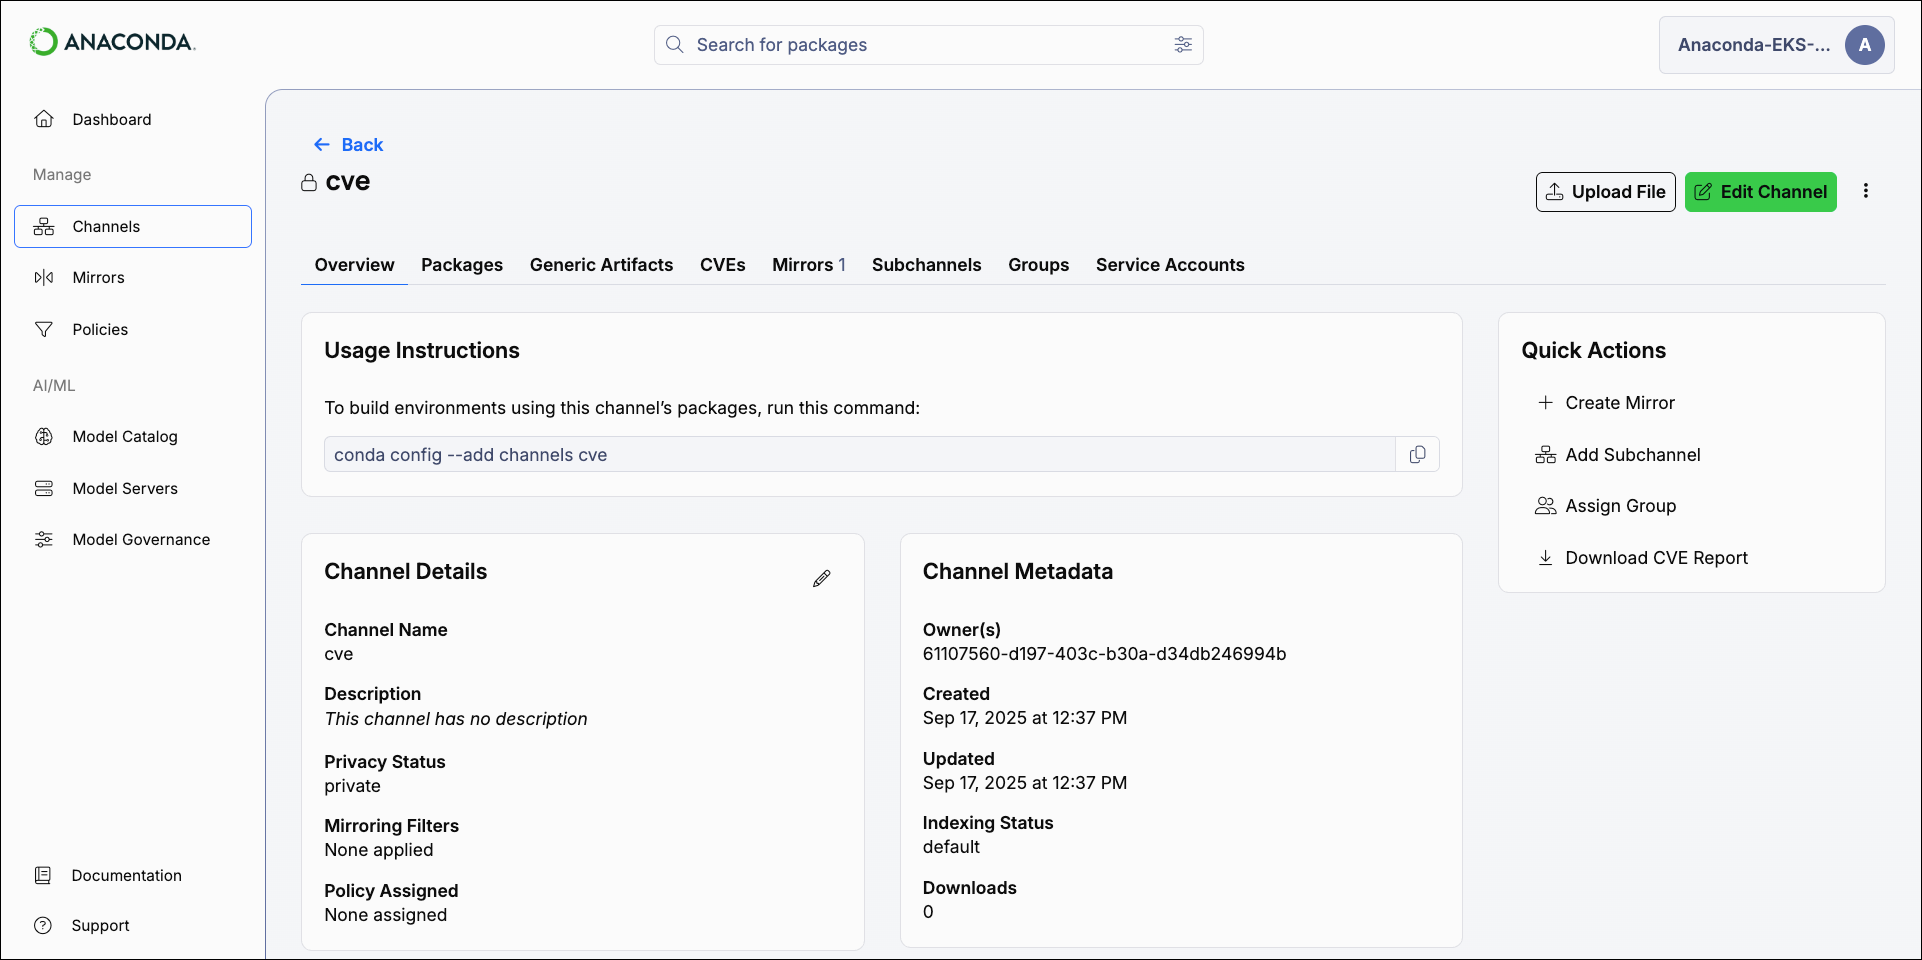
Viewing CVEs by channel
CVE views are only available to users whose role provides
Read permissions for the CVE category.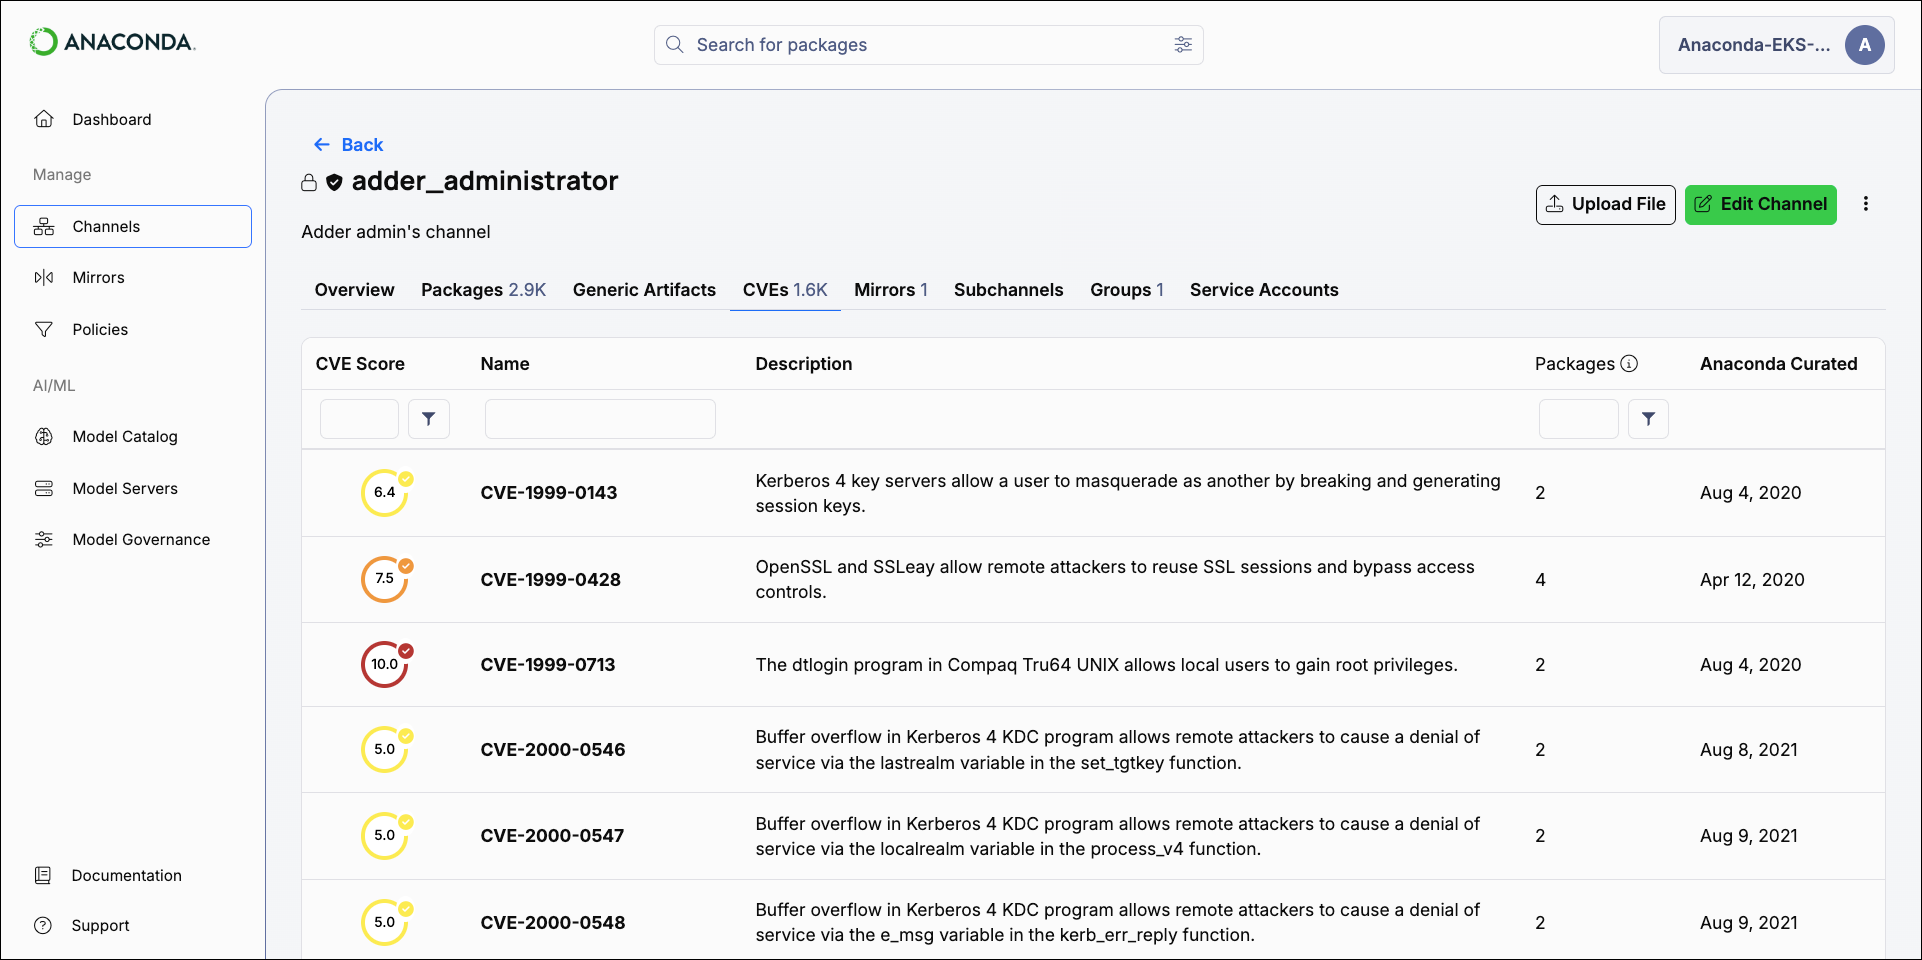
Filtering channel CVEs
Apply filters to your channel’s CVEs tab by utilizing the fields at the top of the table columns.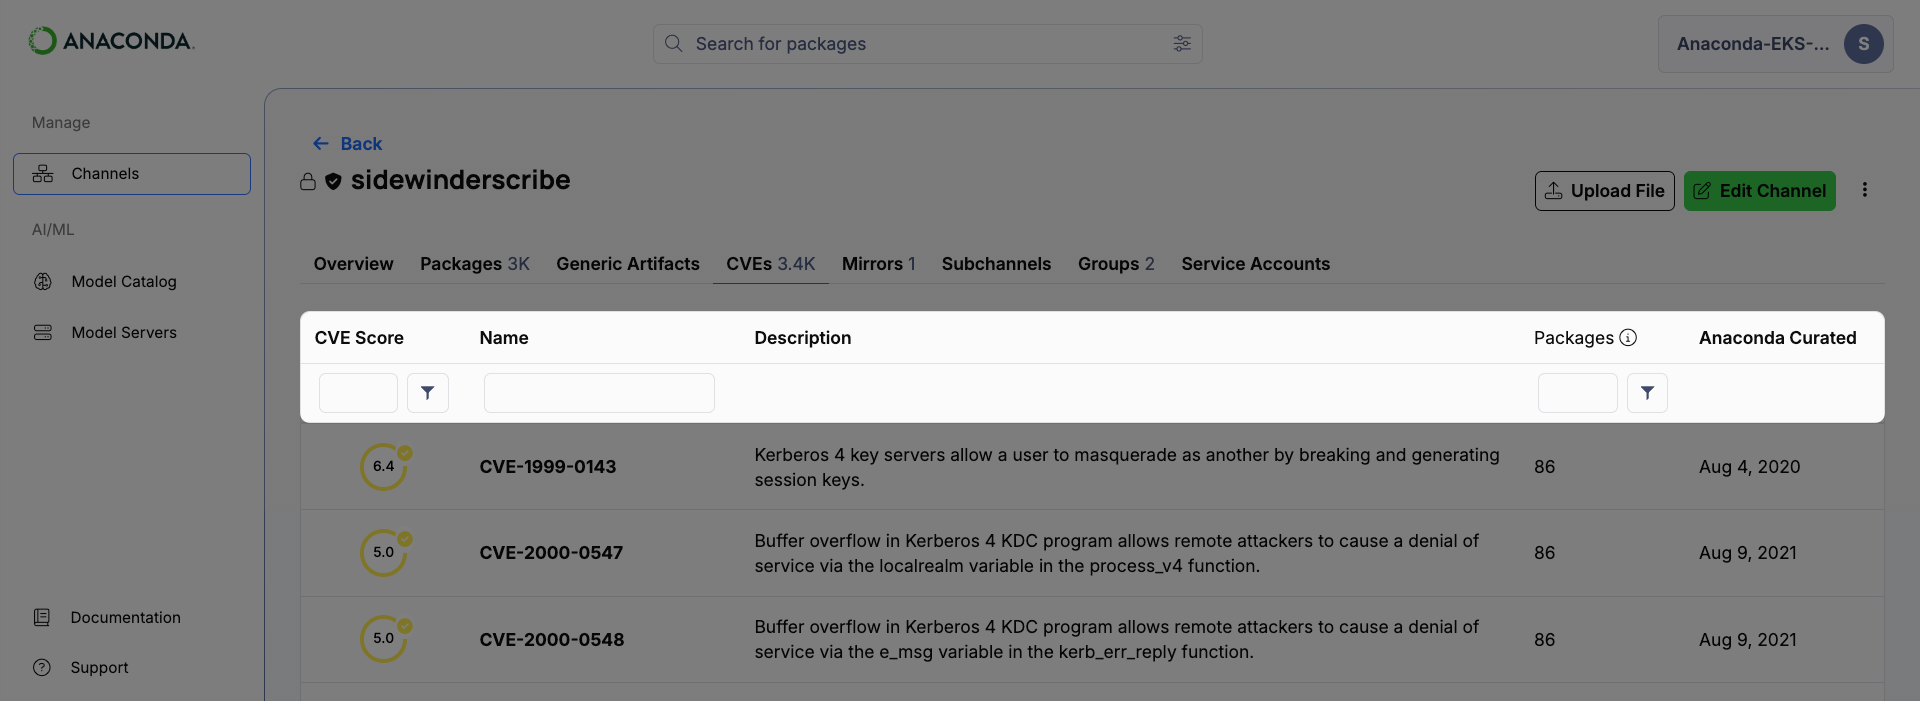
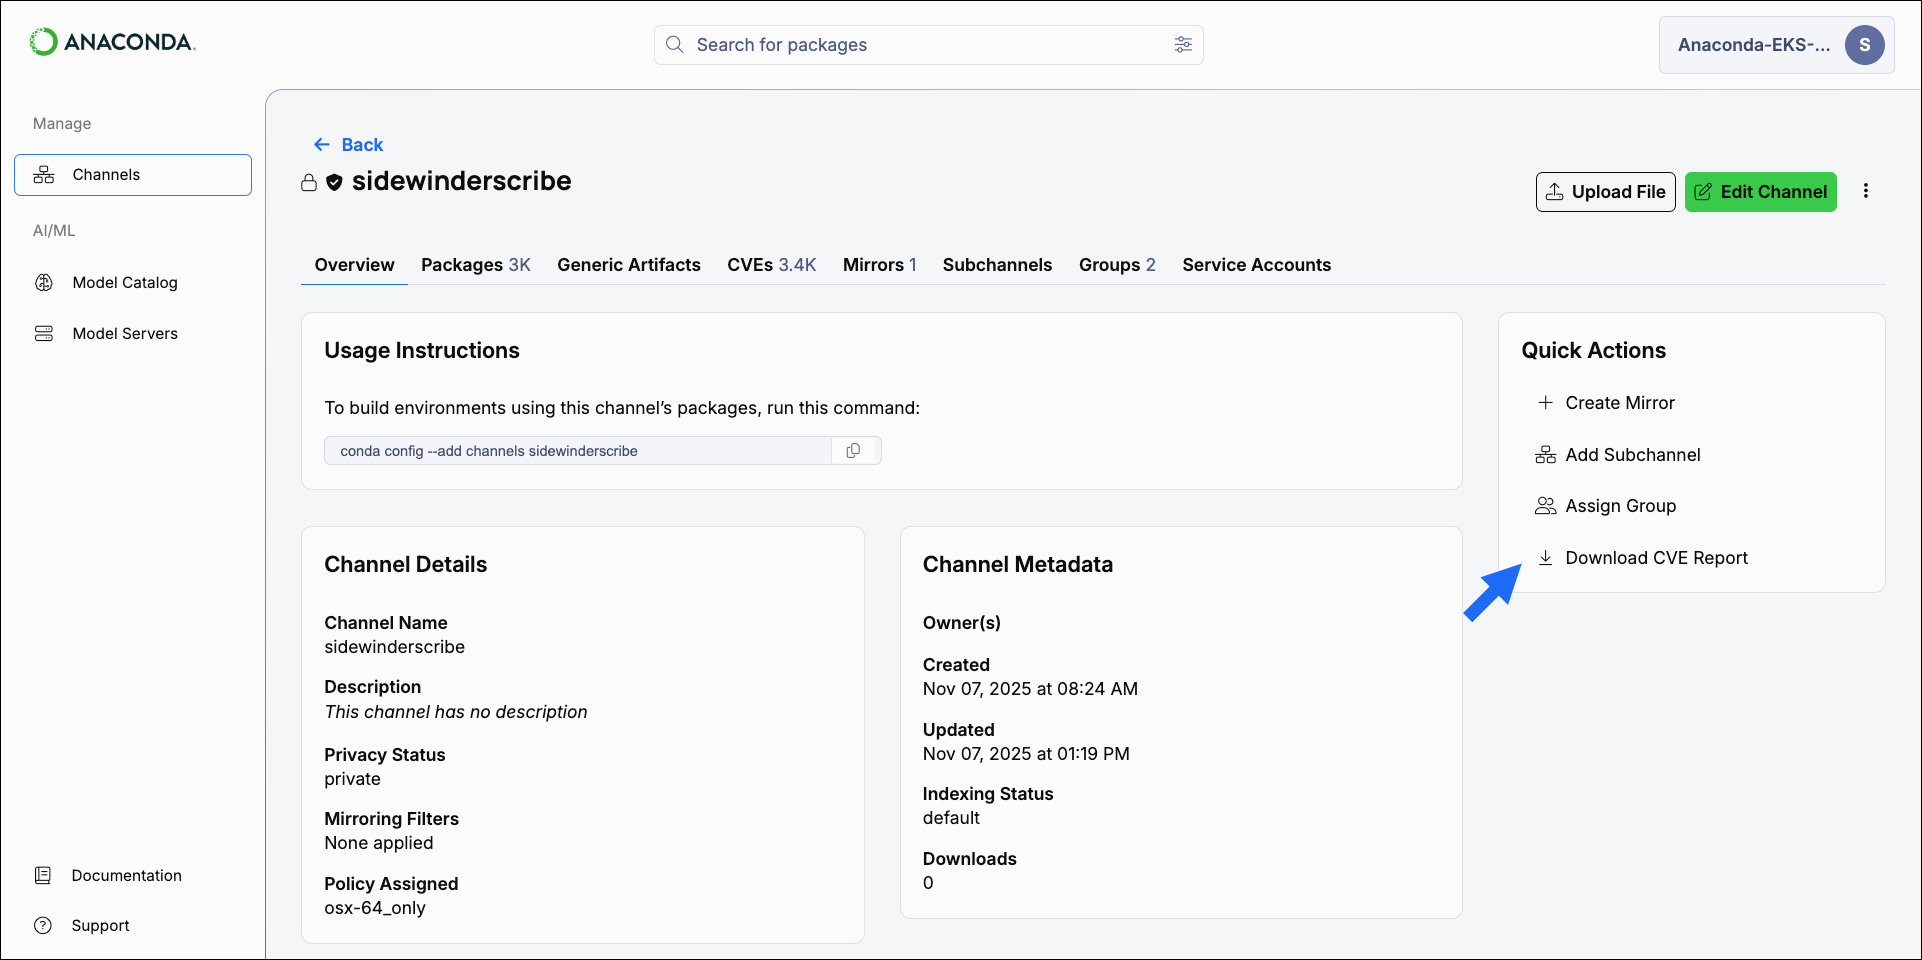
Downloading CVE reports
CVE reports provide a comprehensive list of CVEs associated with the packages in a channel in a.csv file.
- Select Channels from the main navigation menu.
- Select the channel you want to download a CVE report for.
- Select Download CVE Report from the Quick Actions or from the channel actions dropdown. A notification displays to confirm that the report has been initiated.
If you have applied any filters to the channel’s CVEs tab, the report will reflect those filters. For example, if you want a report containing a list of all the packages that pass your security threshold of “CVE score less than or equal to 8.0”, but still have an active or reported CVE, enter 8 as the CVE Score, adjust the filter to less than or equal to, select the Active and Reported statuses in the # Packages column, and then download the report.
Once a report has been initiated, it must complete before another report can be generated.
Viewing CVEs by package
Every channel’s packages list displays a CVEs column indicating how many CVEs are associated with each package in the channel.The packages list is the default view when you open a channel.
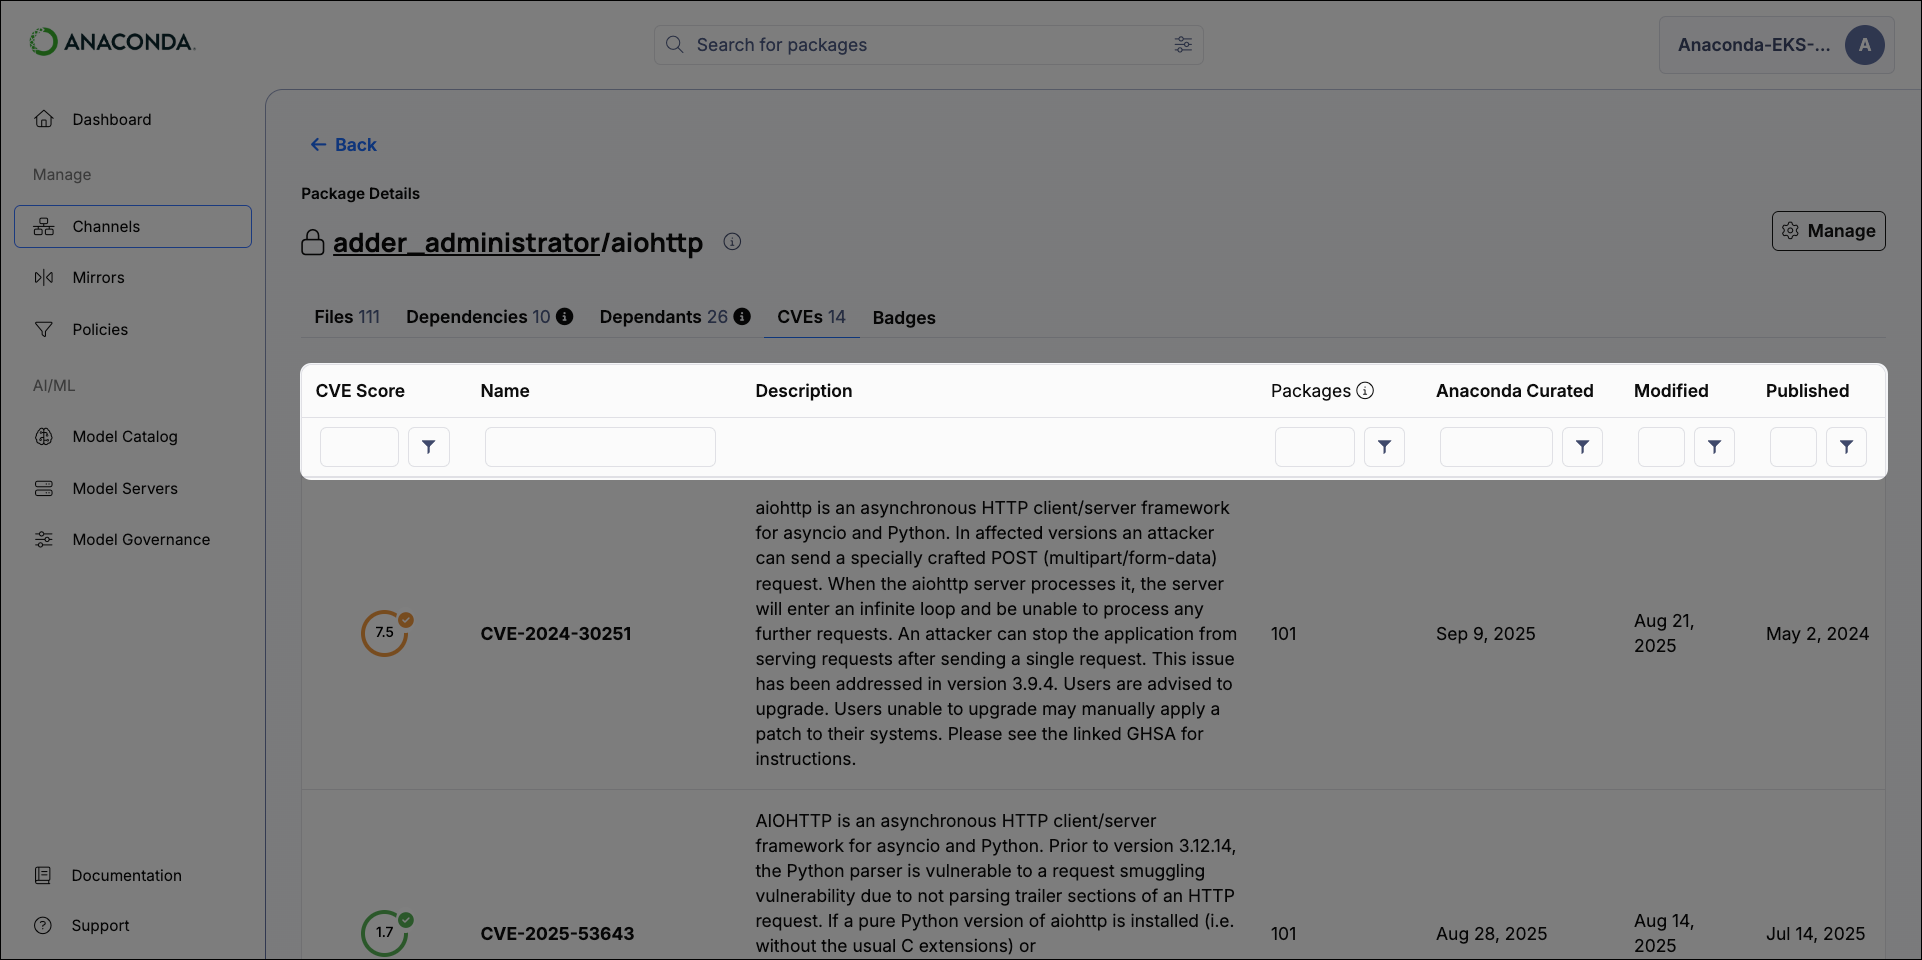
Viewing CVE details
Select on a CVE from any page to view detailed information about the CVE and its dangers. You can view a list of package files associated with the CVE, its CVE Status, and which platforms the package applies to. Select a CVSS tab to view the CVSS version information, which includes exploitability and impact metrics, along with the publication date by NVD and the curation date by Anaconda (if applicable).
The CVSS4 tab is not visible in versions
6.7.x and older. However, if a package has CVSS4 scoring information, it is still visible in older versions in the package file’s metadata. For more information, see Viewing package details.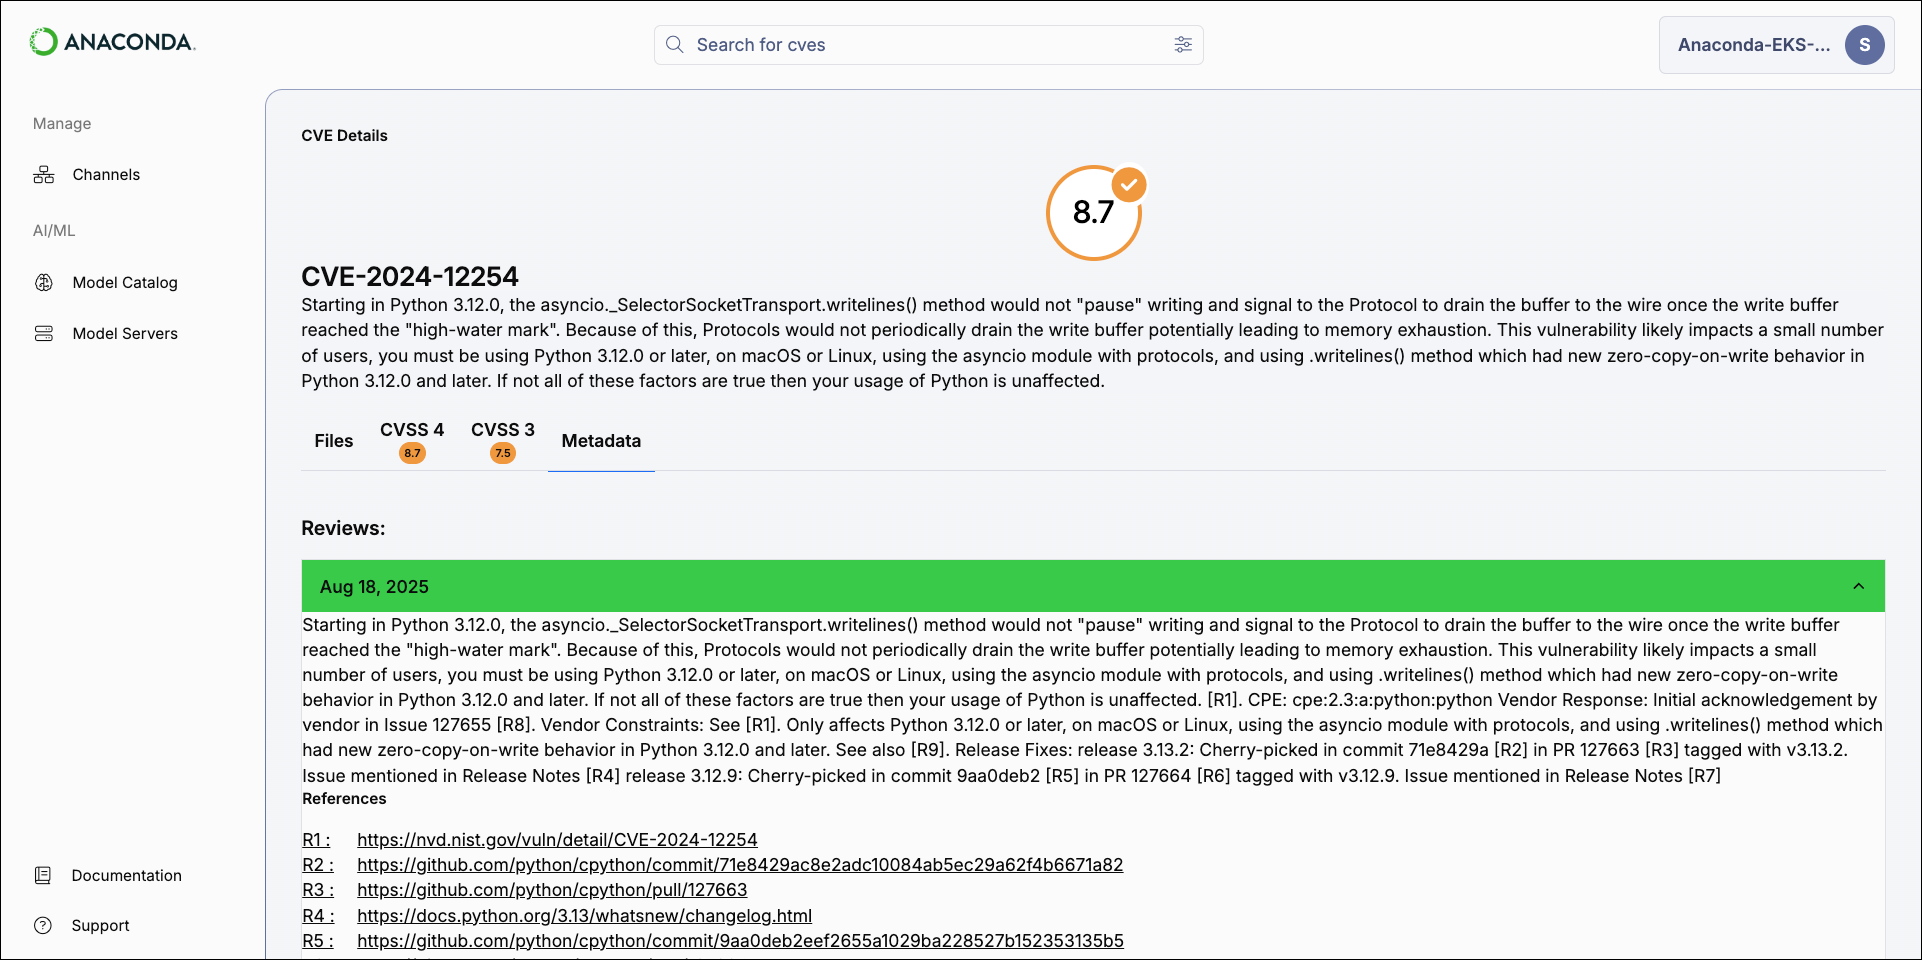
Searching for CVEs
You can search for CVEs using the search bar at the top of the page. Select the icon in the search bar, select CVEs, and then enter the name of the CVE you’re looking for in the search bar.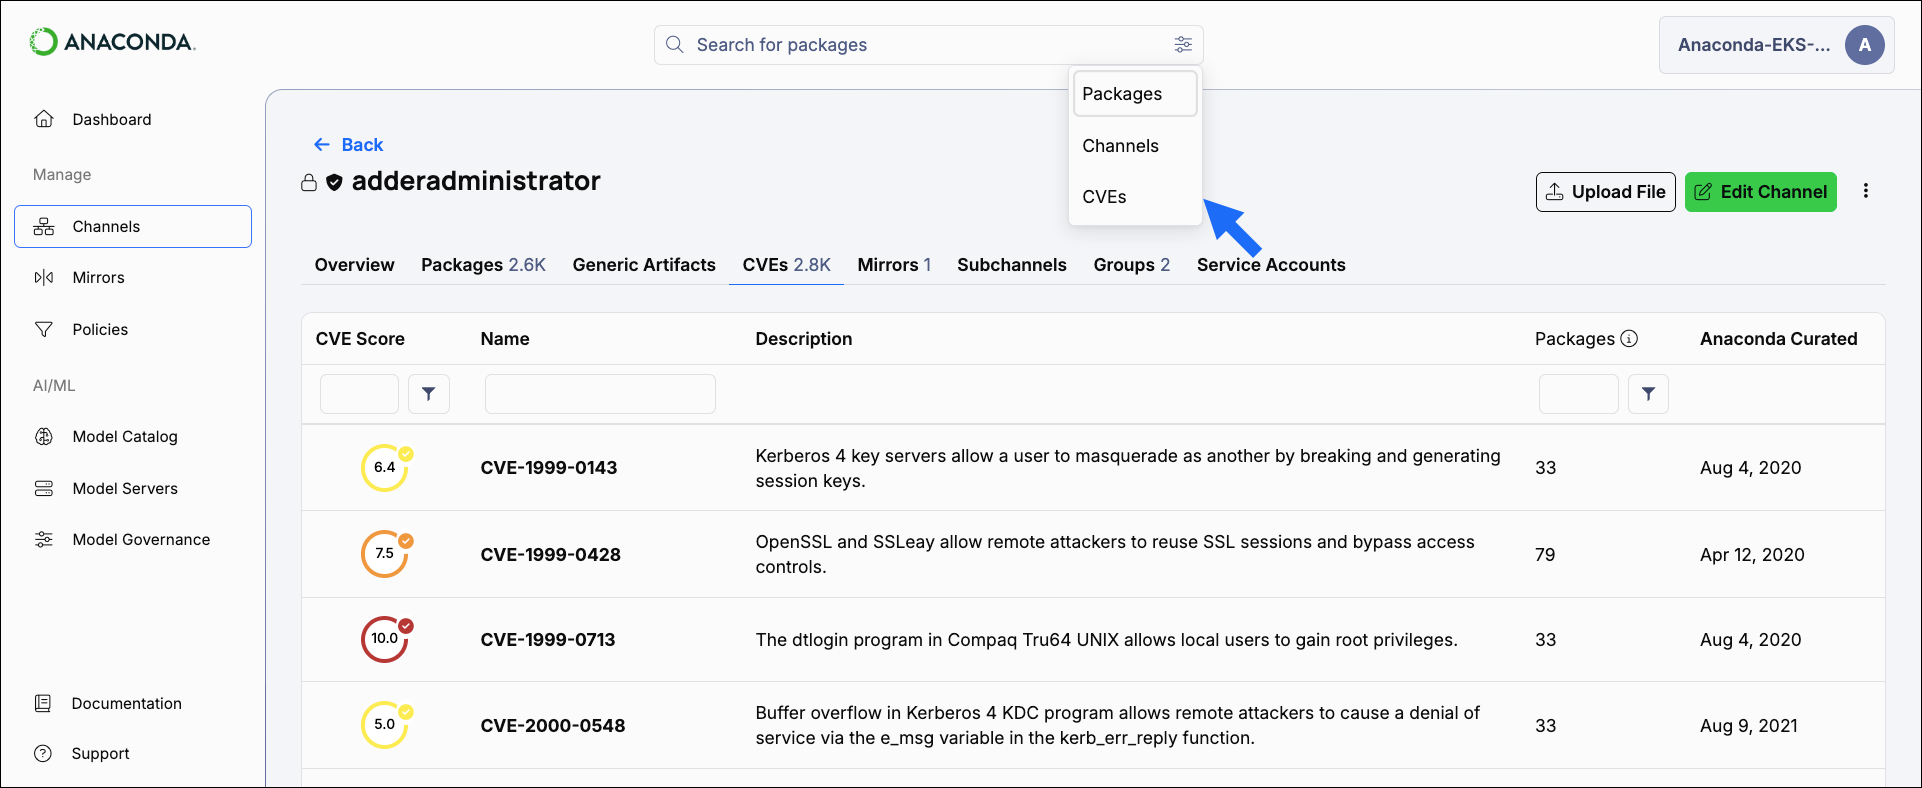
CVE implementation
CVEs have a dedicated channel in Anaconda Platform. This channel pulls from the repo.anaconda.cloud repository, which is updated every four hours. Activating your license automatically creates a mirror of this channel that runs hourly to synchronize between the channel repository and the local database.Air-gapped networks receive up-to-date CVEs and packages during the initial installation of Anaconda Platform, and can update at regular intervals as necessary. CVEs are updated daily for air-gapped users, and packages are updated monthly.
Understanding CVE ingestion
When you initially enter your license, Anaconda Platform automatically connects to Anaconda’s CVE service and establishes a dedicated CVE channel (https://<FQDN>/channels/cve) with a mirror named cve_ingestor that syncs CVE metadata from https://api.anaconda.cloud/repo/anaconda-main every 4 hours.
Validating the CVE mirror
CVEs won’t appear with metadata until the mirror completes and packages are matched to CVEs. If you’ve activated your license and don’t see CVE metadata, use one of the methods below to confirm that the CVE channel exists and contains data:- View the CVE channel directly
- Use the CLI
- REST (X-Auth header)
The CVE channel view is restricted to users whose role provides
manage permissions for CVEs.No internet access or missing proxy
No internet access or missing proxy
If the environment has no outbound internet access or traffic isn’t routed through the required proxy, mirroring fails—even if the Docker host itself can reach the internet using the proxy.Solution: Ensure your proxy server is configured correctly.
Terminating proxy replaces certificates
Terminating proxy replaces certificates
A terminating (transparent or explicit) proxy or network device might replace the certificates presented to Anaconda Platform. The platform uses the Requests library’s default CA bundle instead of the system trust store, so replaced certs won’t be trusted by default.Solution: Add your custom root CA to the requests library store.
Missing root CA certificates
Missing root CA certificates
The proxy or middlebox might not trust the upstream CA (this is common with Let’s Encrypt certificates).Solution: Update the proxy’s trust store so it validates certificates on the upstream connection.
api.anaconda.cloud can be reached; and the SSL validated from the API repo container is successful, you may proceed with the following CVE mirror fix:
Fixing CVE mirror failure during setup
If you work through the steps above and find that your channels still do not contain CVEs, try the following steps:-
Navigate to the CVE channel view:
-
Rename the channel to something else, such as
cve_old. -
Get the bearer token:
-
Call the
PUT https://<FQDN>/api/system/licenseendpoint: - Verify that a new CVE channel and mirror are created by navigating back to the CVE channel view in your browser.
-
Explore the channel to verify that the CVE data is now available. If it is, you can safely delete the
cve_oldchannel.