In this post, I share some useful tips, tricks, and lessons I’ve learned since diving into the new Python in Excel integration. You can follow along with these tips by opening an Excel workbook and trying to replicate the code and described behaviors (when applicable).
Note: To reproduce the tips in this post, install the Python in Excel trial.
1. Excel Cell Outputs and the print Function
One of the first things you can try when getting your bearings within Python in Excel is simply writing your first “Hello world“ example. If you’re at all familiar with Python code, you might try something along these lines:
print(“Hello world, I am running Python in Excel”)
Well, if you type that simple line of code into a Python cell (using =PY) and run it, the result may not be what you expect. Instead of seeing the string of the print function, you will instead see “None.” This is a unique feature of Excel, because the print function is meant to be used solely for “diagnostic” and “logging” information, not to generate cell output.
However, if we do open the “Diagnostics” panel (as shown below), we will be able to see our “Hello world” message.

So what constitutes a valid output for a cell? The execution of each Python cell works in a read–eval–print loop (REPL) fashion, similar to running Python in Jupyter Notebook cells. The last expression in the cell that will be evaluated (e.g., a Python object or the return value of a called Python function) will represent the output of the cell.
Therefore, to see our “Hello world” message as content in our Python cell, we should remove the print function and simply leave the string object to be evaluated (as shown below):
“Hello world, I am running Python in Excel”

2. Excel Value or Python Object?
The output of a Python cell can be of two types, as selected in the drop-down menu next to the cell:

By default, the output of a Python cell will be set as “Excel value.” Therefore, the value of any Python object returned by the code in the cell will be converted to an equivalent Excel output. Any primitive data type is automatically supported (e.g., str will be displayed as text, float as floating point numbers, and so on). But also, Excel natively supports the visualization of pandas.DataFrame and numpy.array (up to 2 dimensions), automatically displayed as Excel tables.
If we instead set up the output of a cell to Python Object, the object icon will be displayed in the cell, next to the object representation itself (or the name of the Python class).

This output can be useful and gives flexibility with the actual visualization of the object (e.g., an Image) or can be used to hold a reference to a Python object to be reused later in the workbook.
3. Use Short, Simple Python Code Snippets (with an Output)
Regardless of the output you decide to set up for your code cell, there are best practices to keep in mind when writing Python code in Excel. I want to highlight two in particular:
- Avoid writing longer code listings.
- Always return a value as a result of that cell.
Writing Python code in Excel cells is not the same development experience as working in a code editor or an integrated development environment (IDE). This is because the main purpose of working with Python in Excel is not developing Python code, but rather using Python to work with Excel (data) in order to create more powerful data insights.
With this in mind, it is preferable to keep the Python code to a minimum, limiting ourselves to only the Python code that is required to produce the desired output. Also, keeping code snippets short and simple in cells make them easier to maintain.
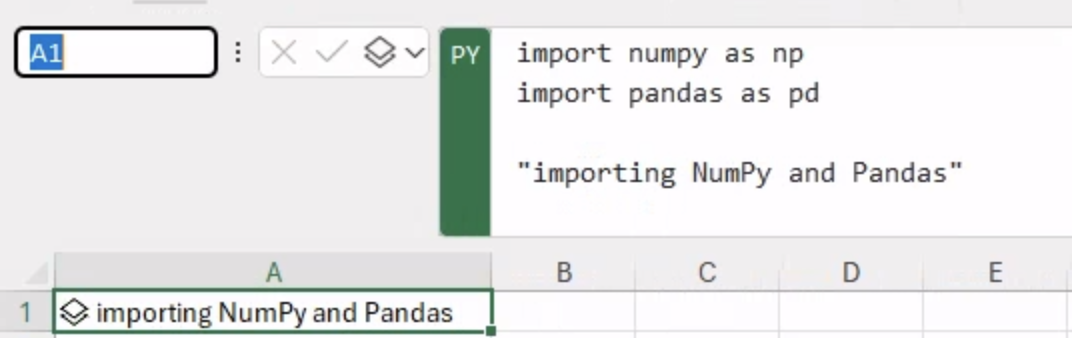
The last thing to bear in mind when writing Python in Excel cells is that it is always preferable to write code that generates an output. This is mainly because the output generated by the Python code is going to be the actual final content of the cell. Python formulas can have outputs of multiple types, namely text, numbers, Python objects, or images, and all of these types are automatically supported by Excel as cell content. Conversely, if your code does not generate any output (e.g., the Python formula only contains import statements), the content of the cell once the code is executed will be displayed as “None.” This makes total sense, as the Python code in the formula simply does not produce any output; however, having “None” as cell output might feel a bit strange or look to others like an error.
For this reason, if your Python code does not generate a specific output, it would be a good idea to define and return a Python string to label the content of your cell (see picture below).
4. Use the Cell Format to Properly Visualize the Python Output
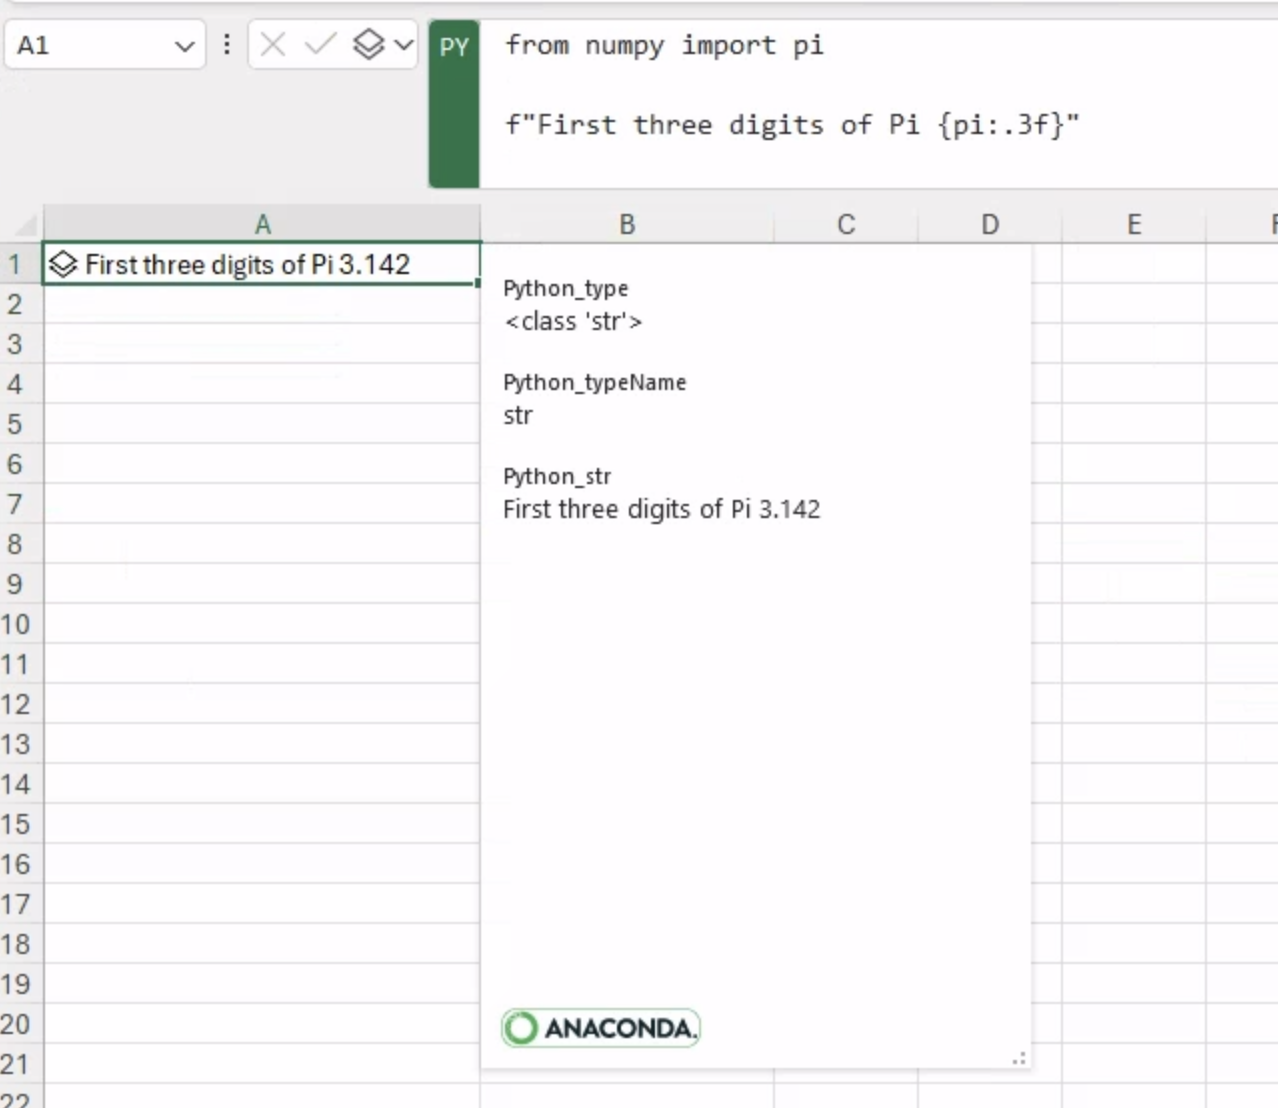
In the previous tip, we put a lot of emphasis on having Python code that actually generates an output. But what about its formatting? For example, we may want to have a string formatted over multiple lines or floating point numbers (e.g., contained in a column of a Python pandas DataFrame) that we want to display with up to two decimal digits. Python itself already offers options to work on formatted output. For example, Python supports formatted string literals (f-strings for short) to create strings with values generated by Python expressions. Python strings can also be multi-line (identified by triple quotes), and include formatting characters and tabulations.
For example, to write the Python code shown in the picture below, we can see that pi is formatted with three decimals and concatenated to the rest of the string. The content of the selected Python cell is a Python object of string type (i.e., str). So, as expected, the content of the cell is a Python-formatted string.
But what if we write in a cell the value of pi directly ?
As shown in the picture below, the output generated in the cell is a Python float object this time, and is displayed automatically with nine decimal digits.
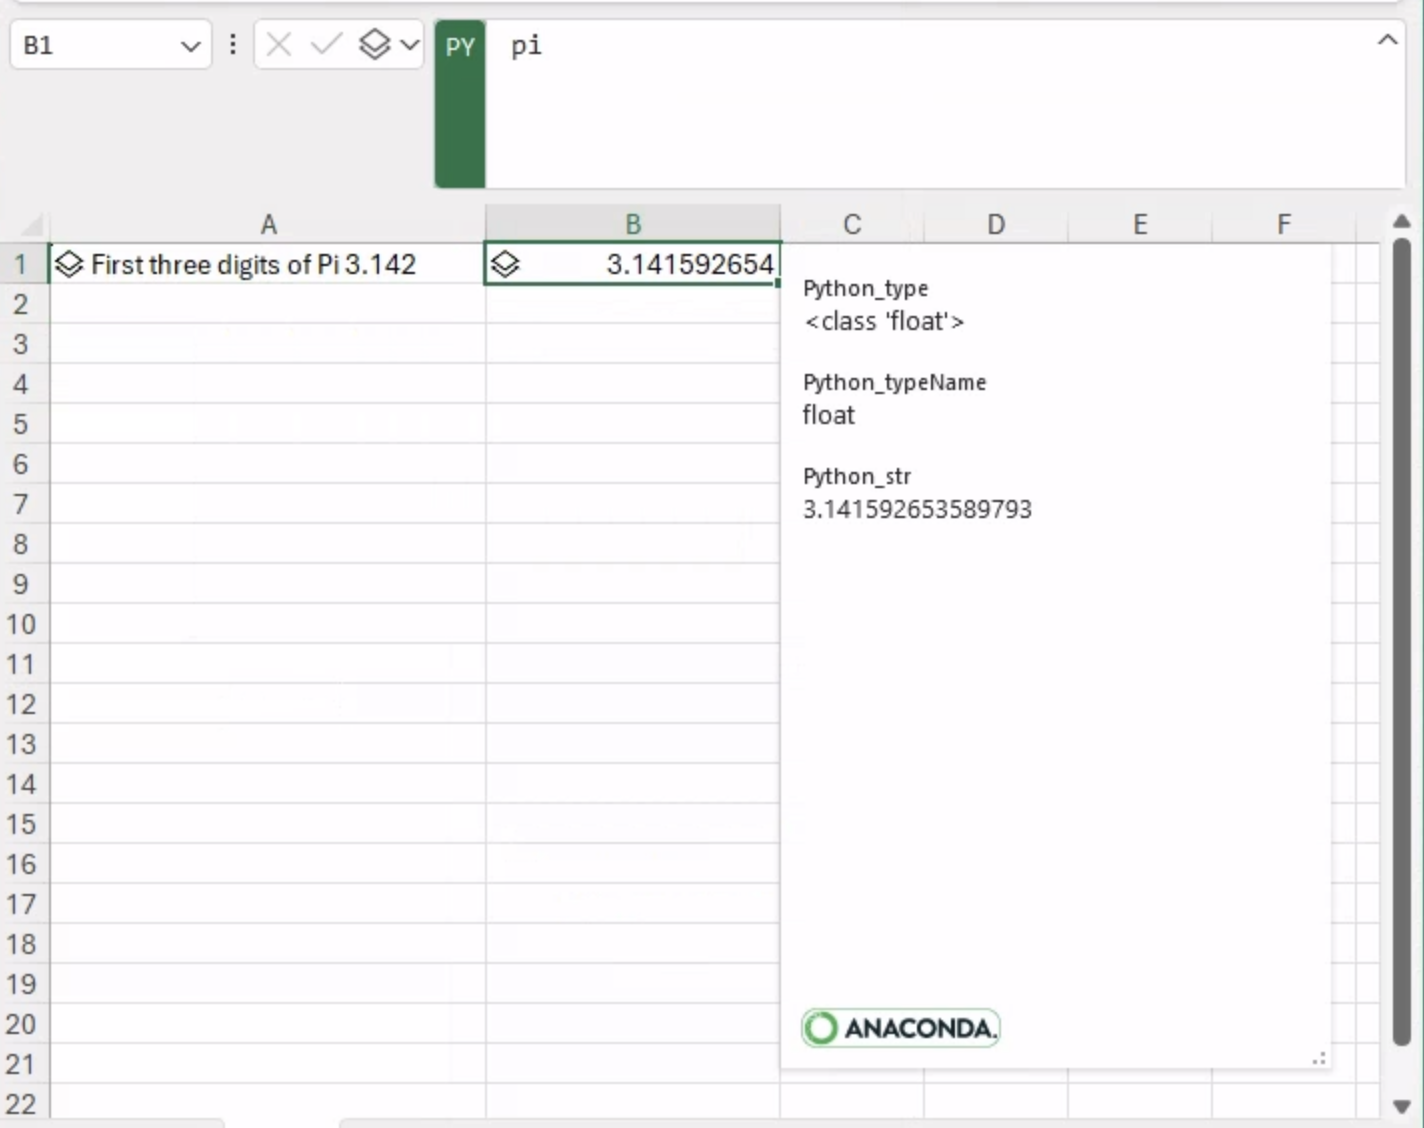
So far so good, but if we inspect the Format options of the cell, we may discover something interesting. Despite the output generated being a floating point number, the format of the cell you will be likely to find applied is “General.” In other words, there is no direct connection between the type returned by Python (float, in this case) and the format of the cell. In fact, if we select the Format “Number” and then set the decimal places to three, the new content of the cell should appear as shown in the picture below.
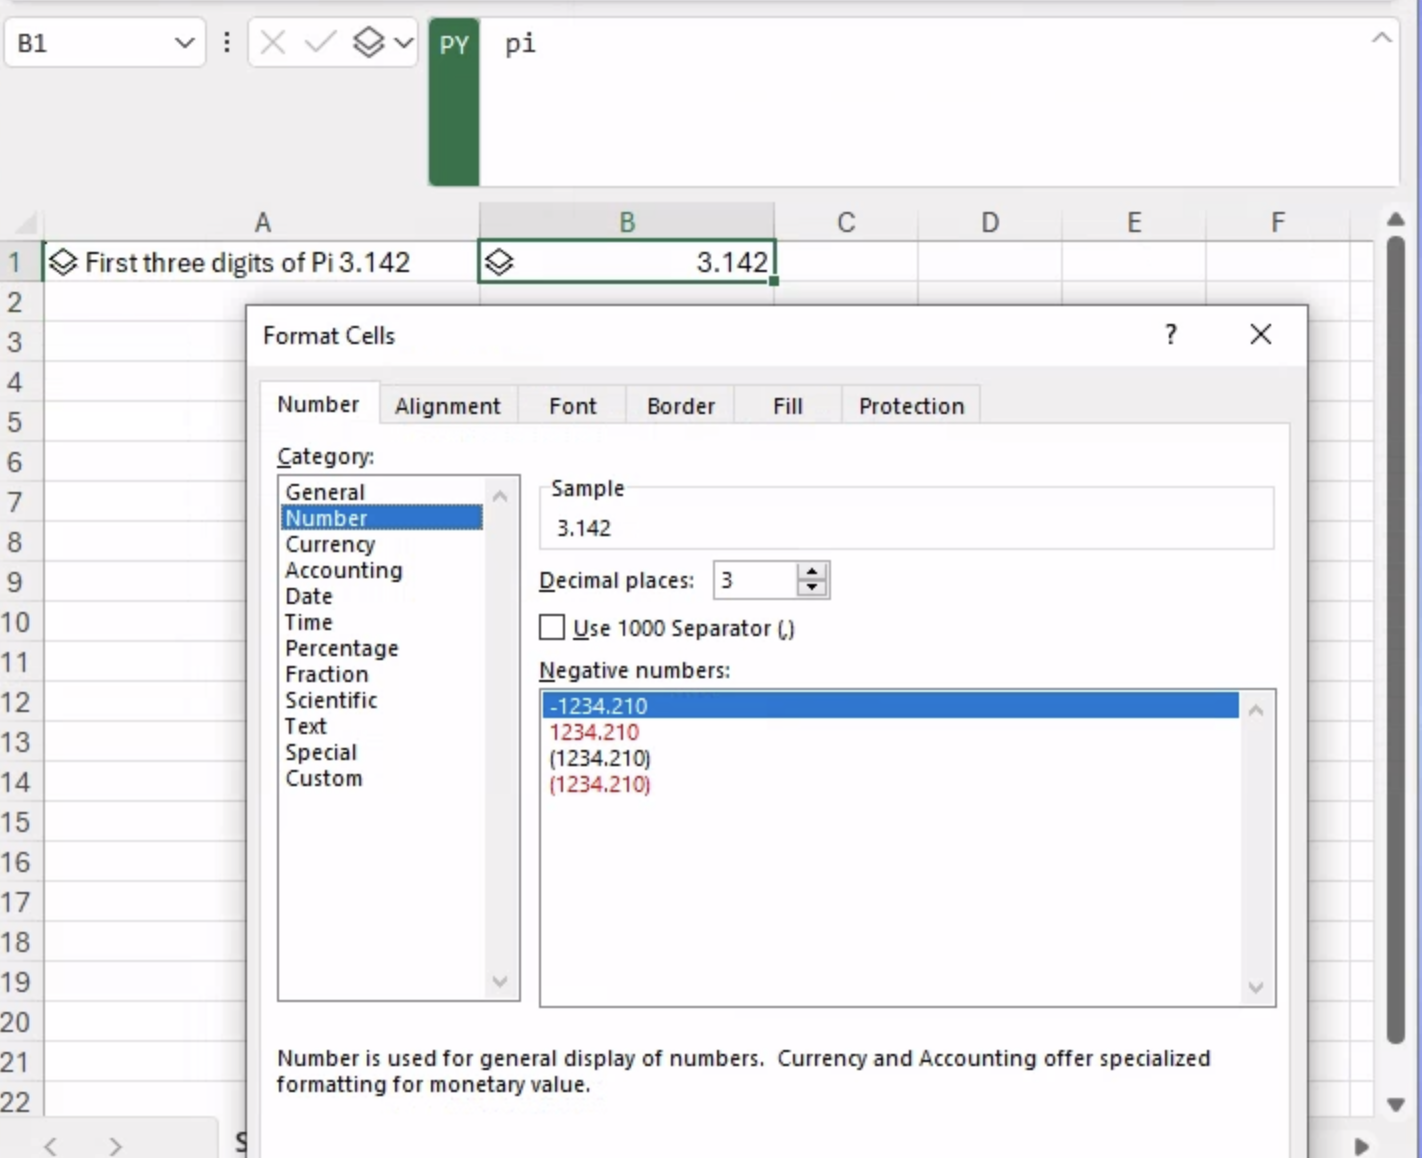
So from now on, the content of the cell (B1 in this example) is going to be treated as a number by Excel.
Therefore, the main takeaway messages to remember from this tip are:
- Python data types and cell formattings are two separate concepts.
- Adjust the format of the cells in your workbook to ensure Excel properly processes the output generated by the Python code, especially if the output is a number or date.
5. Use Python to Create Custom Logic in Excel
Previously, when we’ve used built-in functions in Excel, we’ve called the function (e.g., SUM(…)) and obtained the output immediately in the cell. If we were instead to define a function to be used throughout our workbook, we would have had to use the Visual Basic for Applications (VBA) programming language. Now, we can use Python instead!
We can define Python functions in a cell, and those functions can then be reused in multiple cells throughout the entire workbook. In fact, the underlying execution model of Python in Excel assumes a global namespace shared among each cell. The execution order starts in the top-left cell of the first worksheet and proceeds in a row-major fashion. Therefore, any variable, Python function, or Python object defined in a cell will also be available and accessible from all cells that are next in the execution order.
For example, let’s say we want to create a Python function that generates an array containing a given number of random floating point numbers:
import numpy as np

np.random.seed(42)

def generate_numbers(how_many: int):
return np.random.random(how_many)

generate_numbers(10)
After defining the function, we call it to generate 10 different random numbers. If you run this code, you will get the same numbers shown in the picture below.
If you are wondering how it’s possible to obtain exactly the same numbers despite the random Python function, it’s because we fixed the random seed to 42. Therefore, the pseudo-random number generator is going to repeat the generation of the same number sequences.
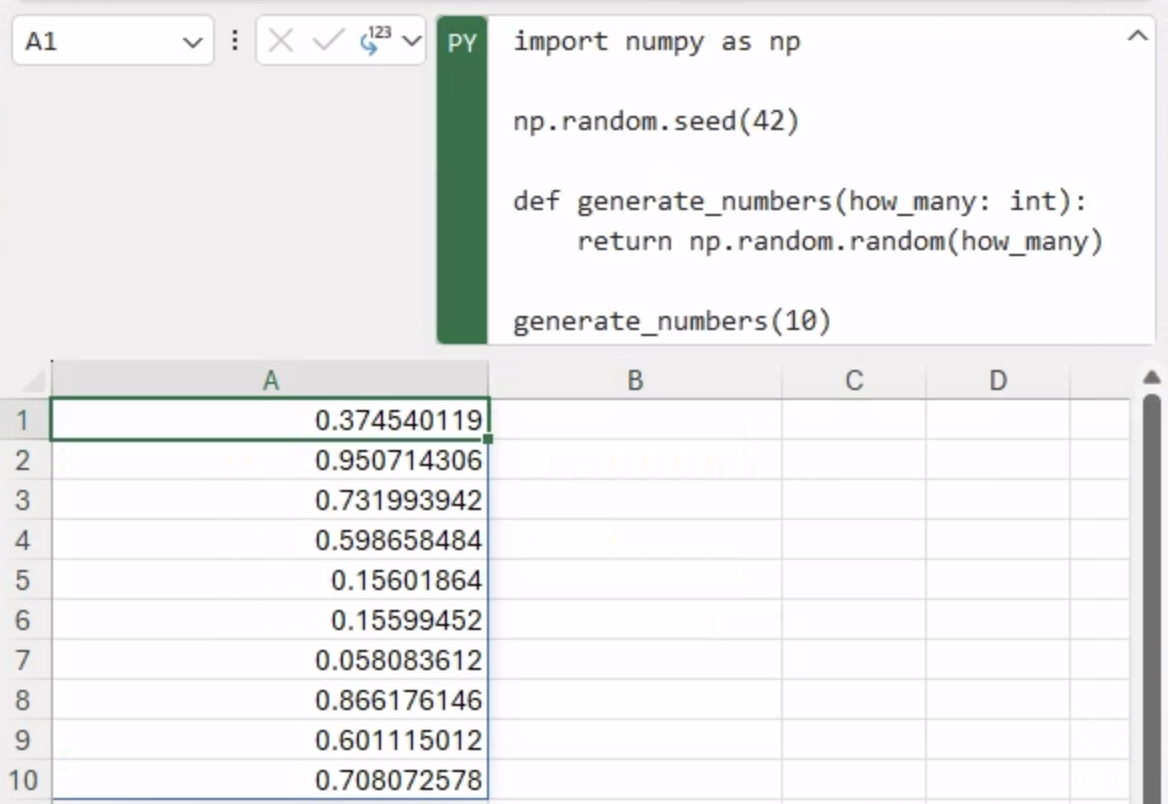
As expected, the function generates a NumPy Python array, and all the values are spilled throughout the 10 cells below.
Now, if we reuse the generate_numbers function in another cell (e.g., B1) and this time enter a different value for the how_many input parameter, for example how_many=5, let’s see what happens:
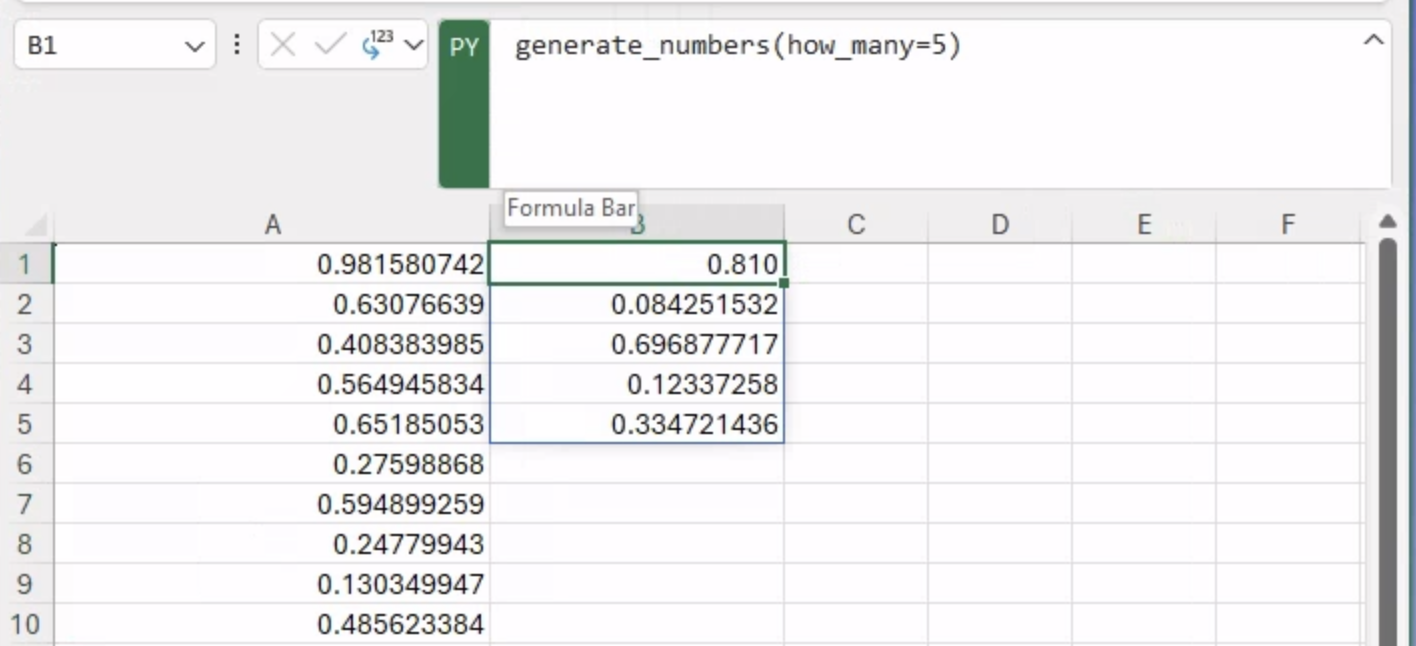
The Python cell B1 only contains a call to the Python function, which generates another array of five new random numbers. So our simple Python function acts as Excel custom logic that can be defined and reused multiple times throughout the workbook, with different parameter values.
Conclusion
In this post, we explored five quick tips for using Python in Excel. We discussed how Python objects are integrated into Excel, how to handle cell outputs and their formatting, and how to use Python to create reusable custom logic. I hope you find these tips useful as you get started with this exciting new integration.
Disclaimer: The Python integration in Microsoft Excel is in Beta Testing as of the publication of this article. Features and functions are likely to change. Don’t hesitate to reach out if you notice an error on this page.
Bio
Valerio Maggio is a researcher and data scientist advocate at Anaconda. He is also an open-source contributor and an active member of the Python community. Over the last 12 years he has contributed to and volunteered at many international conferences and community meetups like PyCon Italy, PyData, EuroPython, and EuroSciPy.