- Channel policies restrict which packages are available from a channel based on criteria like CVE score, license, or platform.
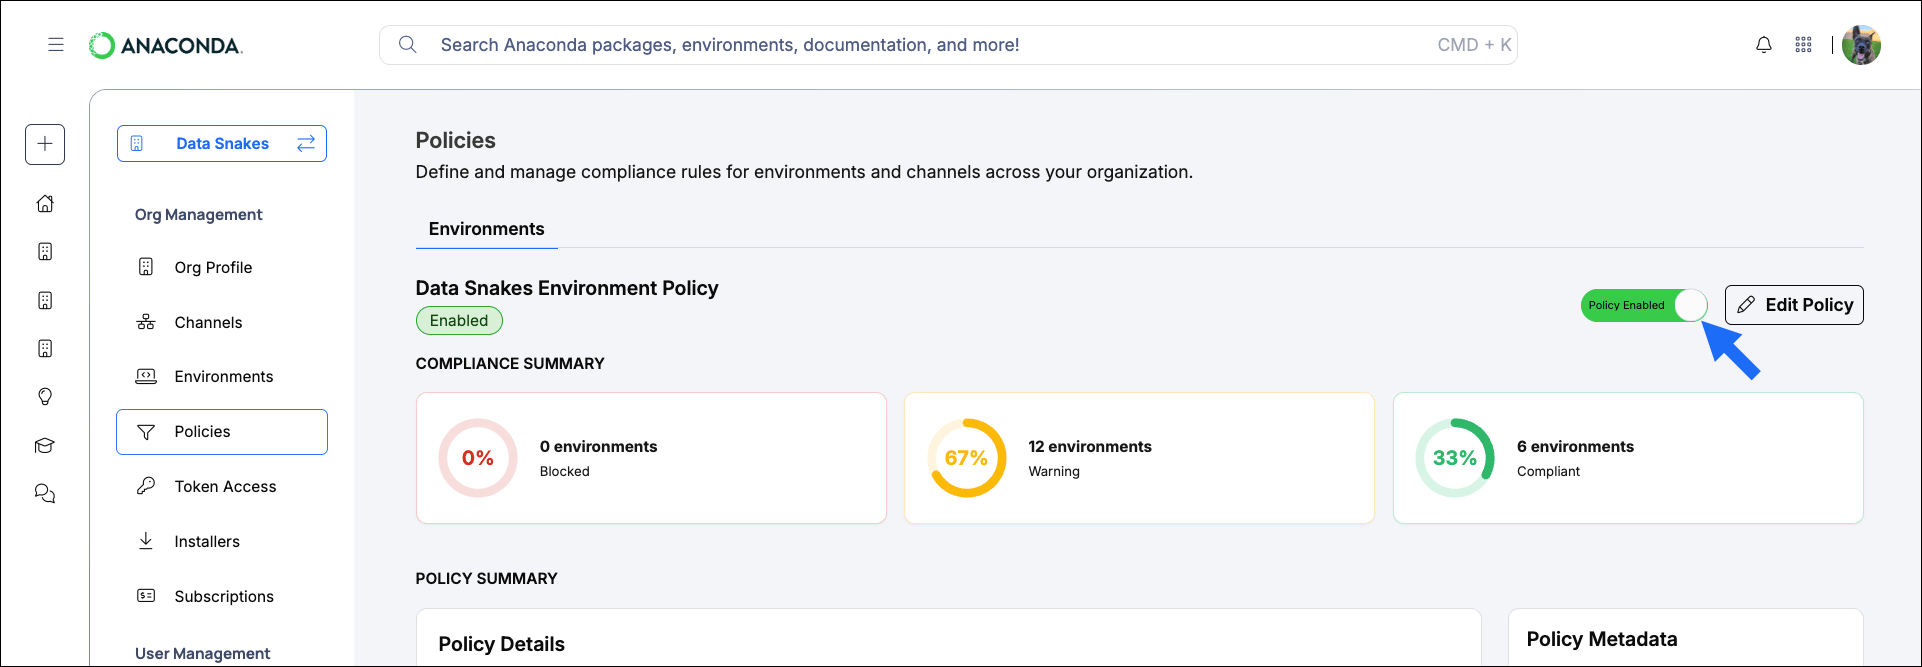
- Environment policies enforce compliance rules across all logged conda environments in your organization, with automated warning and blocking based on service level agreement (SLA) timelines.
Channel policies
A channel policy is an additional security measure you can apply to a to restrict the available that can be sourced from it. Once configured, channel policies automatically ensure that only packages that meet your organization’s security requirements are available from a given channel, eliminating the need for administrators to manually review or re-approve packages when new are reported.Channel policies are currently managed from the Channels page. In a future release, channel policy management will move to the Policies page in the Platform UI.
Channel policy parameters
Channel policy parameters
License Family
License Family
Excludes packages with the specified license family.
CVE Score
CVE Score
Excludes packages with CVE scores in the specified range. For more information, see CVE scores.
CVE Status
CVE Status
Excludes packages that are associated with a CVE that has the specified status.
Keep in mind that packages can be associated with multiple CVEs.
Package Age
Package Age
Excludes packages with the specified package age.
The package age is calculated based on the date the package was last updated.
Platform
Platform
Excludes packages with the specified platform.
Conda Spec
Conda Spec
Excludes packages with the specified conda spec.
Creating a channel policy
- From the Channels page, click Create under POLICIES.
- Provide a unique name for your policy. Anaconda recommends naming it something descriptive.
- In the Exclude package if section, click Add filter.
- In the FILTER GROUP section that appears, set filter parameters for packages you want to exclude.
-
Click Add Filter to Group to include additional parameters for this filter group, or click Add filter to add a separate filter for this policy.
Filters can be applied using either
andororlogic. Click the operator to toggle between the two options.This operator can greatly impact which packages are excluded: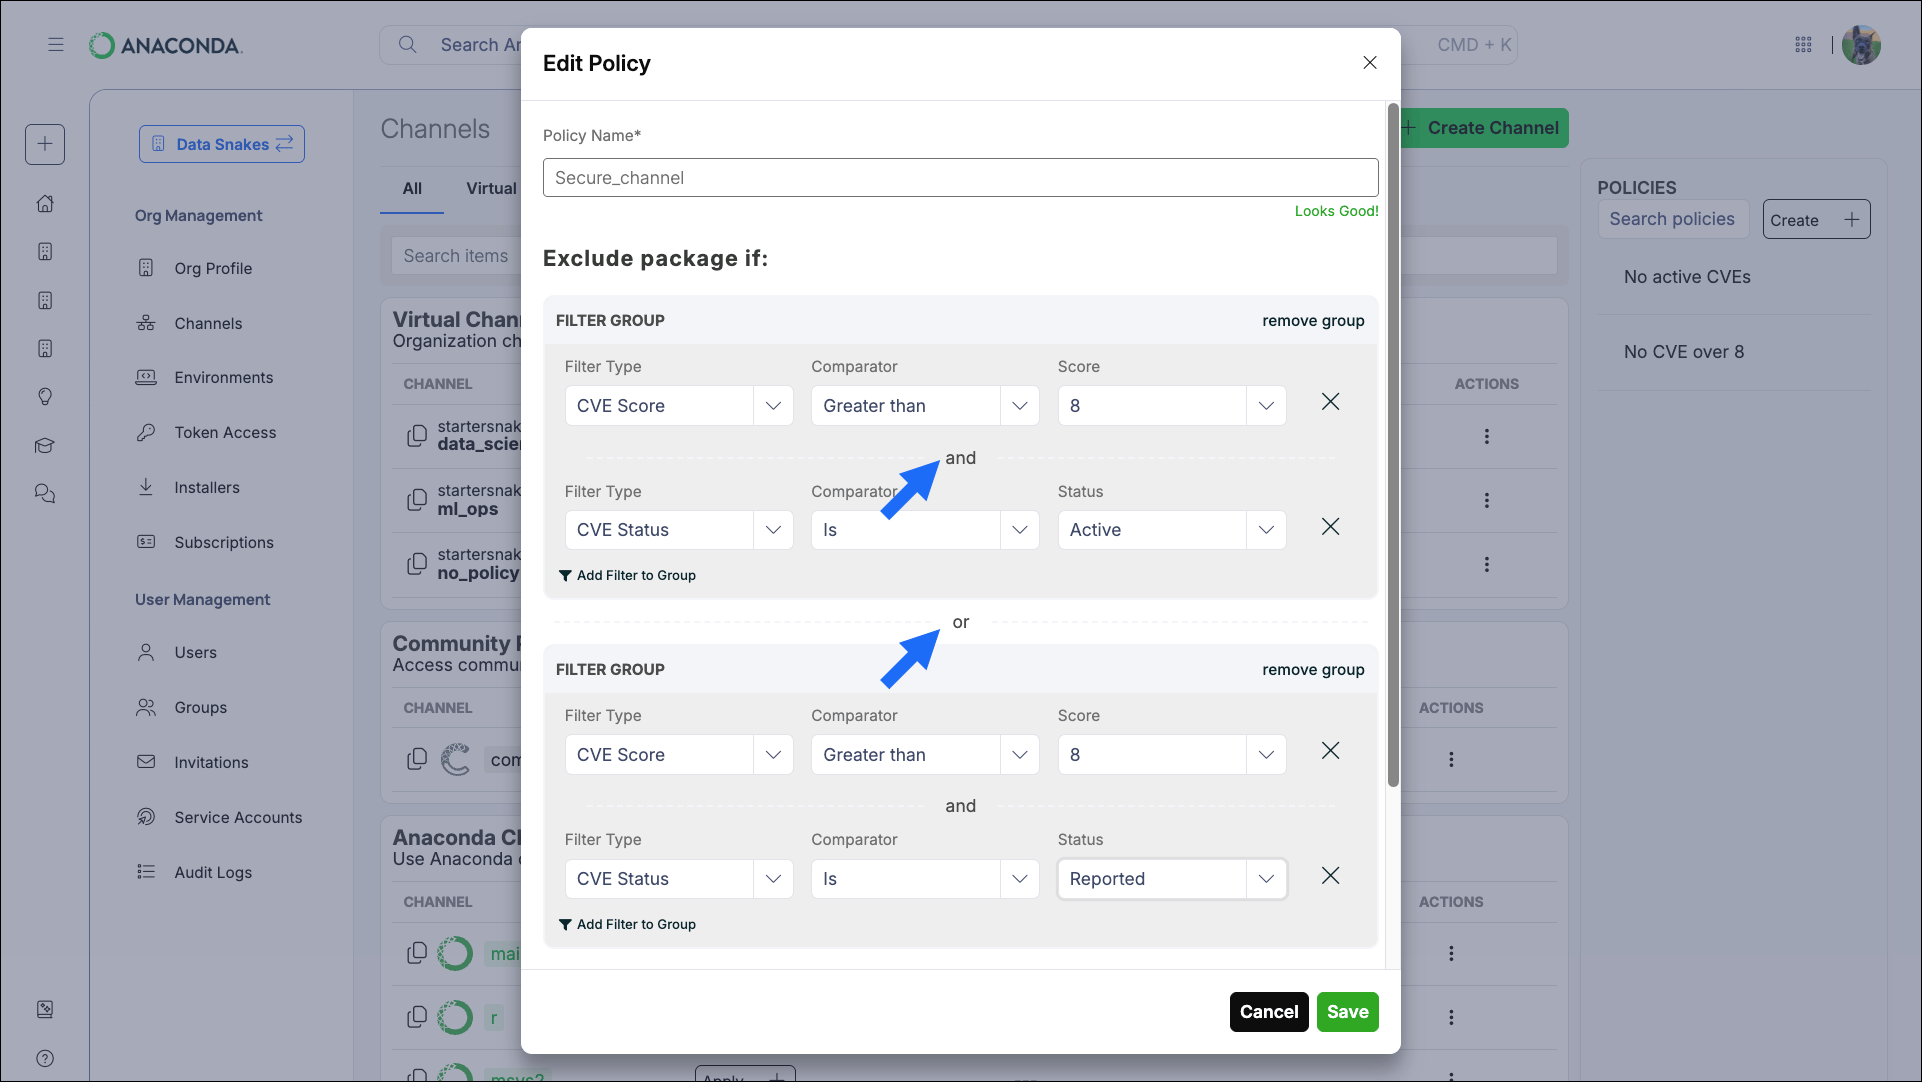
and: All filter parameters must be met by a package for it to be excluded.or: Only one filter parameter needs to be met by a package for it to be excluded.
anda Platform of linux-64 excludes linux-64 packages that have a CVE score greater than 7.However, a filter that excludes packages with a CVE score greater than 7ora Platform of linux-64 excludes:- All packages that have a CVE score greater than 7
- All linux-64 packages
- Repeat this process to apply further package filtering preferences.
-
If necessary, in the Override exclusions and include a package if section, click Add filter.
In some cases, the exclusion parameters of a policy filter might inadvertently remove packages (or dependencies) that are critical for production projects. The override filter allows administrators to add these specific packages back to the channel.You can apply overrides using conda spec and CVE Status.
Example channel policy
Let’s say you want to exclude packages that have a CVE score greater than 8, unless the package file is associated with a CVE that has a Cleared status. Your policy filter would look like this: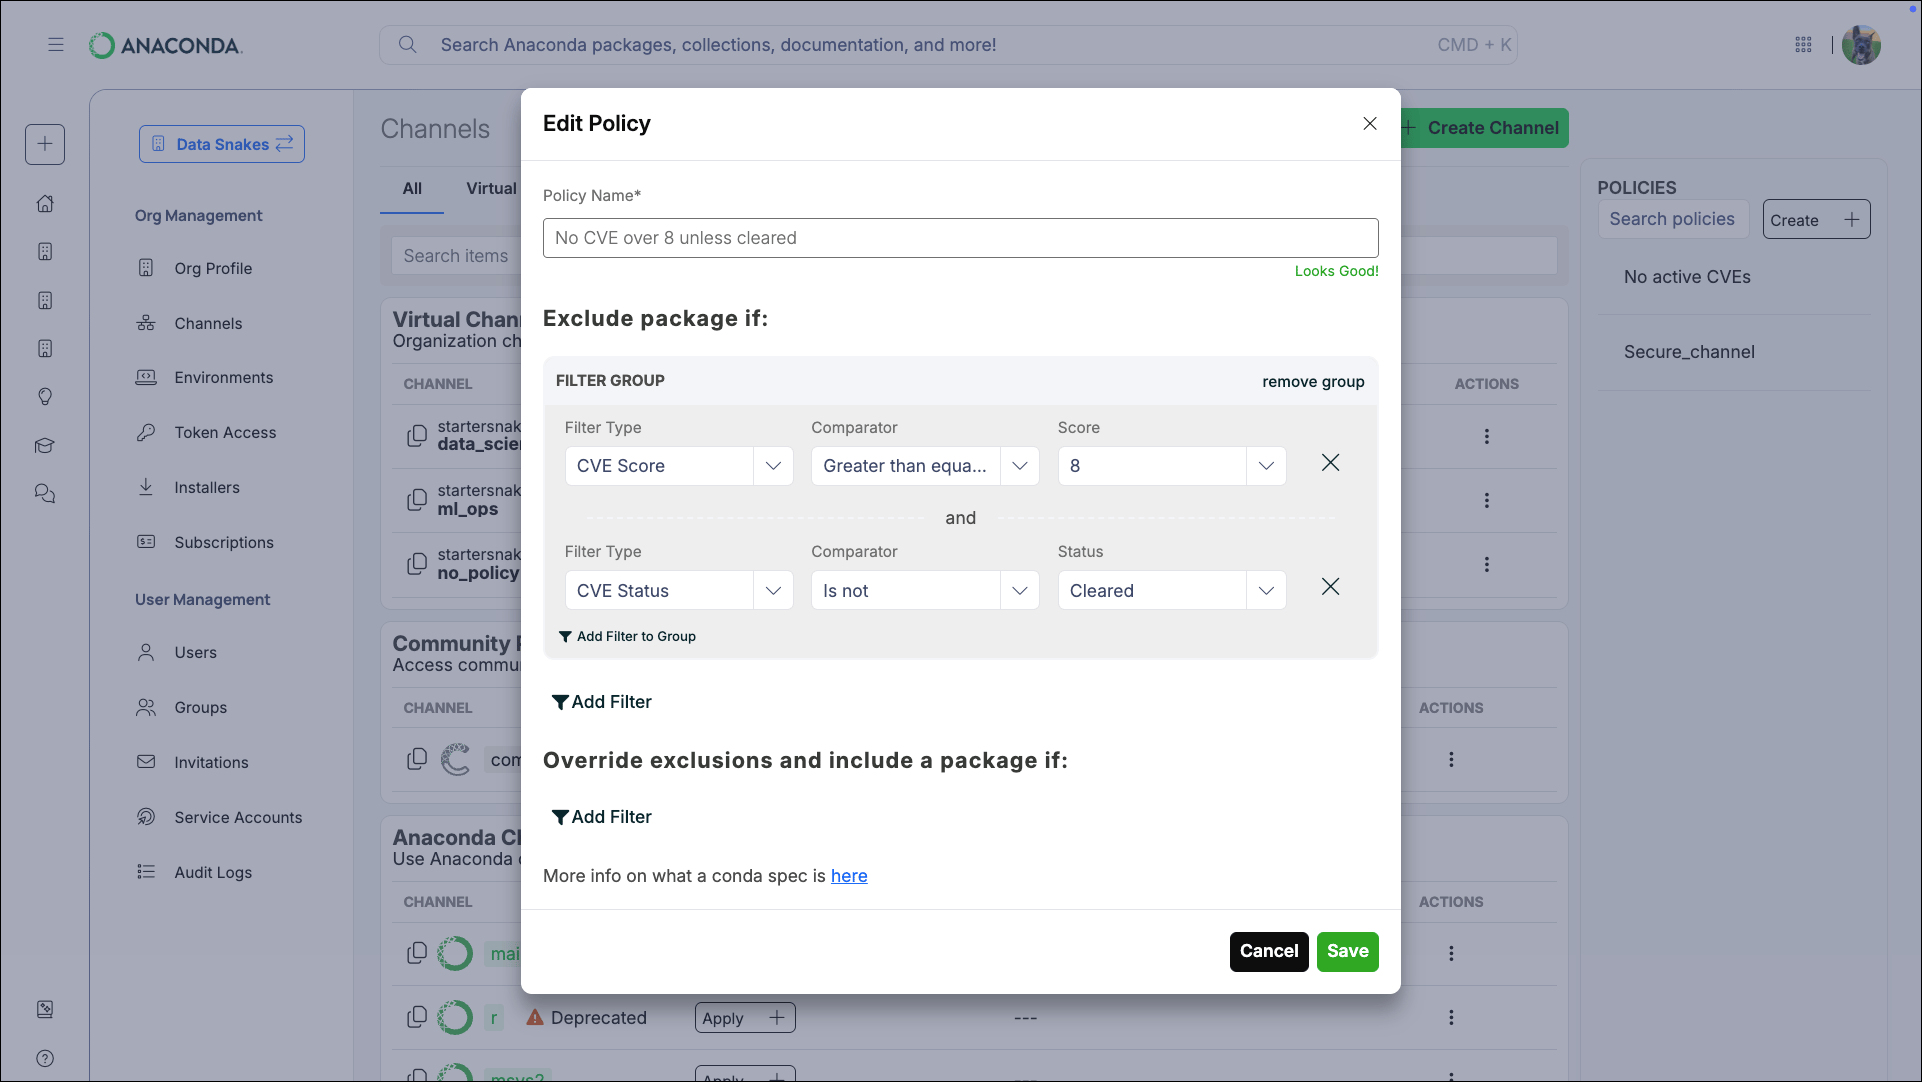
Applying a channel policy
Applying a channel policy to a channel restricts the packages that are able to be sourced from it.- From the Channels page, click Apply beside a channel’s name.
- Select a policy to apply to the channel.
- Click Apply to confirm.
- In Queue
- In Progress
- Completed
- Scheduled
Remove the policy filter by clicking Remove Policy beside the policy name in the channel list.
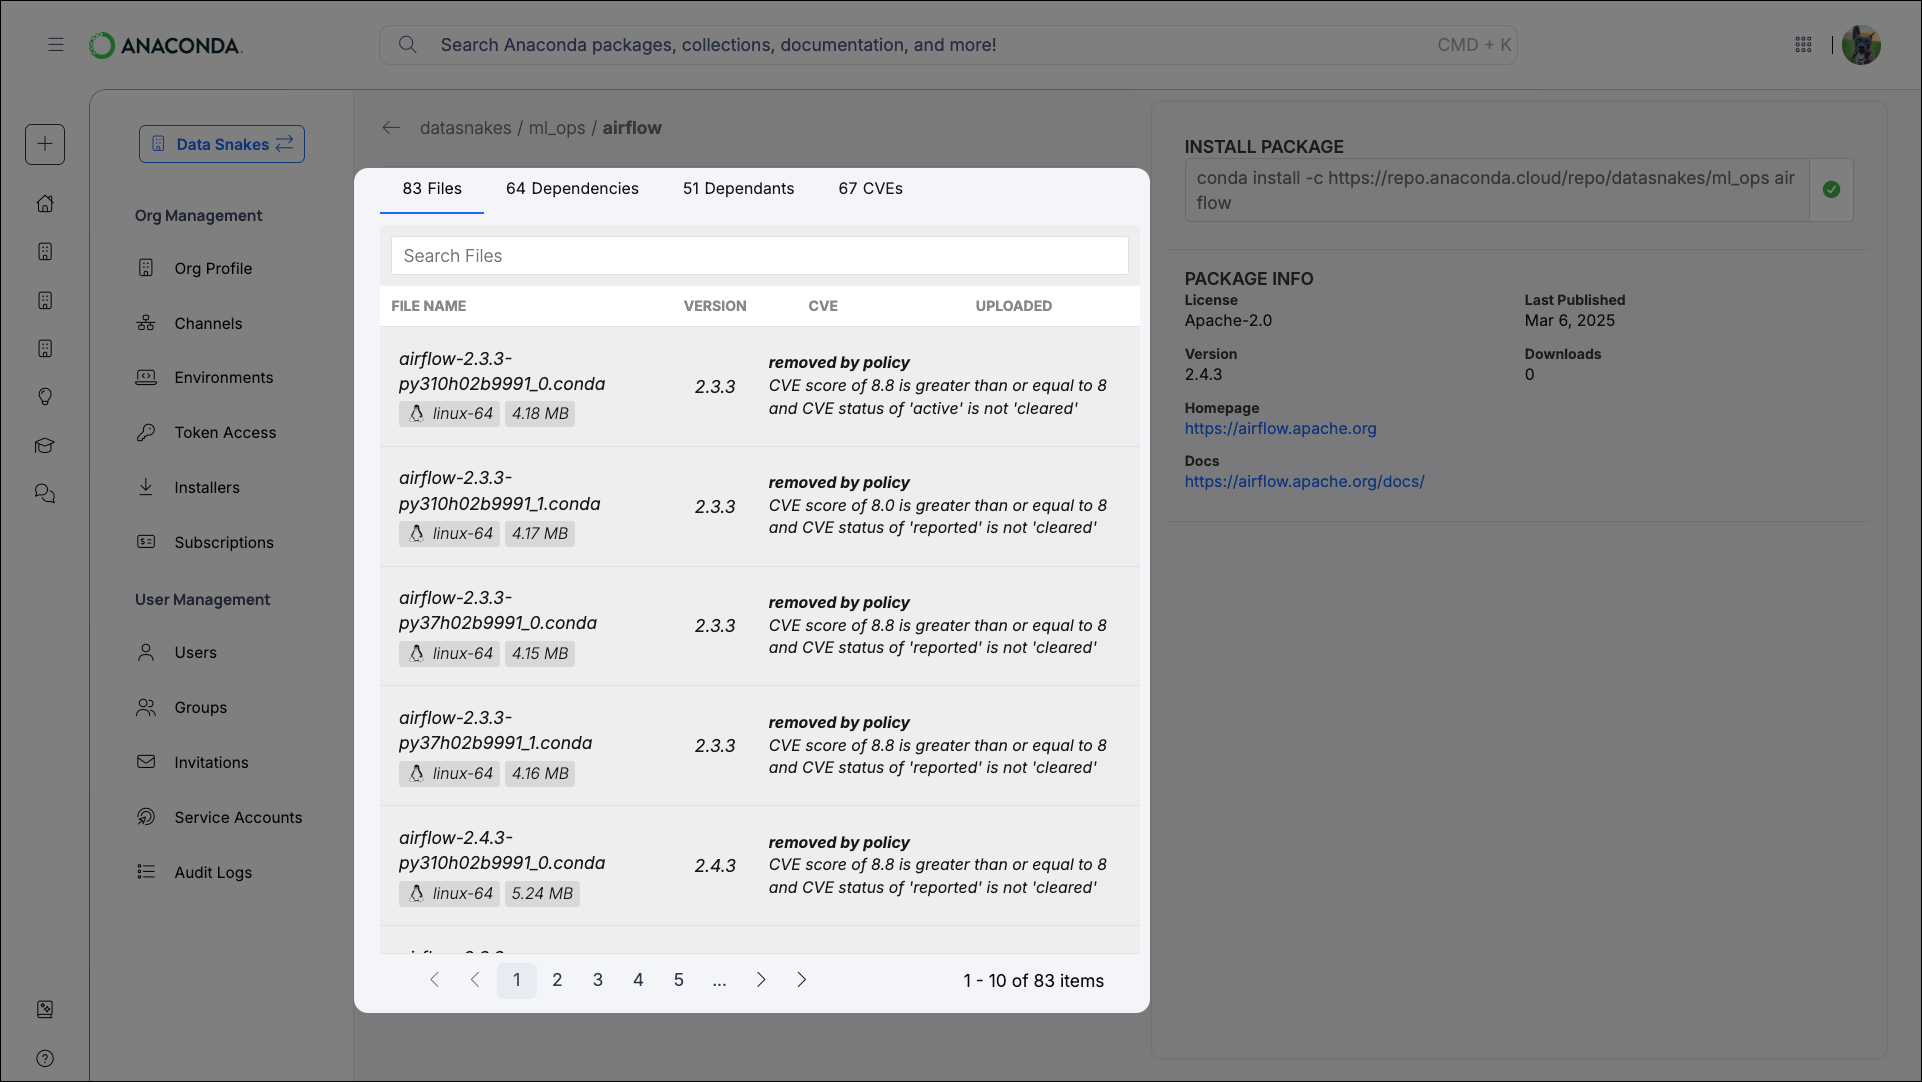
Removed files are not grouped, and some packages have multiple pages of files. For packages with many files, it is best to use the search box to narrow results.
Editing a channel policy
- Select the policy name from the POLICIES list.
- Change the parameters of the filter as if you were creating a policy.
- Click Save.
A warning displayed beside your filter indicates that it has become deprecated. Deprecated filters still work, but Anaconda recommends you update your policies to no longer use these filters.
Viewing the policy report
Once you have applied a channel policy to a channel, view the Policy Report to see a breakdown of the number of package files across various platforms that have been removed, and how many remain. From the Channels page, click the POLICY RESULTS for any channel to open the Policy Report.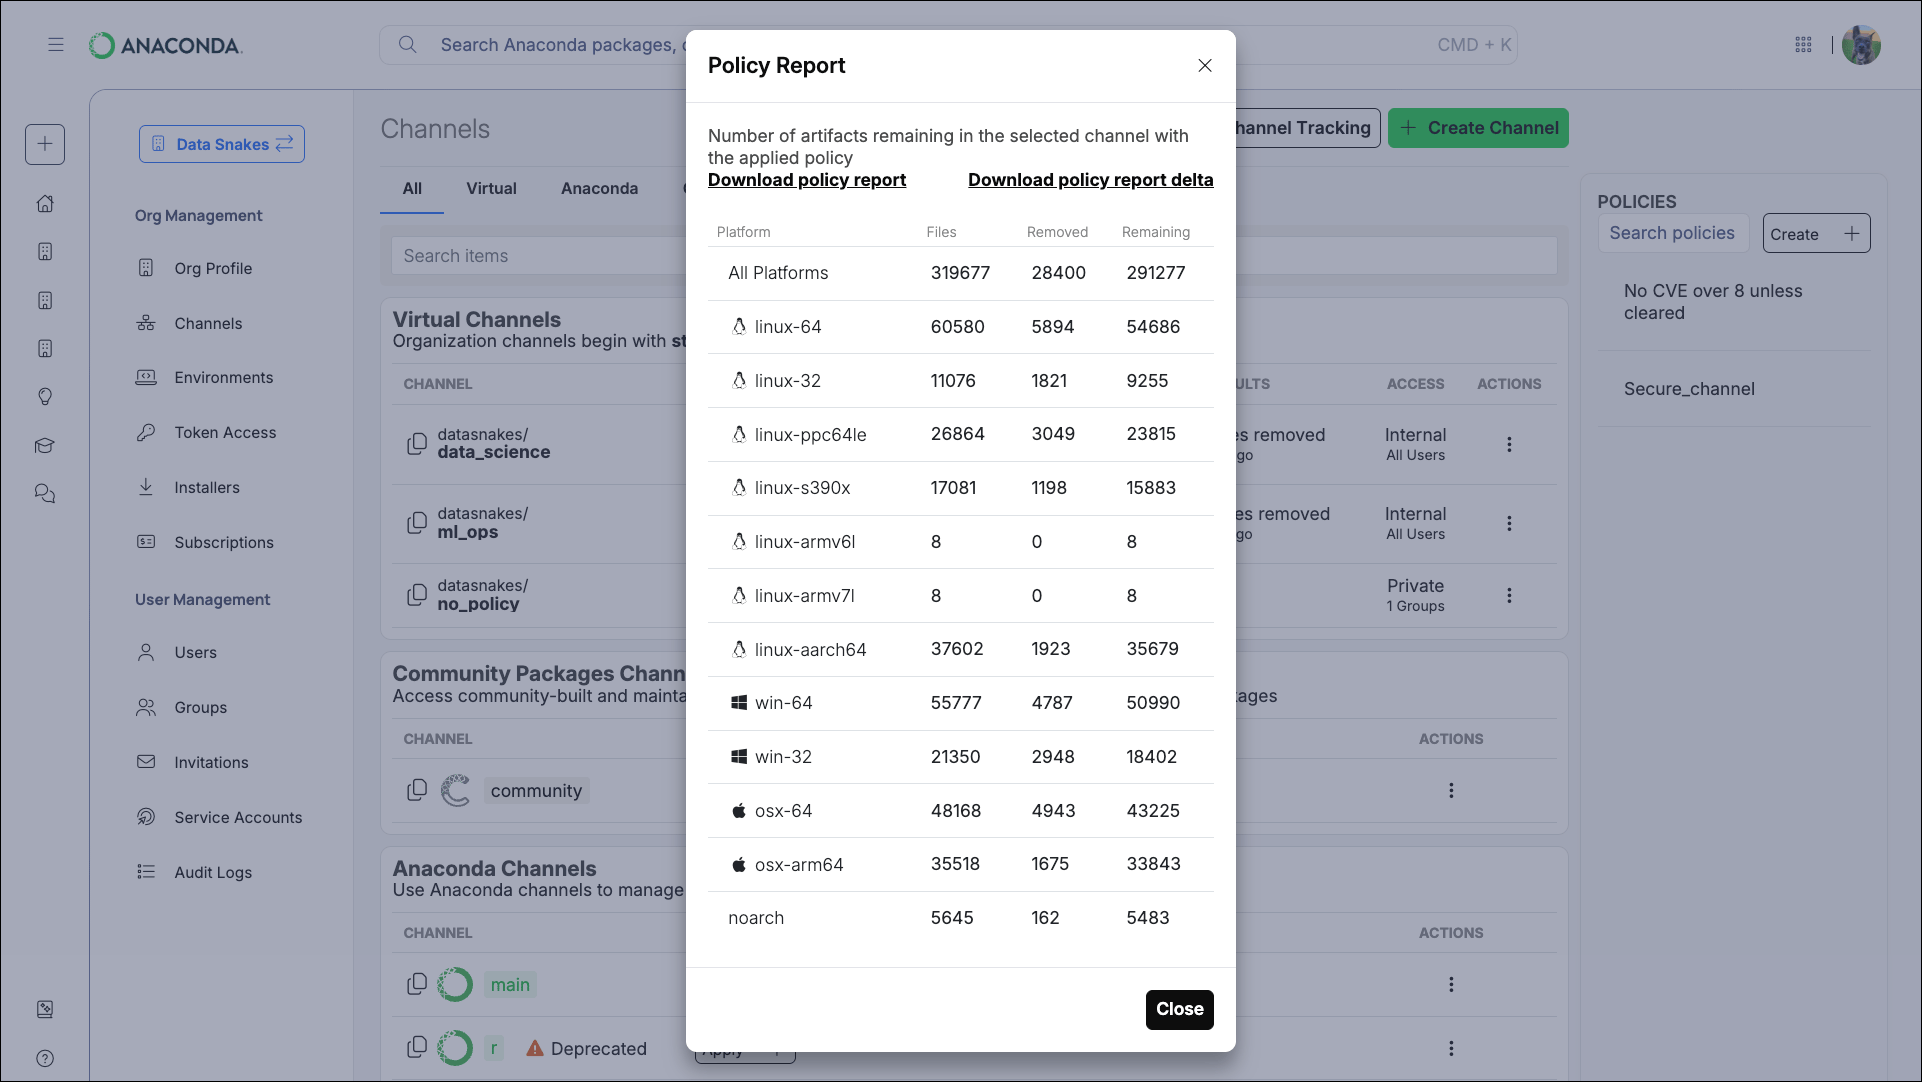
From here, you can download the policy report or the policy report delta in
.csv format.Policy deltas
Sometimes, due to newly reported CVEs or an updated CVE score or status, the contents of your channel will change when the filter performs its scheduled run. A package might become available that was not available previously, or you could find that a package you’ve been using is removed from your channel! From the channel details page, click View Policy Deltas to view a list of deltas. Deltas are the recorded changes to your channel’s contents. Policy delta history begins from the first change that occurs after you start tracking the channel. Once the policy is removed from the channel (if you need to edit it, for example) the policy delta history is lost. A new policy delta history is established once the policy is reapplied to the channel. Use the Start and End date filters to narrow your timeline to locate a specific delta, if necessary. Click the count under either FILES ADDED or FILES REMOVED to see a list of package files from a specific run.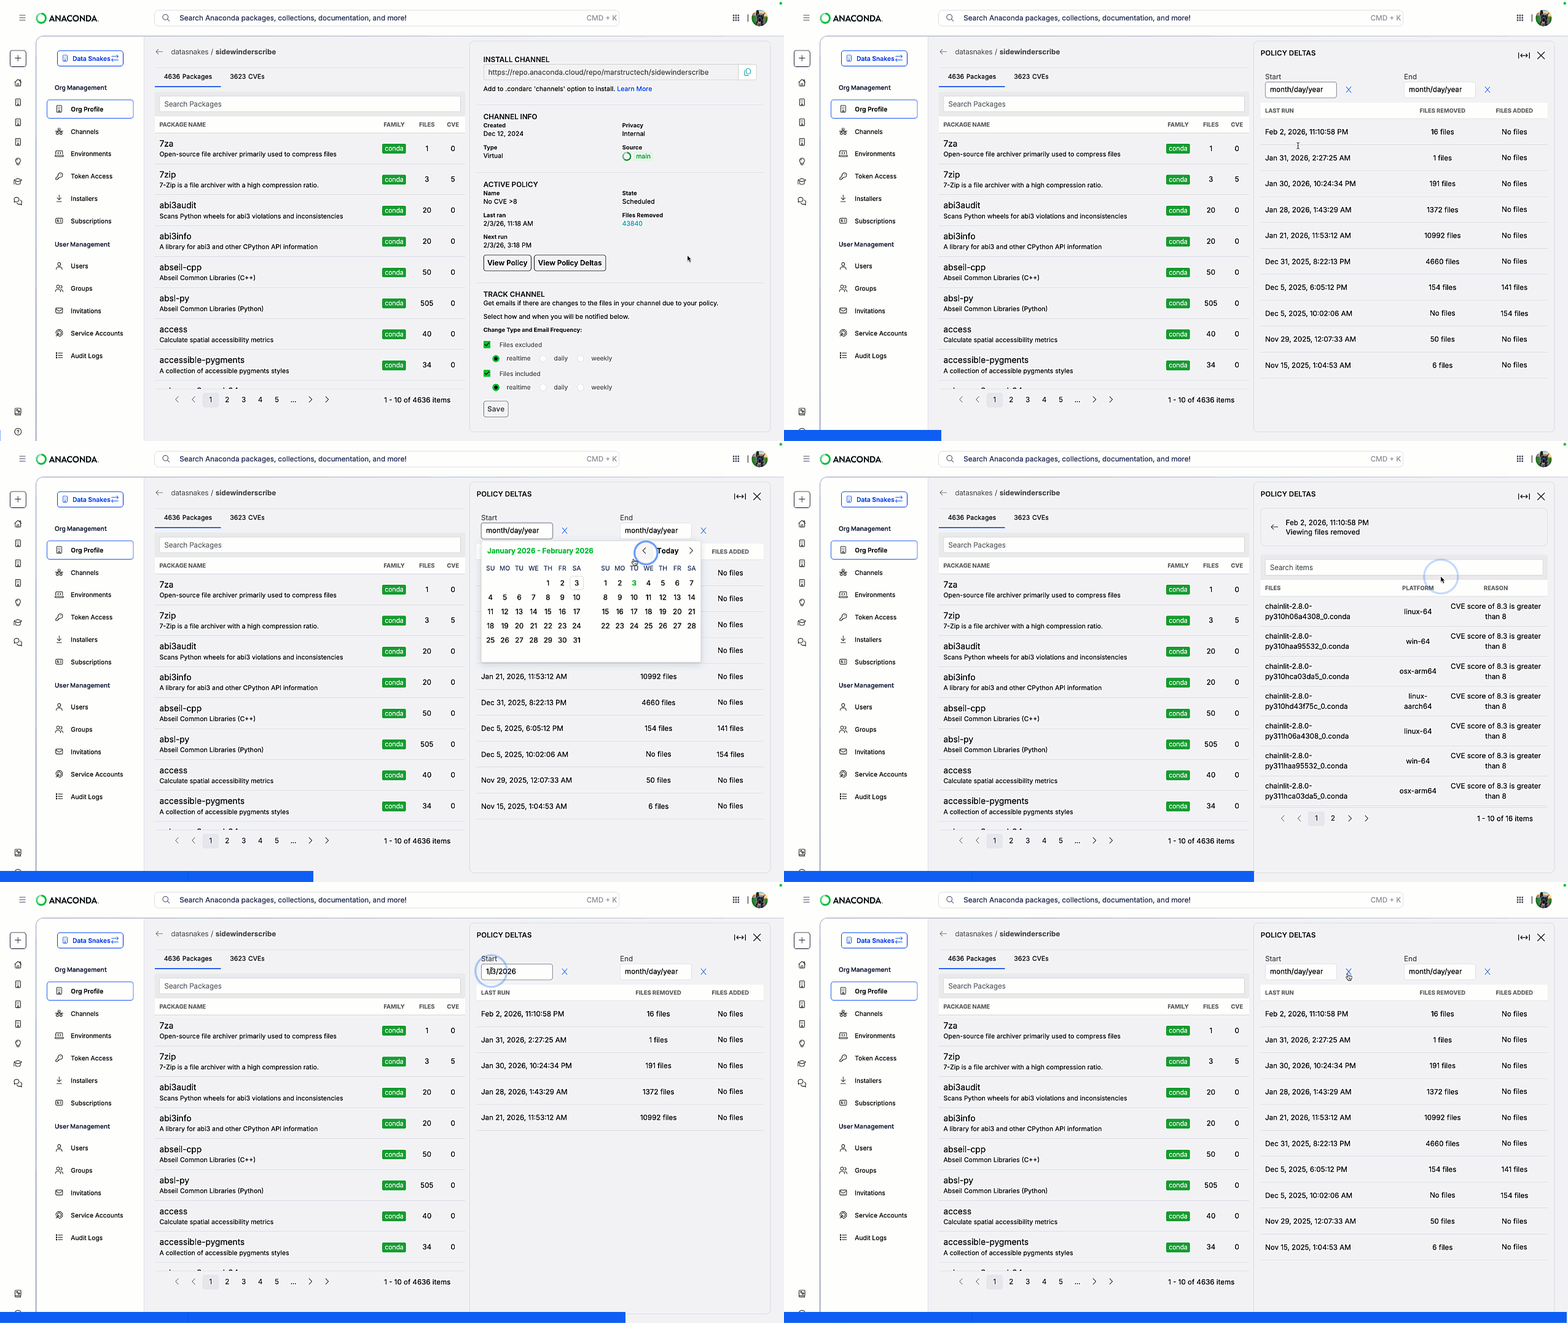
Environment policy
Closed Beta - Contact your CSM to participate An environment policy defines compliance rules that are automatically enforced across all conda environments that are logged in your organization. Environments that violate the policy receive a warning and enter a remediation period where members have time to remediate per your organization’s established Service Level Agreement (SLA). If violations remain unresolved past the SLA period, the environment is blocked from use.Only one environment policy can be active per organization.
Compliance lifecycle
Environments are evaluated against the policy each time they are logged. This means compliance is checked whenever a member performs acreate, install, remove, rename, or update action with conda.
The compliance lifecycle follows this sequence:
What members experience
When a member attempts to activate an environment in a warning or blocked state, they are notified of the compliance status with guidance:Creating an environment policy
The policy wizard provides a step-by-step process to building a policy for your organization’s environments. To create an environment policy, select Policies, then click Create Policy.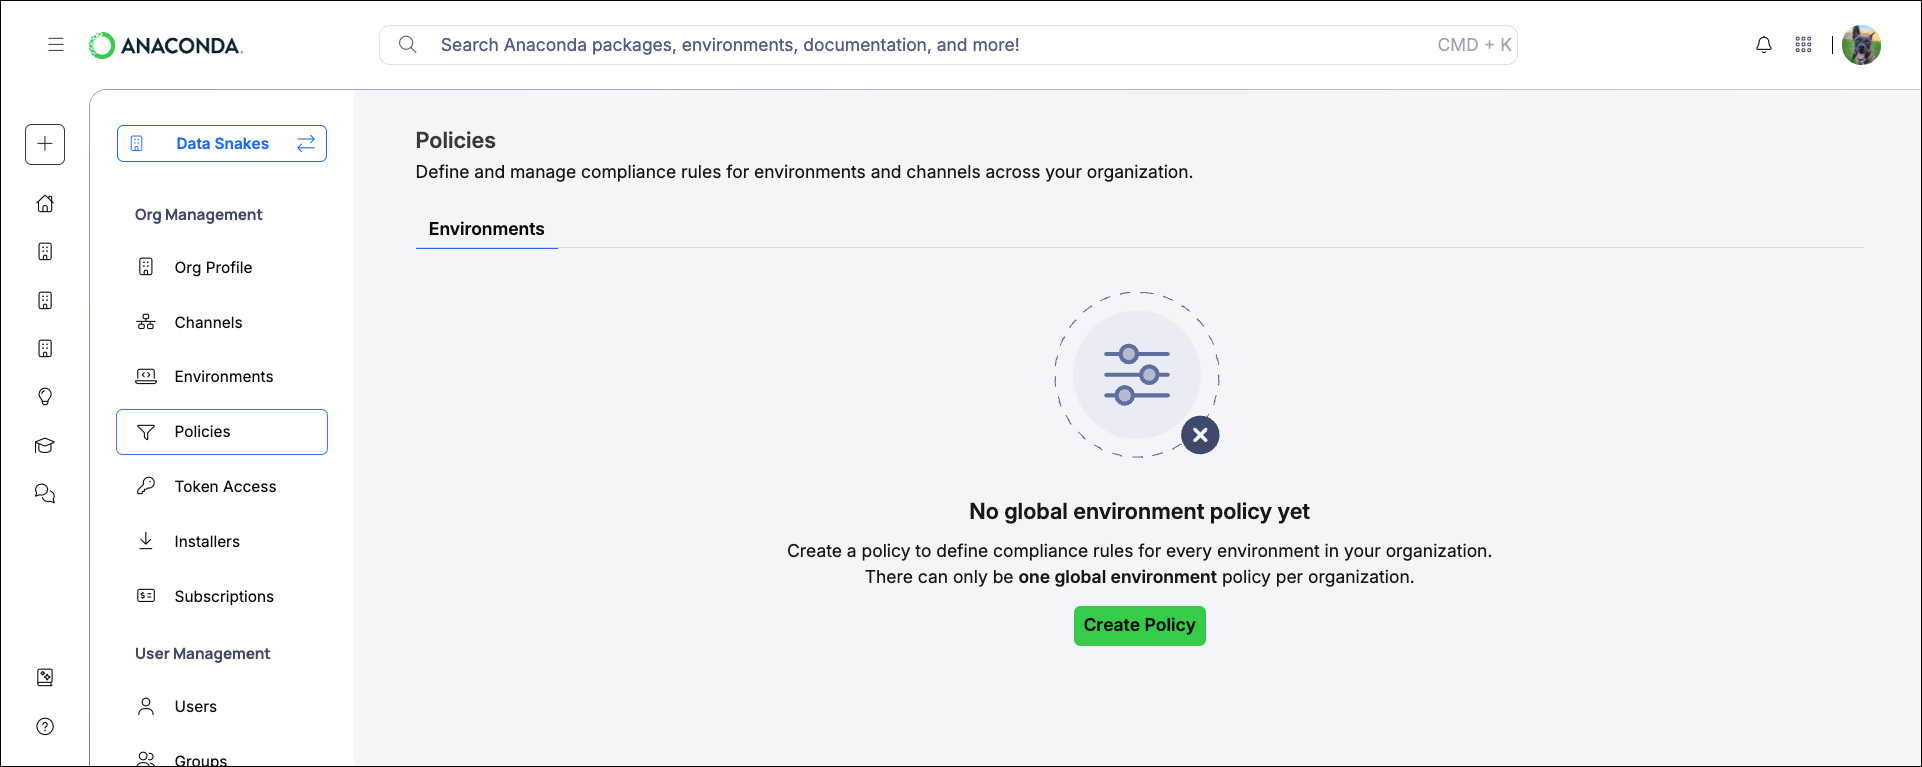
1
Set details
Provide a name and optional description for your policy.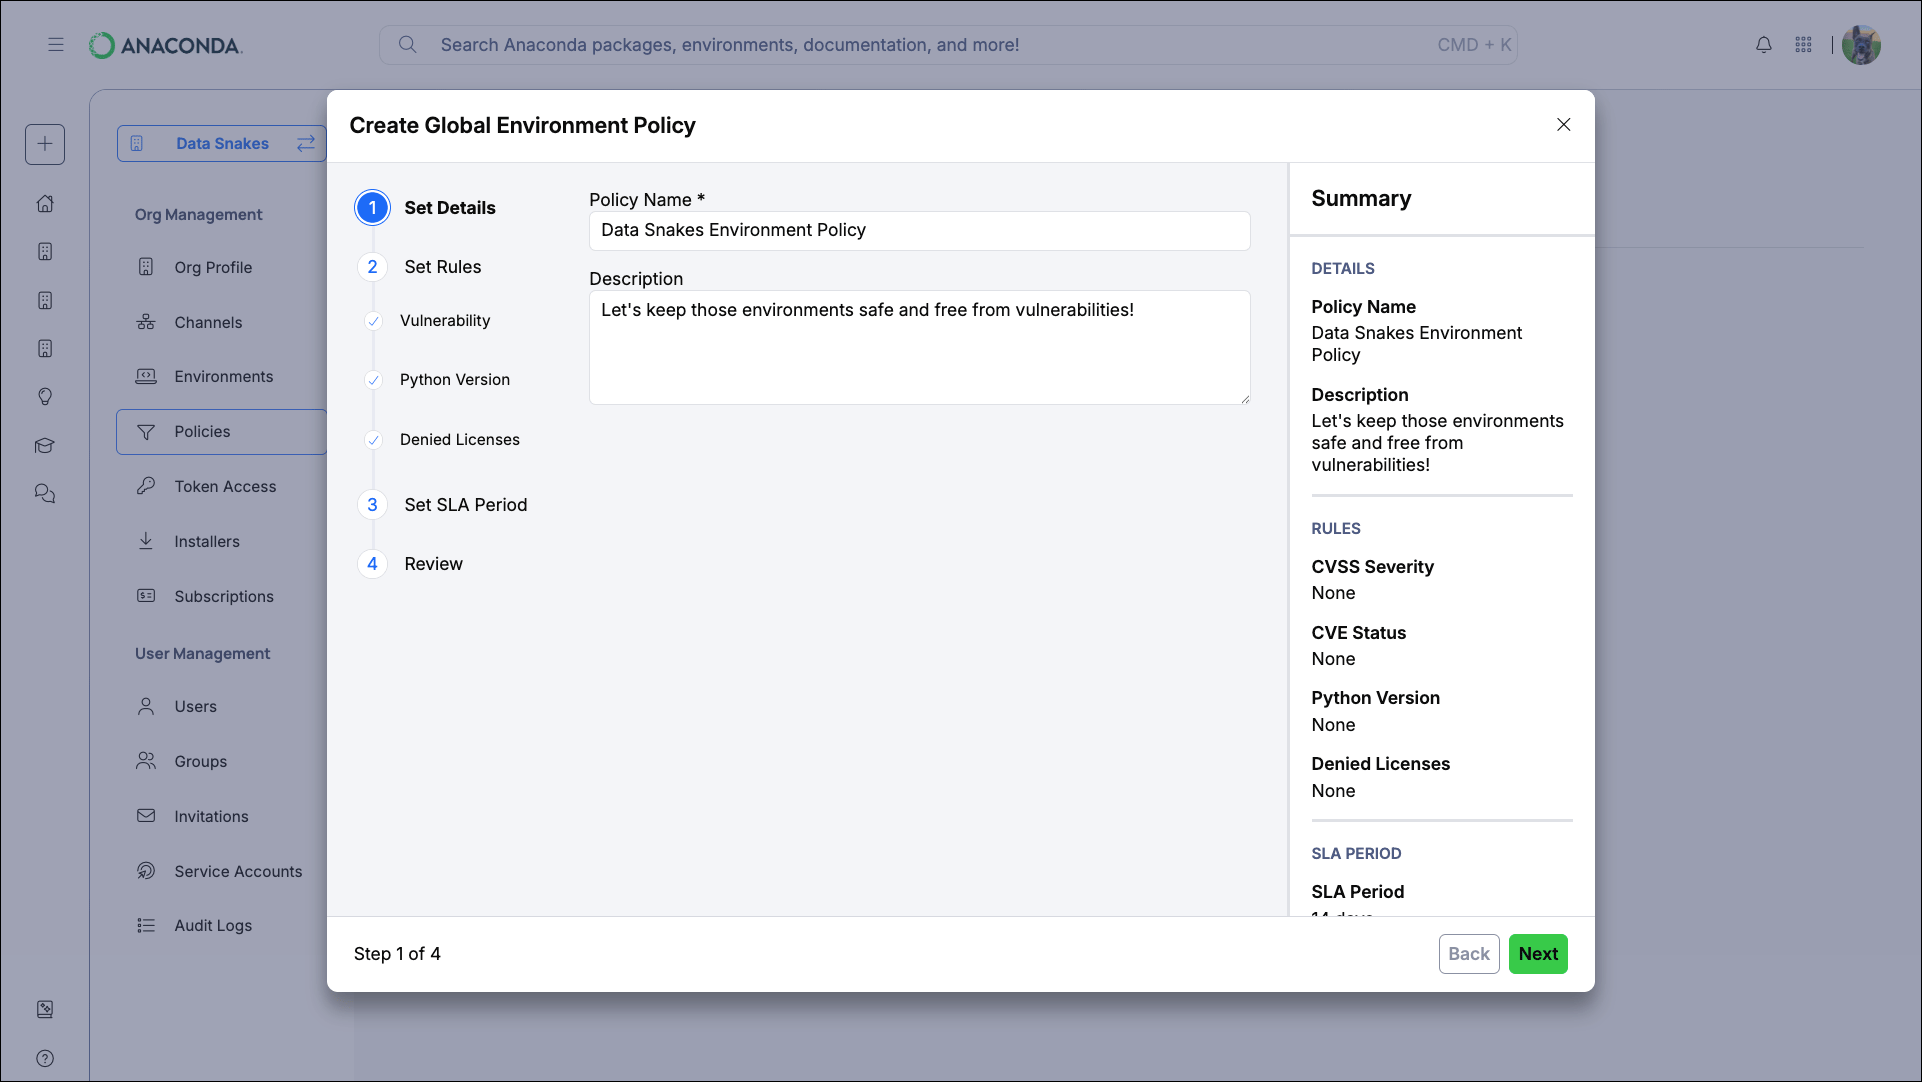
2
Set rules
Rules define what makes an environment non-compliant. You can configure any combination of the three rule types below. Each rule is independently optional, but you must configure at least one to enable the policy.
- Vulnerability threshold
- Python version
- Denied licenses
Use this rule to flag environments containing packages with known security vulnerabilities. This is typically the most impactful rule, as it directly addresses your organization’s exposure to exploitable software.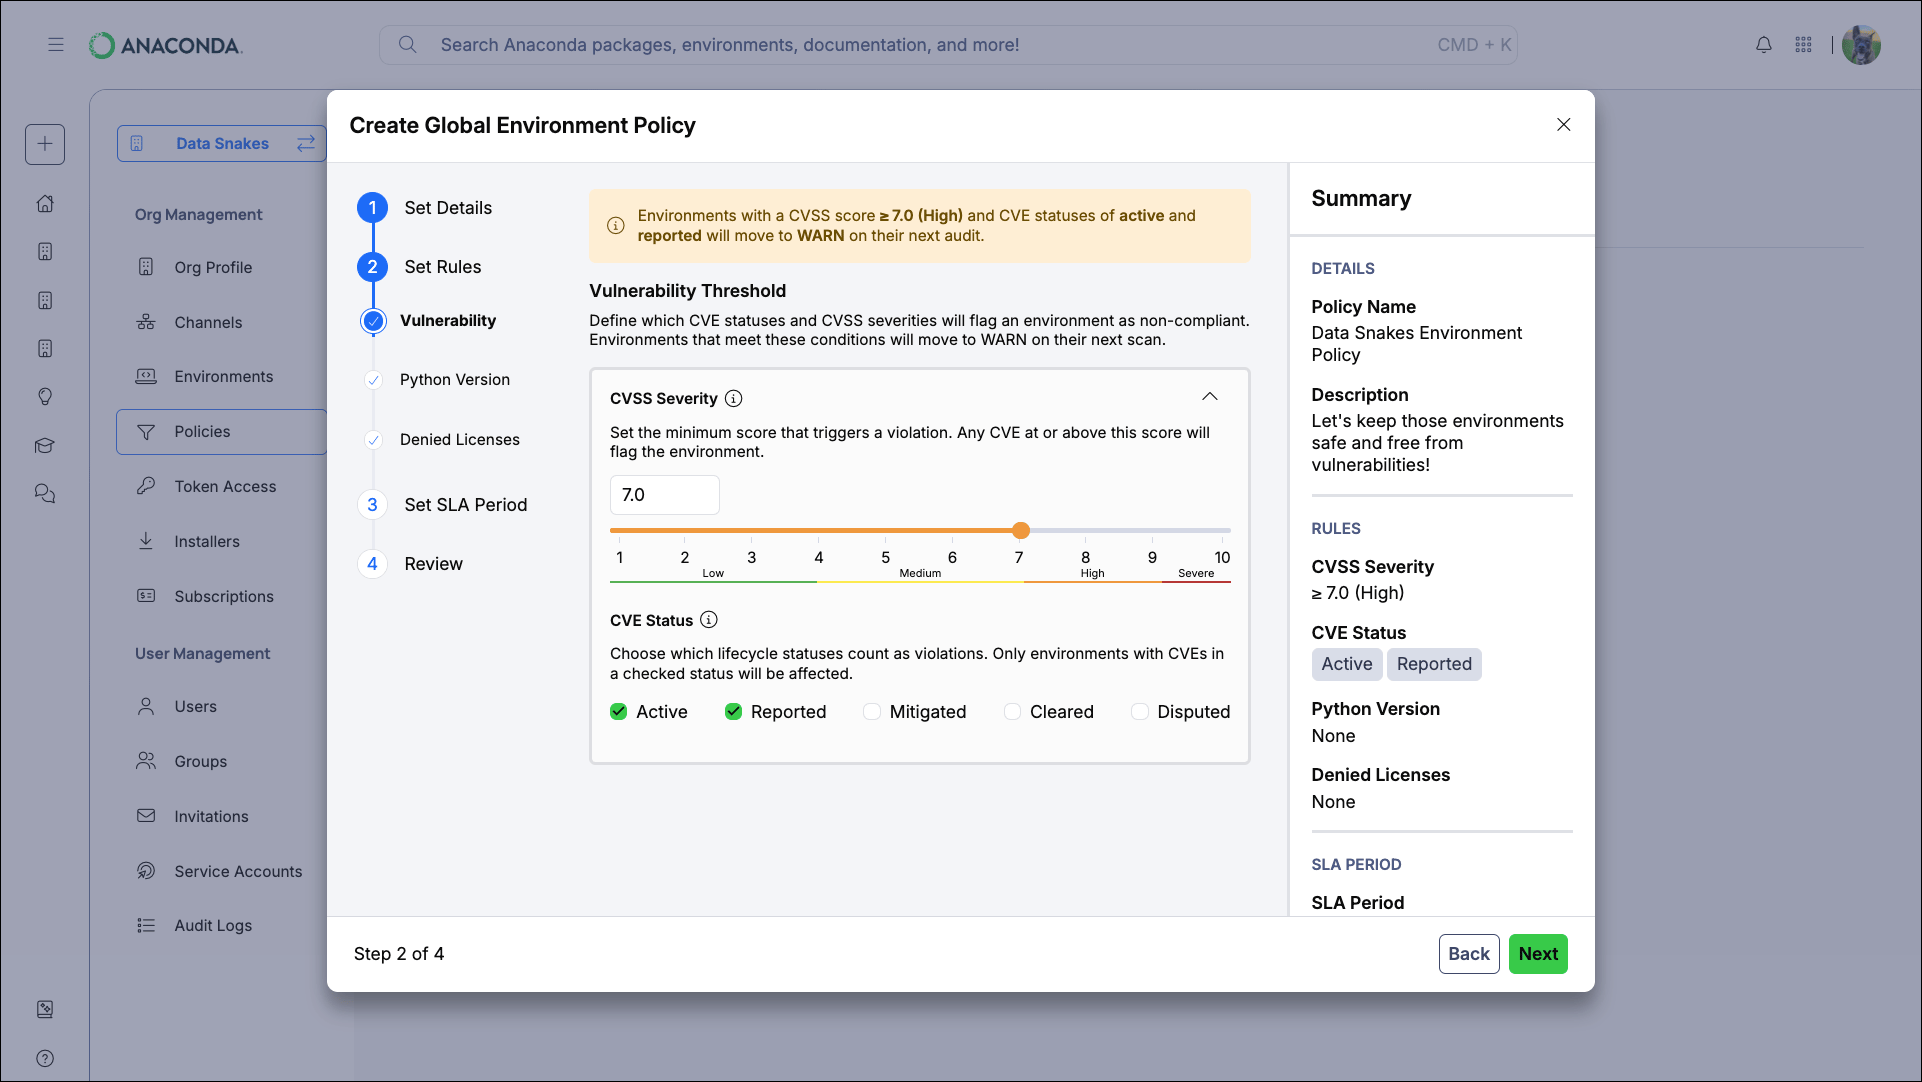
A common starting configuration is a CVSS threshold of
Packages must meet both parameters to trigger a warning for an environment. For example, a package with a CVSS score of
7.0 with Active and Reported statuses selected. This catches confirmed high-severity vulnerabilities without generating excessive noise from lower-risk or already-resolved issues.Packages must meet both parameters to trigger a warning for an environment. For example, a package with a CVSS score of
9.0 and a Cleared status would not trigger a violation for the policy configuration above.CVSS severity scale reference
CVSS severity scale reference
CVE status reference
CVE status reference
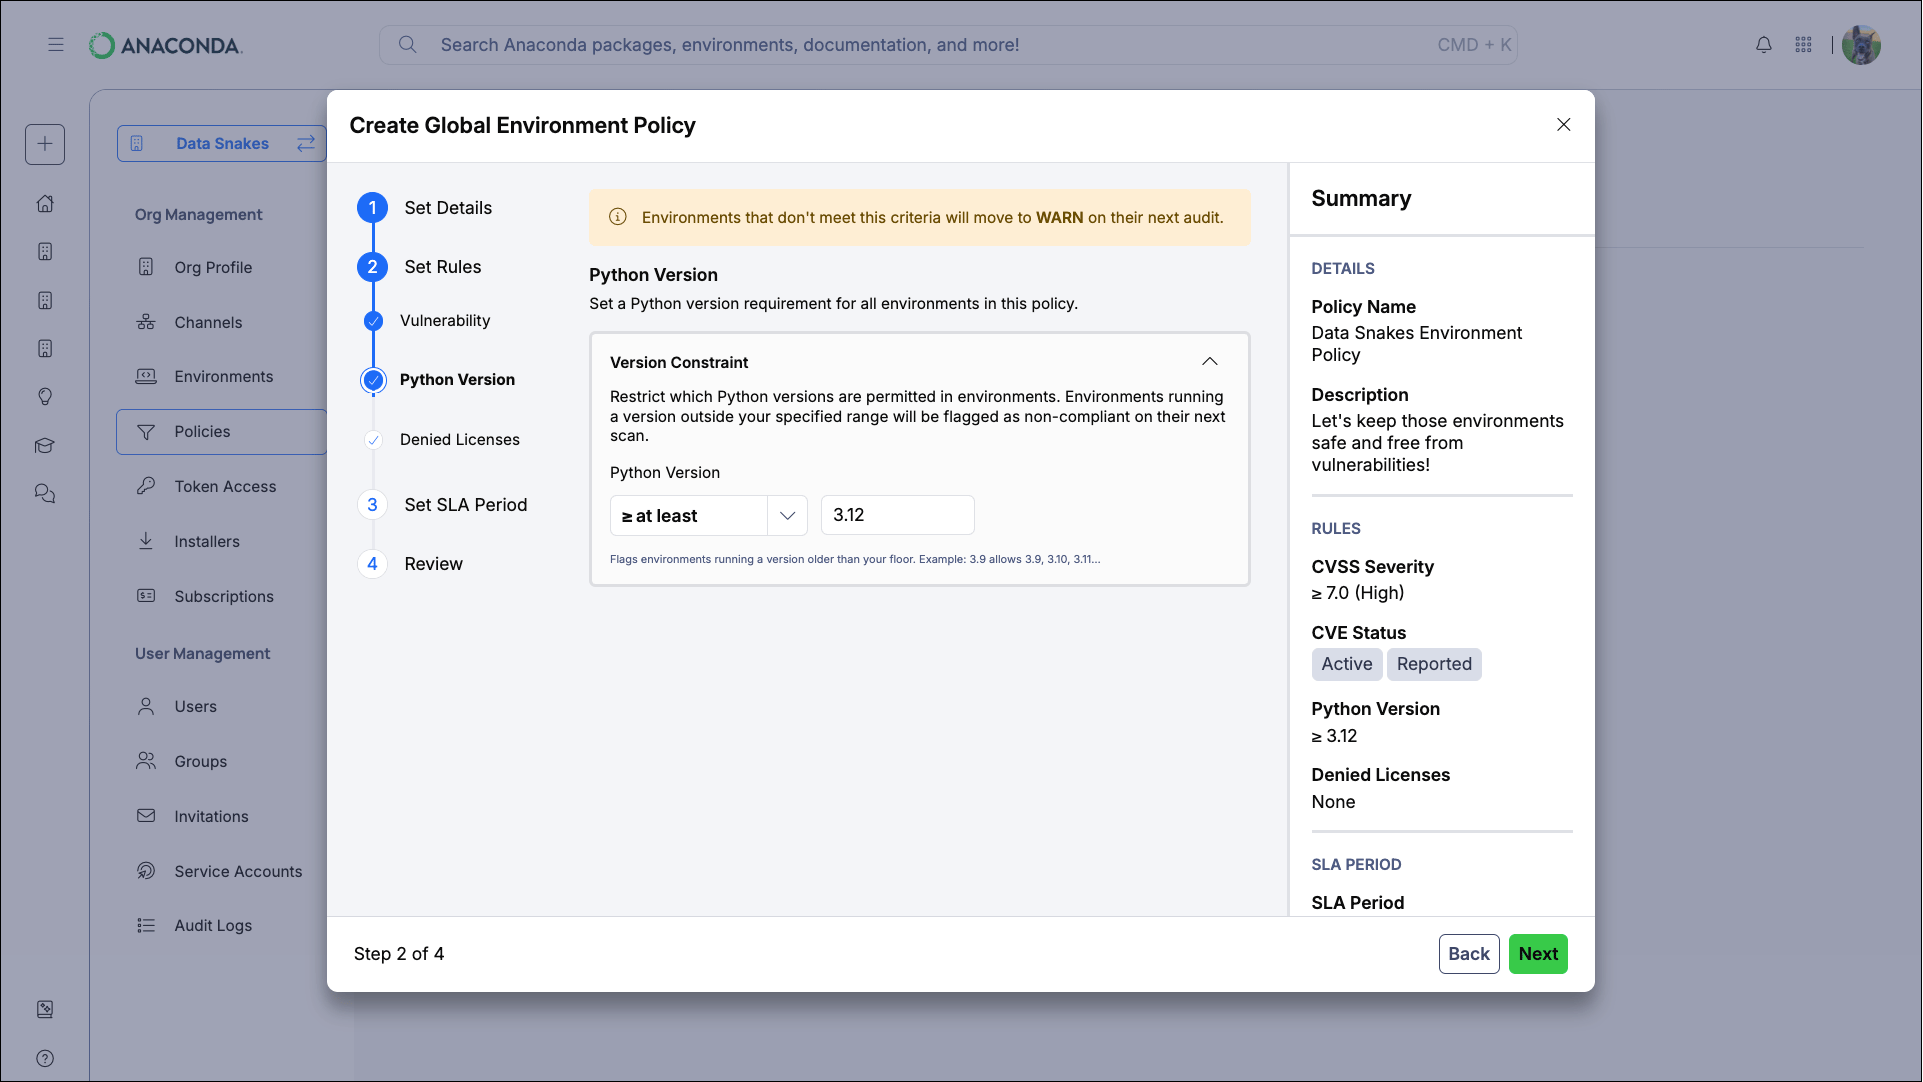
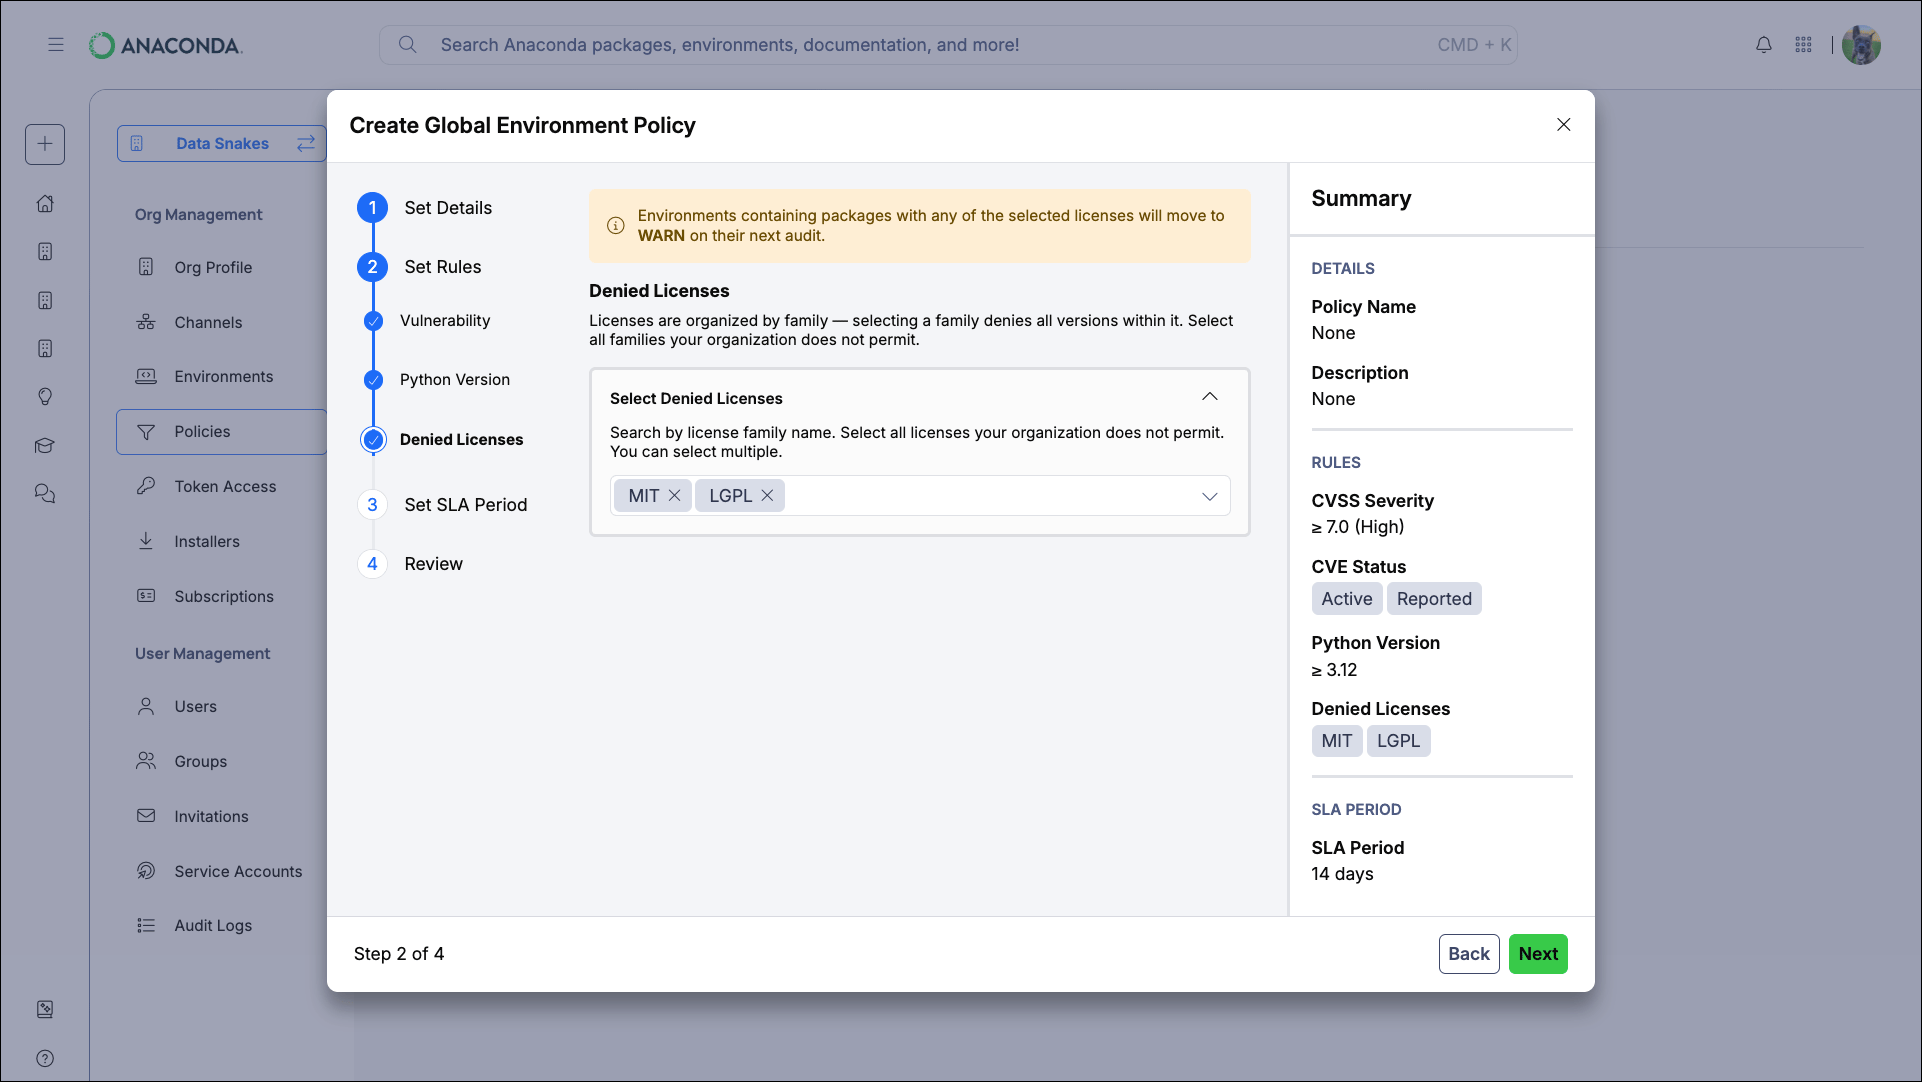
3
Set SLA period
The SLA period is the remediation window between when a violation is detected and when the environment is blocked.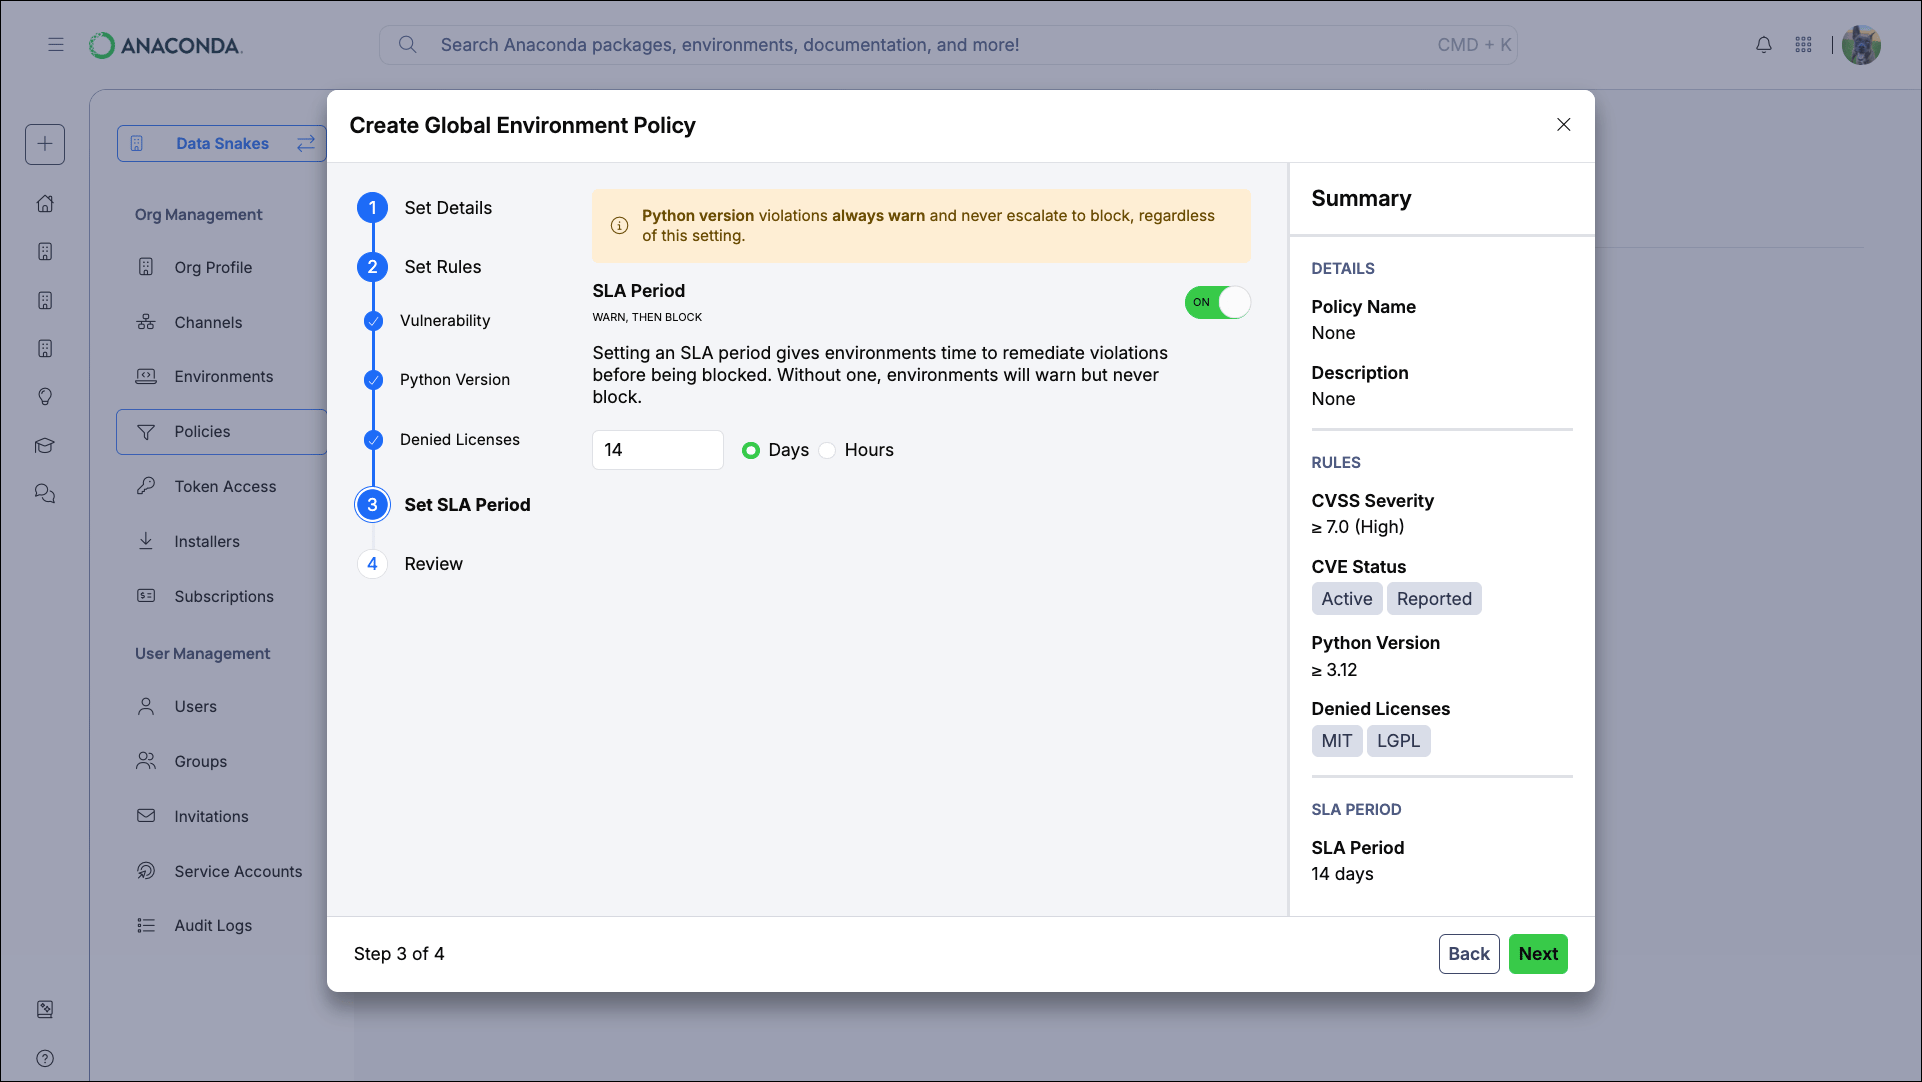
4
Review and enable
The review step displays a summary of your policy configuration. Verify your settings before enabling. If you need to make changes, click the icon beside any section to return to that step. When ready, click Enable Policy to save and activate the policy.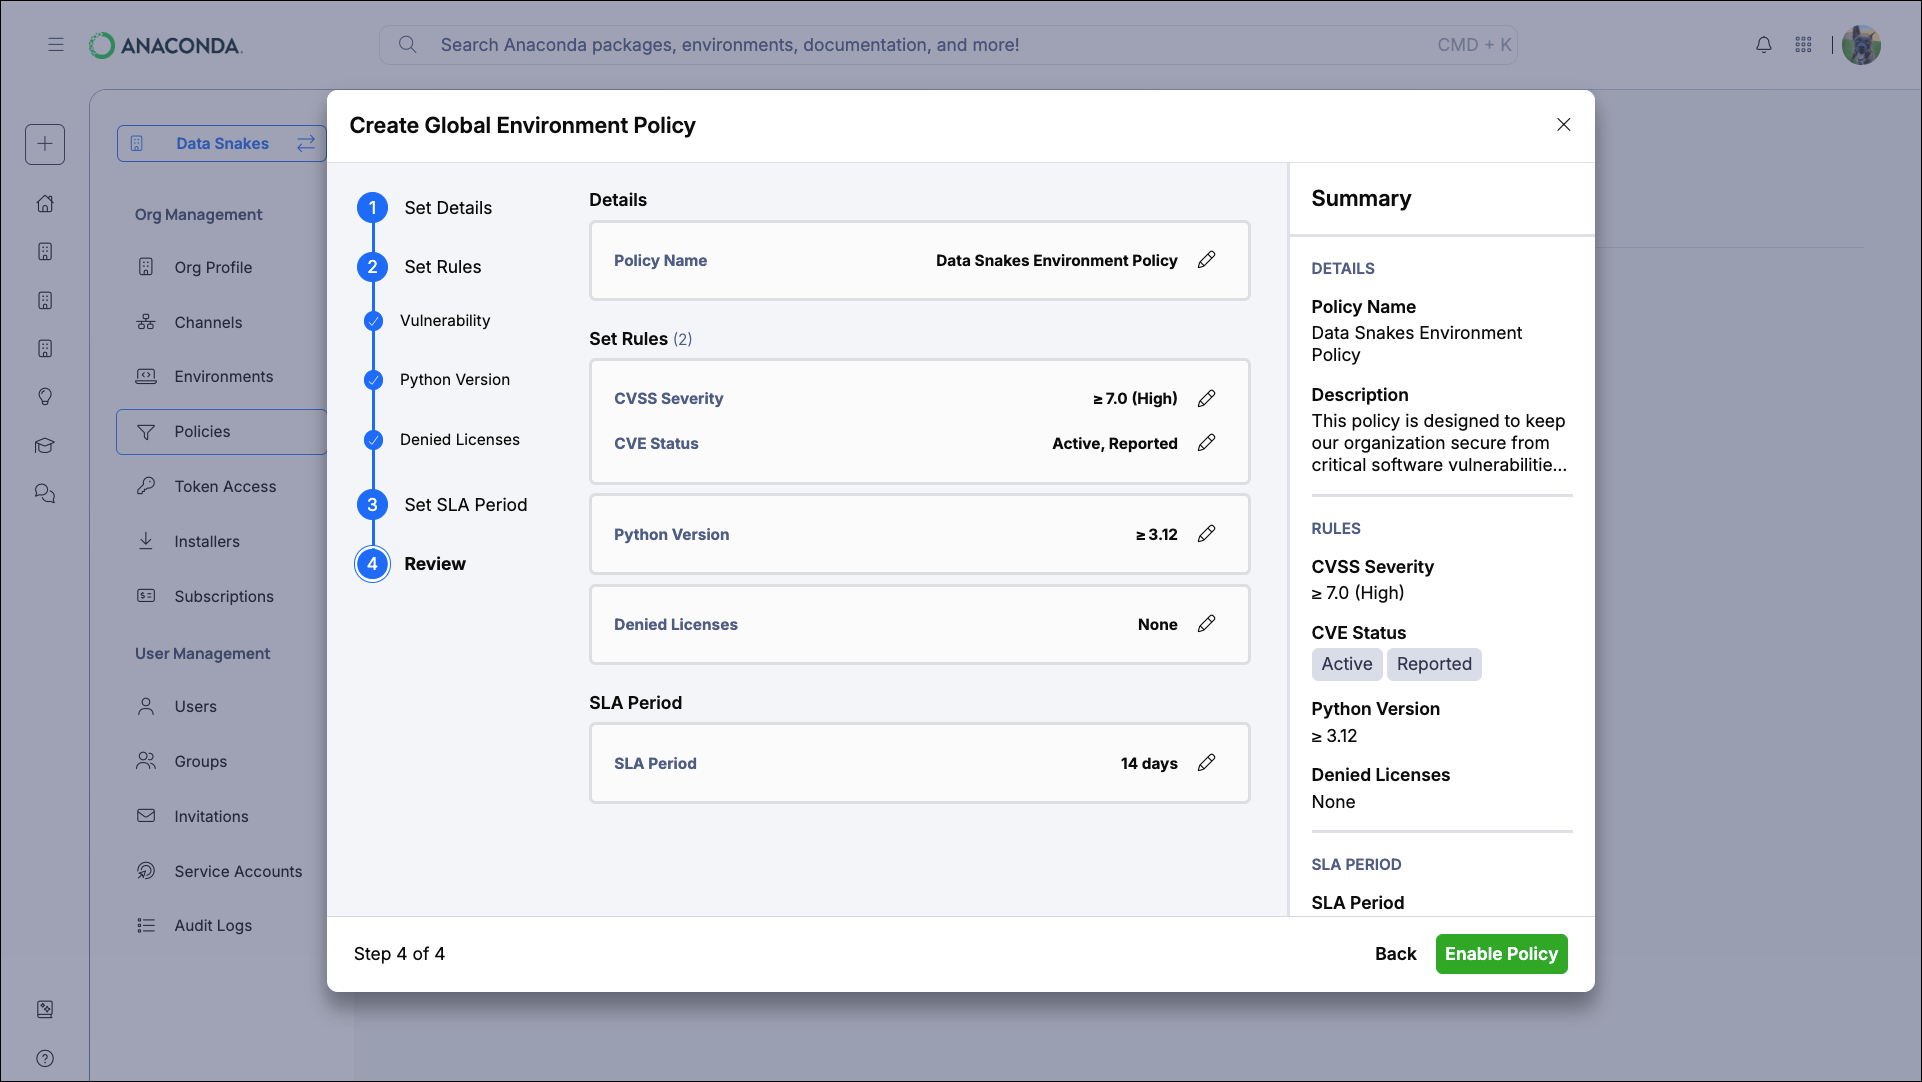
Enabling and disabling an environment policy
Disabling a policy pauses enforcement but retains existing compliance states. Your existing environment policy configurations are preserved, and you can re-enable the policy at any time. When re-enabled, environments are re-evaluated against the policy and compliance states are updated accordingly.