

@checkpoint and @retry decorators, you can build a training flow that saves its progress while it runs, so a failure costs you minutes of rework instead of hours. If the training step fails, Anaconda Platform retries it, and the new attempt picks up where the last one left off.
Prerequisites
Before you begin, make sure you have the following:-
A macOS or Linux machine, or a cloud workstation.
Metaflow is built for macOS and Linux. Windows machines require Windows Subsystem for Linux (WSL) to run Metaflow.
-
The
outerboundspackage installed and connected to your platform. - Access to a compute pool for running Metaflow Tasks.
How checkpointing works
Most machine learning libraries can save a model to a file, but that file stays on the machine that wrote it. If the machine fails, a retry on a new machine can’t find it.@checkpoint solves this by saving checkpoints to your platform’s storage, so any retry can load them.
By default, each task loads only the checkpoints it saved, so parallel training tasks, your colleagues’ runs, and production deployments never pick up each other’s checkpoints. A card in the Runs view shows which checkpoints each attempt loaded and saved.
Adding the  Runs view shows which checkpoints each attempt loaded and saved.
@checkpoint decorator to a step lets you work with checkpoints through the current.checkpoint object. This tutorial uses the following:
Writing a training step that saves checkpoints
In this section, you create two files: a module that saves checkpoints during XGBoost training and the flow that uses it.1
Create a project directory
Create a directory for the tutorial and navigate to it:Metaflow packages every Python file in this directory with your flow, so the flow can import the module you create next, both locally and in the cloud.
2
Create the training callbacks
XGBoost calls a training callback after every boosting round, which makes callbacks a natural place to save progress. Create a file named The file defines two callbacks:
callbacks.py with the following contents:callbacks.py
Checkpointer: Every 10 rounds, writes the model tomodel.pklin the checkpoint directory and callscurrent.checkpoint.save(). Itsload()method reads the model back after@checkpointrestores the directory on a retry.SimulatedFailure: Raises an error after a set number of rounds in each attempt. It stands in for the real failures you’re protecting against, so you can watch recovery happen on demand. Leave it out of your own projects.
3
Create the flow
Create a file named The highlighted lines are where checkpointing happens:
train_flow.py with the following contents:train_flow.py
@retry(times=3)gives thetrainstep up to three more attempts after a failure, for four attempts in total.@checkpointsaves progress within each attempt and, on a retry, loads the latest checkpoint intocurrent.checkpoint.directorybefore your code runs.- The
if current.checkpoint.is_loadedblock decides where training starts. On a retry, it loads the saved model and counts the rounds already completed. XGBoost then trains only the remaining rounds, continuing from the loaded model through thexgb_modelargument.
start step loads a small sample dataset from scikit-learn, and @anaconda_base declares the packages both steps need, sourced from Anaconda’s main channel.Order matters in the callbacks list. Checkpointer runs before SimulatedFailure, so the checkpoint at round 40 is saved before the simulated failure at round 40.After training finishes, set_params(callbacks=None) removes the callbacks from the trained model before Metaflow stores it as the model artifact. Without this line, loading the artifact later, for example in a notebook, would fail unless callbacks.py was importable.checkpoint-tutorial directory now contains callbacks.py and train_flow.py.
Watching the flow recover
Run the flow on your machine first. It’s the quickest way to see the full cycle of failures, retries, and resumed training.1
Run the flow
From the
checkpoint-tutorial directory, run the flow:2
Follow the attempts in the output
The Expected result: The run ends with
train step fails three times, and each failure prints a full traceback ending in RuntimeError: Simulated failure. These errors are expected. Between the tracebacks, look for lines like the following:Example output (trimmed)
The
pid changes with each attempt because every retry runs as a new process with nothing left in memory from the failed attempt. Only the checkpoint carries progress forward.Trained 128 rounds. Attempts used: 4. Without @checkpoint, every retry would start from round zero and fail at round 40 again, and the run would fail after its fourth attempt.3
Inspect the checkpoint card
Follow the link to view your run in the UI, select the 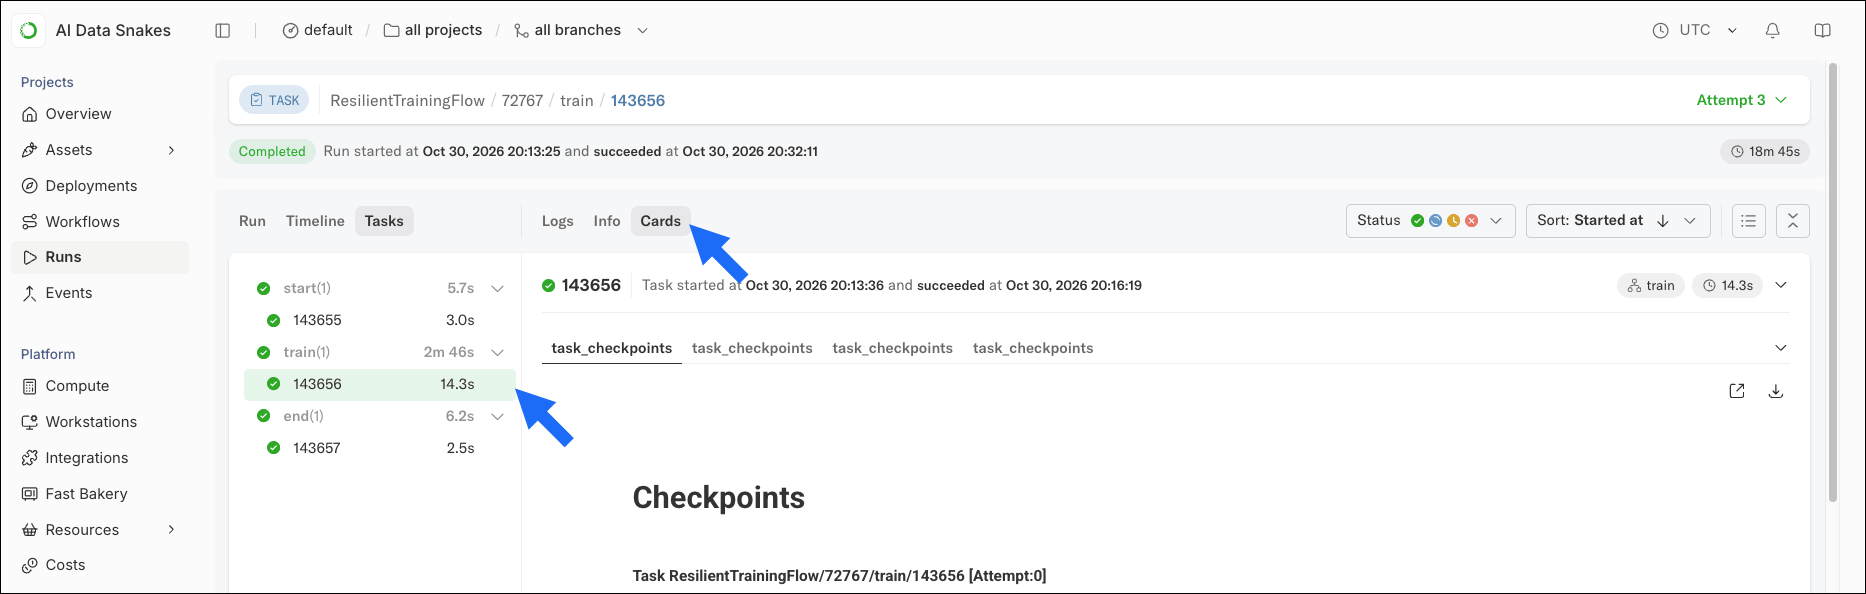
train task, then select the Cards tab.Running the flow on cloud compute
Real training jobs run in the cloud, where failures are more likely. Nodes get replaced, and a retried task often lands on a different instance from the one that failed. Because@checkpoint stores checkpoints in your platform’s datastore rather than on the instance’s disk, the new instance can still load them.
Run the same flow on cloud compute. You don’t need to change any code:
Trained 128 rounds. Attempts used: 4.
Checkpoints and spot instances
Checkpointing lets you reliably train you models on spot instances, which cloud providers sell from their spare capacity at a steep discount. The tradeoff is that the provider can reclaim a spot instance whenever it needs the capacity back, with as little as two minutes’ notice. To your flow, a reclaimed instance is just another failure, like the simulated failures in this tutorial.@retry starts a new attempt on a different instance, and @checkpoint resumes training from the latest checkpoint, so a long training job can run on cheaper capacity and lose only the work since its last save.
On AWS spot instances, Metaflow also signals the two-minute warning through
current.spot_termination_notice, so your training code can save one last checkpoint before the instance shuts down. For an example, see Using spot instances.Tutorial wrap up
You’ve built a training flow that survives failures. Each time thetrain step failed, Anaconda Platform retried it, and the new attempt picked up from the latest checkpoint instead of starting over.
What you learned
- Why artifacts alone can’t protect progress inside a long-running step
- How to save progress during a task with
current.checkpoint.directoryandcurrent.checkpoint.save() - How
@checkpointand@retrywork together to resume a failed task from its latest checkpoint - How to inspect loaded and saved checkpoints in the checkpoint card
- Why checkpoints make lower-cost spot instances practical for long training jobs
- Selecting a checkpoint to use explains load policies, including how to resume training across separate runs during development.
- The Metaflow checkpoint examples repository applies
@checkpointto PyTorch, PyTorch Lightning, Keras, Hugging Face Transformers, and distributed training. - Cost optimization covers other ways to lower compute costs on Anaconda Platform.