> ## Documentation Index
> Fetch the complete documentation index at: https://anaconda.com/docs/llms.txt
> Use this file to discover all available pages before exploring further.
# Packages
## Searching for packages
If you want to know whether or not a package is available in one of your repository channels, you can search for it by entering the package name into the search bar at the top of the dashboard. Click **Show more** to view a full list of matching packages from all available channels.
You can search for channels and CVEs using the same search bar. To adjust your search parameters, open the dropdown menu to the left of the search bar, then select an option from the dropdown menu.
## Viewing package details
Clicking on any package in a channel will display the package details.
From here, you can view the following information:
* All the files contained within the package
* The package's dependents (other packages that require this package to operate properly)
* The package's dependencies (other packages that this package requires to operate properly)
* CVEs that are associated with files in the package
Conda automatically installs a package's dependencies along with the package itself when that package is requested from the channel. If a dependency is not available due to an applied mirror filter, you will not be able to build a working environment with the packages from the current channel.
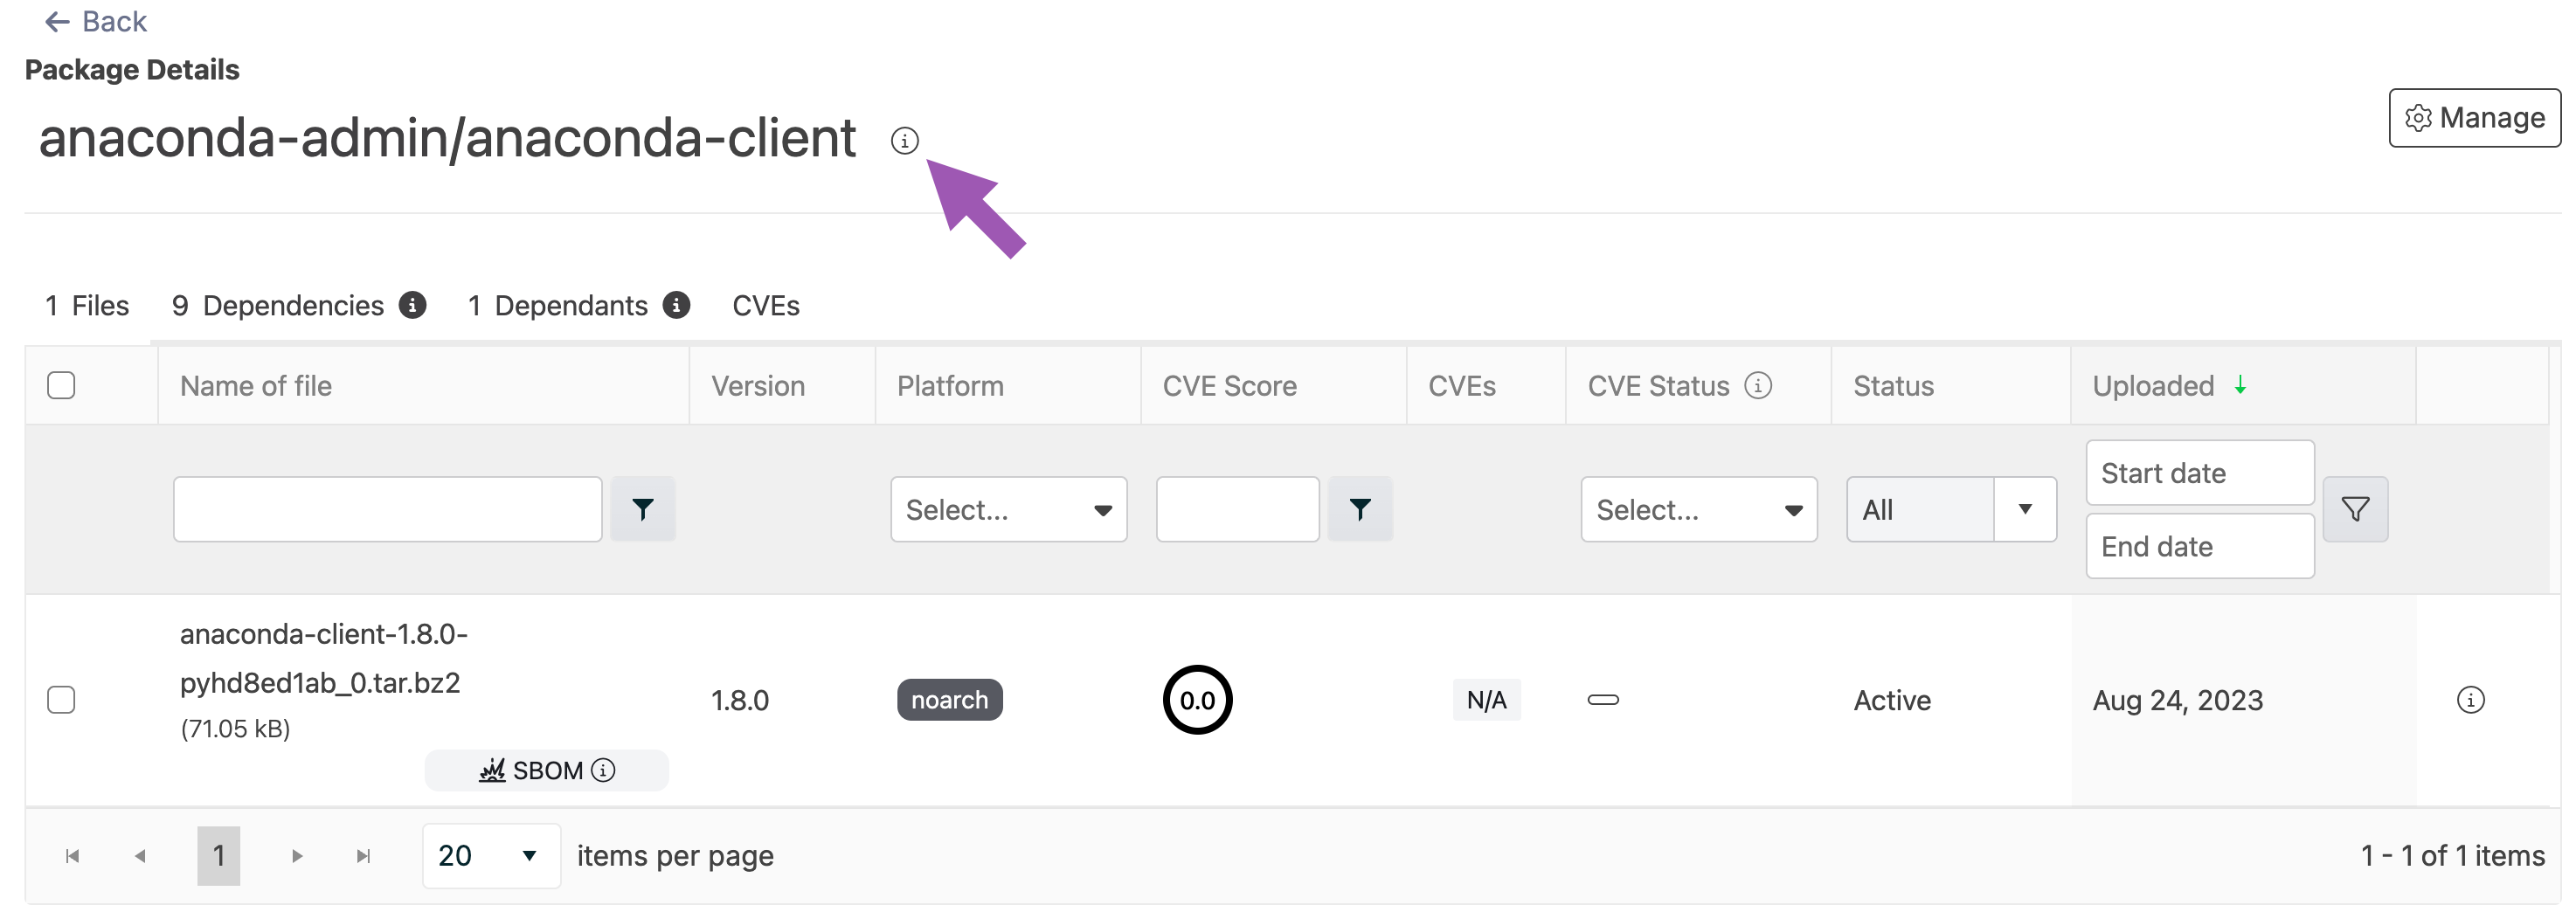
General information about the package, such as its version number, architecture, signature status, CVE score and status, number of CVEs associated, and package status is shown here.
The information icon shows additional information, such as the package’s license type, the last time the package was published, and a command that you can copy to [install the package from this channel](#installing-a-package-in-your-environment).
 ## Package badges
Package badges are a visually intuitive way to display real-time metadata about a package in other applications.
### Embedding package badges
Package badges are a visually intuitive way to display real-time metadata about a package in other applications. Badge images can be embedded into package documentation, repository README files, websites, dashboards, and so on and can be dynamically generated to show the following information:
* Package version
* Download count
* License
* Platforms
* Last updated
* Updated ago
From a package’s details page:
1. Select a package from a channel.
2. Click the **Badges** tab.
3. Open the dropdown for the badge that you want to embed.
4. Click **Copy** beside the language you’re working in.
To embed a badge from an authenticated or private channel, you must include a channel resource token at the end of the URL.
5. You can now take this link and embed it elsewhere.
### Configuring badge colors
Administrators can customize badge colors by setting the following environment variables in the `repo_api` section of the `docker-compose.yml` file. If these variables are not specified, the default colors listed below are used:
```sh theme={null}
REPO_BADGE_LABEL_COLOR="#555"
REPO_BADGE_VERSION_COLOR="#007ec6"
REPO_BADGE_LICENSE_COLOR="#4c1"
REPO_BADGE_DOWNLOADS_COLOR="#97ca00"
REPO_BADGE_PLATFORMS_COLOR="#f37021"
REPO_BADGE_LAST_UPDATED_COLOR="#ff69b4"
REPO_BADGE_UPDATED_AGO_COLOR="#ff69b4"
```
## Filtering package files
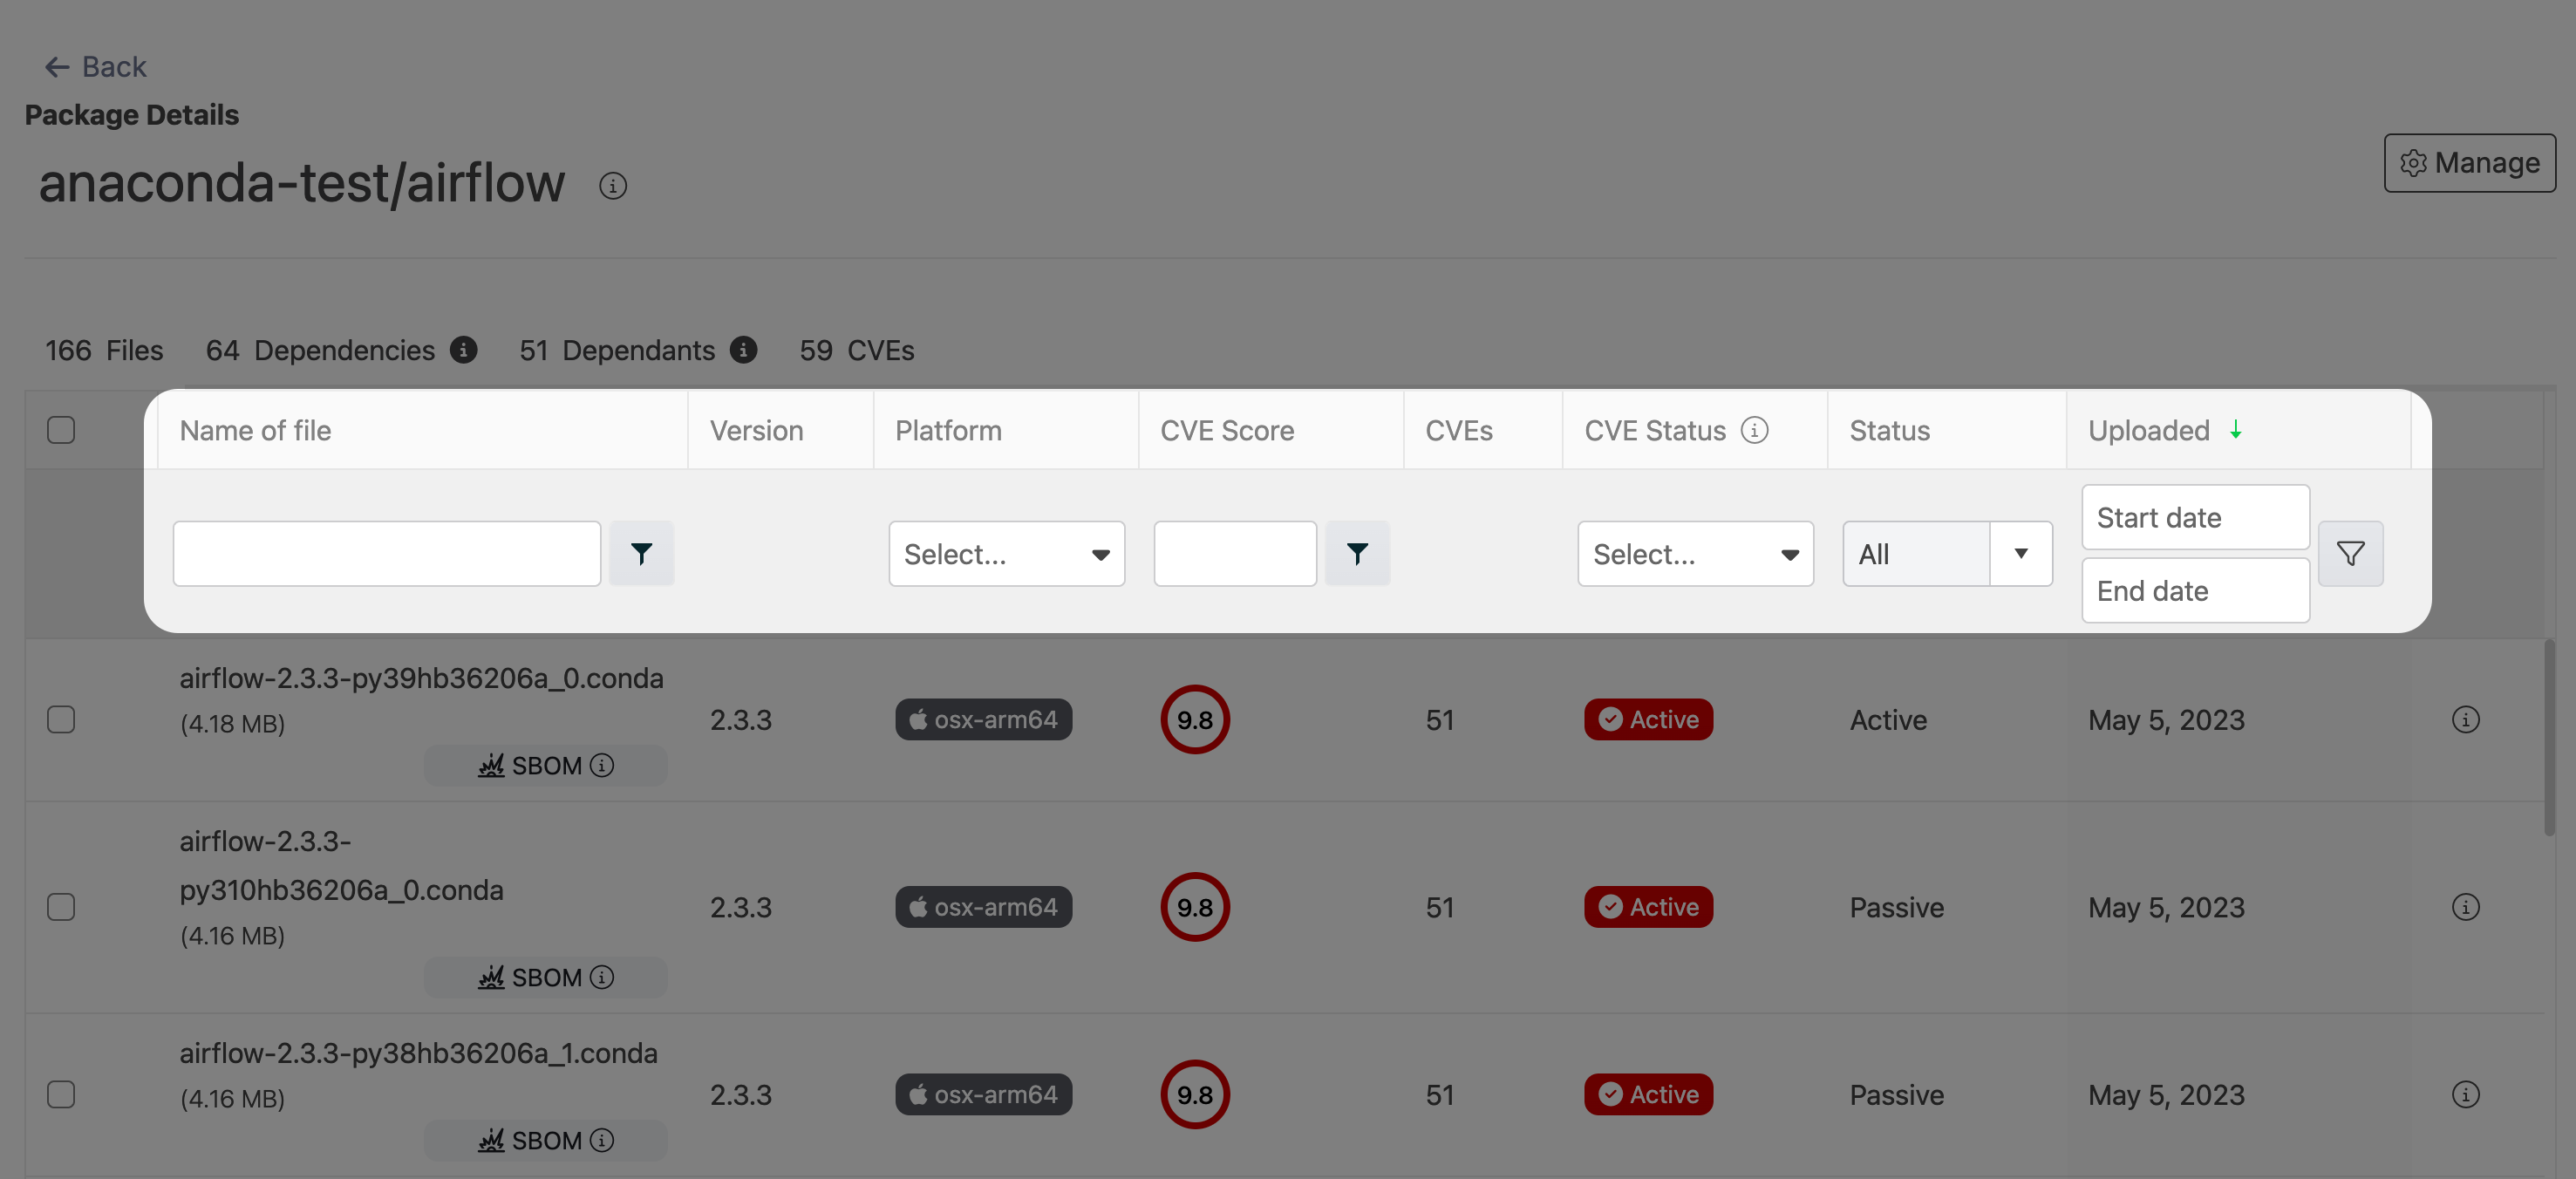
Further search the contents of a package by utilizing the file filters at the top of the table columns. You can filter by file name, platform, CVE score and/or status, package status (active/passive state), and upload date.
## Package badges
Package badges are a visually intuitive way to display real-time metadata about a package in other applications.
### Embedding package badges
Package badges are a visually intuitive way to display real-time metadata about a package in other applications. Badge images can be embedded into package documentation, repository README files, websites, dashboards, and so on and can be dynamically generated to show the following information:
* Package version
* Download count
* License
* Platforms
* Last updated
* Updated ago
From a package’s details page:
1. Select a package from a channel.
2. Click the **Badges** tab.
3. Open the dropdown for the badge that you want to embed.
4. Click **Copy** beside the language you’re working in.
To embed a badge from an authenticated or private channel, you must include a channel resource token at the end of the URL.
5. You can now take this link and embed it elsewhere.
### Configuring badge colors
Administrators can customize badge colors by setting the following environment variables in the `repo_api` section of the `docker-compose.yml` file. If these variables are not specified, the default colors listed below are used:
```sh theme={null}
REPO_BADGE_LABEL_COLOR="#555"
REPO_BADGE_VERSION_COLOR="#007ec6"
REPO_BADGE_LICENSE_COLOR="#4c1"
REPO_BADGE_DOWNLOADS_COLOR="#97ca00"
REPO_BADGE_PLATFORMS_COLOR="#f37021"
REPO_BADGE_LAST_UPDATED_COLOR="#ff69b4"
REPO_BADGE_UPDATED_AGO_COLOR="#ff69b4"
```
## Filtering package files
Further search the contents of a package by utilizing the file filters at the top of the table columns. You can filter by file name, platform, CVE score and/or status, package status (active/passive state), and upload date.
 ## Viewing file metadata
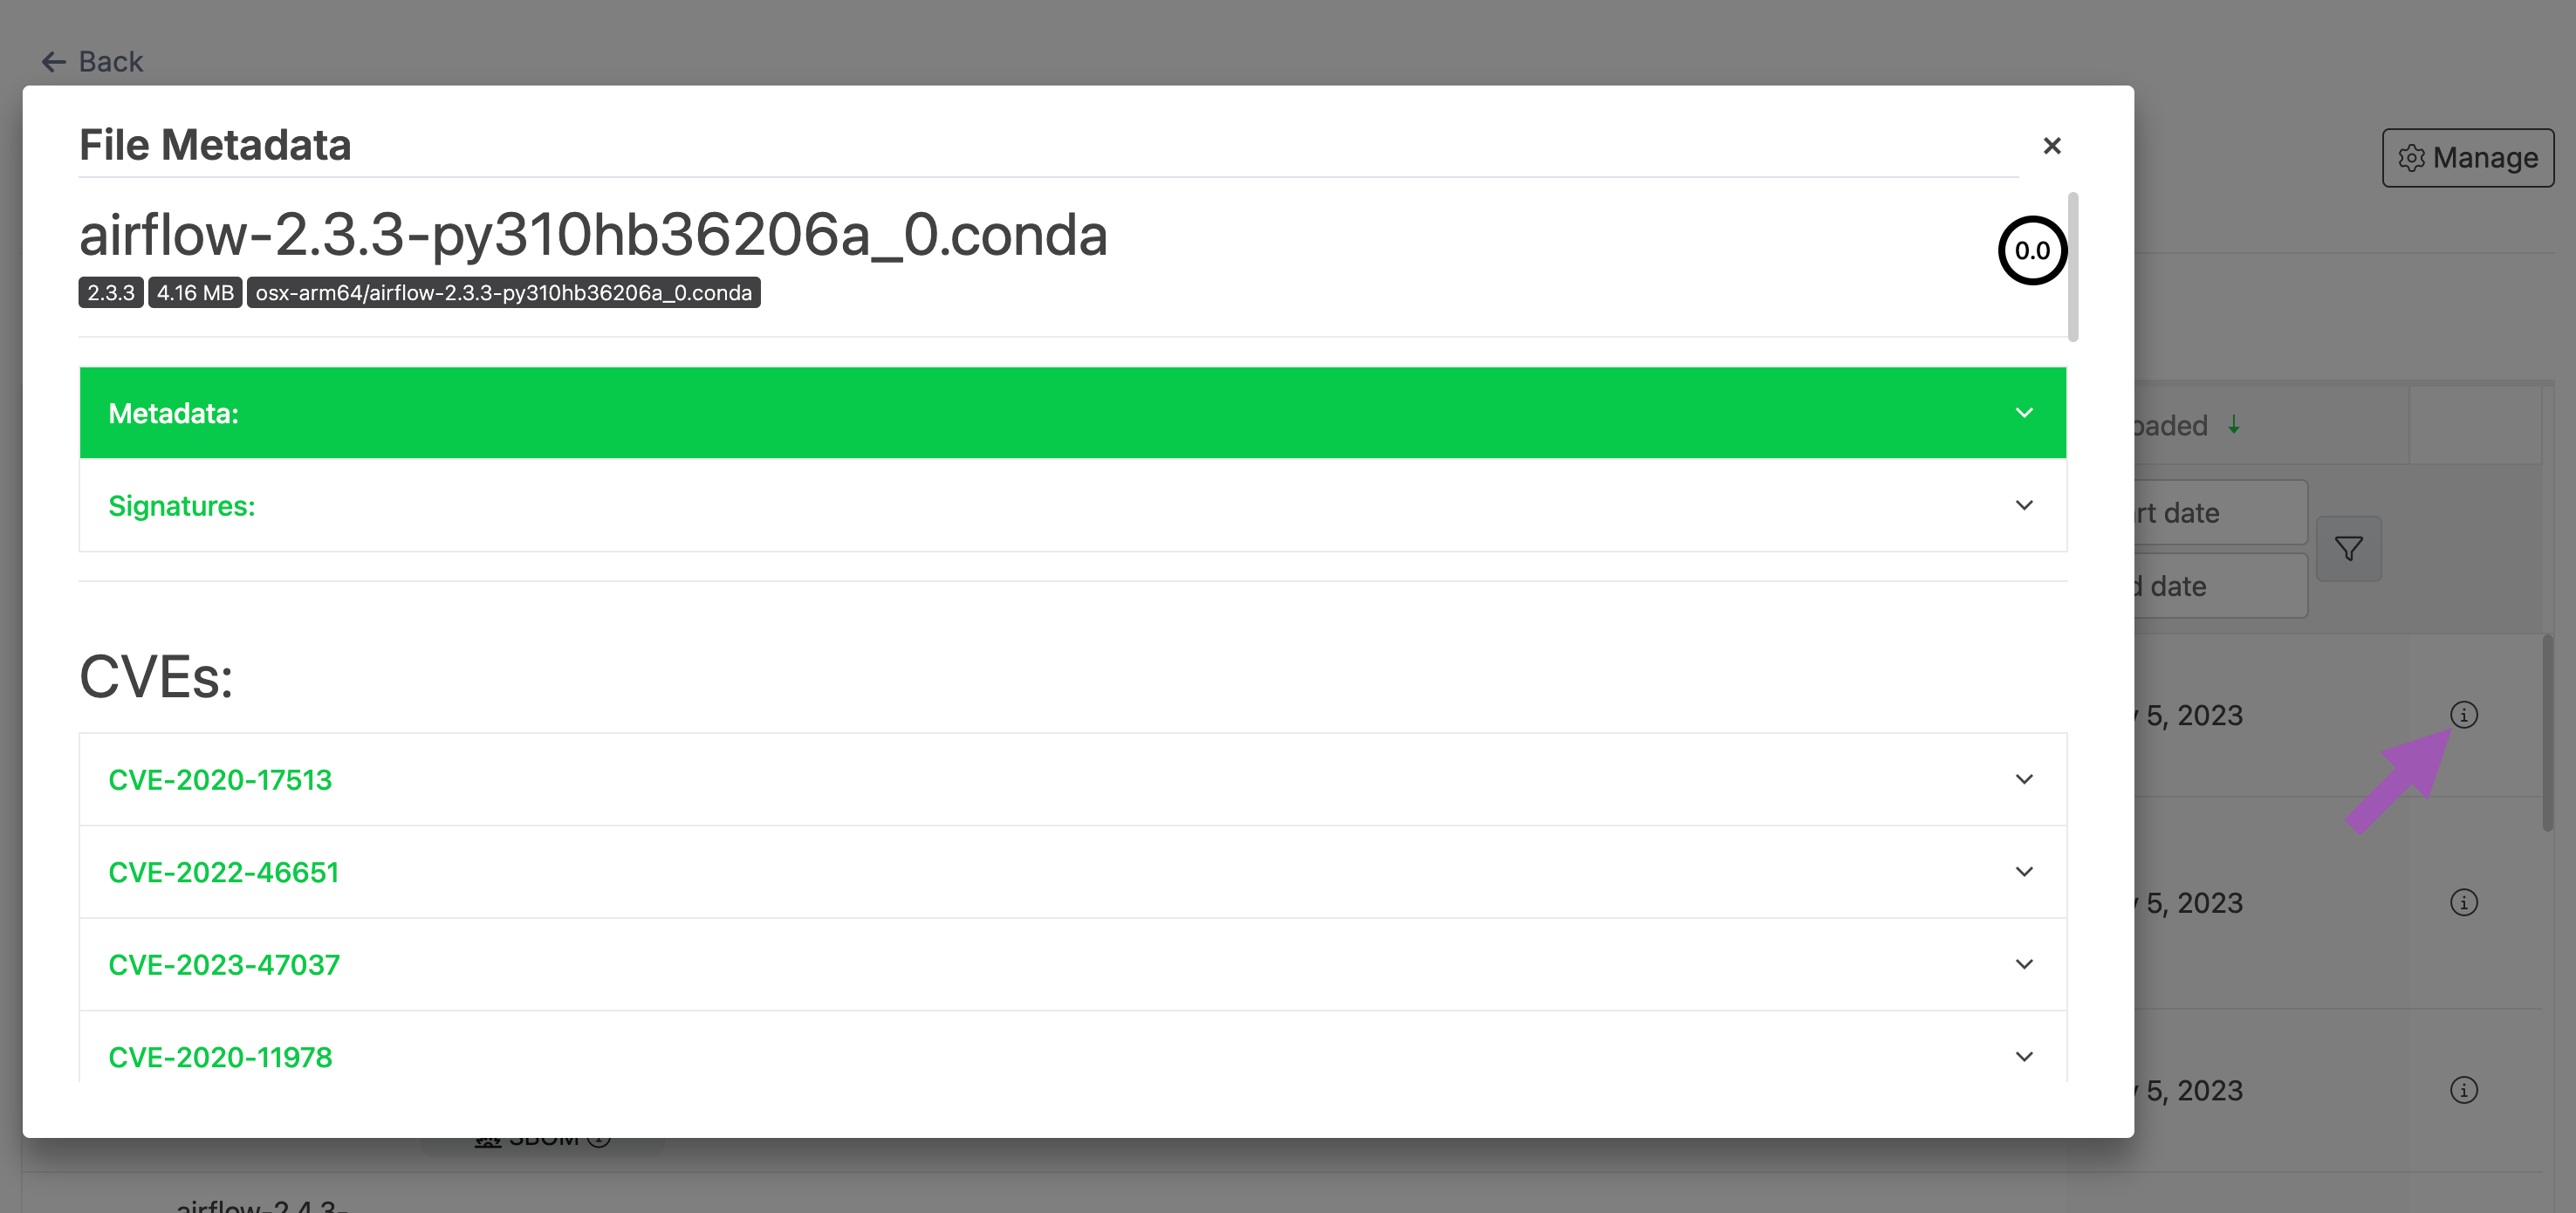
From the package details view, click the information icon associated with a file to view its metadata, which is a `.json` formatted file that contains all of the information about the package file.
## Viewing file metadata
From the package details view, click the information icon associated with a file to view its metadata, which is a `.json` formatted file that contains all of the information about the package file.
 ## Installing a package in your environment
The additional package information provides you with a command to install the package from the channel. **Copy** the command, then run it from within your active conda environment. Keep in mind that this command also installs all the package's dependencies.
## Installing a package in your environment
The additional package information provides you with a command to install the package from the channel. **Copy** the command, then run it from within your active conda environment. Keep in mind that this command also installs all the package's dependencies.
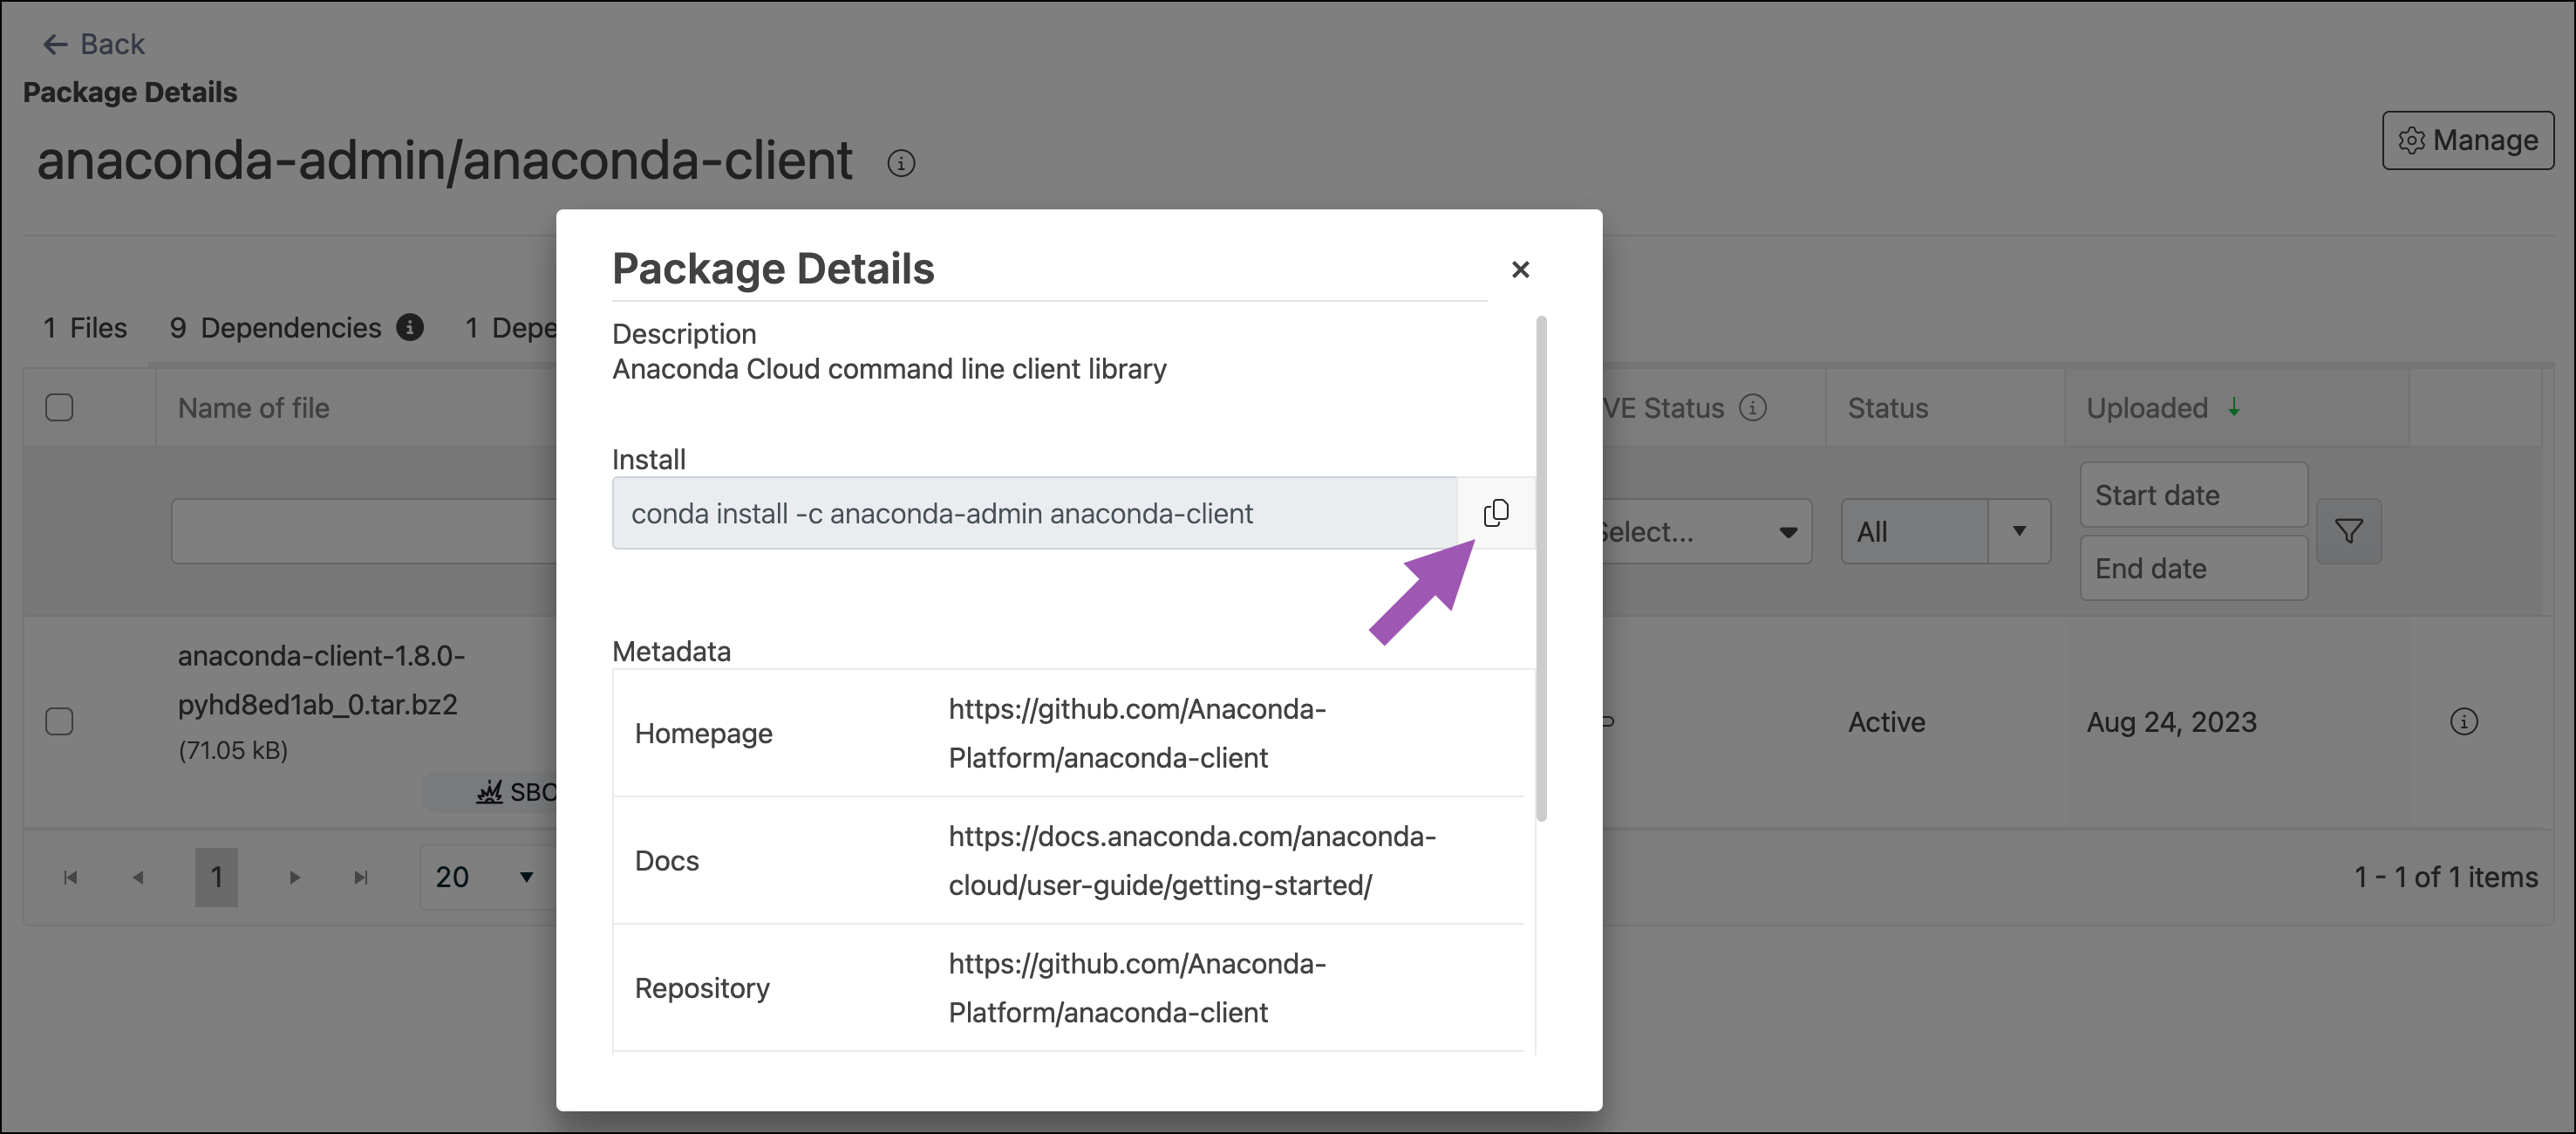 This command assumes that you have set the channel alias in your `.condarc` file to your Package Security Manager URL. For more information and help setting your channel alias, see [Set a channel alias](https://docs.conda.io/projects/conda/en/latest/user-guide/configuration/settings.html#channel-alias-set-a-channel-alias) in the official conda documentation.
## Downloading a package file
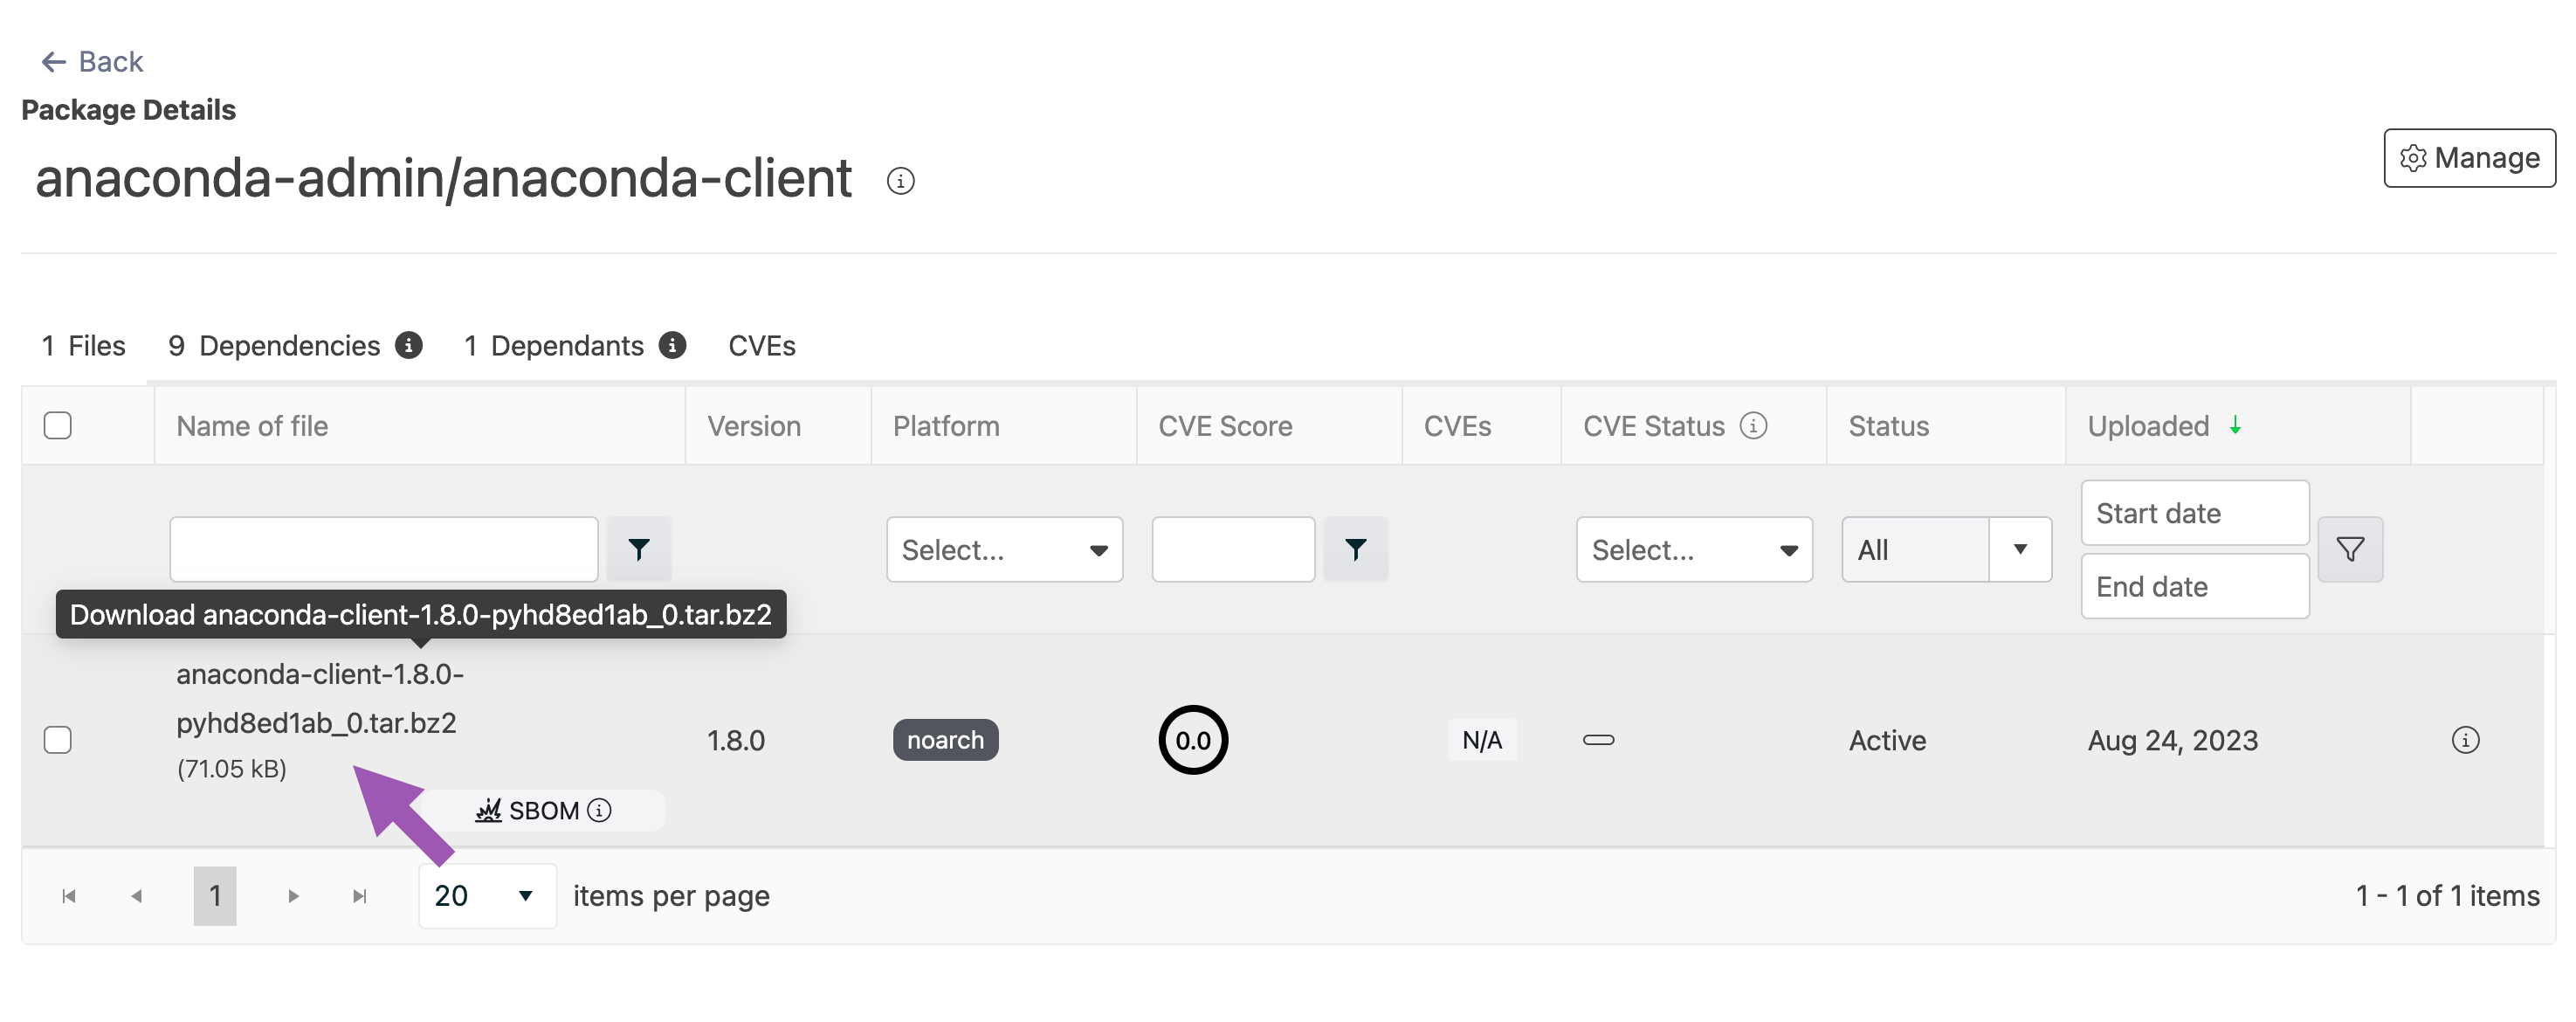
From the package details view, click on a package file's name to download it.
This command assumes that you have set the channel alias in your `.condarc` file to your Package Security Manager URL. For more information and help setting your channel alias, see [Set a channel alias](https://docs.conda.io/projects/conda/en/latest/user-guide/configuration/settings.html#channel-alias-set-a-channel-alias) in the official conda documentation.
## Downloading a package file
From the package details view, click on a package file's name to download it.
 ## Uploading a package
To automate package uploads in a CI/CD pipeline, or to migrate existing CLI-based upload workflows, see [Anaconda GitHub Actions](/docs/cli-reference/anaconda-cli/github-actions#upload-package).
The process for preparing a package for upload differs depending on the package type. Please follow the relevant guide to prepare your package for upload before continuing:
* [conda-build](https://docs.conda.io/projects/conda-build/en/latest/)
* [sdist and wheels](https://packaging.python.org/en/latest/tutorials/packaging-projects/#generating-distribution-archives)
* [cran](https://r-pkgs.org/structure)
Once the package is ready for upload:
1. Log in to Package Security Manager.
2. Navigate to the channel/subchannel you want to upload your package to.
3. Open the **Manage** dropdown menu and select *Upload File*.
4. Open the **Type** dropdown menu and select your applicable file type.
5. Click **Select files...** then locate the file on your computer, and then click **Upload**.
You can also drag and drop the file you'd like to upload.
## Moving a package
To move a package from one channel or subchannel to another:
1. From the channel or subchannel details page, click the **Packages** tab.
2. Select the checkbox beside the packages you want to move. File management buttons appear at the top of the list.
3. Click **Move # packages**.
4. Open the **Move To:** dropdown menu and select a destination channel or subchannel for your packages.
5. Click **Move**.
Moving a package will remove it from its origin channel.
## Copying a package
To copy a package from one channel or subchannel to another:
1. From the channel or subchannel details page, click the **Packages** tab.
2. Select the checkbox beside the packages you want to copy. File management buttons appear at the top of the list.
3. Click **Copy # packages**.
4. Open the **Copy To:** dropdown menu and select a destination channel for your packages.
5. Click **Copy**.
Copying a package will not remove it from its origin channel.
## Deleting a package
To delete a package from a channel or subchannel:
1. From the channel or subchannel details page, click the **Packages** tab.
2. Select the checkbox beside the packages you want to delete. File management buttons appear at the top of the list.
3. Click **Delete # packages**.
4. Click **Delete** to verify you want to delete your selected packages.
## Package signatures
Packages in Anaconda's repository come with a security signature: a special key value that proves that the package hasn't been tampered with since going through Anaconda's curation process. Files within a package that have a signature display a signed tag in the signature column. The actual signature value can be viewed at the bottom of the metadata file.
You must mirror your packages using an Package Security Manager (Cloud) channel as a source to view package signatures.
### Enabling package signature verification
Package signature verification requires conda version 4.10.1 or later. Signature verification is not enabled by default.
1. Install the necessary packages:
```sh theme={null}
conda install "conda>=4.10.1" "conda-token>=0.3.0" conda-content-trust
```
2. Use `conda-token` to configure access, turn on signature verification, and empty the index cache:
```sh theme={null}
# Replace with your organization access token
conda token set --enable-signature-verification
```
Conda signature verification is now enabled. When using conda to install packages from the premium repository, conda informs you of the signature status of the proposed packages by appending the following to trusted packages:
```
(INFO: package metadata is signed by Anaconda and trusted)
```
If the trusted signatures do not match the data, tampering may have occurred, and conda will append a warning to the package instead:
```
(WARNING: metadata signature verification failed)
```
If no signatures are currently provided for a package (for example, if you are installing from third-party channels), the signature status message is not provided.
```
(environment) ➜ ~ conda install django
## Package Plan ##
environment location: /home/s/miniconda3-av2
added / updated specs:
- django
The following packages will be downloaded:
package | build
---------------------------|-----------------
asgiref-3.3.4 | pyhd3eb1b0_0 24 KB
django-3.2 | pyhd3eb1b0_0 3.1 MB
krb5-1.17.1 | h173b8e3_0 1.3 MB
libpq-12.2 | h20c2e04_0 2.1 MB
psycopg2-2.8.6 | py38h3c74f83_1 160 KB
pytz-2021.1 | pyhd3eb1b0_0 181 KB
sqlparse-0.4.1 | py_0 35 KB
------------------------------------------------------------
Total: 6.9 MB
The following NEW packages will be INSTALLED:
asgiref repo/main/noarch::asgiref-3.3.4-pyhd3eb1b0_0 (INFO: package metadata is signed by Anaconda and trusted)
django repo/main/noarch::django-3.2-pyhd3eb1b0_0 (INFO: package metadata is signed by Anaconda and trusted)
krb5 repo/main/linux-64::krb5-1.17.1-h173b8e3_0 (INFO: package metadata is signed by Anaconda and trusted)
libpq repo/main/linux-64::libpq-12.2-h20c2e04_0 (INFO: package metadata is signed by Anaconda and trusted)
psycopg2 repo/main/linux-64::psycopg2-2.8.6-py38h3c74f83_1 (INFO: package metadata is signed by Anaconda and trusted)
pytz repo/main/noarch::pytz-2021.1-pyhd3eb1b0_0 (INFO: package metadata is signed by Anaconda and trusted)
sqlparse repo/main/noarch::sqlparse-0.4.1-py_0 (INFO: package metadata is signed by Anaconda and trusted)
```
### Disabling conda signature verification
To turn the feature off, you can adjust your conda configuration:
```sh theme={null}
conda config --set extra_safety_checks false
```
## Package license information
Open source licenses specify how packages can be used. While many licenses allow a broad range of usage, some are more restrictive, especially with respect to production environments. Package Security Manager allows for filtering by license type, which can help organizations govern package availability before license issues can cause production issues.
The following is a list of OSS licenses and links to further details.
* [Affero General Public License (AGPL)](https://opensource.org/licenses/AGPL-3.0)
* [General Public License 2 (GPL2)](https://opensource.org/licenses/GPL-2.0)
* [General Public License 3 (GPL3)](https://opensource.org/licenses/GPL-3.0)
* [Lesser General Public License (LGPL)](https://opensource.org/licenses/GPL-3.0)
* [Berkeley Source Distribution (BSD)](https://opensource.org/licenses/BSD-3-Clause)
* [Massachusetts Institute of Technology (MIT)](https://opensource.org/licenses/MIT)
* [Apache](https://opensource.org/licenses/Apache-2.0)
* [Python Software Foundation (PSF)](https://opensource.org/licenses/Python-2.0)
* Public Domain
* Proprietary
* Other
* None
* [https://opensource.org/licenses](https://opensource.org/licenses)
* [https://opensource.org/licenses/alphabetical](https://opensource.org/licenses/alphabetical)
## Managing packages with the CLI
If you want to manage your packages using the CLI, see [Package Security Manager CLI](/docs/psm-on-prem/6.8.0/user/cli#packages).
## Managing packages with the API
You can also use the API to perform various functions regarding package management. Access the API interface and view the API documentation by logging in as an administrator user, opening a new tab, and then navigating to `http(s):///swagger/ui`, replacing `` with your Package Security Manager fully qualified domain name.
The following is a list of available endpoints you can use to manage your packages in Package Security Manager:
### Viewing package details
```sh theme={null}
GET /api/channels//artifacts//
GET /api/channels//artifacts///readme
GET /api/channels//artifacts///cves
GET /api/channels//artifacts///files
GET /api/channels//artifacts///dependencies
GET /api/channels//subchannels//artifacts//
GET /api/channels//subchannels//artifacts///readme
GET /api/channels//subchannels//artifacts///cves
GET /api/channels//subchannels//artifacts///files
GET /api/channels//subchannels//artifacts///dependencies
```
### Deleting a package
```sh theme={null}
DELETE /api/channels//artifacts//
DELETE /api/channels//subchannels//artifacts//
```
## Uploading a package
To automate package uploads in a CI/CD pipeline, or to migrate existing CLI-based upload workflows, see [Anaconda GitHub Actions](/docs/cli-reference/anaconda-cli/github-actions#upload-package).
The process for preparing a package for upload differs depending on the package type. Please follow the relevant guide to prepare your package for upload before continuing:
* [conda-build](https://docs.conda.io/projects/conda-build/en/latest/)
* [sdist and wheels](https://packaging.python.org/en/latest/tutorials/packaging-projects/#generating-distribution-archives)
* [cran](https://r-pkgs.org/structure)
Once the package is ready for upload:
1. Log in to Package Security Manager.
2. Navigate to the channel/subchannel you want to upload your package to.
3. Open the **Manage** dropdown menu and select *Upload File*.
4. Open the **Type** dropdown menu and select your applicable file type.
5. Click **Select files...** then locate the file on your computer, and then click **Upload**.
You can also drag and drop the file you'd like to upload.
## Moving a package
To move a package from one channel or subchannel to another:
1. From the channel or subchannel details page, click the **Packages** tab.
2. Select the checkbox beside the packages you want to move. File management buttons appear at the top of the list.
3. Click **Move # packages**.
4. Open the **Move To:** dropdown menu and select a destination channel or subchannel for your packages.
5. Click **Move**.
Moving a package will remove it from its origin channel.
## Copying a package
To copy a package from one channel or subchannel to another:
1. From the channel or subchannel details page, click the **Packages** tab.
2. Select the checkbox beside the packages you want to copy. File management buttons appear at the top of the list.
3. Click **Copy # packages**.
4. Open the **Copy To:** dropdown menu and select a destination channel for your packages.
5. Click **Copy**.
Copying a package will not remove it from its origin channel.
## Deleting a package
To delete a package from a channel or subchannel:
1. From the channel or subchannel details page, click the **Packages** tab.
2. Select the checkbox beside the packages you want to delete. File management buttons appear at the top of the list.
3. Click **Delete # packages**.
4. Click **Delete** to verify you want to delete your selected packages.
## Package signatures
Packages in Anaconda's repository come with a security signature: a special key value that proves that the package hasn't been tampered with since going through Anaconda's curation process. Files within a package that have a signature display a signed tag in the signature column. The actual signature value can be viewed at the bottom of the metadata file.
You must mirror your packages using an Package Security Manager (Cloud) channel as a source to view package signatures.
### Enabling package signature verification
Package signature verification requires conda version 4.10.1 or later. Signature verification is not enabled by default.
1. Install the necessary packages:
```sh theme={null}
conda install "conda>=4.10.1" "conda-token>=0.3.0" conda-content-trust
```
2. Use `conda-token` to configure access, turn on signature verification, and empty the index cache:
```sh theme={null}
# Replace with your organization access token
conda token set --enable-signature-verification
```
Conda signature verification is now enabled. When using conda to install packages from the premium repository, conda informs you of the signature status of the proposed packages by appending the following to trusted packages:
```
(INFO: package metadata is signed by Anaconda and trusted)
```
If the trusted signatures do not match the data, tampering may have occurred, and conda will append a warning to the package instead:
```
(WARNING: metadata signature verification failed)
```
If no signatures are currently provided for a package (for example, if you are installing from third-party channels), the signature status message is not provided.
```
(environment) ➜ ~ conda install django
## Package Plan ##
environment location: /home/s/miniconda3-av2
added / updated specs:
- django
The following packages will be downloaded:
package | build
---------------------------|-----------------
asgiref-3.3.4 | pyhd3eb1b0_0 24 KB
django-3.2 | pyhd3eb1b0_0 3.1 MB
krb5-1.17.1 | h173b8e3_0 1.3 MB
libpq-12.2 | h20c2e04_0 2.1 MB
psycopg2-2.8.6 | py38h3c74f83_1 160 KB
pytz-2021.1 | pyhd3eb1b0_0 181 KB
sqlparse-0.4.1 | py_0 35 KB
------------------------------------------------------------
Total: 6.9 MB
The following NEW packages will be INSTALLED:
asgiref repo/main/noarch::asgiref-3.3.4-pyhd3eb1b0_0 (INFO: package metadata is signed by Anaconda and trusted)
django repo/main/noarch::django-3.2-pyhd3eb1b0_0 (INFO: package metadata is signed by Anaconda and trusted)
krb5 repo/main/linux-64::krb5-1.17.1-h173b8e3_0 (INFO: package metadata is signed by Anaconda and trusted)
libpq repo/main/linux-64::libpq-12.2-h20c2e04_0 (INFO: package metadata is signed by Anaconda and trusted)
psycopg2 repo/main/linux-64::psycopg2-2.8.6-py38h3c74f83_1 (INFO: package metadata is signed by Anaconda and trusted)
pytz repo/main/noarch::pytz-2021.1-pyhd3eb1b0_0 (INFO: package metadata is signed by Anaconda and trusted)
sqlparse repo/main/noarch::sqlparse-0.4.1-py_0 (INFO: package metadata is signed by Anaconda and trusted)
```
### Disabling conda signature verification
To turn the feature off, you can adjust your conda configuration:
```sh theme={null}
conda config --set extra_safety_checks false
```
## Package license information
Open source licenses specify how packages can be used. While many licenses allow a broad range of usage, some are more restrictive, especially with respect to production environments. Package Security Manager allows for filtering by license type, which can help organizations govern package availability before license issues can cause production issues.
The following is a list of OSS licenses and links to further details.
* [Affero General Public License (AGPL)](https://opensource.org/licenses/AGPL-3.0)
* [General Public License 2 (GPL2)](https://opensource.org/licenses/GPL-2.0)
* [General Public License 3 (GPL3)](https://opensource.org/licenses/GPL-3.0)
* [Lesser General Public License (LGPL)](https://opensource.org/licenses/GPL-3.0)
* [Berkeley Source Distribution (BSD)](https://opensource.org/licenses/BSD-3-Clause)
* [Massachusetts Institute of Technology (MIT)](https://opensource.org/licenses/MIT)
* [Apache](https://opensource.org/licenses/Apache-2.0)
* [Python Software Foundation (PSF)](https://opensource.org/licenses/Python-2.0)
* Public Domain
* Proprietary
* Other
* None
* [https://opensource.org/licenses](https://opensource.org/licenses)
* [https://opensource.org/licenses/alphabetical](https://opensource.org/licenses/alphabetical)
## Managing packages with the CLI
If you want to manage your packages using the CLI, see [Package Security Manager CLI](/docs/psm-on-prem/6.8.0/user/cli#packages).
## Managing packages with the API
You can also use the API to perform various functions regarding package management. Access the API interface and view the API documentation by logging in as an administrator user, opening a new tab, and then navigating to `http(s):///swagger/ui`, replacing `` with your Package Security Manager fully qualified domain name.
The following is a list of available endpoints you can use to manage your packages in Package Security Manager:
### Viewing package details
```sh theme={null}
GET /api/channels//artifacts//
GET /api/channels//artifacts///readme
GET /api/channels//artifacts///cves
GET /api/channels//artifacts///files
GET /api/channels//artifacts///dependencies
GET /api/channels//subchannels//artifacts//
GET /api/channels//subchannels//artifacts///readme
GET /api/channels//subchannels//artifacts///cves
GET /api/channels//subchannels//artifacts///files
GET /api/channels//subchannels//artifacts///dependencies
```
### Deleting a package
```sh theme={null}
DELETE /api/channels//artifacts//
DELETE /api/channels//subchannels//artifacts//
```