> ## Documentation Index
> Fetch the complete documentation index at: https://anaconda.com/docs/llms.txt
> Use this file to discover all available pages before exploring further.
# Enable and configure SSL post installation
## Enabling SSL
Because Package Security Manager (On-prem) does not require SSL certificates to operate, you’ll need to perform some additional steps in order to enable SSL on an existing HTTP based instance.
1. Log in to your instanace of Package Security Manager as a user with root access.
2. Open your Package Security Manager installer directory. This directory contains both the `docker-compose.yml` and `.env` files.
You can find your installer directory by running the `ls -la` command to view the contents of your current working directory.
```sh theme={null}
# Replace with your base installer directory
cd
```
3. Edit your `docker-compose.yml` file.
1. Find the `Services:` section near the top of the file. Then, under the `nginx_proxy:` portion, add the following lines:
```yaml theme={null}
secrets:
- source: nginx_key
target: /etc/nginx/certs/tls.key
- source: nginx_cert
target: /etc/nginx/certs/tls.crt
```
2. Find the `Keycloak:` section further down in the file. Then, under the `environment:` portion, add this line:
```sh theme={null}
- PROXY_ADDRESS_FORWARDING=true
```
4. Edit your `.env` file.
1. Change `DOMAIN` to new FQDN, if applicable.
2. Change `NGINX_PROXY_PORT` to `443`.
3. Change `PROTOCOL` to `https`
5. Edit your `/opt/anaconda/repo/config/nginx/conf.d/repo.conf` file.
1. Near the top of the file, change `listen 8080;` to `listen 8080 ssl;`.
2. Add the following lines after the `listen 8080 ssl;` line:
```
ssl_certificate /etc/nginx/certs/tls.crt;
ssl_certificate_key /etc/nginx/certs/tls.key;
ssl_protocols TLSv1.2 TLSv1.3;
ssl_ciphers HIGH:!aNULL:!MD5;
```
Here is an example of what your `repo.conf` file will look like when correctly configured:
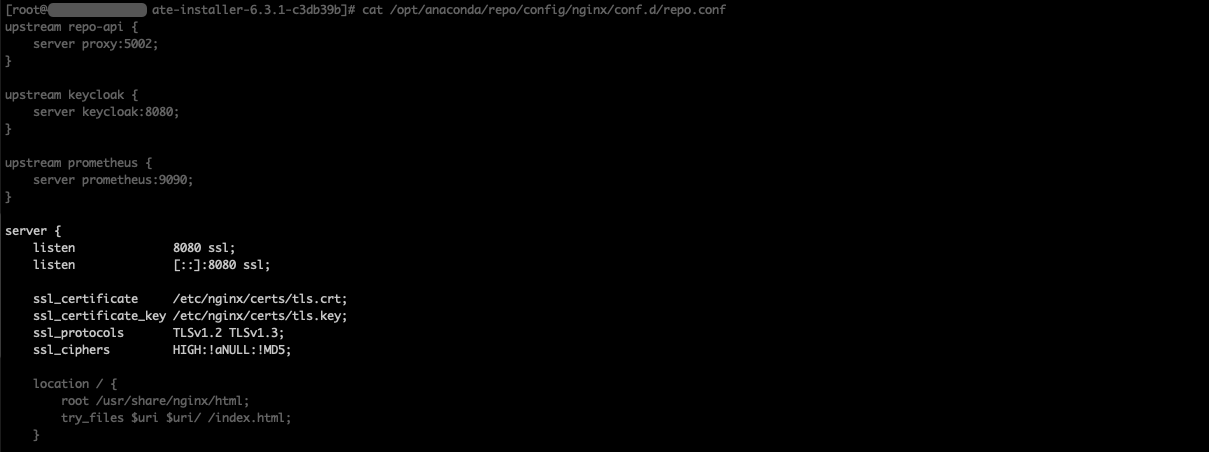 6. Add your certificate and private key, named `tls.crt` and `tls.key`, to the following directory:
```sh theme={null}
/opt/anaconda/repo/config/nginx/certs
```
7. Run the following commands from the directory containing `docker-compose.yml` to apply the changes:
```sh theme={null}
docker compose stop nginx_proxy
docker compose up -d
```
## Configuring SSL
The following steps will allow you to configure the SSL:
1. Add or remove the following lines relating to the SSL in `/config/nginx/conf.d/repo.conf`, where `` is the installation directory:
```
listen 8080 ssl;
ssl_certificate /etc/nginx/certs/tls.crt;
ssl_certificate_key /etc/nginx/certs/tls.key;
ssl_protocols TLSv1.2 TLSv1.3;
ssl_ciphers HIGH:!aNULL:!MD5;
```
2. Add or remove certificates from the following directory:
```sh theme={null}
# Replace with your base install directory
/config/nginx/certs
```
3. Run the following commands:
```sh theme={null}
docker compose stop nginx_proxy
docker compose up -d
```
Refer to nginx’s documentation for the standard [SSL configuration](https://nginx.org/en/docs/http/configuring_https_servers.html) procedure.
## Updating URL/URIs in Keycloak
Once your SSL cert and key are in place, you will need to update Keycloak to point to your new root URL and any valid URI redirects to your domain.
1. Navigate to your Keycloak instance at `/auth/admin` and log in.
2. Select **Clients** from the left-hand navigation.
3. Select **repo-service** from the list of available clients.
4. On the **Settings** tab, update your root URL and any necessary valid redirect URI's.
5. Click **Save** at the bottom of the page.
6. Select **Clients** from the left-hand navigation.
7. Select **repo-account-sync** from the list of available clients.
8. On the **Settings** tab, update your root URL.
9. Click **Save** at the bottom of the page.
## Rebuilding your channel index
Migrating from `HTTP` to `HTTPS` or updating your `FQDN` will alter the file path to your channel’s packages. You must [rebuild your channel index](/docs/psm-on-prem/6.6.3/user/channel#rebuilding-your-channel-index) to correct the file path. If you do not, you will be unable to successfully download packages after migrating.
6. Add your certificate and private key, named `tls.crt` and `tls.key`, to the following directory:
```sh theme={null}
/opt/anaconda/repo/config/nginx/certs
```
7. Run the following commands from the directory containing `docker-compose.yml` to apply the changes:
```sh theme={null}
docker compose stop nginx_proxy
docker compose up -d
```
## Configuring SSL
The following steps will allow you to configure the SSL:
1. Add or remove the following lines relating to the SSL in `/config/nginx/conf.d/repo.conf`, where `` is the installation directory:
```
listen 8080 ssl;
ssl_certificate /etc/nginx/certs/tls.crt;
ssl_certificate_key /etc/nginx/certs/tls.key;
ssl_protocols TLSv1.2 TLSv1.3;
ssl_ciphers HIGH:!aNULL:!MD5;
```
2. Add or remove certificates from the following directory:
```sh theme={null}
# Replace with your base install directory
/config/nginx/certs
```
3. Run the following commands:
```sh theme={null}
docker compose stop nginx_proxy
docker compose up -d
```
Refer to nginx’s documentation for the standard [SSL configuration](https://nginx.org/en/docs/http/configuring_https_servers.html) procedure.
## Updating URL/URIs in Keycloak
Once your SSL cert and key are in place, you will need to update Keycloak to point to your new root URL and any valid URI redirects to your domain.
1. Navigate to your Keycloak instance at `/auth/admin` and log in.
2. Select **Clients** from the left-hand navigation.
3. Select **repo-service** from the list of available clients.
4. On the **Settings** tab, update your root URL and any necessary valid redirect URI's.
5. Click **Save** at the bottom of the page.
6. Select **Clients** from the left-hand navigation.
7. Select **repo-account-sync** from the list of available clients.
8. On the **Settings** tab, update your root URL.
9. Click **Save** at the bottom of the page.
## Rebuilding your channel index
Migrating from `HTTP` to `HTTPS` or updating your `FQDN` will alter the file path to your channel’s packages. You must [rebuild your channel index](/docs/psm-on-prem/6.6.3/user/channel#rebuilding-your-channel-index) to correct the file path. If you do not, you will be unable to successfully download packages after migrating.