> ## Documentation Index
> Fetch the complete documentation index at: https://anaconda.com/docs/llms.txt
> Use this file to discover all available pages before exploring further.
# Roles and permissions
## Roles
Roles determine the level of access a user has within Anaconda Server. Some preconfigured roles have been embedded into Keycloak to provide users with varying levels of access to the software’s available features. If the default Anaconda roles described here do not suit your use case, you can create a custom role for your users.
### Permission levels
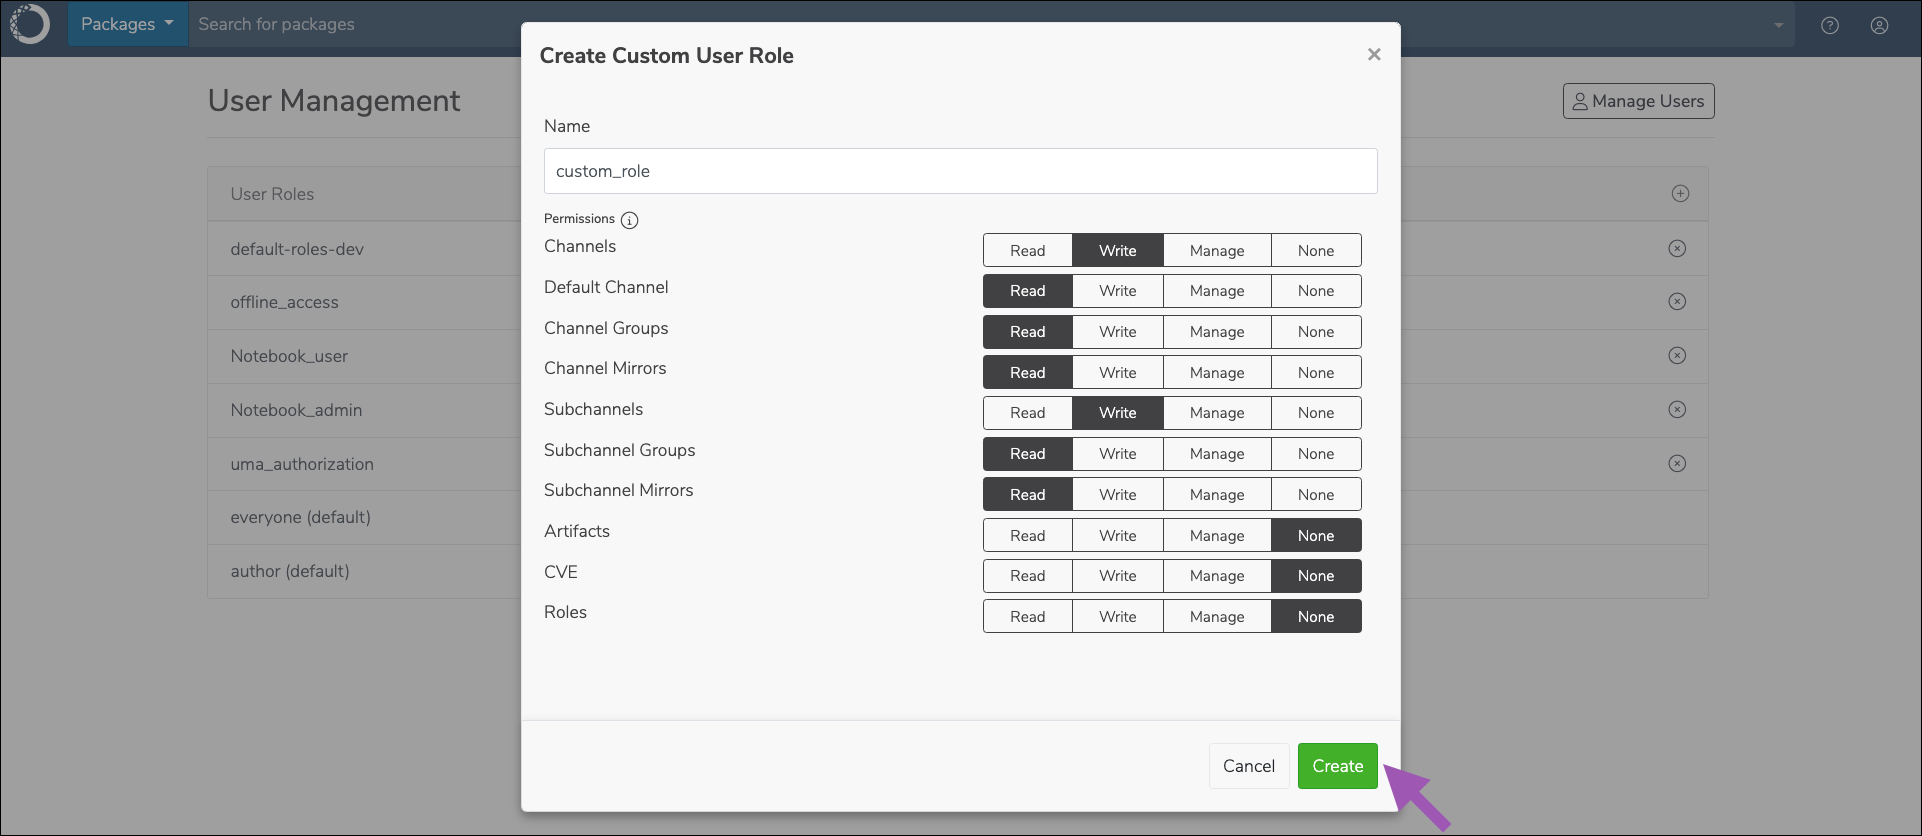
There are four levels of permissions available for Anaconda Server:
* **Read**: provides the ability to view the associated feature.
* **Write**: provides the ability to view and create new assets of the associated feature.
* **Manage**: provides the ability to view, create, and edit assets of the associated feature.
* **None**: removes permissions for the associated feature.
### Permission categories
Each permission category is associated with some feature of Anaconda Server. The available permission categories are:
* **Channels**: grants interaction with channels
* **Default Channel**: grants interaction with the user’s default channel
* **Channel Groups**: grants interaction with channel groups
* **Channel Mirrors**: grants interaction with channel mirrors
* **Subchannels**: grants interaction with subchannels
* **Subchannel Groups**: grants interaction with subchannel groups
* **Subchannel Mirrors**: grants interaction with subchannel mirrors
* **Artifacts**: grants interaction with artifacts
* **CVE**: grants interaction with CVEs
* **Roles**: grants interaction with roles
* **Audit Logs**: (read permissions only) grants admins permissions to download user audit logs report
### Preconfigured roles
Anaconda Server contains the following preconfigured roles for the Dev realm:
* **everyone**: A non-authenticated user. Allows visibility into public channel and subchannel contents as well as group membership.
* **author**: An authenticated user. Allows users to create new channels and subchannels, and provides user level access to your Team Notebooks server.
* **admin**: The administrator role has full management permissions over all the features of Anaconda Server. The admin role is responsible for creating and maintaining mirrors in addition to managing users and CVE data. This role also provides admin level permissions to your Team Notebooks server.
* **Notebooks admin**: An administrator role for the Team Notebooks server.
* **Notebooks author**: Allows users to access the Team Notebooks server.
The admin role is not visible through Anaconda Server UI.
## Managing Roles
For customers on the Business plan, Anaconda has two main user personas: IT administrators and everyone else. As an IT administrator, you are responsible for establishing and maintaining the users’ accounts and the resources available to them within Anaconda Server.
### Creating custom roles
To create a custom role, complete the following steps:
1. Log in to Anaconda Server.
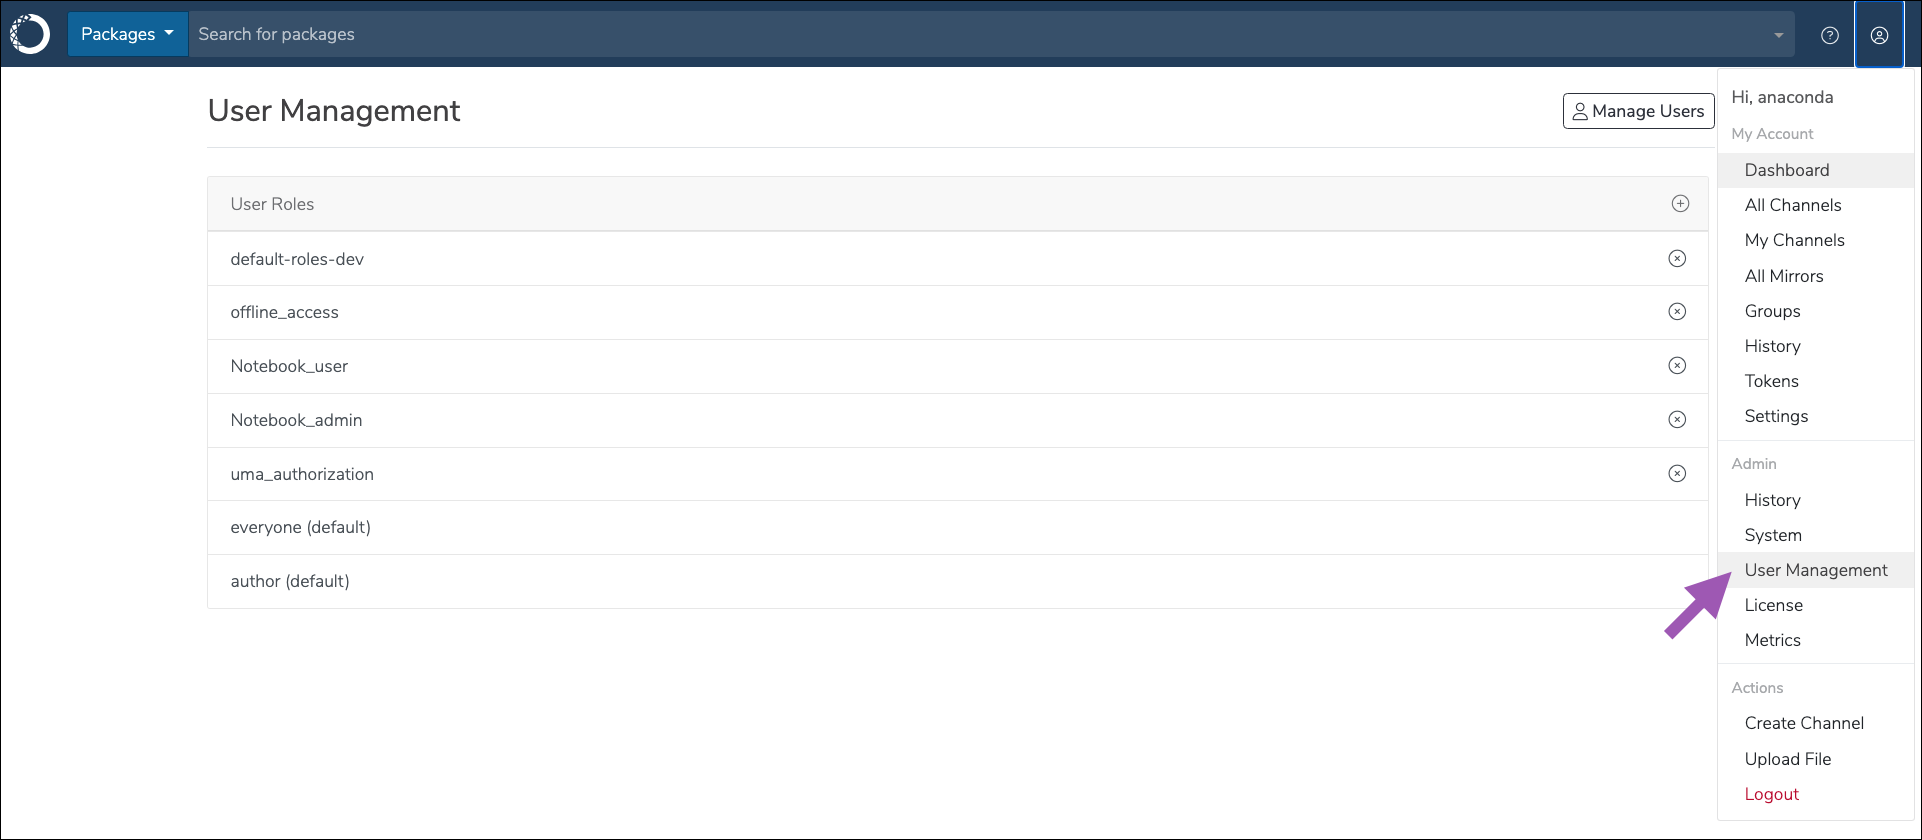
2. Navigate to the **User Management** page.
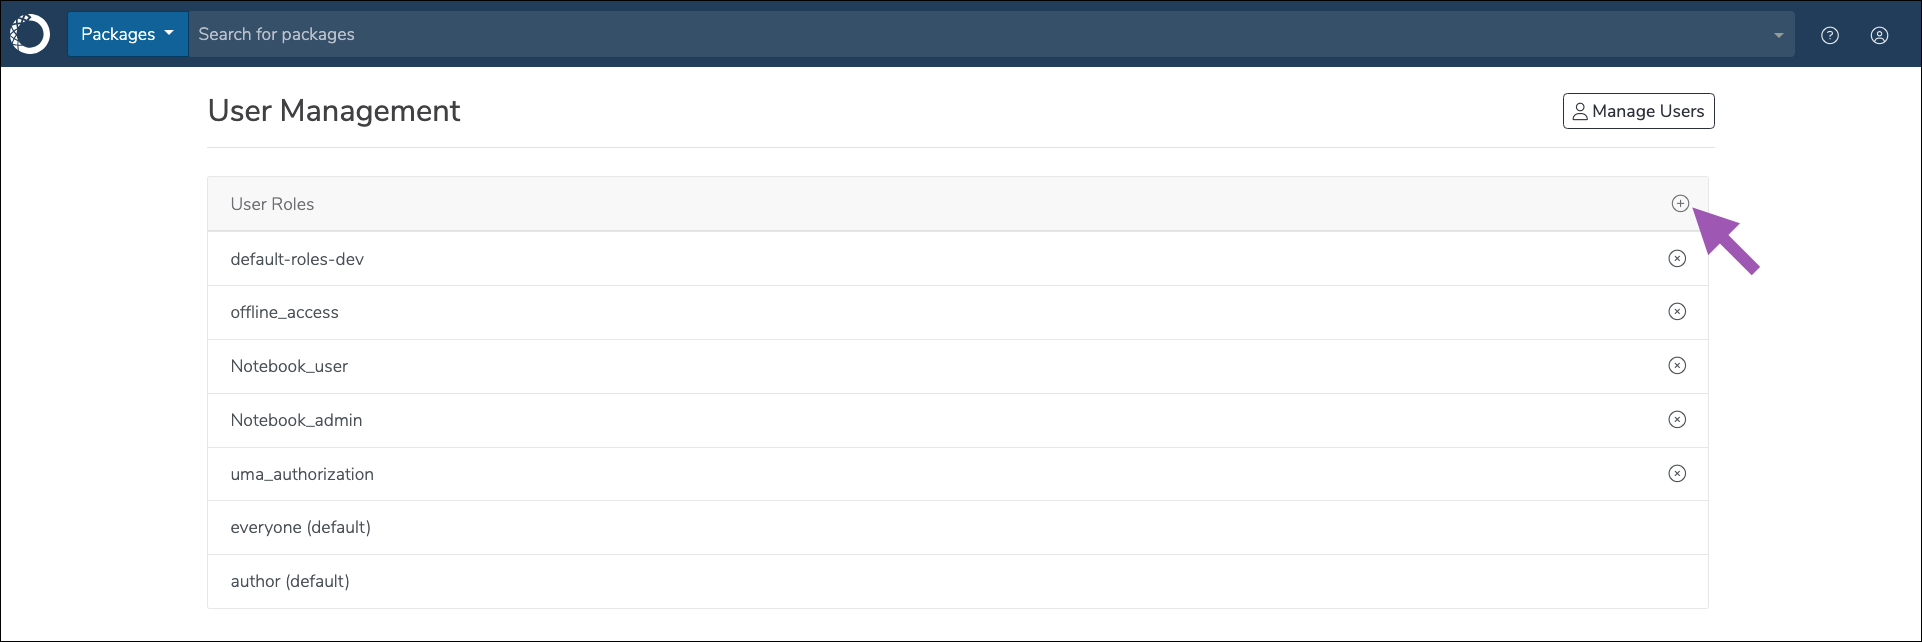
 3. Click the icon to the right of **User Roles**.
 4. Enter a unique name and set the permission levels for your custom role.
5. Click **Create**.
4. Enter a unique name and set the permission levels for your custom role.
5. Click **Create**.
 ### Editing role permissions
To edit your role permissions, complete the following steps:
1. Log in to Anaconda Server.
2. Navigate to the **User Management** page.
3. Select an existing role from the list.
4. Edit the role name and permissions as needed.
5. Click **Update**.
### Assigning a role to a user
To assign a role to a user, complete the following steps:
1. [Log in to the Keycloak administrative console](/docs/psm-on-prem/6.5.3/admin/keycloak_config/user_roles#accessing-the-keycloak-administrative-console).
2. Navigate to the dev realm.
3. Select **Users** from the left-hand navigation.
4. Select a user to assign roles to.
5. Select the **Role Mapping** tab.
6. Click **Assign role**.
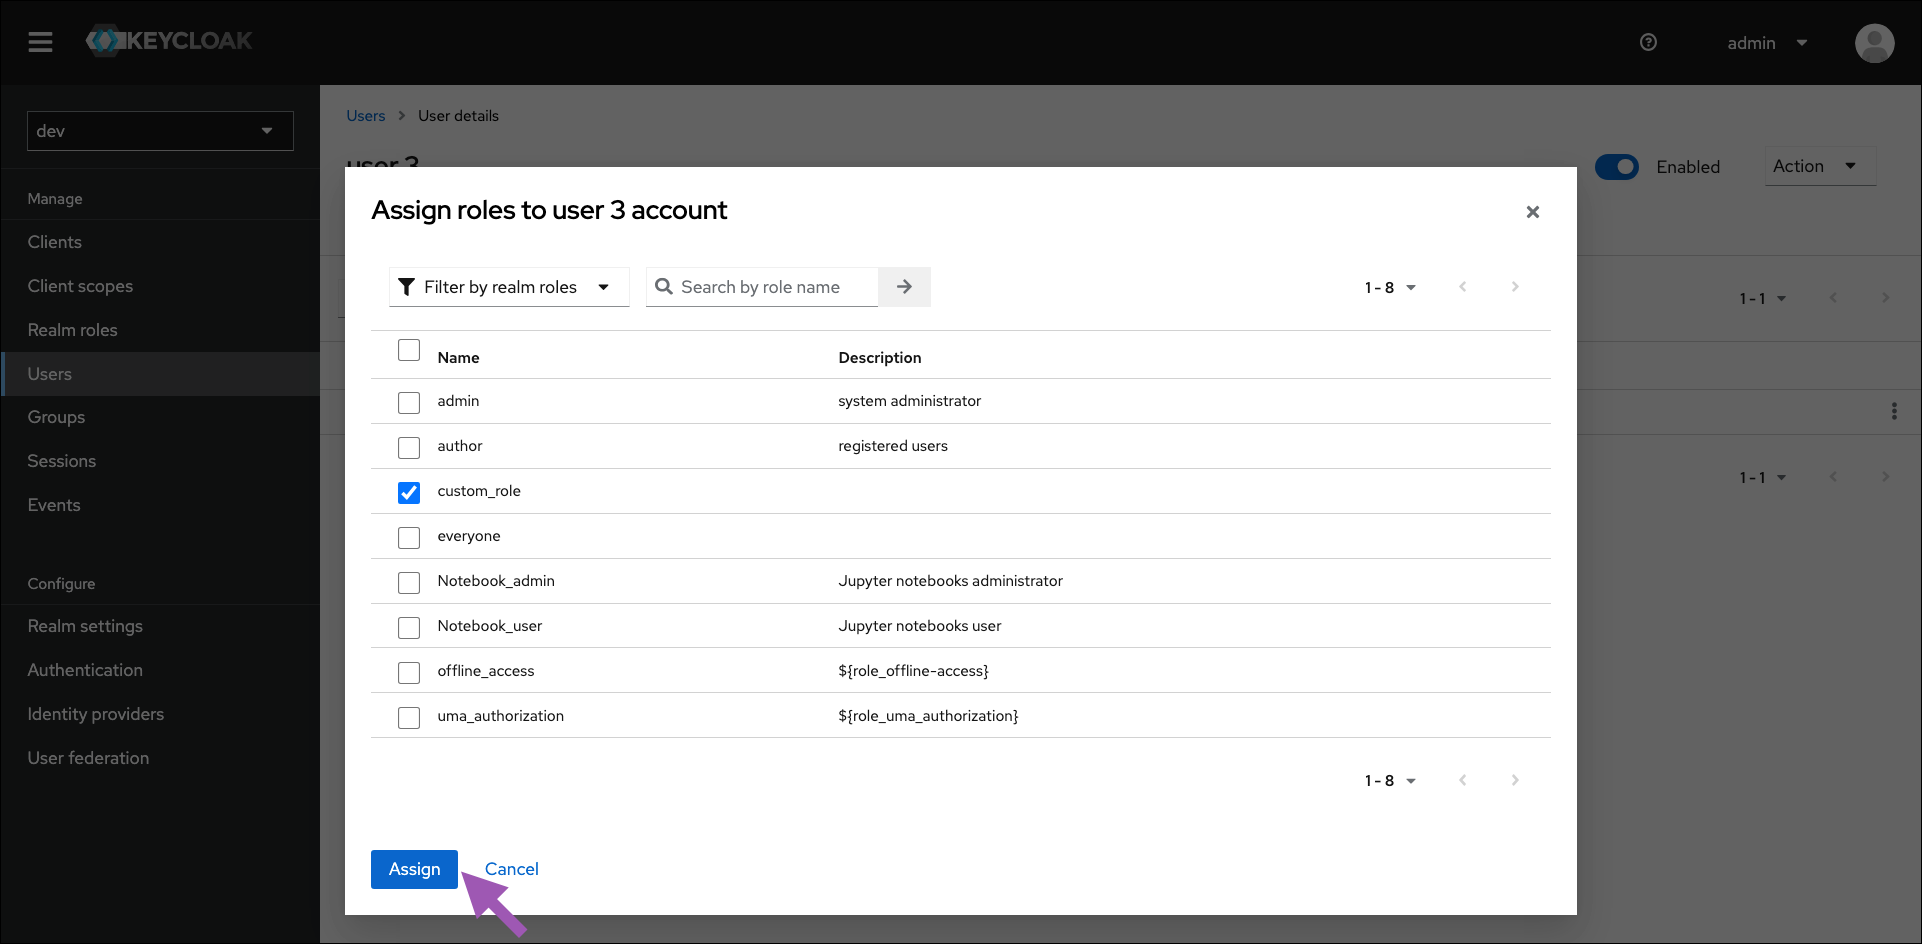
7. Select the roles you need to add to your user, then click **Assign**.
### Editing role permissions
To edit your role permissions, complete the following steps:
1. Log in to Anaconda Server.
2. Navigate to the **User Management** page.
3. Select an existing role from the list.
4. Edit the role name and permissions as needed.
5. Click **Update**.
### Assigning a role to a user
To assign a role to a user, complete the following steps:
1. [Log in to the Keycloak administrative console](/docs/psm-on-prem/6.5.3/admin/keycloak_config/user_roles#accessing-the-keycloak-administrative-console).
2. Navigate to the dev realm.
3. Select **Users** from the left-hand navigation.
4. Select a user to assign roles to.
5. Select the **Role Mapping** tab.
6. Click **Assign role**.
7. Select the roles you need to add to your user, then click **Assign**.
 ### Deleting a role
To delete a role, complete the following steps:
1. Log in to Anaconda Server.
2. Navigate to the **User Management** page.
3. Click the icon to the right of the role you want to delete.
### Deleting a role
To delete a role, complete the following steps:
1. Log in to Anaconda Server.
2. Navigate to the **User Management** page.
3. Click the icon to the right of the role you want to delete.
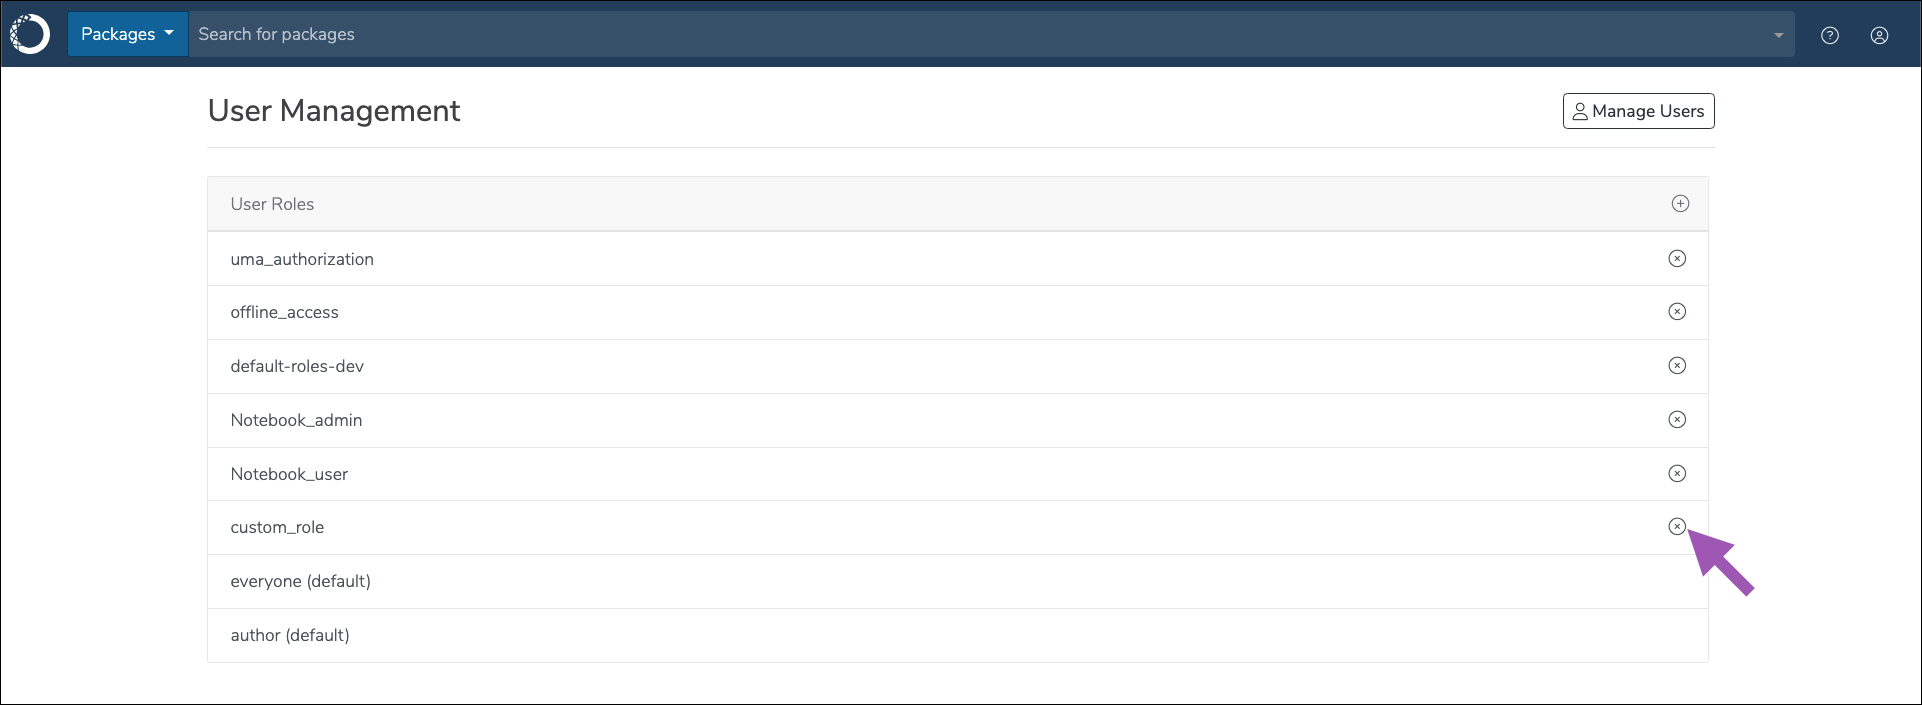 4. Click **Delete** to confirm that you want to delete the role.
### Composite roles
A composite role is built from other existing roles and provides the aggregated permissions of all the roles it’s composed of.
In the following example, we create a composite role that allows an admin user on the master realm to manage users on the dev realm. However, you can use this same process to create admin roles with restricted access to managing other things on the dev realm.
To create an admin role with restricted permissions, complete the following steps:
1. [Log in to the Keycloak administrative console](/docs/psm-on-prem/6.5.3/admin/keycloak_config/user_roles#accessing-the-keycloak-administrative-console).
2. Navigate to the master realm.
3. Select **Realm roles** from the left-hand navigation.
4. Click **Create Role**.
5. Enter a name for your role and provide a brief description of its intended use.
6. Click **Save**. More tabs appear.
4. Click **Delete** to confirm that you want to delete the role.
### Composite roles
A composite role is built from other existing roles and provides the aggregated permissions of all the roles it’s composed of.
In the following example, we create a composite role that allows an admin user on the master realm to manage users on the dev realm. However, you can use this same process to create admin roles with restricted access to managing other things on the dev realm.
To create an admin role with restricted permissions, complete the following steps:
1. [Log in to the Keycloak administrative console](/docs/psm-on-prem/6.5.3/admin/keycloak_config/user_roles#accessing-the-keycloak-administrative-console).
2. Navigate to the master realm.
3. Select **Realm roles** from the left-hand navigation.
4. Click **Create Role**.
5. Enter a name for your role and provide a brief description of its intended use.
6. Click **Save**. More tabs appear.
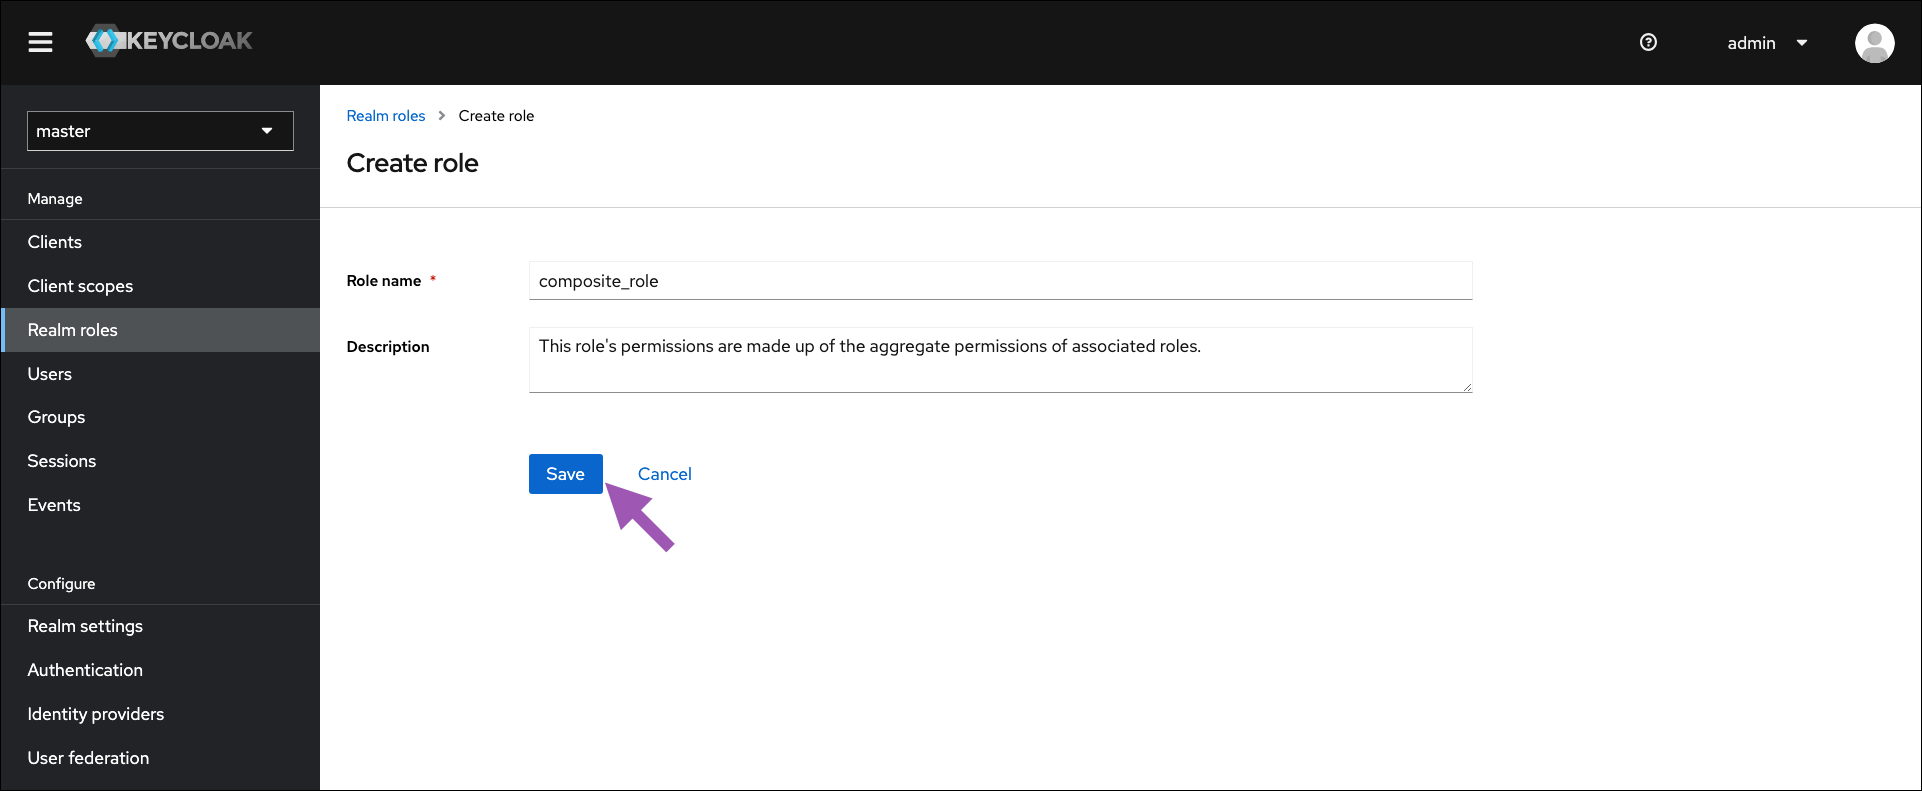 7. Open the **Action** dropdown menu and select **Add associated roles**.
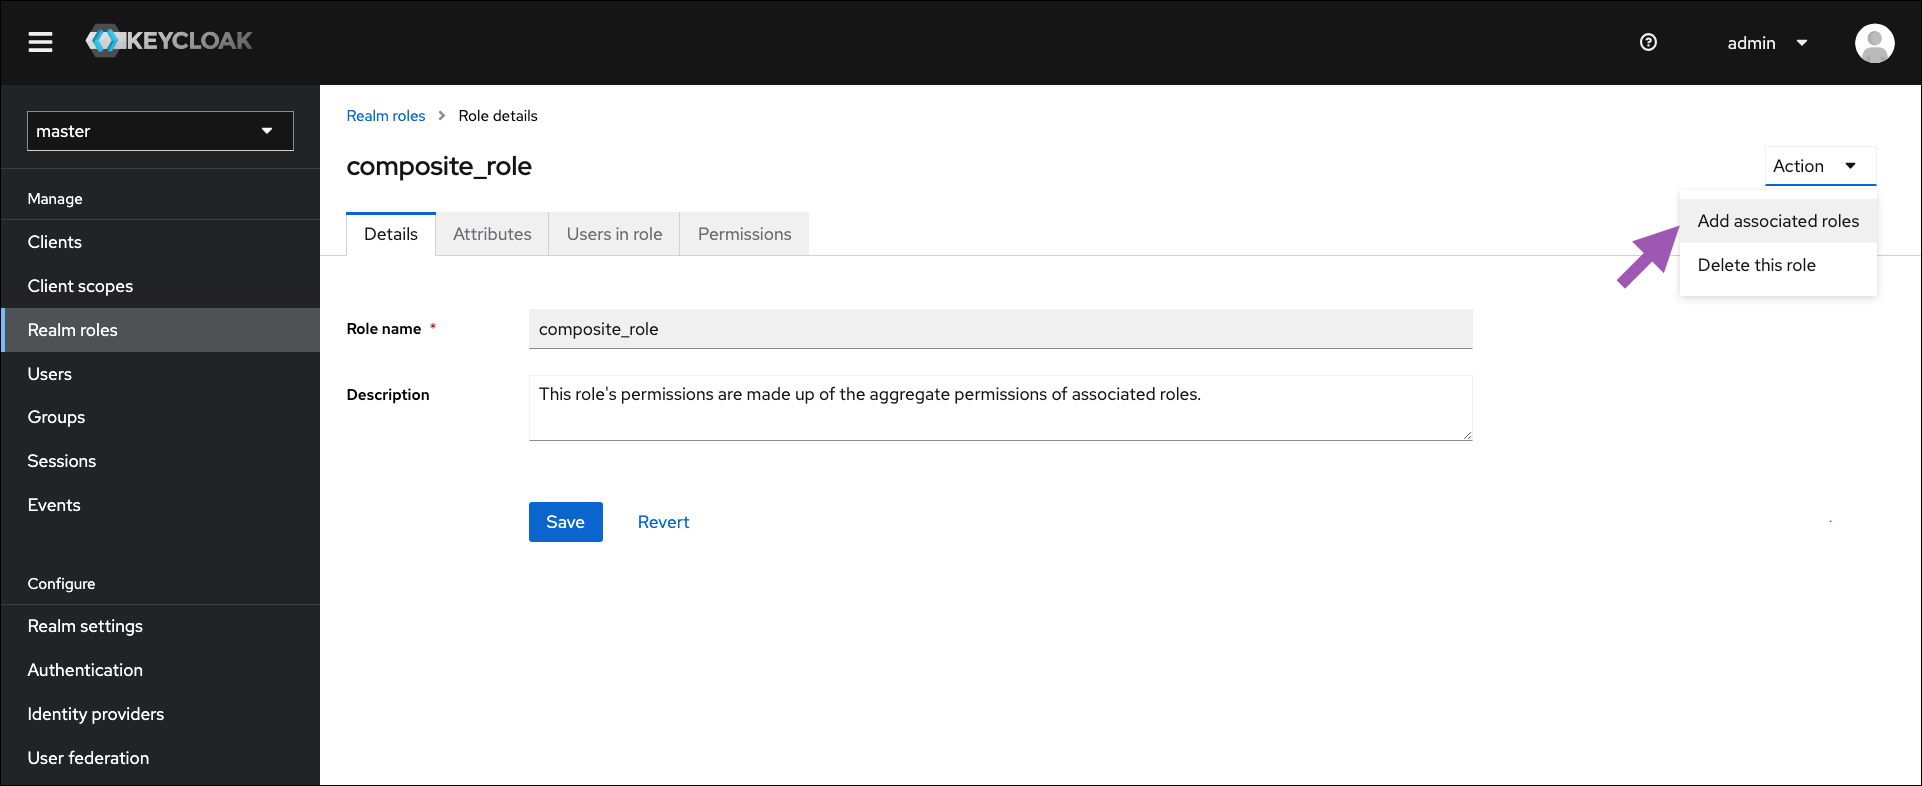 8. If necessary, open the filter dropdown menu and select **Filter by clients**.
To achieve the preferred result of creating an admin user that can only view and manage users on the dev realm, select the following available client roles:
* manage-users
* query-users
* view-users
9. Select available roles to associate their permissions with this composite role.
10. Click **Assign**.
### Setting/updating default roles
Default roles are permissions that are automatically applied to any newly created or imported user. Each realm has its own set of default roles that are applied to users created/imported on that realm. These are composite roles, and must be constructed of other existing roles.
To set the default roles, complete the following steps:
1. [Log in to the Keycloak administrative console](/docs/psm-on-prem/6.5.3/admin/keycloak_config/user_roles#accessing-the-keycloak-administrative-console).
2. Verify you are on the realm you need to set default roles for.
3. Select **Realm settings** from the left-hand navigation.
4. Select the **User registration** tab.
5. Click **Assign role**.
8. If necessary, open the filter dropdown menu and select **Filter by clients**.
To achieve the preferred result of creating an admin user that can only view and manage users on the dev realm, select the following available client roles:
* manage-users
* query-users
* view-users
9. Select available roles to associate their permissions with this composite role.
10. Click **Assign**.
### Setting/updating default roles
Default roles are permissions that are automatically applied to any newly created or imported user. Each realm has its own set of default roles that are applied to users created/imported on that realm. These are composite roles, and must be constructed of other existing roles.
To set the default roles, complete the following steps:
1. [Log in to the Keycloak administrative console](/docs/psm-on-prem/6.5.3/admin/keycloak_config/user_roles#accessing-the-keycloak-administrative-console).
2. Verify you are on the realm you need to set default roles for.
3. Select **Realm settings** from the left-hand navigation.
4. Select the **User registration** tab.
5. Click **Assign role**.
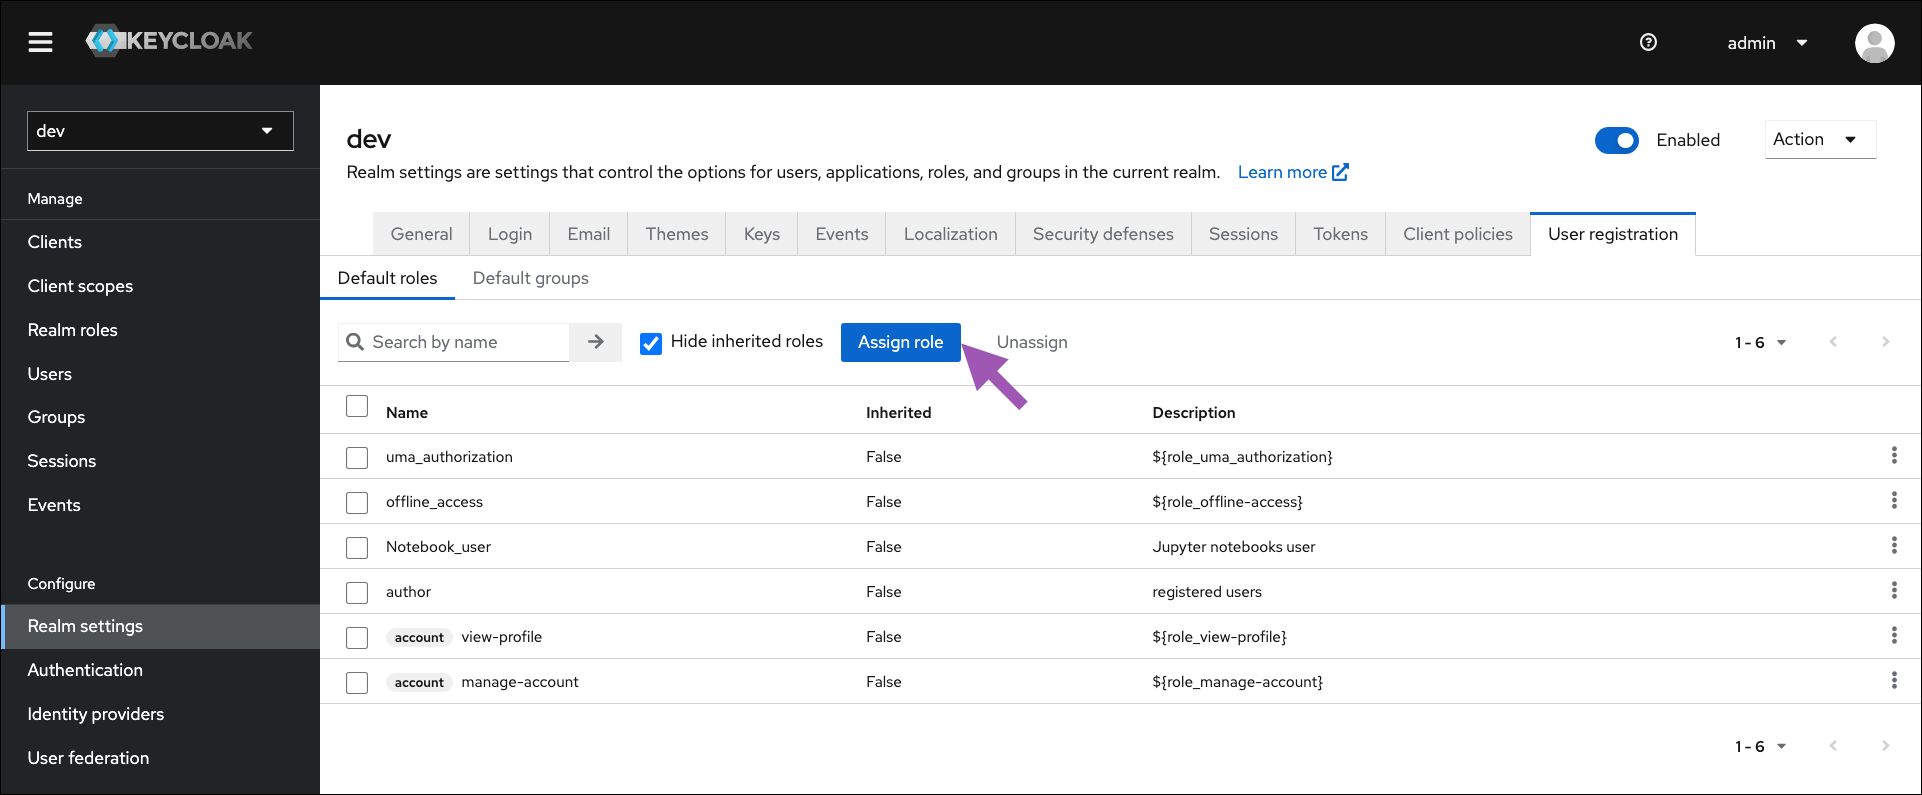 6. If necessary, open the filter dropdown menu and select **Filter by clients**.
7. Select available roles to assign to newly created or imported users.
8. Click **Assign**.
### Group roles
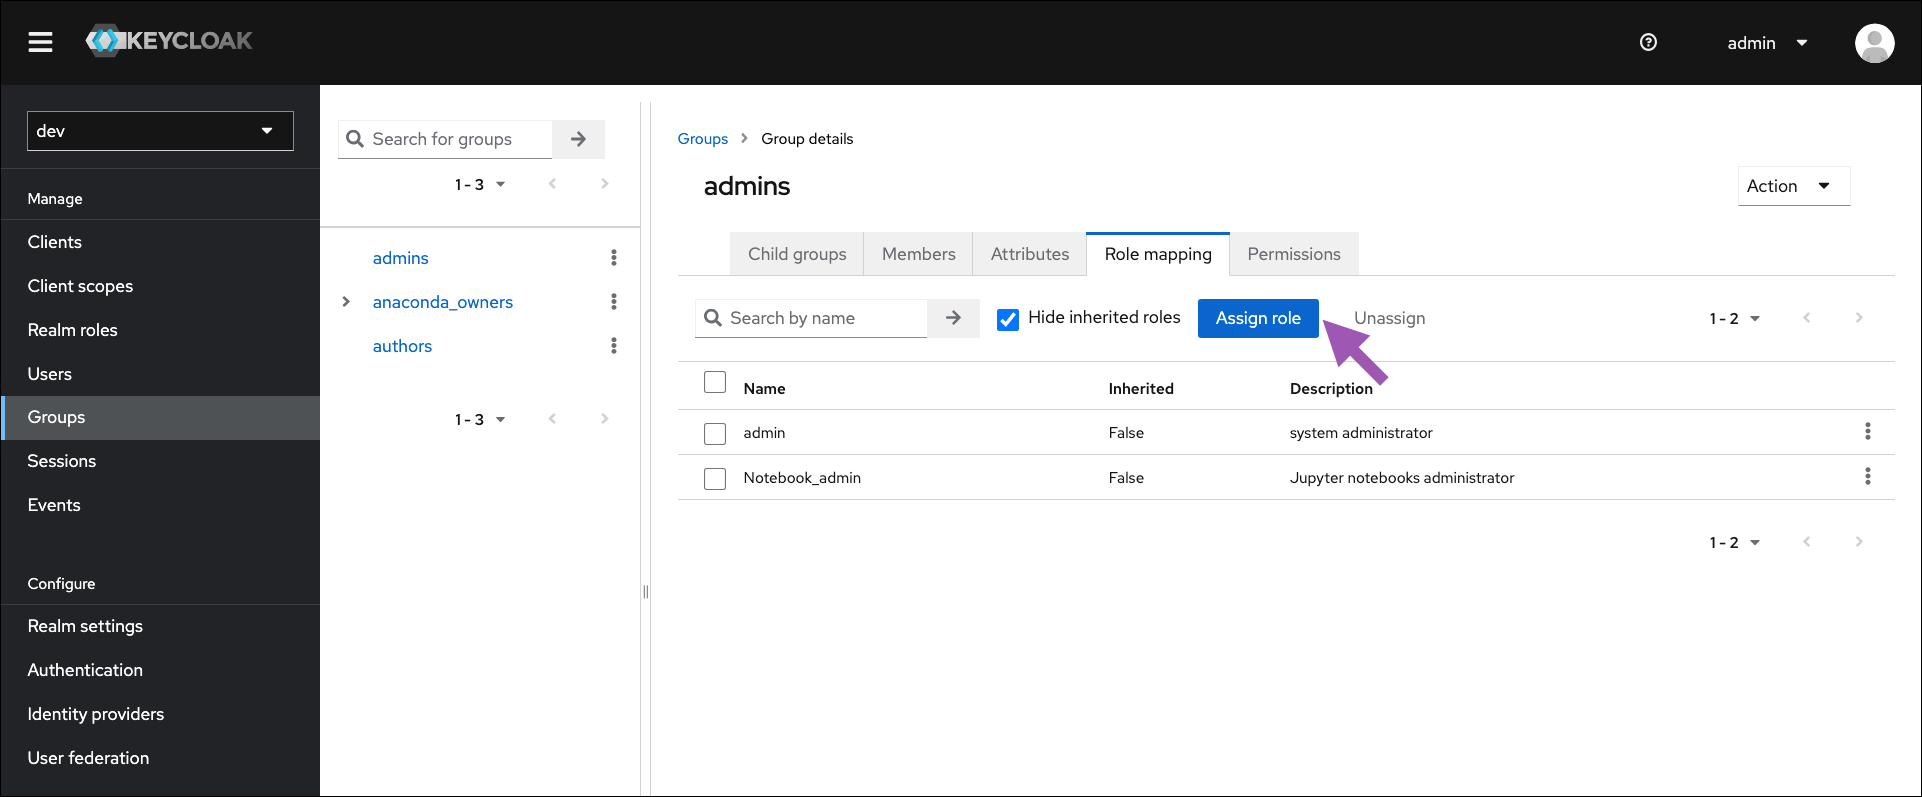
Any permissions that can be granted to an individual by assigning them a role can also be granted to multiple people by assigning the role to a group. This is exceptionally useful for Anaconda Server implementations that utilize an LDAP or Active Directory server.
To assign roles to a group, complete the following steps:
1. [Log in to the Keycloak administrative console](/docs/psm-on-prem/6.5.3/admin/keycloak_config/user_roles#accessing-the-keycloak-administrative-console).
2. Verify you are working in the dev realm.
3. Select **Groups** from the left-hand navigation.
4. Select the group you want to provide permissions to.
5. Select the **Role mapping** tab.
6. Click **Assign role**.
6. If necessary, open the filter dropdown menu and select **Filter by clients**.
7. Select available roles to assign to newly created or imported users.
8. Click **Assign**.
### Group roles
Any permissions that can be granted to an individual by assigning them a role can also be granted to multiple people by assigning the role to a group. This is exceptionally useful for Anaconda Server implementations that utilize an LDAP or Active Directory server.
To assign roles to a group, complete the following steps:
1. [Log in to the Keycloak administrative console](/docs/psm-on-prem/6.5.3/admin/keycloak_config/user_roles#accessing-the-keycloak-administrative-console).
2. Verify you are working in the dev realm.
3. Select **Groups** from the left-hand navigation.
4. Select the group you want to provide permissions to.
5. Select the **Role mapping** tab.
6. Click **Assign role**.
 7. If necessary, open the filter dropdown menu and select **Filter by clients**.
8. Select available roles to assign to newly created or imported users.
9. Click **Assign**.
### Setting/updating default groups
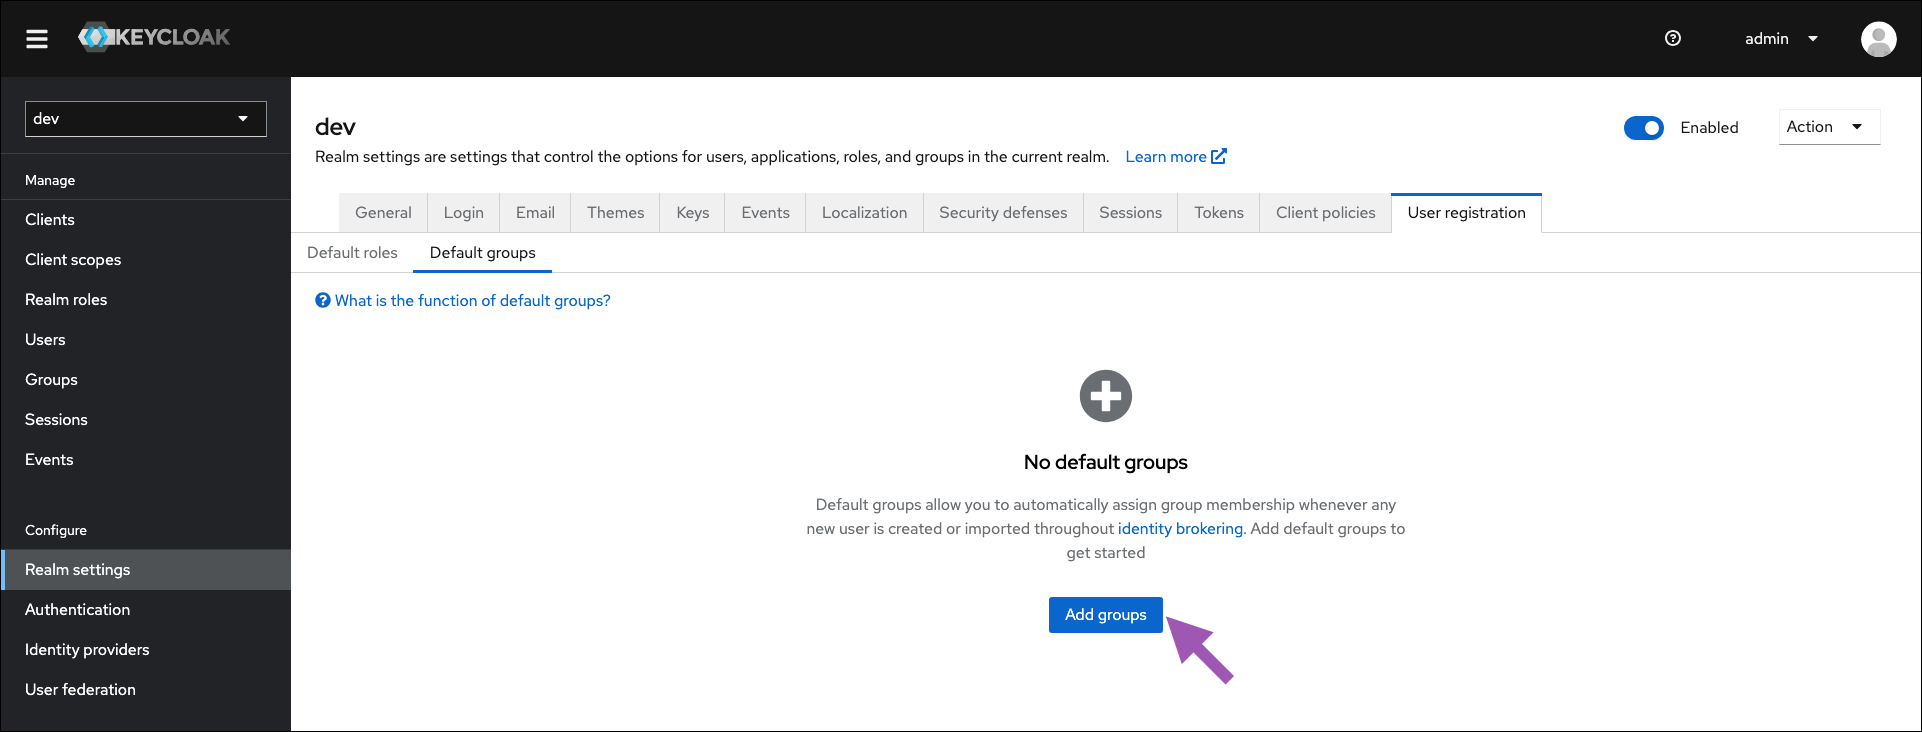
Setting default groups will automatically assign group membership to all newly created or imported users.
To set the default groups, complete the following steps:
1. [Log in to the Keycloak administrative console](/docs/psm-on-prem/6.5.3/admin/keycloak_config/user_roles#accessing-the-keycloak-administrative-console).
2. Verify you are in the dev realm.
3. Select **Realm settings** from the left-hand navigation.
4. Select the **User registration** tab.
5. Select the **Default groups** tab.
6. Click **Add groups**.
7. If necessary, open the filter dropdown menu and select **Filter by clients**.
8. Select available roles to assign to newly created or imported users.
9. Click **Assign**.
### Setting/updating default groups
Setting default groups will automatically assign group membership to all newly created or imported users.
To set the default groups, complete the following steps:
1. [Log in to the Keycloak administrative console](/docs/psm-on-prem/6.5.3/admin/keycloak_config/user_roles#accessing-the-keycloak-administrative-console).
2. Verify you are in the dev realm.
3. Select **Realm settings** from the left-hand navigation.
4. Select the **User registration** tab.
5. Select the **Default groups** tab.
6. Click **Add groups**.
 7. Select the groups you want to assigned as default.
8. Click **Add**.
7. Select the groups you want to assigned as default.
8. Click **Add**.