> ## Documentation Index
> Fetch the complete documentation index at: https://anaconda.com/docs/llms.txt
> Use this file to discover all available pages before exploring further.
# Establishing an LDAP connection
The Lightweight Directory Access Protocol (LDAP) is a standardized set of rules that governs how information is transmitted and handled between a directory server and other servers on a network. Directory servers are external storage that contains information about users’ identities. This could include their first and last name, email address, and employee ID number. Directory servers also often contain sensitive information, such as account passwords. For more information about LDAP, see the [official LDAP documentation](https://ldap.com/).
## Before you begin
Anaconda highly recommends you have knowledge of your LDAP server and organizational structure to complete this procedure. Configuring identity and access management is complex, and each enterprise has a unique LDAP directory structure.
While your implementation will be based on the specific structure and needs of your organization, the principals and processes described here will enable you to:
* Gather directory information about your LDAP server.
* Establish a connection to your LDAP server in Keycloak.
* Reduce the number of users that need to be mapped into Anaconda through the use of groups and roles.
* Reduce the number of groups that need to be mapped into Anaconda by filtering groups.
* Automate importing new groups for team memberships based on filters.
* Automate the provisioning of permissions to users based on group membership.
## Prerequisites
You must have credentials for the “bind user” service account to perform these tasks. If you do not have the proper credentials, get them from your LDAP Server Administrator.
## Gathering directory structure information
In order to configure Keycloak to validate credentials from your external LDAP server, you need to gather some information about your LDAP directory structure. You’ll use this information to link user attributes (object classes, email, user ID, password, and so on) for use in Anaconda.
While you cannot discern a complete picture of your LDAP directory structure from the bind user credentials, you can make some general assumptions about it based on them. For example, if the bind user distinguished name (DN) is:
```sh theme={null}
uid=binduser,cn=users,cn=accounts,dc=tools,dc=anaconda,dc=io
```
We can see the “root” or “base” of the directory tree is `dc=tools,dc=anaconda,dc=io`. From there we can discern the rest of the tree structure. In this example, we can see that the `uid` attribute is stored in the *users* folder, which is stored in the *accounts* folder.
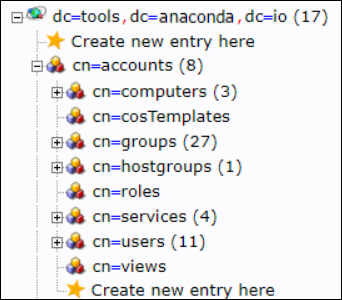
If you prefer, tools are available to help visualize, navigate, and update your organization’s LDAP directory server, such as [phpldapadmin](https://phpldapadmin.sourceforge.net/wiki/index.php/Download), which was used to generate the following view. This provides additional information about the LDAP structure that you can’t discern from just looking at the bind credentials, such as the location of *groups*, which is also stored in the *accounts* folder.
 Now that you better understand how to discern your LDAP directory structure, you are ready to use the `ldapsearch` tool, along with the bind user credentials, to learn details about an individual user based on their user ID. For more information about the `ldapsearch` tool, [see the official documentation](https://docs.ldap.com/ldap-sdk/docs/tool-usages/ldapsearch.html).
Gather the information you’ll need to configure user federation within Keycloak by running the following command against a known user ID:
```sh theme={null}
# Replace with your bind user address
# Replace with the address of your LDAP server
# Replace with the root of your LDAP server
# Replace with the ID of a user on your LDAP sever
ldapsearch -D '' -W -H -b "()"
```
Following the example for the bind user DN, to find information about user `User1` the command would look like this:
```sh theme={null}
ldapsearch -D 'uid=binduser,cn=users,cn=accounts,dc=tools,dc=anaconda,dc=io' -W -H ldap://ipa.tools.anaconda.io -b dc=tools,dc=anaconda,dc=io "(uid=User1)"
```
The return from the command looks like this:
```sh expandable theme={null}
# User1, users, compat, tools.anaconda.io
dn: uid=User1,cn=users,cn=compat,dc=tools,dc=anaconda,dc=io
objectClass: posixAccount
objectClass: ipaOverrideTarget
objectClass: top
gecos: User1
cn: User1
uidNumber: 1666600031
gidNumber: 1666600031
loginShell: /bin/sh
homeDirectory: /home/User1
ipaAnchorUUID:: OklQQTp0b29scy5jb250aW51dW0uaW86OTEyYTMwNjgtZDhmYy0xMWU4LTgzYTUtMTIyYTE3YWNlMzJh
uid: User1
# User1, users, accounts, tools.anaconda.io
dn: uid=User1,cn=users,cn=accounts,dc=tools,dc=anaconda,dc=io
displayName: User1
uid: User1
krbCanonicalName: [[email protected]](/cdn-cgi/l/email-protection)
objectClass: top
objectClass: person
objectClass: organizationalperson
objectClass: inetorgperson
objectClass: inetuser
objectClass: posixaccount
objectClass: krbprincipalaux
objectClass: krbticketpolicyaux
objectClass: ipaobject
objectClass: ipasshuser
objectClass: ipaSshGroupOfPubKeys
objectClass: mepOriginEntry
loginShell: /bin/sh
initials: U1
gecos: User1
sn: LastName
homeDirectory: /home/User1
mail: [[email protected]](/cdn-cgi/l/email-protection)
krbPrincipalName: [[email protected]](/cdn-cgi/l/email-protection)
givenName: User1
cn: User1
ipaUniqueID: 912a3068-d8fc-11e8-83a5-122a17ace32a
uidNumber: 1666600031
gidNumber: 1666600031
krbPasswordExpiration: 20181026085310Z
krbLastPwdChange: 20181026085310Z
memberOf: cn=ipausers,cn=groups,cn=accounts,dc=tools,dc=anaconda,dc=io
memberOf: cn=grp-anaconda-data-scientist,cn=groups,cn=accounts,dc=tools,dc=anaconda,dc=io
memberOf: cn=grp-anaconda-users,cn=groups,cn=accounts,dc=tools,dc=anaconda,dc=io
memberOf: cn=grp-finance,cn=groups,cn=accounts,dc=tools,dc=anaconda,dc=io
# search result
search: 2
result: 0 Success
# numResponses: 3
# numEntries: 2
```
Remember, the information you need to configure Keycloak to authenticate your users can be found in these results. Save this information and keep it somewhere accessible for reference.
## Setting up LDAP user federation
Now that you have gathered information about your directory, you need to tell Keycloak how to interpret that information, so it can use it with Anaconda software.
These attributes can be remapped later, if necessary.
1. Log in to your Keycloak console using an account that has administrator privileges.
2. Select **User federation** from the left-hand navigation menu.
3. Select **ldap** from the **Add provider…** dropdown menu.
Let’s take a look at the Add LDAP provider page. Keep in mind that entries shown here are in alignment with the example provided above.
Now that you better understand how to discern your LDAP directory structure, you are ready to use the `ldapsearch` tool, along with the bind user credentials, to learn details about an individual user based on their user ID. For more information about the `ldapsearch` tool, [see the official documentation](https://docs.ldap.com/ldap-sdk/docs/tool-usages/ldapsearch.html).
Gather the information you’ll need to configure user federation within Keycloak by running the following command against a known user ID:
```sh theme={null}
# Replace with your bind user address
# Replace with the address of your LDAP server
# Replace with the root of your LDAP server
# Replace with the ID of a user on your LDAP sever
ldapsearch -D '' -W -H -b "()"
```
Following the example for the bind user DN, to find information about user `User1` the command would look like this:
```sh theme={null}
ldapsearch -D 'uid=binduser,cn=users,cn=accounts,dc=tools,dc=anaconda,dc=io' -W -H ldap://ipa.tools.anaconda.io -b dc=tools,dc=anaconda,dc=io "(uid=User1)"
```
The return from the command looks like this:
```sh expandable theme={null}
# User1, users, compat, tools.anaconda.io
dn: uid=User1,cn=users,cn=compat,dc=tools,dc=anaconda,dc=io
objectClass: posixAccount
objectClass: ipaOverrideTarget
objectClass: top
gecos: User1
cn: User1
uidNumber: 1666600031
gidNumber: 1666600031
loginShell: /bin/sh
homeDirectory: /home/User1
ipaAnchorUUID:: OklQQTp0b29scy5jb250aW51dW0uaW86OTEyYTMwNjgtZDhmYy0xMWU4LTgzYTUtMTIyYTE3YWNlMzJh
uid: User1
# User1, users, accounts, tools.anaconda.io
dn: uid=User1,cn=users,cn=accounts,dc=tools,dc=anaconda,dc=io
displayName: User1
uid: User1
krbCanonicalName: [[email protected]](/cdn-cgi/l/email-protection)
objectClass: top
objectClass: person
objectClass: organizationalperson
objectClass: inetorgperson
objectClass: inetuser
objectClass: posixaccount
objectClass: krbprincipalaux
objectClass: krbticketpolicyaux
objectClass: ipaobject
objectClass: ipasshuser
objectClass: ipaSshGroupOfPubKeys
objectClass: mepOriginEntry
loginShell: /bin/sh
initials: U1
gecos: User1
sn: LastName
homeDirectory: /home/User1
mail: [[email protected]](/cdn-cgi/l/email-protection)
krbPrincipalName: [[email protected]](/cdn-cgi/l/email-protection)
givenName: User1
cn: User1
ipaUniqueID: 912a3068-d8fc-11e8-83a5-122a17ace32a
uidNumber: 1666600031
gidNumber: 1666600031
krbPasswordExpiration: 20181026085310Z
krbLastPwdChange: 20181026085310Z
memberOf: cn=ipausers,cn=groups,cn=accounts,dc=tools,dc=anaconda,dc=io
memberOf: cn=grp-anaconda-data-scientist,cn=groups,cn=accounts,dc=tools,dc=anaconda,dc=io
memberOf: cn=grp-anaconda-users,cn=groups,cn=accounts,dc=tools,dc=anaconda,dc=io
memberOf: cn=grp-finance,cn=groups,cn=accounts,dc=tools,dc=anaconda,dc=io
# search result
search: 2
result: 0 Success
# numResponses: 3
# numEntries: 2
```
Remember, the information you need to configure Keycloak to authenticate your users can be found in these results. Save this information and keep it somewhere accessible for reference.
## Setting up LDAP user federation
Now that you have gathered information about your directory, you need to tell Keycloak how to interpret that information, so it can use it with Anaconda software.
These attributes can be remapped later, if necessary.
1. Log in to your Keycloak console using an account that has administrator privileges.
2. Select **User federation** from the left-hand navigation menu.
3. Select **ldap** from the **Add provider…** dropdown menu.
Let’s take a look at the Add LDAP provider page. Keep in mind that entries shown here are in alignment with the example provided above.
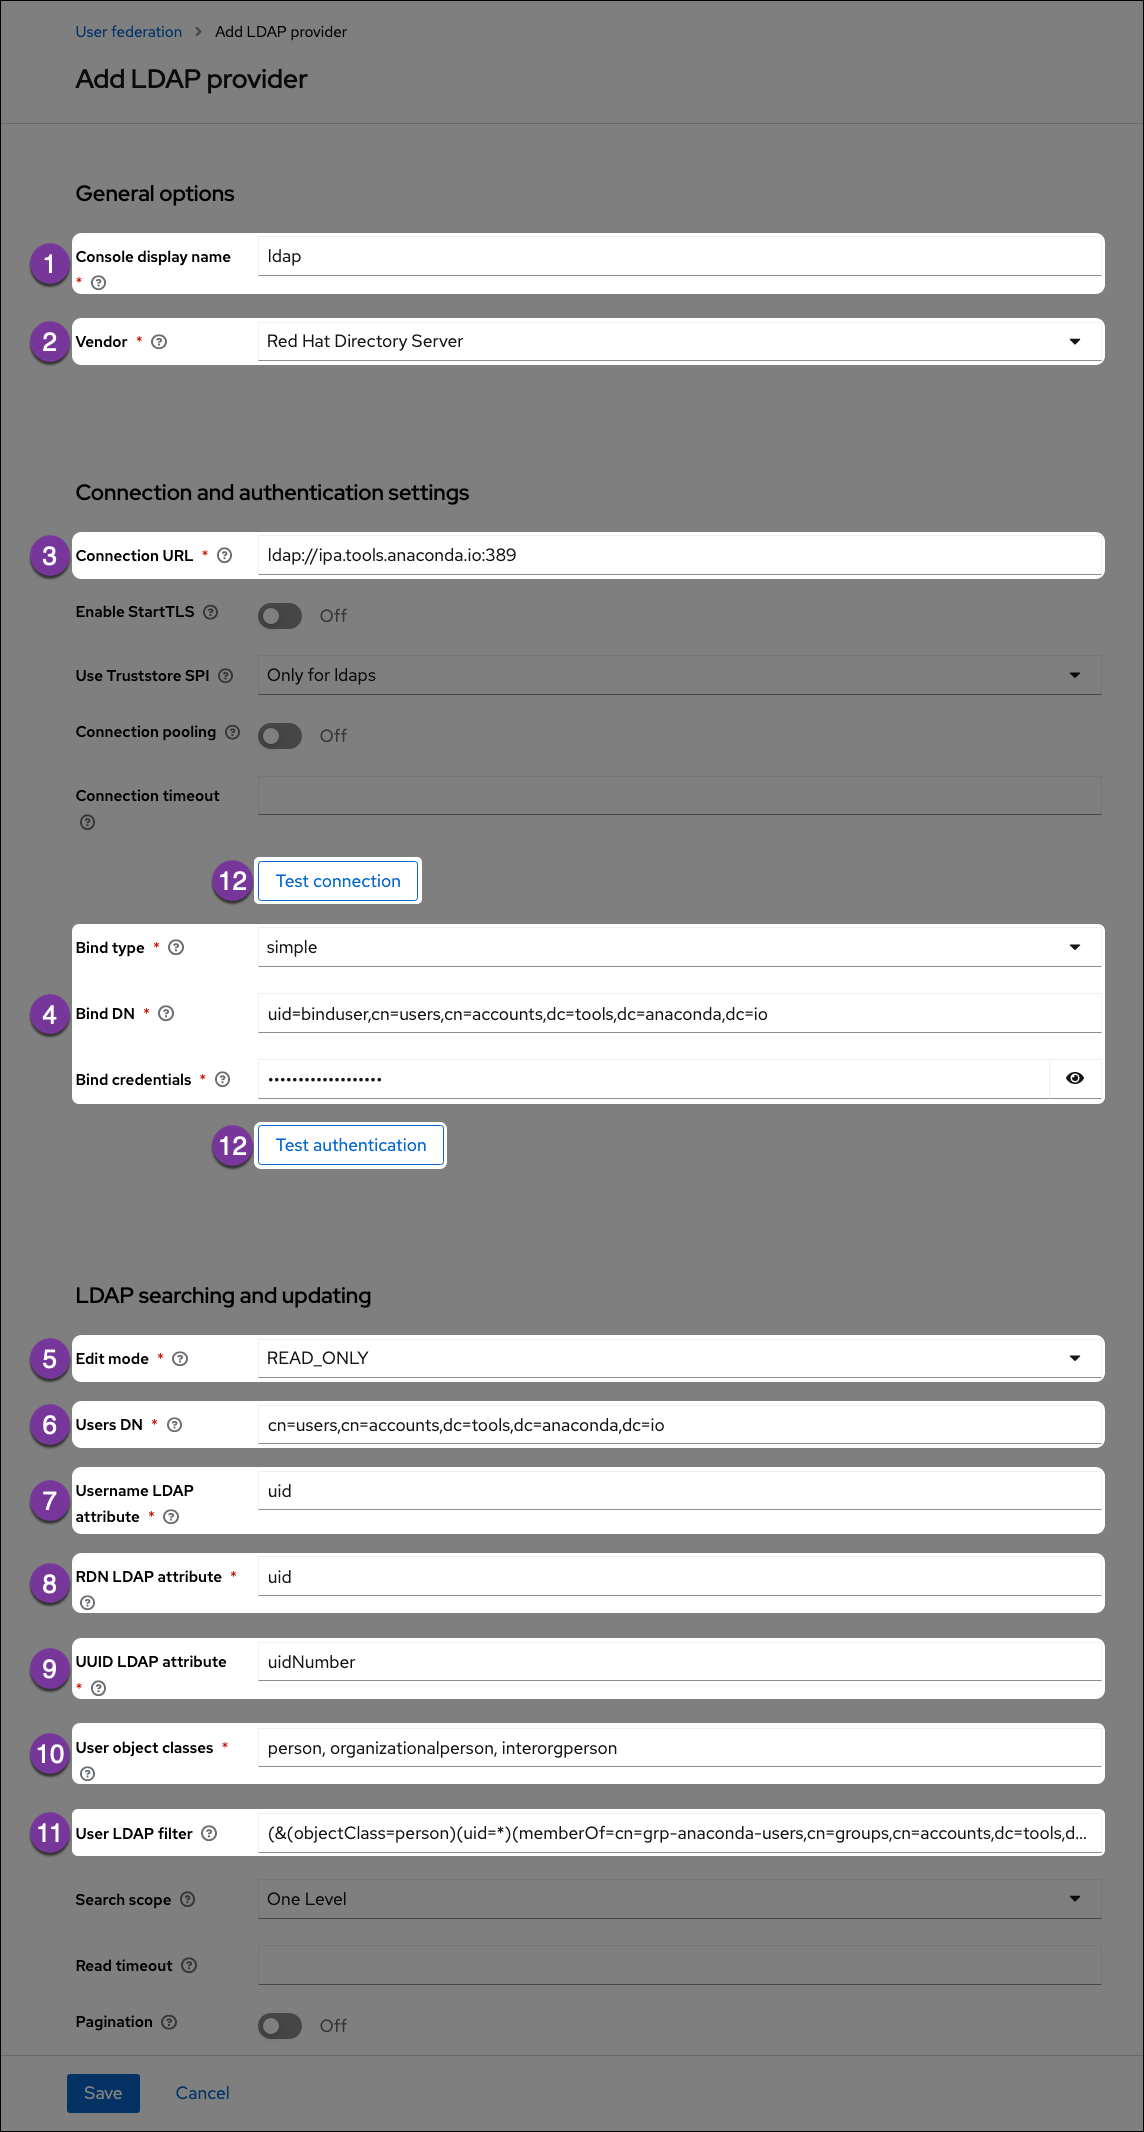 Enter a name for Keycloak to display for the LDAP server.
Select your LDAP server vendor from the dropdown menu. If you do not know your vendor, ask your LDAP server administrator.
Enter the LDAP server URL here.
Enter the bind user information here.
Set the edit mode to `READ_ONLY` so you can view and import user information but not have to worry about making unwanted changes to your LDAP server.
Enter the LDAP directory location for your users here.
Get this information from your `ldapsearch` return. This attribute determines what is displayed as your user’s name when they sign into Anaconda. In this example, the username attribute is `uid`.
Usernames cannot be all numeric values. All numeric usernames are indistinguishable from UUID’s and will break managed persistence if implemented.
Get this information from your `ldapsearch` return. Usually, the relative distinguished name (RDN) attribute is the same as the username attribute, but this field may default to something else depending on your vendor.
Get this information from your `ldapsearch` return. Your users’ unique identifiers (UUID).
Get this information from your `ldapsearch` return. Generally, the user object classes field will have more than one entry, separated by a comma.
The user LDAP filter restricts which users are returned from your LDAP directory. In the example, we only want users with the attribute `objectClass=person` that also have a `uid` and are in the group `cn=grp-anaconda-users`.
Because users must explicitly be added to the group, unauthorized access is prevented, and license management is simplified.
Filters also limit the need to synchronize a large number of objects from LDAP, which will help prevent out-of-memory errors in the auth pod.
Avoid the temptation to add new groups into the Custom User LDAP Filter! `ldapsearch` utilizes regular expressions and is notorious for its complexity. If implemented incorrectly, a custom filter could cause all users to have their access suspended or be functionally disabled.
Use the **Test connection** and **Test authentication** buttons to verify that Anaconda can connect to the provider with the credentials provided. You’ll need to resolve any errors before continuing.
This is a good method for making sure your certifications are in the correct place if you are using LDAPS.
By default, users will not be synced from LDAP until they log in. To test whether the custom user LDAP Filter is working correctly, add or remove users in LDAP, then enable the sync settings to see if your changes are picked up and user authentication works as expected.
After you save your configurations, your LDAP server can be viewed on the **User Federation** page.
If you are using LDAPS, you must also [complete the steps provided here](/docs/psm-on-prem/6.5.2/admin/keycloak_config/ldap_setup).
Once you’ve saved your changes, you can navigate to **Users** in the left-hand navigation, then select **View all users** to verify that your users’ information was imported correctly.
## Configuring group mappers
Once user federation is established, you can set up a *group mapper* for Keycloak to import your LDAP server’s groups automatically for you. Once again, use the `ldapsearch` tool to gather information about your LDAP directory, only this time, look for information pertaining to your organization’s groups.
To gather information about groups in your LDAP directory, run the following command against a known group DN:
```sh theme={null}
# Replace with your bind user address
# Replace with the address of your LDAP server
# Replace with the root of your LDAP server
# Replace with the group's distinguished name
ldapsearch -D '' -W -H -b "()"
```
Following with the earlier example, the command looks like this:
```sh theme={null}
ldapsearch -D 'uid=binduser,cn=users,cn=accounts,dc=tools,dc=anaconda,dc=io' -W -H ldap://ipa.tools.anaconda.io -b dc=tools,dc=anaconda,dc=io "(cn=grp-anaconda-users)"
```
The return from the command looks like this:
```sh expandable theme={null}
# grp-anaconda-users, groups, compat, tools.anaconda.io
dn: cn=grp-anaconda-users,cn=groups,cn=compat,dc=tools,dc=anaconda,dc=io
objectClass: posixGroup
objectClass: ipaOverrideTarget
objectClass: ipaexternalgroup
objectClass: top
gidNumber: 1666600026
memberUid: User1
memberUid: User2
memberUid: User3
memberUid: User4
memberUid: User5
memberUid: User6
memberUid: User7
memberUid: User8
memberUid: User9
ipaAnchorUUID:: OklQQTp0b29scy5jb250aW51dW0uaW86NGFhOTQ4NzYtZDg4YS0xMWU4LWE2ZD
ctMTIyYTE3YWNlMzJh
cn: grp-anaconda-users
# grp-anaconda-users, groups, accounts, tools.anaconda.io
dn: cn=grp-anaconda-users,cn=groups,cn=accounts,dc=tools,dc=anaconda,dc=io
objectClass: top
objectClass: groupofnames
objectClass: nestedgroup
objectClass: ipausergroup
objectClass: ipaobject
objectClass: posixgroup
cn: grp-anaconda-users
ipaUniqueID: 4aa94876-d88a-11e8-a6d7-122a17ace32a
gidNumber: 1666600026
member: uid=User1,cn=users,cn=accounts,dc=tools,dc=anaconda,dc=io
member: uid=User2,cn=users,cn=accounts,dc=tools,dc=anaconda,dc=io
member: uid=User3,cn=users,cn=accounts,dc=tools,dc=anaconda,dc=io
member: uid=User4,cn=users,cn=accounts,dc=tools,dc=anaconda,dc=io
member: uid=User5,cn=users,cn=accounts,dc=tools,dc=anaconda,dc=io
member: uid=User6,cn=users,cn=accounts,dc=tools,dc=anaconda,dc=io
member: uid=User7,cn=users,cn=accounts,dc=tools,dc=anaconda,dc=io
member: uid=User8,cn=users,cn=accounts,dc=tools,dc=anaconda,dc=io
member: uid=User9,cn=users,cn=accounts,dc=tools,dc=anaconda,dc=io
# search result
search: 2
result: 0 Success
# numResponses: 3
# numEntries: 2
```
Remember, the information you need to create a group mapper can be found in these results. Save this information and keep it somewhere accessible for reference.
Return to Keycloak and complete the following steps:
1. Select **User Federation** from the left-hand navigation menu.
2. Select your LDAP server.
3. Click the **Mappers** tab.
4. Click **Create** or **Add mapper**.
5. Enter a name for your group mapper, such as *ldap\_group\_mapper*.
6. Select **group-ldap-mapper** from the **Mapper Type** dropdown menu. More options appear based on your dropdown selection.
Let’s take a look at the Create new mapper page. Keep in mind that entries shown here are in alignment with the example provided above.
Enter a name for Keycloak to display for the LDAP server.
Select your LDAP server vendor from the dropdown menu. If you do not know your vendor, ask your LDAP server administrator.
Enter the LDAP server URL here.
Enter the bind user information here.
Set the edit mode to `READ_ONLY` so you can view and import user information but not have to worry about making unwanted changes to your LDAP server.
Enter the LDAP directory location for your users here.
Get this information from your `ldapsearch` return. This attribute determines what is displayed as your user’s name when they sign into Anaconda. In this example, the username attribute is `uid`.
Usernames cannot be all numeric values. All numeric usernames are indistinguishable from UUID’s and will break managed persistence if implemented.
Get this information from your `ldapsearch` return. Usually, the relative distinguished name (RDN) attribute is the same as the username attribute, but this field may default to something else depending on your vendor.
Get this information from your `ldapsearch` return. Your users’ unique identifiers (UUID).
Get this information from your `ldapsearch` return. Generally, the user object classes field will have more than one entry, separated by a comma.
The user LDAP filter restricts which users are returned from your LDAP directory. In the example, we only want users with the attribute `objectClass=person` that also have a `uid` and are in the group `cn=grp-anaconda-users`.
Because users must explicitly be added to the group, unauthorized access is prevented, and license management is simplified.
Filters also limit the need to synchronize a large number of objects from LDAP, which will help prevent out-of-memory errors in the auth pod.
Avoid the temptation to add new groups into the Custom User LDAP Filter! `ldapsearch` utilizes regular expressions and is notorious for its complexity. If implemented incorrectly, a custom filter could cause all users to have their access suspended or be functionally disabled.
Use the **Test connection** and **Test authentication** buttons to verify that Anaconda can connect to the provider with the credentials provided. You’ll need to resolve any errors before continuing.
This is a good method for making sure your certifications are in the correct place if you are using LDAPS.
By default, users will not be synced from LDAP until they log in. To test whether the custom user LDAP Filter is working correctly, add or remove users in LDAP, then enable the sync settings to see if your changes are picked up and user authentication works as expected.
After you save your configurations, your LDAP server can be viewed on the **User Federation** page.
If you are using LDAPS, you must also [complete the steps provided here](/docs/psm-on-prem/6.5.2/admin/keycloak_config/ldap_setup).
Once you’ve saved your changes, you can navigate to **Users** in the left-hand navigation, then select **View all users** to verify that your users’ information was imported correctly.
## Configuring group mappers
Once user federation is established, you can set up a *group mapper* for Keycloak to import your LDAP server’s groups automatically for you. Once again, use the `ldapsearch` tool to gather information about your LDAP directory, only this time, look for information pertaining to your organization’s groups.
To gather information about groups in your LDAP directory, run the following command against a known group DN:
```sh theme={null}
# Replace with your bind user address
# Replace with the address of your LDAP server
# Replace with the root of your LDAP server
# Replace with the group's distinguished name
ldapsearch -D '' -W -H -b "()"
```
Following with the earlier example, the command looks like this:
```sh theme={null}
ldapsearch -D 'uid=binduser,cn=users,cn=accounts,dc=tools,dc=anaconda,dc=io' -W -H ldap://ipa.tools.anaconda.io -b dc=tools,dc=anaconda,dc=io "(cn=grp-anaconda-users)"
```
The return from the command looks like this:
```sh expandable theme={null}
# grp-anaconda-users, groups, compat, tools.anaconda.io
dn: cn=grp-anaconda-users,cn=groups,cn=compat,dc=tools,dc=anaconda,dc=io
objectClass: posixGroup
objectClass: ipaOverrideTarget
objectClass: ipaexternalgroup
objectClass: top
gidNumber: 1666600026
memberUid: User1
memberUid: User2
memberUid: User3
memberUid: User4
memberUid: User5
memberUid: User6
memberUid: User7
memberUid: User8
memberUid: User9
ipaAnchorUUID:: OklQQTp0b29scy5jb250aW51dW0uaW86NGFhOTQ4NzYtZDg4YS0xMWU4LWE2ZD
ctMTIyYTE3YWNlMzJh
cn: grp-anaconda-users
# grp-anaconda-users, groups, accounts, tools.anaconda.io
dn: cn=grp-anaconda-users,cn=groups,cn=accounts,dc=tools,dc=anaconda,dc=io
objectClass: top
objectClass: groupofnames
objectClass: nestedgroup
objectClass: ipausergroup
objectClass: ipaobject
objectClass: posixgroup
cn: grp-anaconda-users
ipaUniqueID: 4aa94876-d88a-11e8-a6d7-122a17ace32a
gidNumber: 1666600026
member: uid=User1,cn=users,cn=accounts,dc=tools,dc=anaconda,dc=io
member: uid=User2,cn=users,cn=accounts,dc=tools,dc=anaconda,dc=io
member: uid=User3,cn=users,cn=accounts,dc=tools,dc=anaconda,dc=io
member: uid=User4,cn=users,cn=accounts,dc=tools,dc=anaconda,dc=io
member: uid=User5,cn=users,cn=accounts,dc=tools,dc=anaconda,dc=io
member: uid=User6,cn=users,cn=accounts,dc=tools,dc=anaconda,dc=io
member: uid=User7,cn=users,cn=accounts,dc=tools,dc=anaconda,dc=io
member: uid=User8,cn=users,cn=accounts,dc=tools,dc=anaconda,dc=io
member: uid=User9,cn=users,cn=accounts,dc=tools,dc=anaconda,dc=io
# search result
search: 2
result: 0 Success
# numResponses: 3
# numEntries: 2
```
Remember, the information you need to create a group mapper can be found in these results. Save this information and keep it somewhere accessible for reference.
Return to Keycloak and complete the following steps:
1. Select **User Federation** from the left-hand navigation menu.
2. Select your LDAP server.
3. Click the **Mappers** tab.
4. Click **Create** or **Add mapper**.
5. Enter a name for your group mapper, such as *ldap\_group\_mapper*.
6. Select **group-ldap-mapper** from the **Mapper Type** dropdown menu. More options appear based on your dropdown selection.
Let’s take a look at the Create new mapper page. Keep in mind that entries shown here are in alignment with the example provided above.
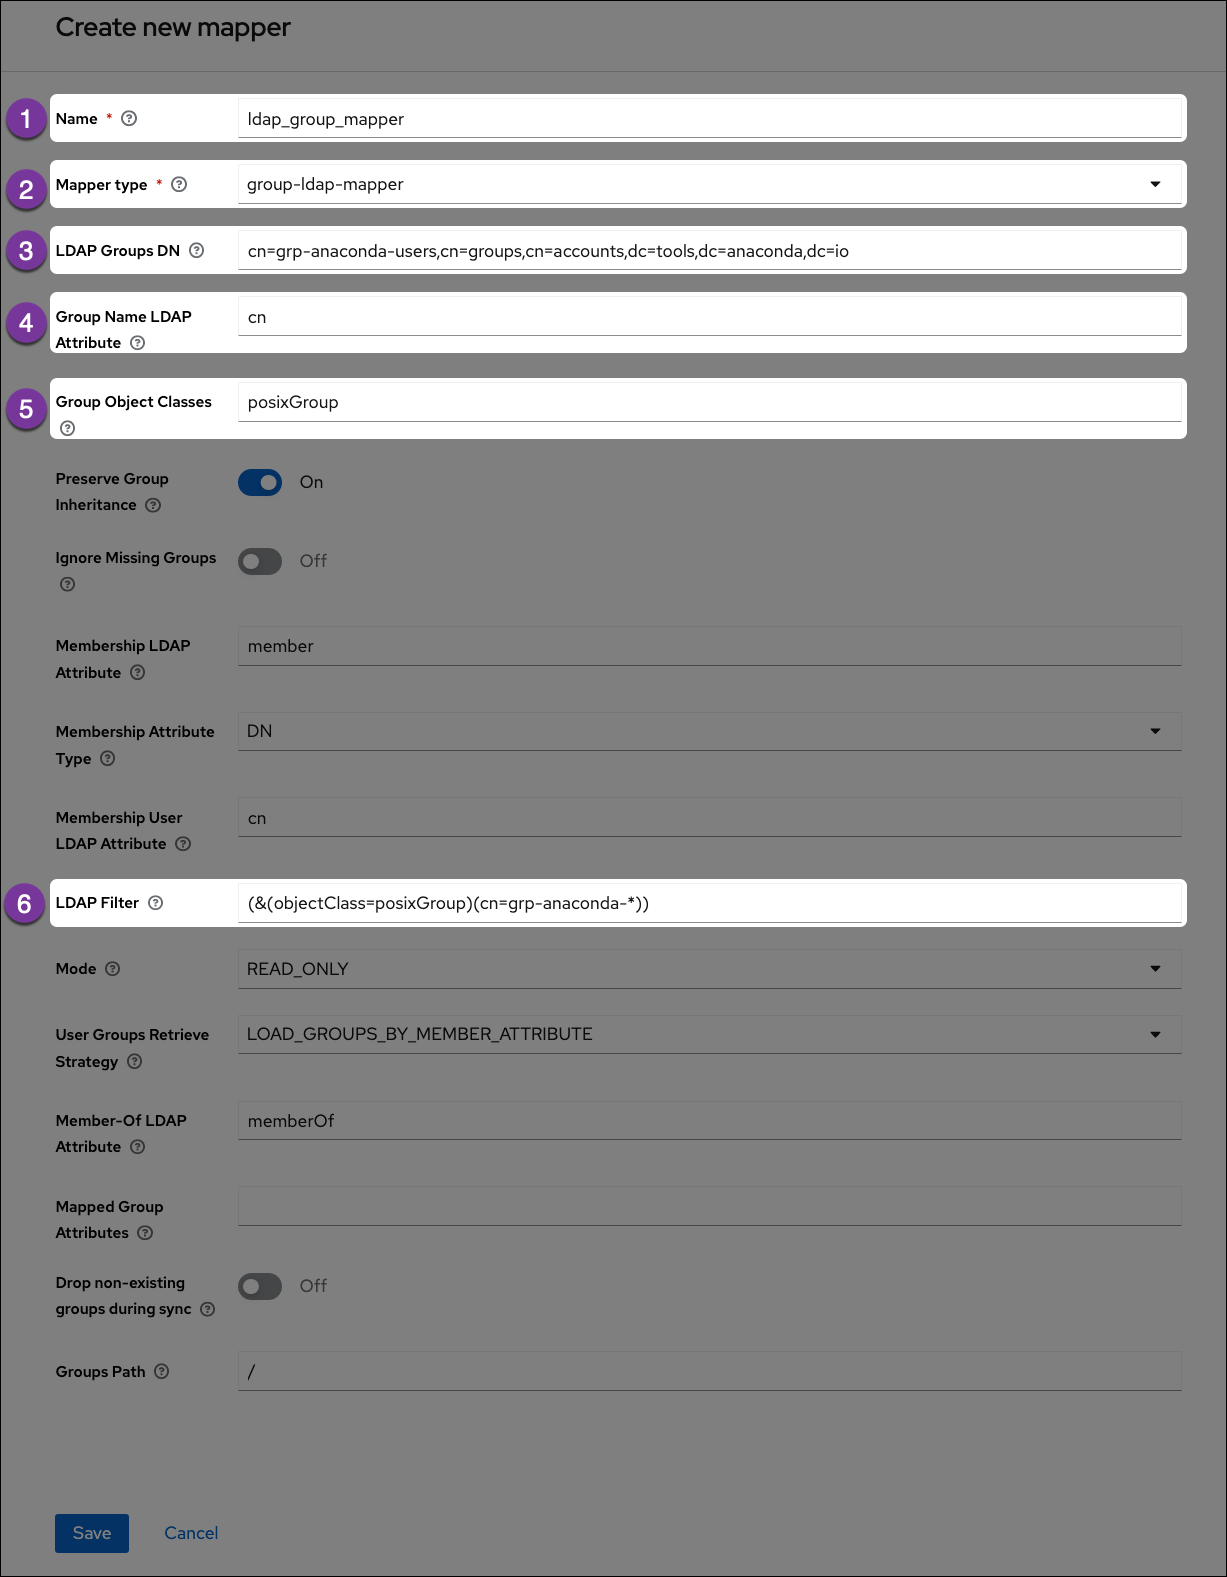 Enter a name for Keycloak to display for the LDAP group mapper.
Select **group-ldap-mapper** from the dropdown menu.
Get this information from your `ldapsearch` return. Provide the distinguished name of the group you would like to map.
Get this information from your `ldapsearch` return. Enter the attribute that is associated with groups. In this example, the attribute is `cn`.
Get this information from your `ldapsearch` return. This field will often have multiple entries, separated by a comma.
If you have established groups of users in your LDAP server that you plan to provide with access to Anaconda, you can import those specific groups by providing search filter criteria here. However, depending on how your LDAP server is structured, filtering to the correct groups can be complicated.
The search filter utilizes regular expressions (that is, it supports the use of wildcard characters). This example shows the search filter as `cn=grp-anaconda-*`, which will reach out to the LDAP server and import all groups that begin with `cn=grp-anaconda-`.
Click **Save** to create your LDAP server mapper. An ID field appears at the top of the Mapper details page once it’s established.
## Mapping group roles
If you have groups of users that you plan to provide with access to Anaconda, you can import them using the LDAP filter as described above. Once complete, you need to provide your groups of users with permissions to work within Anaconda.
Roles determine a user’s permissions within Anaconda, and a set of “realm” roles are established for you by default when you install. As a final step in establishing a connection to your LDAP server, you can map these provided roles to groups within your LDAP server to provide your team members with the permissions they need to work within Anaconda. Once the group roles are established, if a new team member arrives, adding them to the correct LDAP group provides them with all the correct permissions they need to use Anaconda right away. For more information about roles, see [User management and permissions](/docs/psm-on-prem/6.5.2/admin/keycloak_config/user_roles).
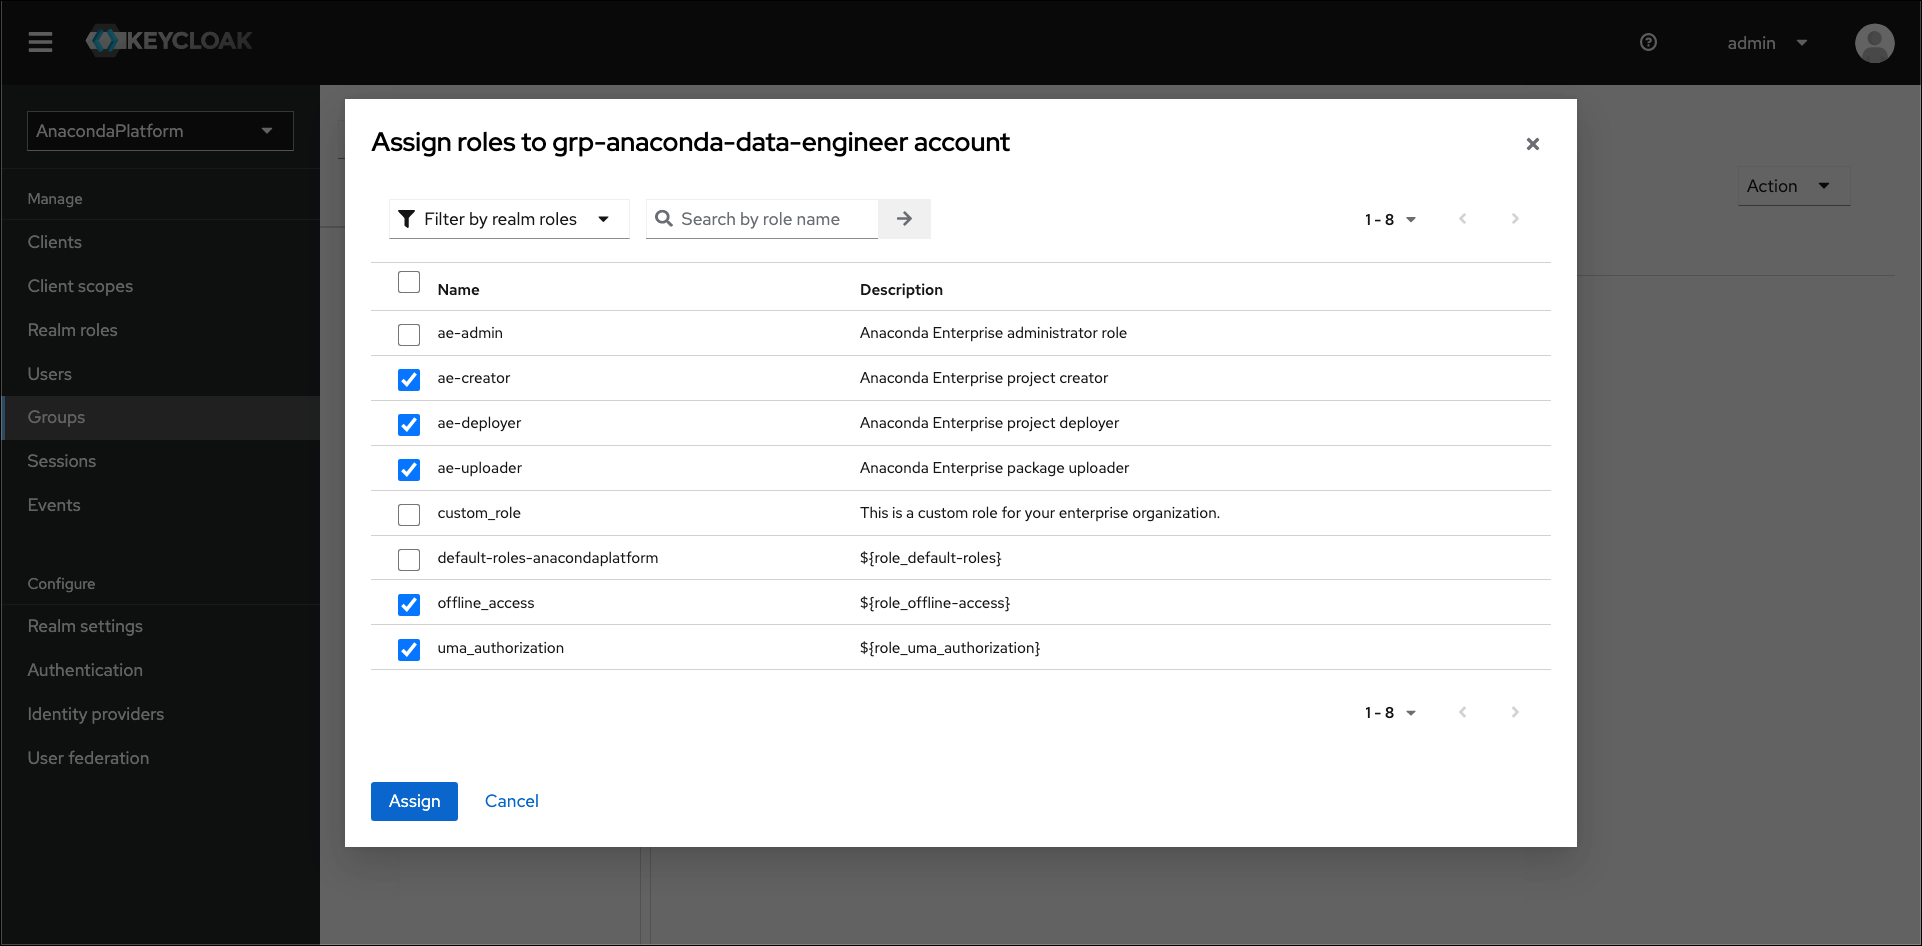
To map a role to a group of users imported from your LDAP server, complete the following steps:
1. Select **Groups** from the left-hand navigation menu.
2. Select your group from the list.
3. Click the **Role mappings** tab.
4. Click **Assign role**.
5. Select the roles you want to provide to this group of users, then click **Assign**.
Enter a name for Keycloak to display for the LDAP group mapper.
Select **group-ldap-mapper** from the dropdown menu.
Get this information from your `ldapsearch` return. Provide the distinguished name of the group you would like to map.
Get this information from your `ldapsearch` return. Enter the attribute that is associated with groups. In this example, the attribute is `cn`.
Get this information from your `ldapsearch` return. This field will often have multiple entries, separated by a comma.
If you have established groups of users in your LDAP server that you plan to provide with access to Anaconda, you can import those specific groups by providing search filter criteria here. However, depending on how your LDAP server is structured, filtering to the correct groups can be complicated.
The search filter utilizes regular expressions (that is, it supports the use of wildcard characters). This example shows the search filter as `cn=grp-anaconda-*`, which will reach out to the LDAP server and import all groups that begin with `cn=grp-anaconda-`.
Click **Save** to create your LDAP server mapper. An ID field appears at the top of the Mapper details page once it’s established.
## Mapping group roles
If you have groups of users that you plan to provide with access to Anaconda, you can import them using the LDAP filter as described above. Once complete, you need to provide your groups of users with permissions to work within Anaconda.
Roles determine a user’s permissions within Anaconda, and a set of “realm” roles are established for you by default when you install. As a final step in establishing a connection to your LDAP server, you can map these provided roles to groups within your LDAP server to provide your team members with the permissions they need to work within Anaconda. Once the group roles are established, if a new team member arrives, adding them to the correct LDAP group provides them with all the correct permissions they need to use Anaconda right away. For more information about roles, see [User management and permissions](/docs/psm-on-prem/6.5.2/admin/keycloak_config/user_roles).
To map a role to a group of users imported from your LDAP server, complete the following steps:
1. Select **Groups** from the left-hand navigation menu.
2. Select your group from the list.
3. Click the **Role mappings** tab.
4. Click **Assign role**.
5. Select the roles you want to provide to this group of users, then click **Assign**.
 ## LDAPS
LDAP over SSL, or LDAPS, allows you to encrypt your LDAP server data while it travels during communications, in order to protect it from attacks like certificate theft. For more information, see the [official Keycloak documentation on LDAPS](https://www.keycloak.org/docs/latest/server_admin/#connecting-to-ldap-over-ssl).
### Prerequisites
You must have the Java `jre` package installed to complete this procedure.
### Establishing LDAPS
1. Open a terminal and connect to your instance of Anaconda Server.
2. Generate a truststore on your host by running the following command:
```sh theme={null}
# Replace with the password for your truststore file
# Replace with the path to the root certificate authority
keytool -keystore truststore.jks -storepass -noprompt -trustcacerts -importcert -alias ldap-ca -file
```
3. Copy the `truststore.jks` file you just generated to the following location:
```sh theme={null}
/opt/anaconda/repo/config/keycloak
```
4. Find and open your `docker-compose.yml` file in your installer directory using your preferred file editor.
5. Find the `services: keycloak:` section of the file and add the following lines:
```sh theme={null}
# Replace with the password for your truststore file
volumes:
- ${BASE_INSTALL_DIR}/config/keycloak/truststore.jks:/opt/keycloak/truststore.jks
command: kc.sh start --import-realm --spi-truststore-file-file=/opt/keycloak/truststore.jks --spi-truststore-file-password=
```
Pay close attention to the indentation of your added lines. If you do not add them at the correct level of indentation, your configurations will not be readable.
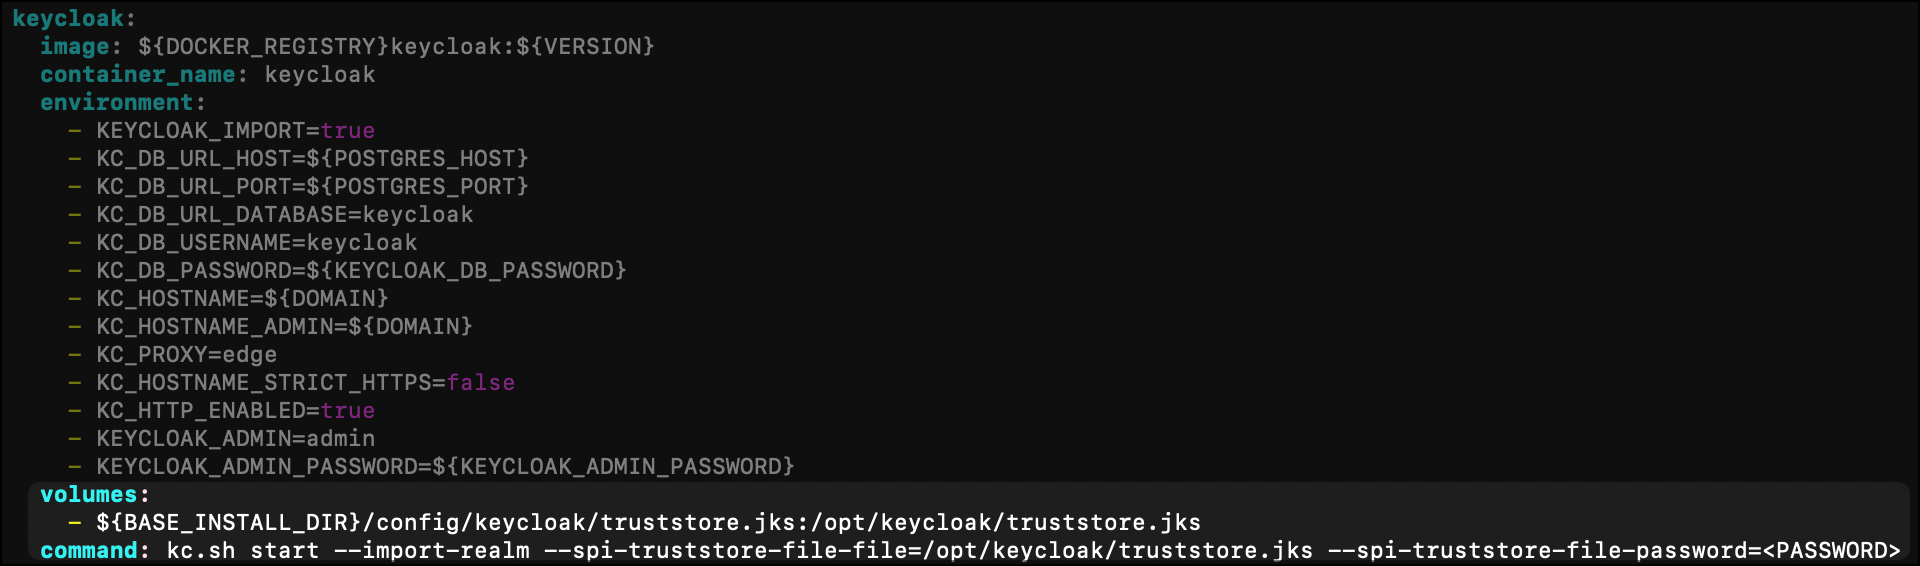
Here is an example of what your `docker-compose.yml` file should look like when you are finished adding these lines:
## LDAPS
LDAP over SSL, or LDAPS, allows you to encrypt your LDAP server data while it travels during communications, in order to protect it from attacks like certificate theft. For more information, see the [official Keycloak documentation on LDAPS](https://www.keycloak.org/docs/latest/server_admin/#connecting-to-ldap-over-ssl).
### Prerequisites
You must have the Java `jre` package installed to complete this procedure.
### Establishing LDAPS
1. Open a terminal and connect to your instance of Anaconda Server.
2. Generate a truststore on your host by running the following command:
```sh theme={null}
# Replace with the password for your truststore file
# Replace with the path to the root certificate authority
keytool -keystore truststore.jks -storepass -noprompt -trustcacerts -importcert -alias ldap-ca -file
```
3. Copy the `truststore.jks` file you just generated to the following location:
```sh theme={null}
/opt/anaconda/repo/config/keycloak
```
4. Find and open your `docker-compose.yml` file in your installer directory using your preferred file editor.
5. Find the `services: keycloak:` section of the file and add the following lines:
```sh theme={null}
# Replace with the password for your truststore file
volumes:
- ${BASE_INSTALL_DIR}/config/keycloak/truststore.jks:/opt/keycloak/truststore.jks
command: kc.sh start --import-realm --spi-truststore-file-file=/opt/keycloak/truststore.jks --spi-truststore-file-password=
```
Pay close attention to the indentation of your added lines. If you do not add them at the correct level of indentation, your configurations will not be readable.
Here is an example of what your `docker-compose.yml` file should look like when you are finished adding these lines:
 6. Enter your base installer directory by running the following command:
```sh theme={null}
# Replace with your installer directory folder
cd
```
7. Restart your containers by running the following command:
```sh theme={null}
docker-compose up -d
```
### Troubleshooting LDAPS
If you have any issues, verify the certificate authority against the LDAPS server by running the following command:
```sh theme={null}
# Replace with your certificate authority
openssl s_client -CAfile -connect ldapserver.com:636
```
This returns the following string:
```sh theme={null}
Verify return code: 0 (ok)
```
You can inspect the keystore you created with the following command:
```sh theme={null}
# Replace with the password for your truststore file
keytool -list -v -keystore /opt/keycloak/standalone/configuration/keystores/truststore -storepass
```
6. Enter your base installer directory by running the following command:
```sh theme={null}
# Replace with your installer directory folder
cd
```
7. Restart your containers by running the following command:
```sh theme={null}
docker-compose up -d
```
### Troubleshooting LDAPS
If you have any issues, verify the certificate authority against the LDAPS server by running the following command:
```sh theme={null}
# Replace with your certificate authority
openssl s_client -CAfile -connect ldapserver.com:636
```
This returns the following string:
```sh theme={null}
Verify return code: 0 (ok)
```
You can inspect the keystore you created with the following command:
```sh theme={null}
# Replace with the password for your truststore file
keytool -list -v -keystore /opt/keycloak/standalone/configuration/keystores/truststore -storepass
```