> ## Documentation Index
> Fetch the complete documentation index at: https://anaconda.com/docs/llms.txt
> Use this file to discover all available pages before exploring further.
# Configure realm email settings
Administrators can configure email for both themselves and users within a realm. This will allow Keycloak to send emails for the following tasks:
* Verifying an email address
* Resetting a password
* Enabling notifications for server events
**On this page:**
* [Assigning an email address to an admin account](#assigning-an-email-address-to-an-admin-account)
* [Configuring email settings for a realm](#configuring-email-settings-for-a-realm)
* [Gmail configuration](#gmail-configuration)
## Assigning an email address to an admin account
You can let Keycloak know which email to associate with your admin account.
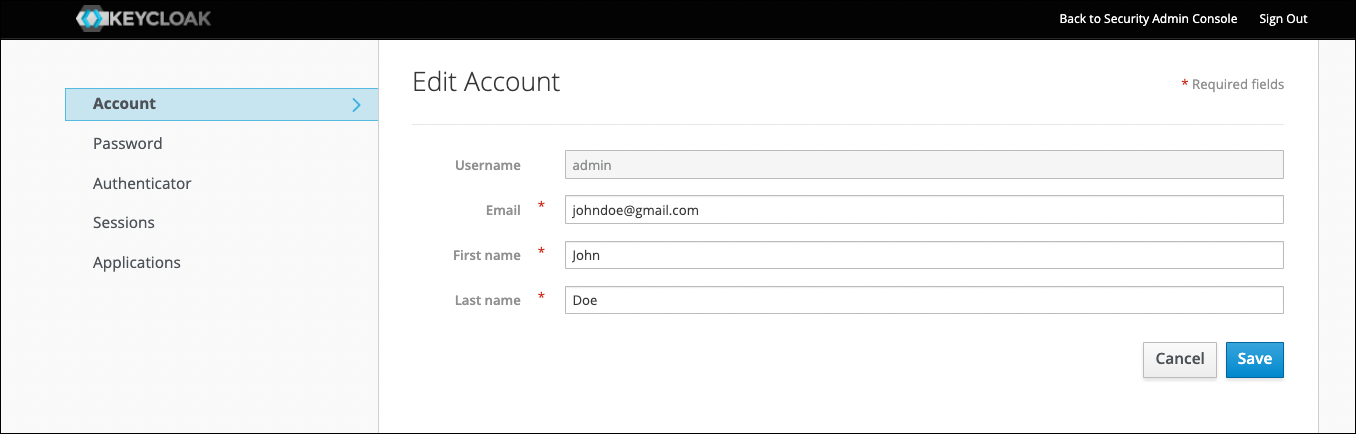 1. Log in to Keycloak using admin credentials.
2. Click **Admin** in the top right, then select **Manage account**.
3. On the **Edit Account** page, enter your email, first name, and last name.
4. Click **Save**.
## Configuring email settings for a realm
To enable Keycloak to send emails, you need to provide Keycloak with your SMTP server settings.
1. Log in to Keycloak using admin credentials.
2. Click **Admin** in the top right, then select **Manage account**.
3. On the **Edit Account** page, enter your email, first name, and last name.
4. Click **Save**.
## Configuring email settings for a realm
To enable Keycloak to send emails, you need to provide Keycloak with your SMTP server settings.
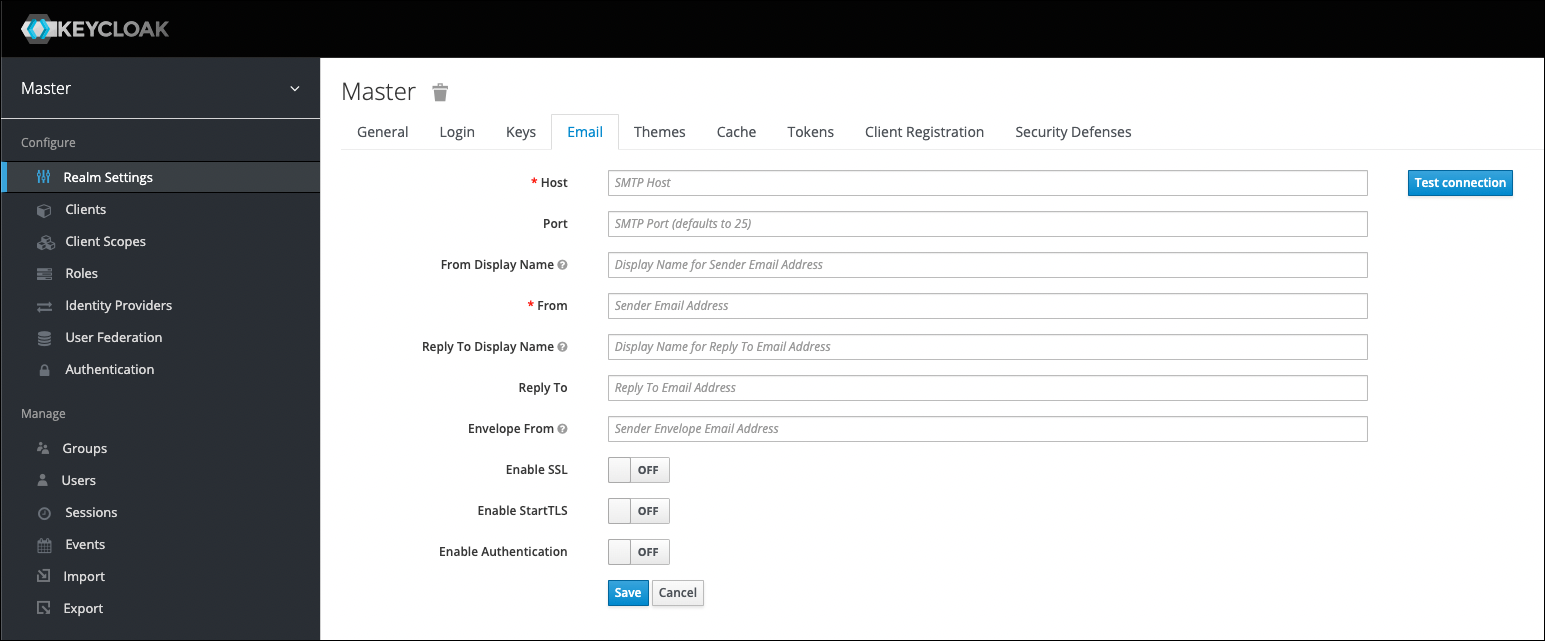 1. Log in to Keycloak using admin credentials.
2. Go to **Realm Settings**.
3. Fill in the fields and toggle switches as needed:
* **Host**: SMTP server hostname used for sending emails.
* **Port**: SMTP server port.
* **From**: Address used for the `From` SMTP-Header for emails sent.
* **From Display Name**: (Optional) Configure a user-friendly email address alias. If not set, the standard `From` email address will be displayed.
* **Reply To**: (Optional) Address used for the `Reply-To` SMTP-Header for emails sent. If not set, the standard `From` email address will be displayed.
* **Reply To Display Name**: (Optional) Configure a user-friendly email address alias. If not set, the standard `Reply-To` email address will be displayed.
* **Envelope From**: (Optional) Return address used for the `Return-Path` SMTP-Header for emails sent.
* **Enable SSL** and **Enable Start TLS**: Toggle one of these switches to `ON` to support sending emails for recovering usernames and passwords, especially if the SMTP server is on an external network. You will most likely need to change the Port to 465, the default port for SSL/TLS.
* **Enable Authentication**: Set this switch to `ON` if your SMTP server requires authentication. When prompted, supply the username and password. The value of the **Password** field can refer a value from an external vault.
### Gmail configuration
Complete the following steps for setting up an admin Gmail account.
1. Log in to Keycloak using admin credentials.
2. Go to **Realm Settings**.
3. Fill in the fields and toggle switches as needed:
* **Host**: SMTP server hostname used for sending emails.
* **Port**: SMTP server port.
* **From**: Address used for the `From` SMTP-Header for emails sent.
* **From Display Name**: (Optional) Configure a user-friendly email address alias. If not set, the standard `From` email address will be displayed.
* **Reply To**: (Optional) Address used for the `Reply-To` SMTP-Header for emails sent. If not set, the standard `From` email address will be displayed.
* **Reply To Display Name**: (Optional) Configure a user-friendly email address alias. If not set, the standard `Reply-To` email address will be displayed.
* **Envelope From**: (Optional) Return address used for the `Return-Path` SMTP-Header for emails sent.
* **Enable SSL** and **Enable Start TLS**: Toggle one of these switches to `ON` to support sending emails for recovering usernames and passwords, especially if the SMTP server is on an external network. You will most likely need to change the Port to 465, the default port for SSL/TLS.
* **Enable Authentication**: Set this switch to `ON` if your SMTP server requires authentication. When prompted, supply the username and password. The value of the **Password** field can refer a value from an external vault.
### Gmail configuration
Complete the following steps for setting up an admin Gmail account.
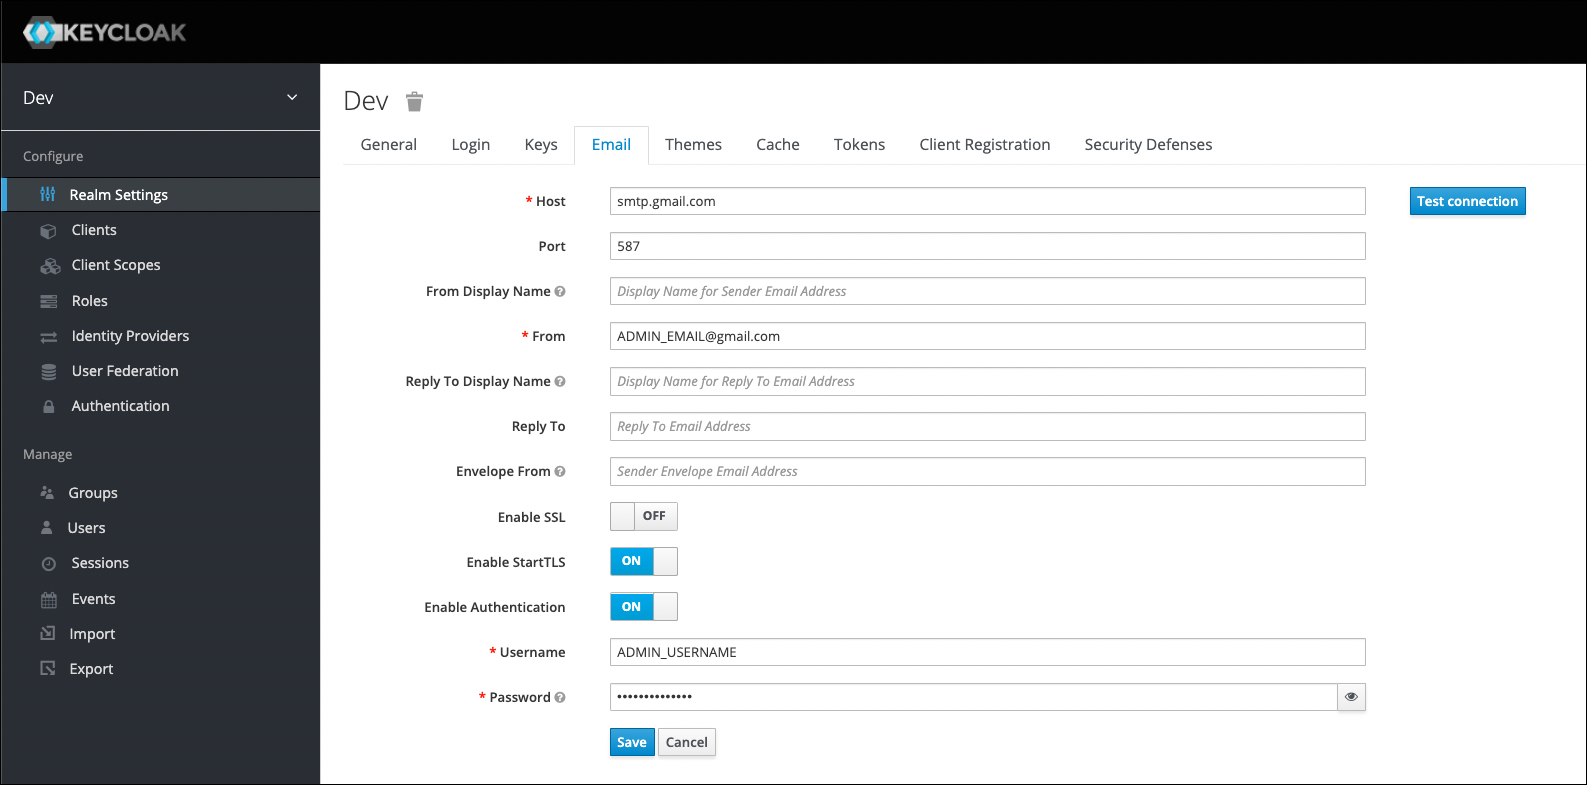 1. In **Realm Settings**, fill in the fields as follows:
* **Host**: smtp.gmail.com
* **Port**: 587 (for SSL, use 465)
* **From**: *Admin email address*
* **Enable StartTLS**: `ON` (for SSL, use Enable SSL)
* **Enable Authentication**: `ON`
* **Username**: *Admin username*
* **Password**: *Admin password*
2. In a browser, log in to the Gmail account.
3. Visit Google’s [Less secure app access](https://www.google.com/settings/security/lesssecureapps) page, then turn on the **Allow less secure apps** toggle.
4. Visit Google’s [Display Unlock Captcha](https://accounts.google.com/DisplayUnlockCaptcha) page, then follow any on-screen instructions.
1. In **Realm Settings**, fill in the fields as follows:
* **Host**: smtp.gmail.com
* **Port**: 587 (for SSL, use 465)
* **From**: *Admin email address*
* **Enable StartTLS**: `ON` (for SSL, use Enable SSL)
* **Enable Authentication**: `ON`
* **Username**: *Admin username*
* **Password**: *Admin password*
2. In a browser, log in to the Gmail account.
3. Visit Google’s [Less secure app access](https://www.google.com/settings/security/lesssecureapps) page, then turn on the **Allow less secure apps** toggle.
4. Visit Google’s [Display Unlock Captcha](https://accounts.google.com/DisplayUnlockCaptcha) page, then follow any on-screen instructions.