> ## Documentation Index
> Fetch the complete documentation index at: https://anaconda.com/docs/llms.txt
> Use this file to discover all available pages before exploring further.
# User roles and permissions
Assigning access and permissions to individual users can be too fine-grained and cumbersome for organizations to manage, so Anaconda Server enables you to assign access permissions to specific roles.
## Understanding roles and permissions
Use roles to authorize individual or groups of users to perform specific actions. Default roles allow you to automatically assign user role mappings when any user is newly created or imported (for example, through LDAP).
### Default user roles
By default, Anaconda Server contains the following preconfigured roles for the **dev** realm.
* **Admin**: the user who, in addition to managing all content, can manage mirrors and CVE data as well
* **Author**: an authenticated user who can create channels
* **Everyone**: a non-authenticated user
### Permission categories
Within the Anaconda Server UI, any role created in Keycloak can be assigned these permission categories. Each of these support read/write admin values.
* channel
* channel.default-channel (managing default channel)
* channel.group (managing channel groups)
* channel.mirror (managing channel mirror)
* subchannel
* subchannel.group
* subchannel.mirror
* artifact
* cve
* roles
Each possible permission category can be assigned the value of **read**, **write**, **manage**, or **none**.
* **read**: provides the ability to view the resource
* **write**: provides the ability to view and create the resource
* **manage**: provides the ability to view, create, and edit the resource
* **none**: denies the ability to view, create, or edit the resource
## Default roles and permissions
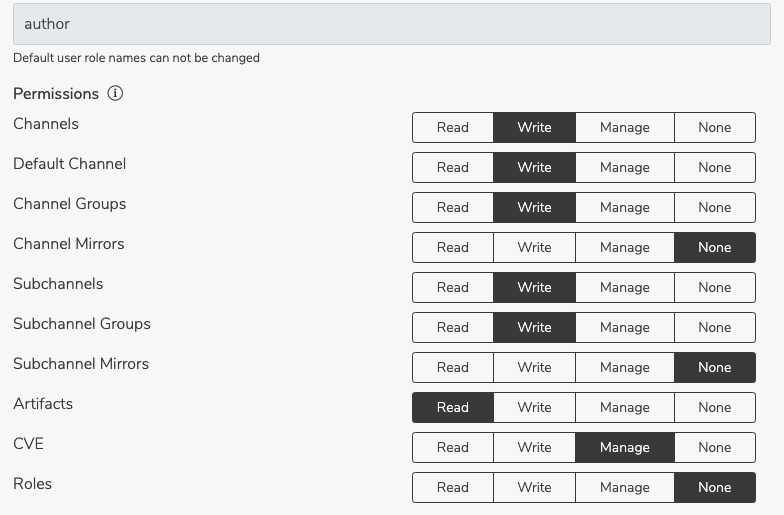
These are the permissions assigned to authors and admins by default:
 ## Editing default permissions
It is possible to edit default permission settings for **everyone** and **author** roles. It is not possible to edit default settings for the **admin** role.
For example, you can grant CVE access to authors by switching user permissions for **CVE** from **None** to **Manage** in the **User Management** dashboard:
## Editing default permissions
It is possible to edit default permission settings for **everyone** and **author** roles. It is not possible to edit default settings for the **admin** role.
For example, you can grant CVE access to authors by switching user permissions for **CVE** from **None** to **Manage** in the **User Management** dashboard:
 ## Creating custom roles
In order to do this, we must first create and map the role in Keycloak.
### Accessing the Keycloak administration console
Follow these steps to access the Keycloak administration console:
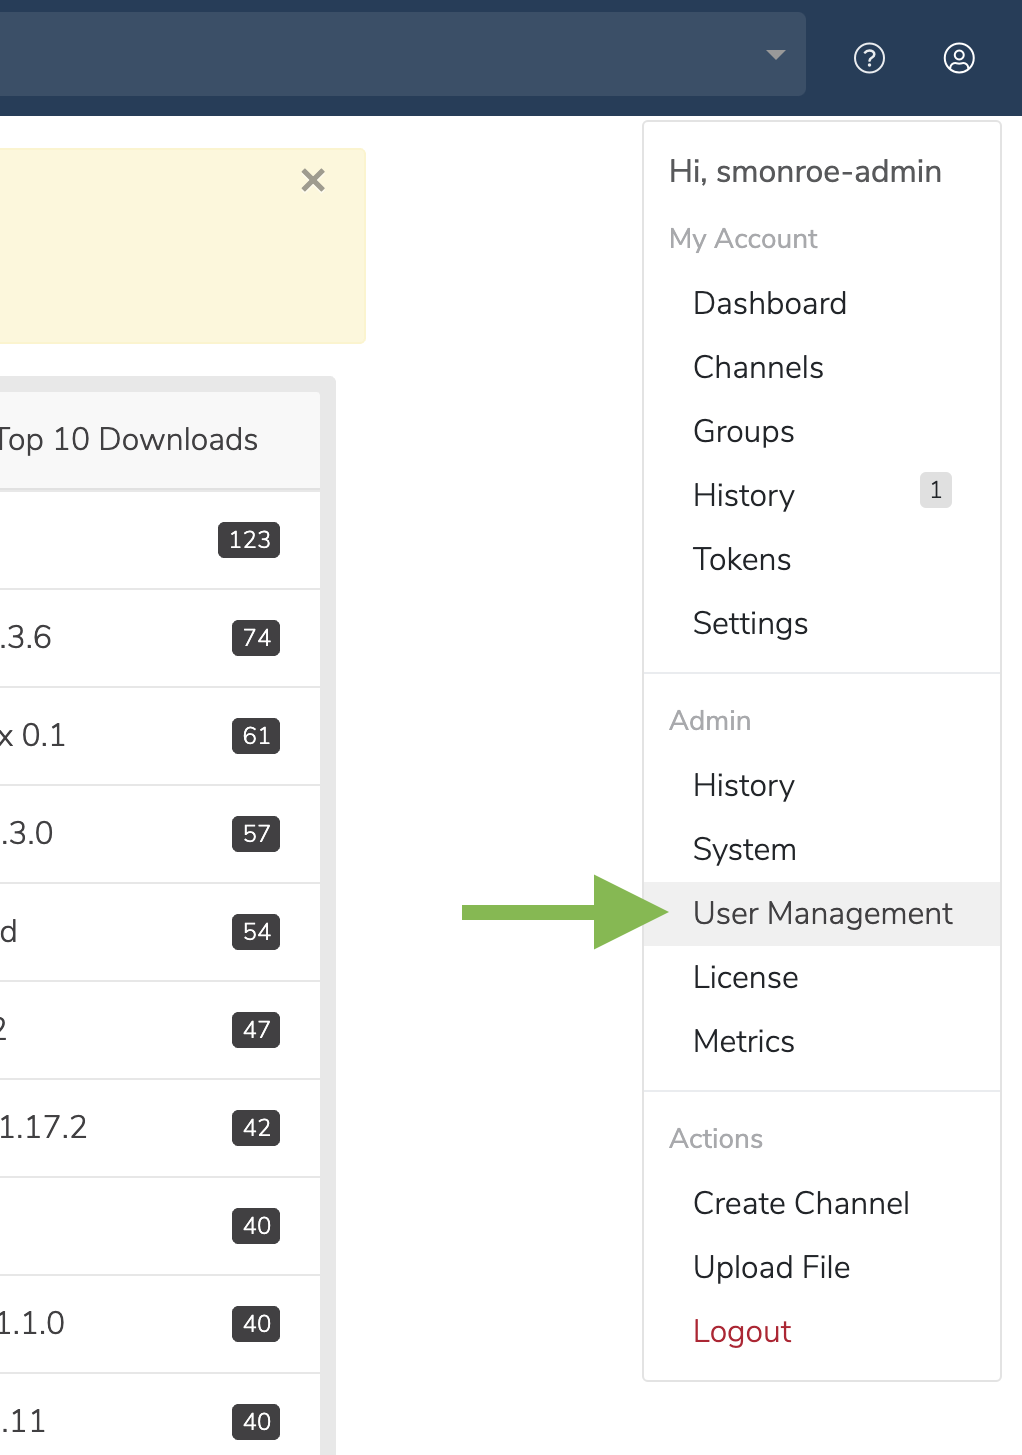
1. Click on the **My account** button in the top right.
2. In the dropdown, under **Admin**, select **User Management**.
## Creating custom roles
In order to do this, we must first create and map the role in Keycloak.
### Accessing the Keycloak administration console
Follow these steps to access the Keycloak administration console:
1. Click on the **My account** button in the top right.
2. In the dropdown, under **Admin**, select **User Management**.
 3. On the **User Management** screen, click the **Manage Users** button. You will be directed to the Keycloak login screen.
The default admin username is **admin**, and the admin password can be found in the installer output (an example of which is shown in the [Installing with root access section](/docs/psm-on-prem/6.1.9/install/instructions#installing-with-root-access) of the install instructions). The installer will generate a random password for this user.
Alternatively, you can use `/auth/admin` to reach the Keycloak admin login page.
Additional guides for Keycloak:
* [Keycloak documentation for server administration](https://www.keycloak.org/docs/latest/server_admin/)
* [User management](https://www.keycloak.org/docs/latest/server_admin/#user-management)
* [Setup and configuration of Keycloak server](https://www.keycloak.org/docs/latest/server_admin/#setup-and-configuration-of-keycloak-server)
### Creating new roles in Keycloak
Follow these steps to create a new role in Keycloak:
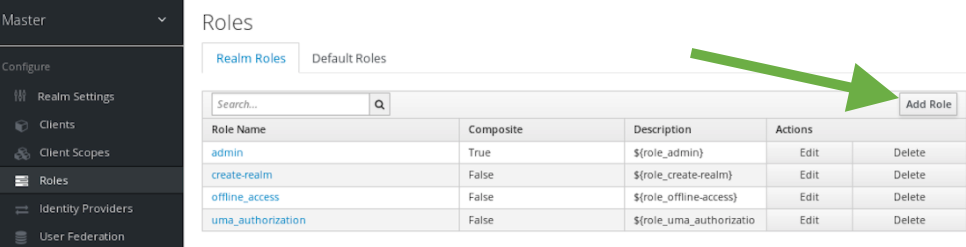
1. To create a new role, click **Add Role** on the **Realm Roles** tab.
3. On the **User Management** screen, click the **Manage Users** button. You will be directed to the Keycloak login screen.
The default admin username is **admin**, and the admin password can be found in the installer output (an example of which is shown in the [Installing with root access section](/docs/psm-on-prem/6.1.9/install/instructions#installing-with-root-access) of the install instructions). The installer will generate a random password for this user.
Alternatively, you can use `/auth/admin` to reach the Keycloak admin login page.
Additional guides for Keycloak:
* [Keycloak documentation for server administration](https://www.keycloak.org/docs/latest/server_admin/)
* [User management](https://www.keycloak.org/docs/latest/server_admin/#user-management)
* [Setup and configuration of Keycloak server](https://www.keycloak.org/docs/latest/server_admin/#setup-and-configuration-of-keycloak-server)
### Creating new roles in Keycloak
Follow these steps to create a new role in Keycloak:
1. To create a new role, click **Add Role** on the **Realm Roles** tab.
 2. Enter a name and description of the role, and click **Save**.
Roles can be assigned to users automatically or require an explicit request. If a user has to explicitly request a realm role, enable the **Scope Param Required** switch. The role must then be specified using the `scope` parameter when requesting a token.
The new role is now available to be used as a default role.
### Setting and removing admin roles in Keycloak
Follow these steps to set or remove the admin role for a Anaconda Server user:
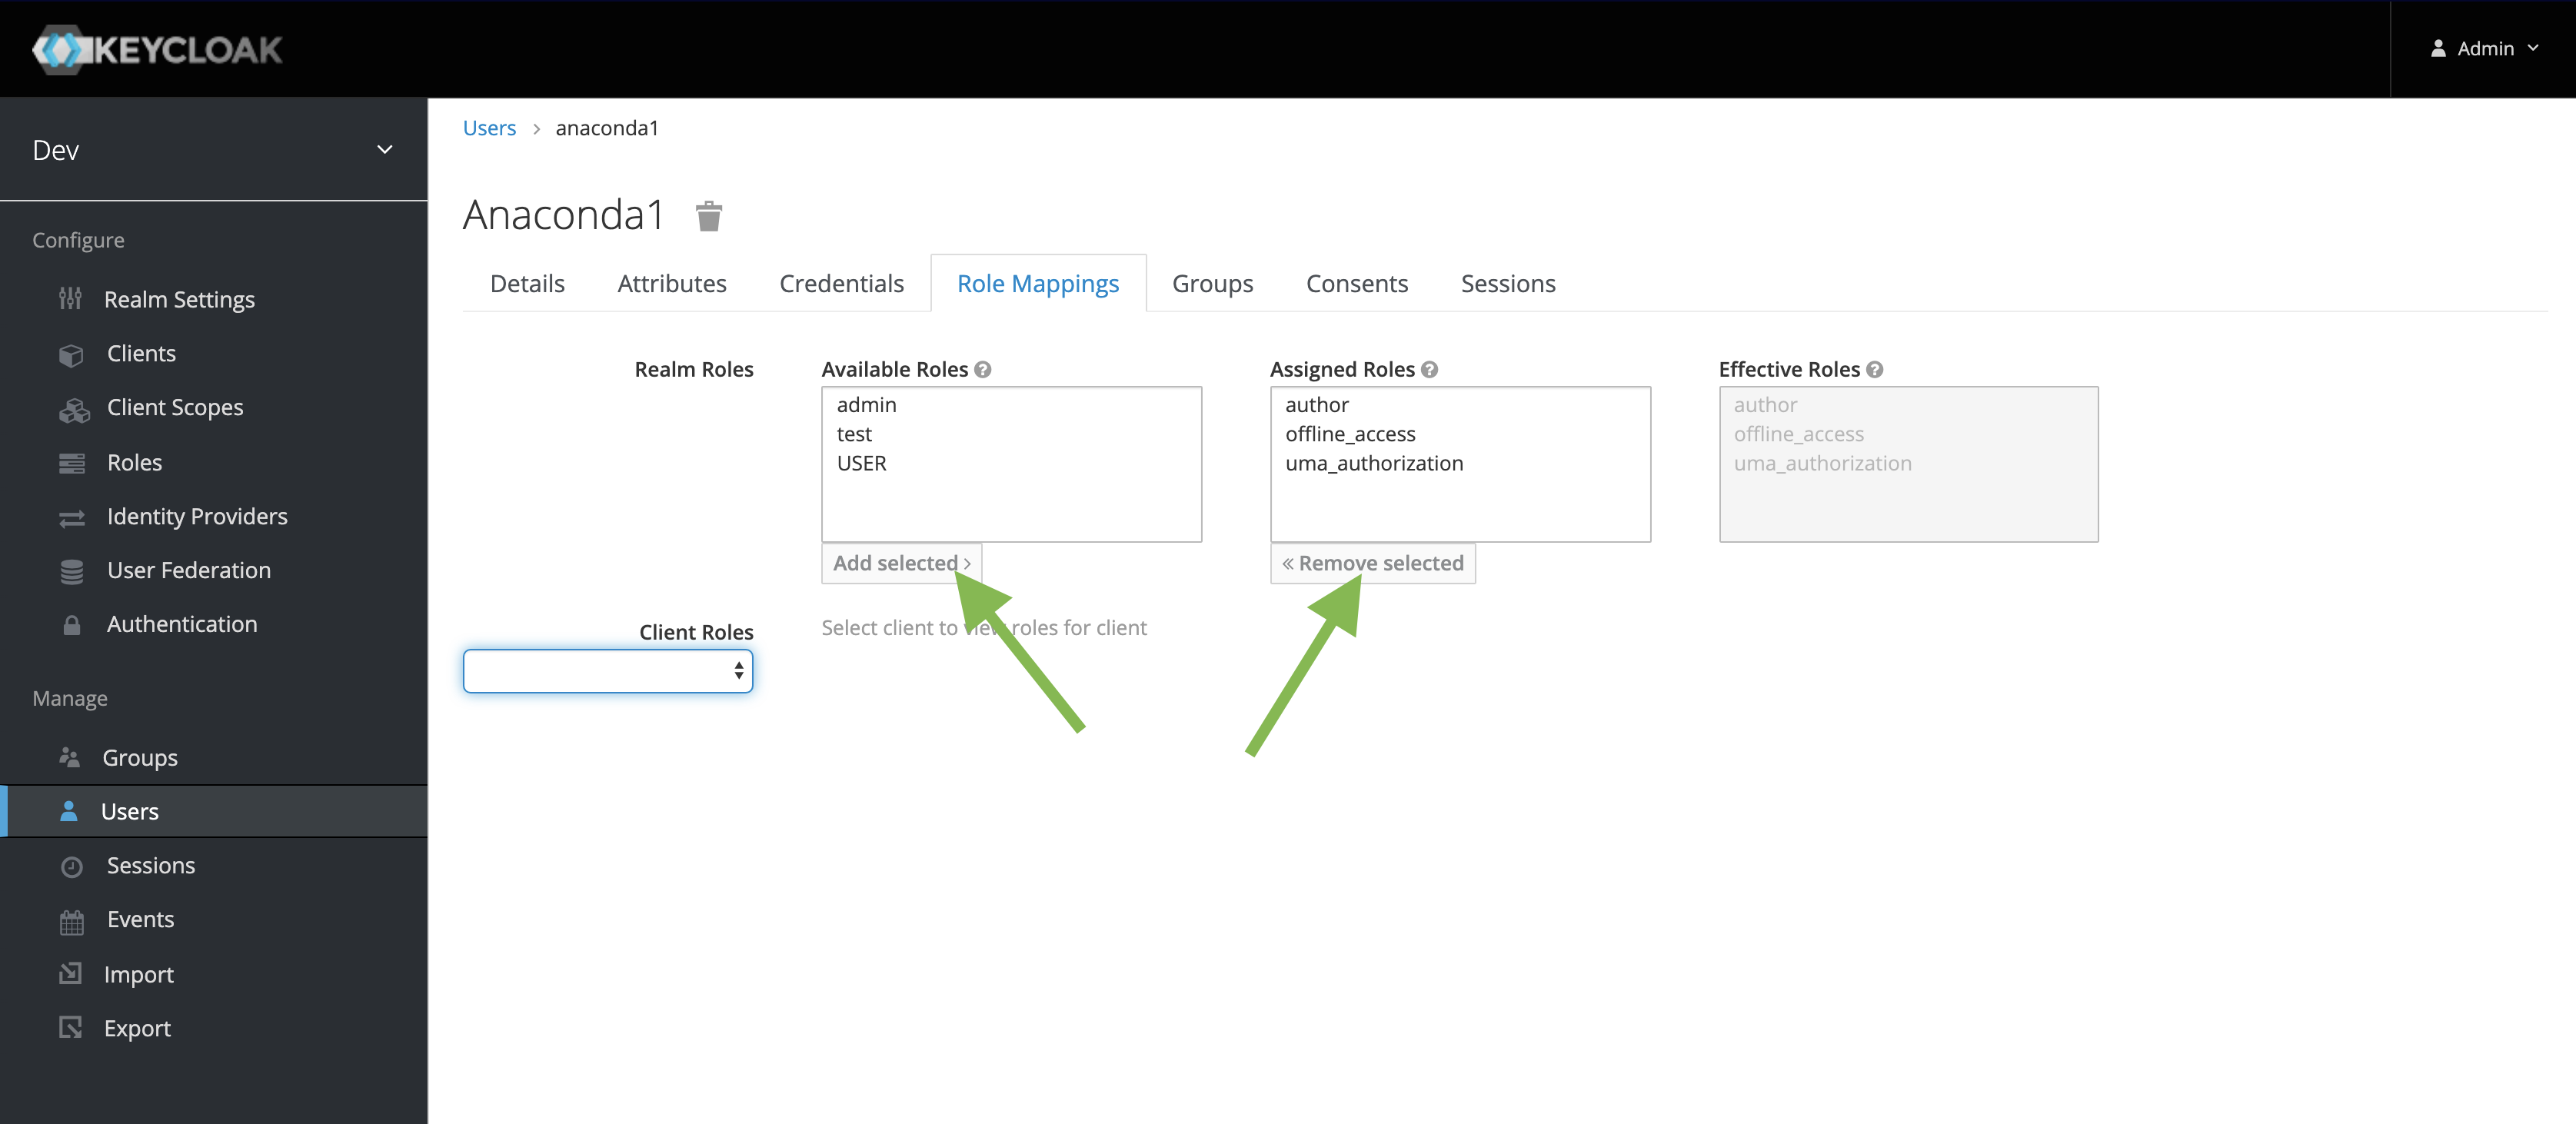
1. In Keycloak, under **Manage**, navigate to the **Users** page.
2. Go to the **Role Mappings** tab.
3. **To set the admin role:** Under **Available Roles**, select **admin** and click **Add selected**.
**To remove the admin role:** Under **Assigned Roles**, select the user and click **Remove selected**.
4. Log in again and check the available actions.
2. Enter a name and description of the role, and click **Save**.
Roles can be assigned to users automatically or require an explicit request. If a user has to explicitly request a realm role, enable the **Scope Param Required** switch. The role must then be specified using the `scope` parameter when requesting a token.
The new role is now available to be used as a default role.
### Setting and removing admin roles in Keycloak
Follow these steps to set or remove the admin role for a Anaconda Server user:
1. In Keycloak, under **Manage**, navigate to the **Users** page.
2. Go to the **Role Mappings** tab.
3. **To set the admin role:** Under **Available Roles**, select **admin** and click **Add selected**.
**To remove the admin role:** Under **Assigned Roles**, select the user and click **Remove selected**.
4. Log in again and check the available actions.
 ### View existing users in Keycloak
Follow these steps to view a list of existing users currently present in Anaconda Server:
1. Log in to Keycloak as the admin user.
2. Select **DEV** realm.
3. In the Manage menu on the left, click **Users**.
4. On the **Lookup** tab, click **View all users** to list every user in the system, or search the user database for all users that match the criteria you enter, based on their first name, last name, or email address.
This will search the local user database and not the federated database (such as LDAP) because not all external identity provider systems include a way to page through users. If you want users from a federated database to be synced into the local database, select **User Federation** in the Configure menu on the left, and adjust the **Sync Settings** for your user federation provider.
### Create a user in Keycloak
Follow these steps to create a user:
1. In Keycloak, go to the **Users** section on the left.
2. Click **Add user** and specify a user name—and optionally provide values for the other fields—before clicking **Save**.
### View existing users in Keycloak
Follow these steps to view a list of existing users currently present in Anaconda Server:
1. Log in to Keycloak as the admin user.
2. Select **DEV** realm.
3. In the Manage menu on the left, click **Users**.
4. On the **Lookup** tab, click **View all users** to list every user in the system, or search the user database for all users that match the criteria you enter, based on their first name, last name, or email address.
This will search the local user database and not the federated database (such as LDAP) because not all external identity provider systems include a way to page through users. If you want users from a federated database to be synced into the local database, select **User Federation** in the Configure menu on the left, and adjust the **Sync Settings** for your user federation provider.
### Create a user in Keycloak
Follow these steps to create a user:
1. In Keycloak, go to the **Users** section on the left.
2. Click **Add user** and specify a user name—and optionally provide values for the other fields—before clicking **Save**.
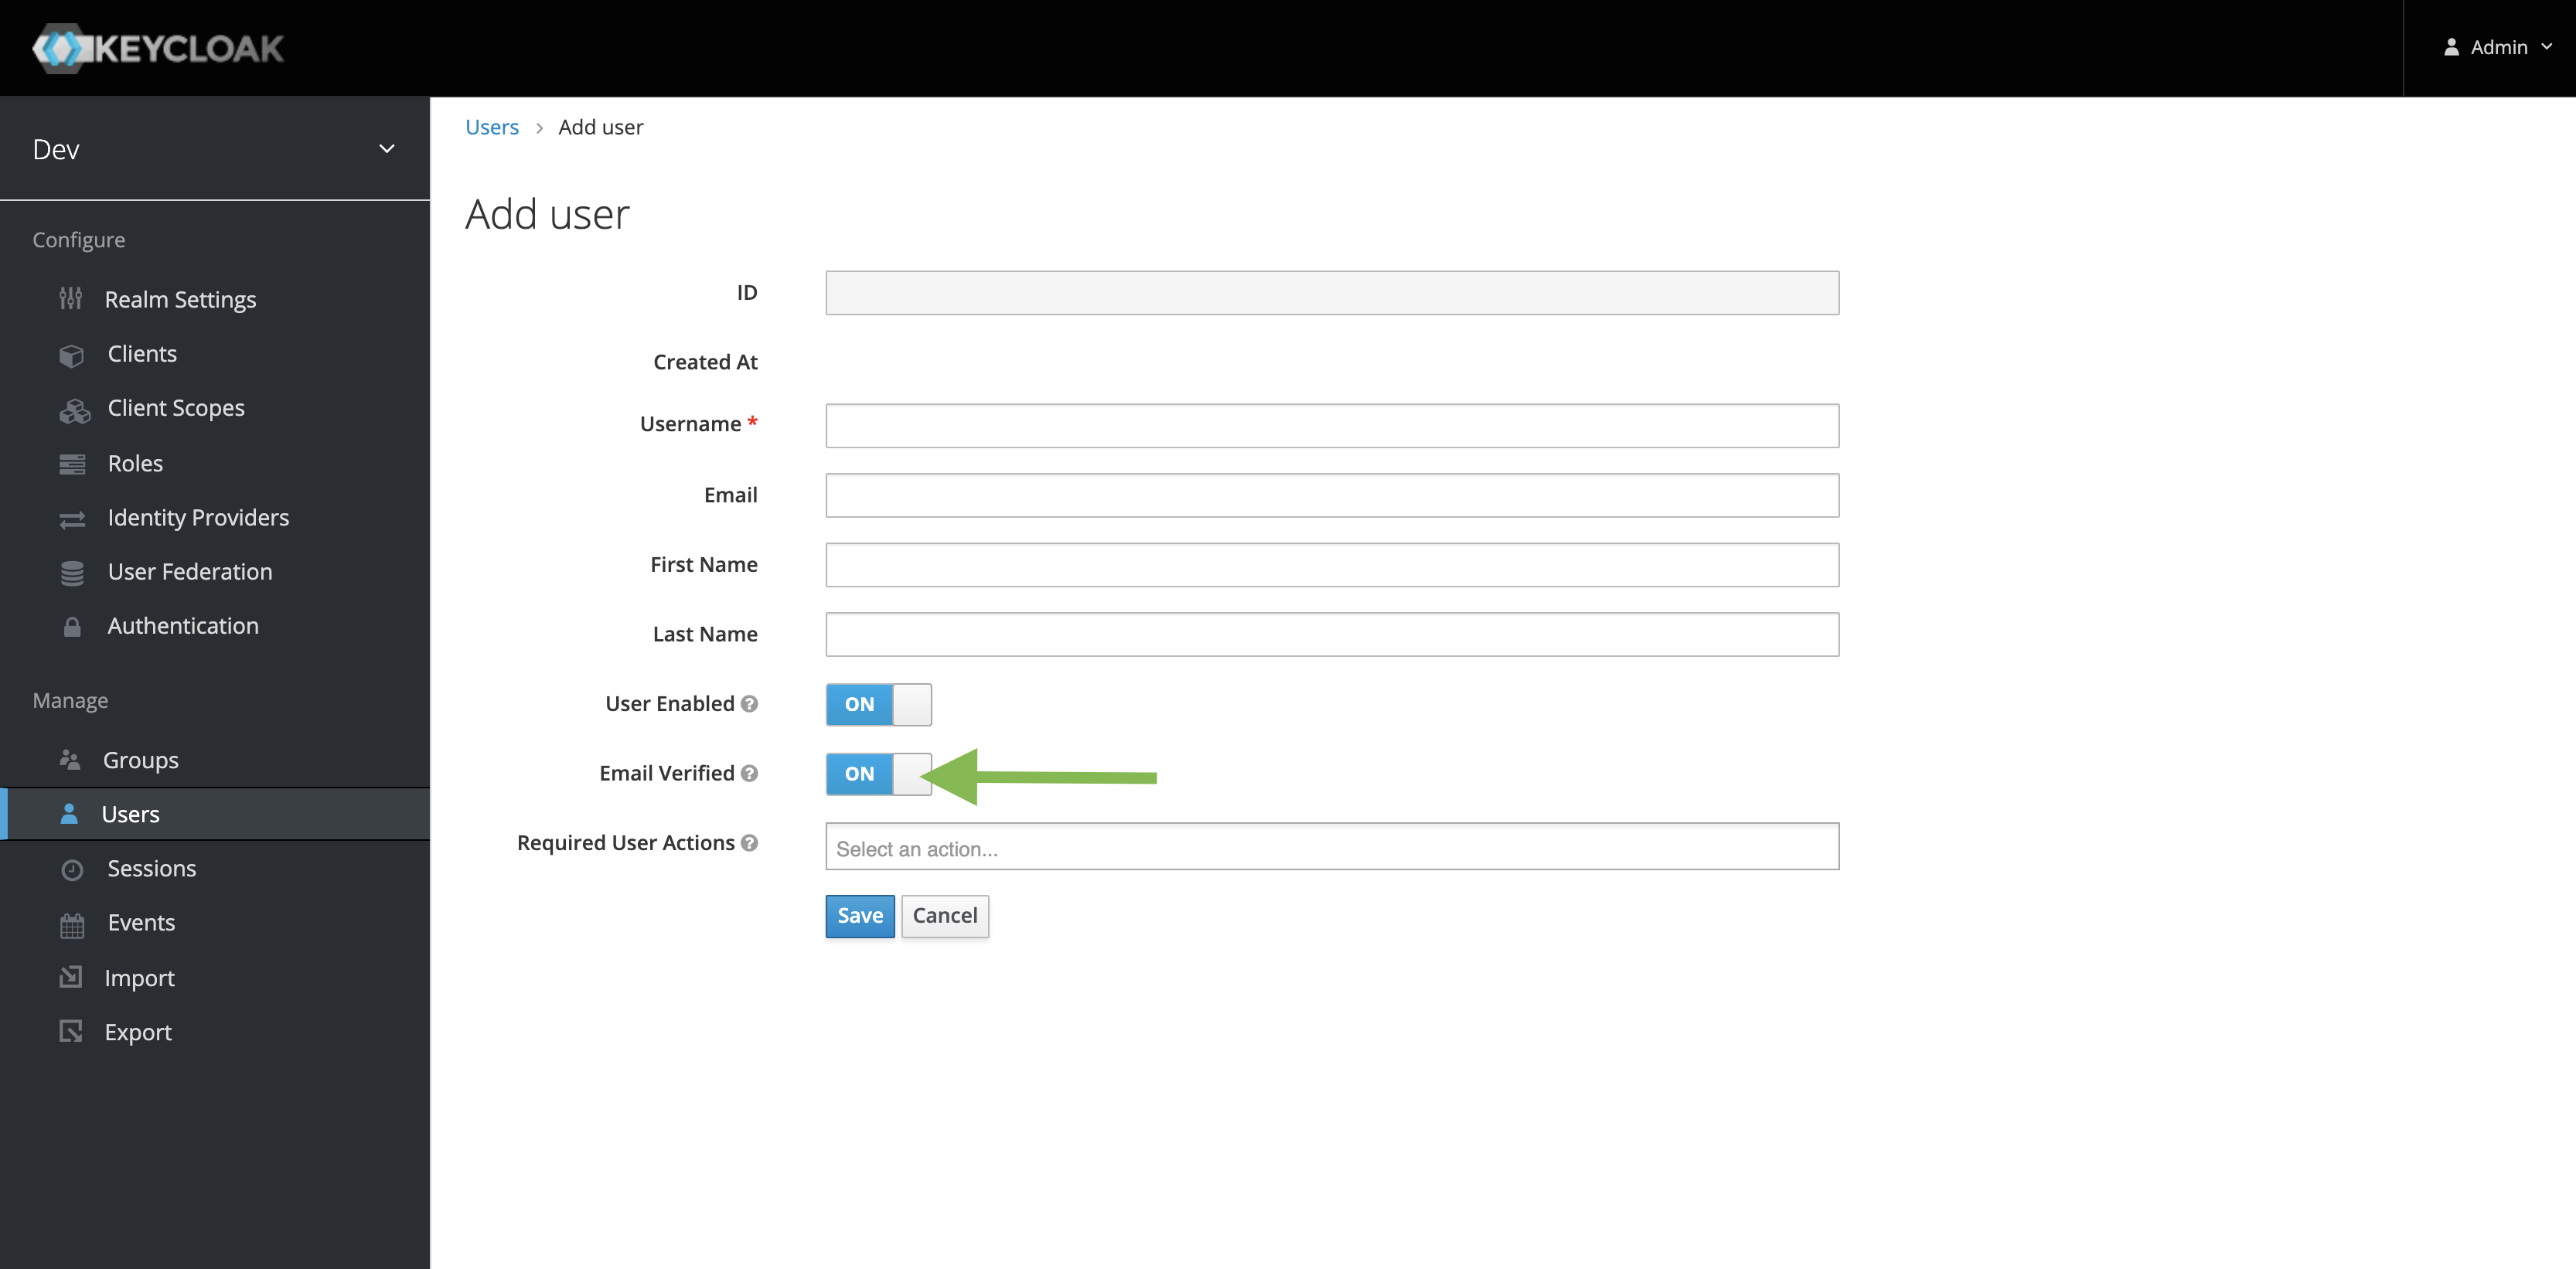
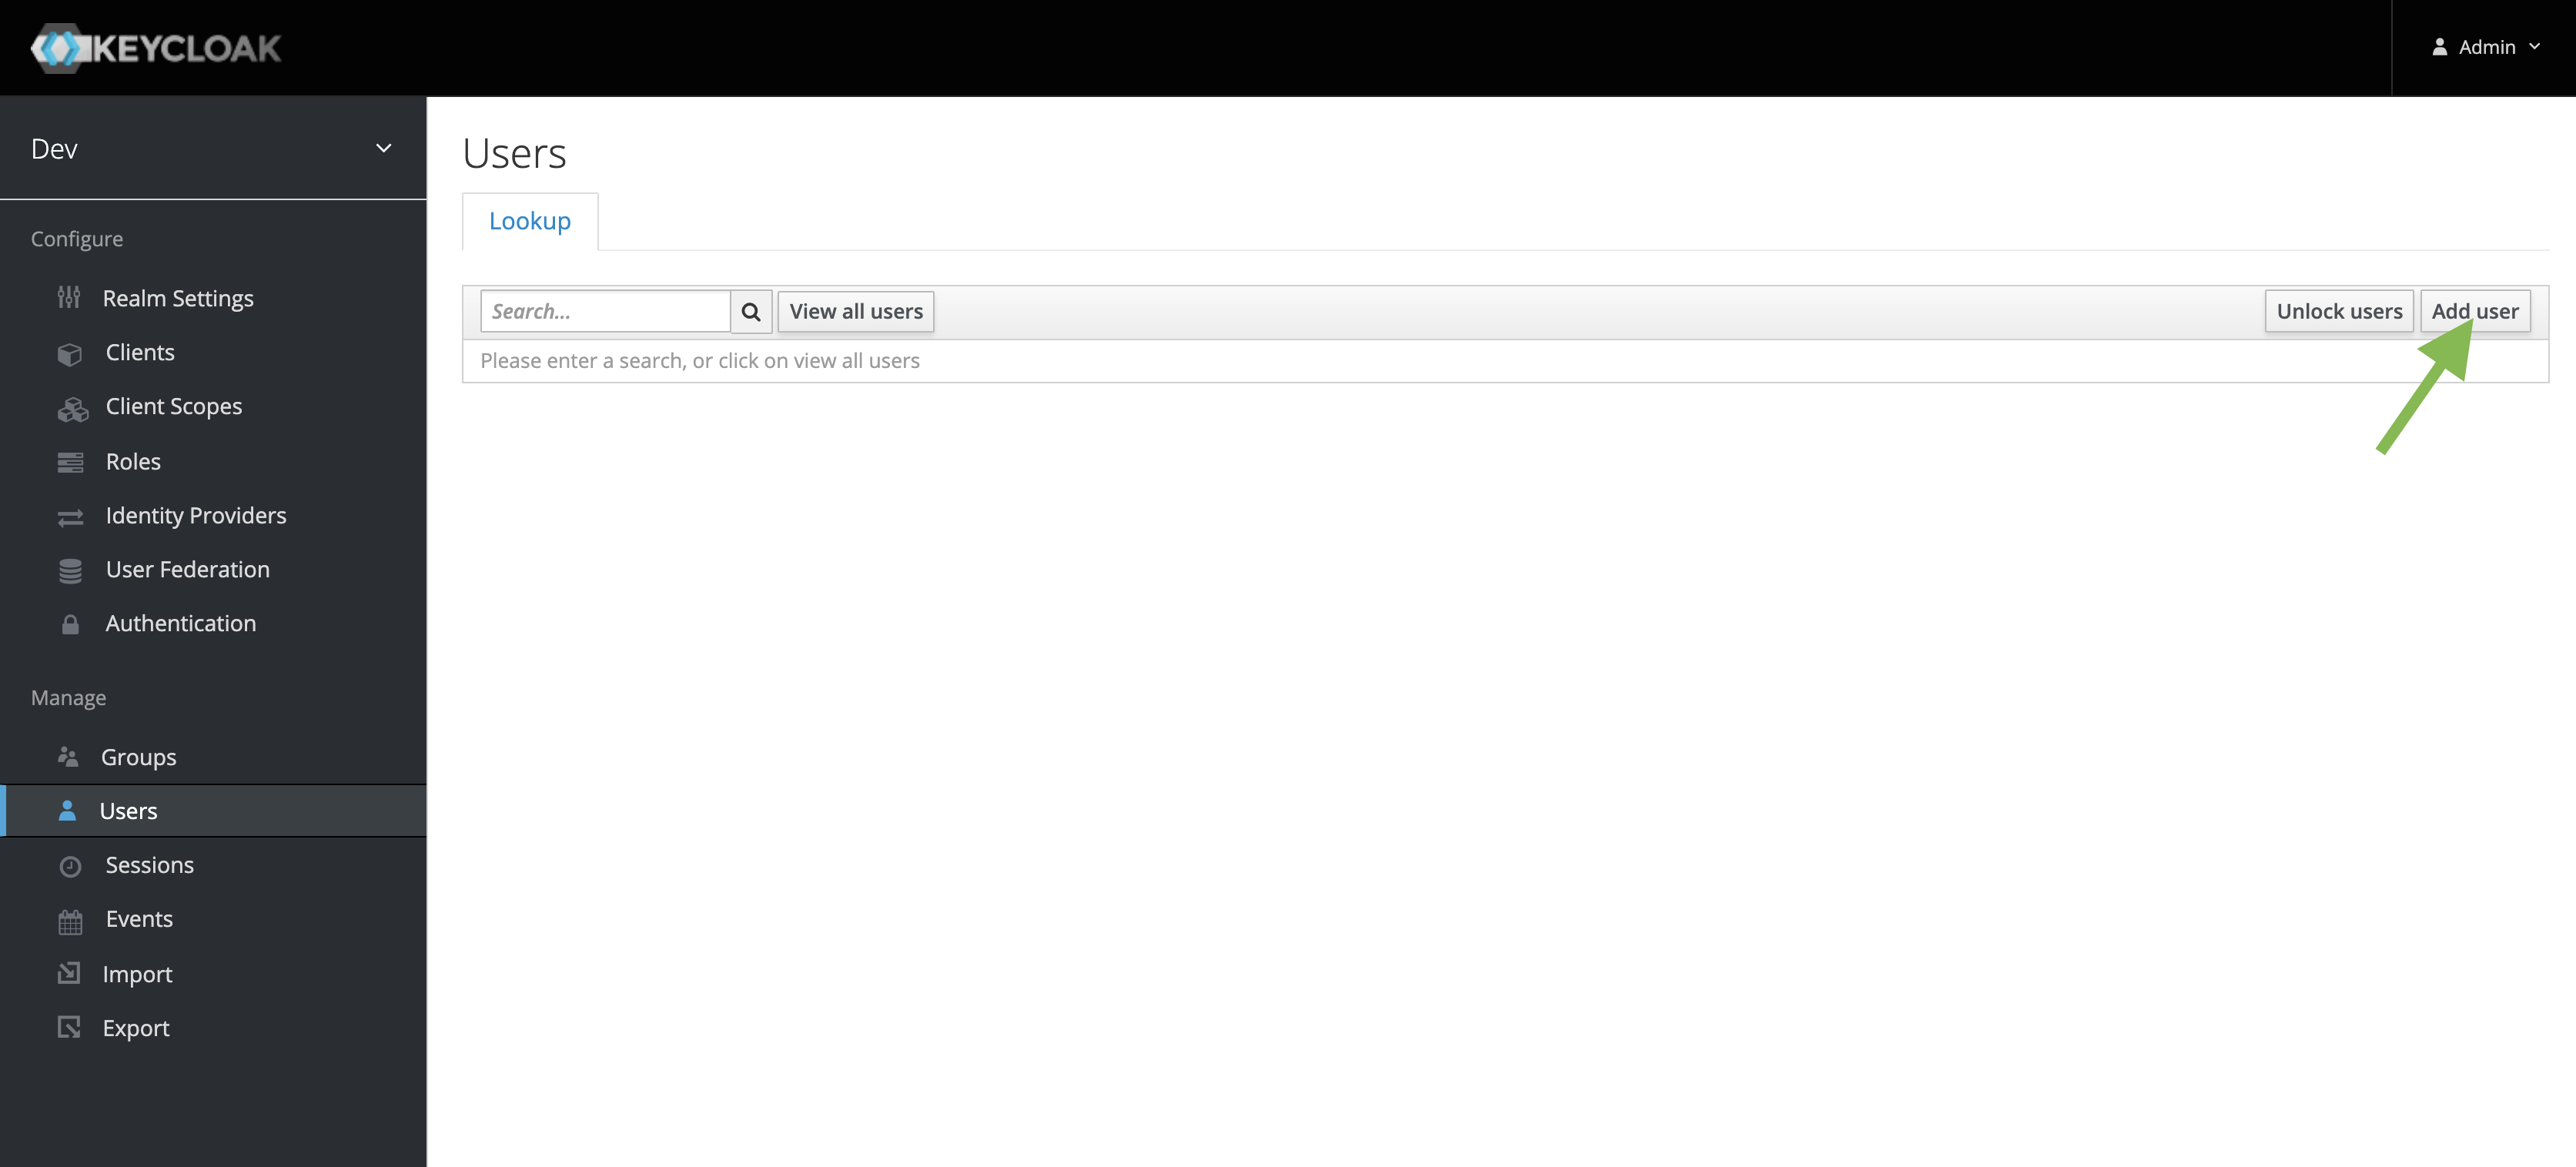 3. Enter the username and ensure **Email Verified** is **ON**. User names containing unicode characters—special characters, punctuation, symbols, spaces—are not permitted.
 4. Click save, then navigate to the Credentials tab.
5. Ensure **Temporary** is **OFF**.
4. Click save, then navigate to the Credentials tab.
5. Ensure **Temporary** is **OFF**.
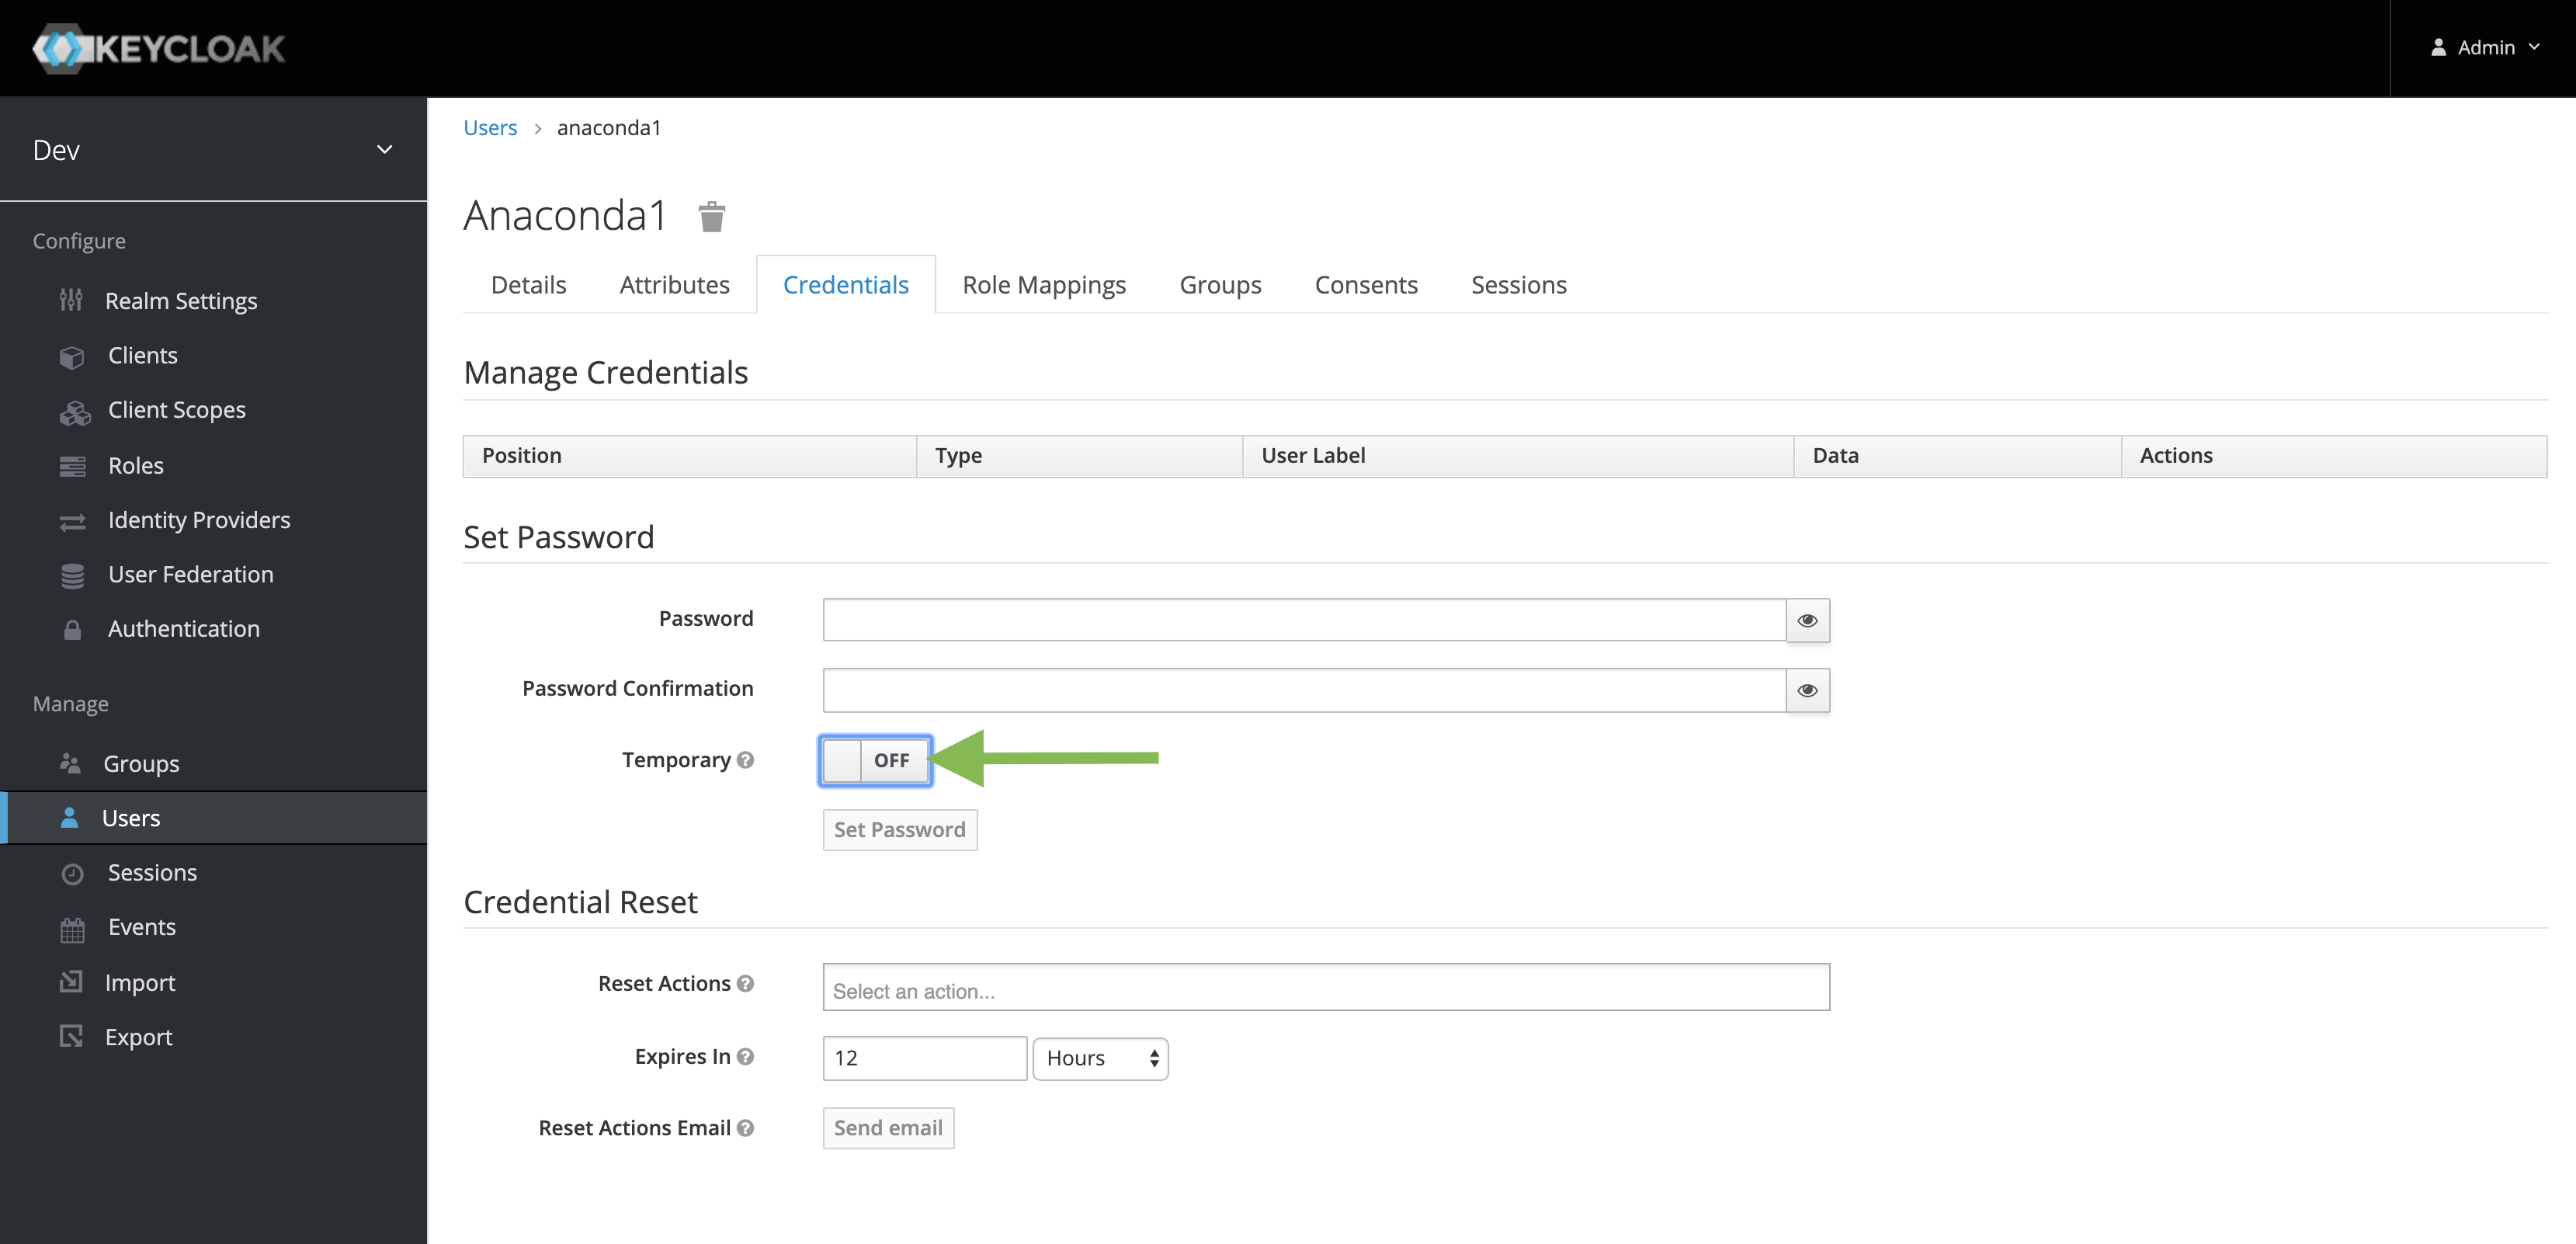 6. Click **Set Password**.
## Add a new master realm admin user/Reset password
Follow these steps from the command line to add a new admin user to the master realm *or* to reset your admin password if you’re locked out or have forgotten your password.
1. Exec into the Keycloak container:
```sh theme={null}
# Replace with your keycloak container ID
docker exec -it /bin/bash
```
2. Create a user:
```sh theme={null}
# Replace with your username and with your password
/opt/jboss/keycloak/bin/add-user-keycloak.sh -u -p -r master --roles=admin
```
3. Restart the server. Restarting the server will delete the container and any current state:
```sh theme={null}
/opt/jboss/keycloak/bin/standalone.sh -Djboss.socket.binding.port-offset=100
```
4. Log in to Keycloak from the following URL:
```sh theme={null}
#Replace with your fully qualified domain name
https:///auth/admin/master/console
```
## Adding and editing user roles in Anaconda Server
Once roles have been mapped in Keycloak, you can manage users in Anaconda Server.
1. Click on the **My account** button in the top right.
2. In the dropdown, under **Admin**, select **User Management**.
3. On the **User Management** screen, you can see the **User Roles** table listing the current roles. Click on a role to edit it, or click the **+** icon to add a new role. You can also delete a role by clicking the **x** icon. This will prompt a window to confirm the deletion.
6. Click **Set Password**.
## Add a new master realm admin user/Reset password
Follow these steps from the command line to add a new admin user to the master realm *or* to reset your admin password if you’re locked out or have forgotten your password.
1. Exec into the Keycloak container:
```sh theme={null}
# Replace with your keycloak container ID
docker exec -it /bin/bash
```
2. Create a user:
```sh theme={null}
# Replace with your username and with your password
/opt/jboss/keycloak/bin/add-user-keycloak.sh -u -p -r master --roles=admin
```
3. Restart the server. Restarting the server will delete the container and any current state:
```sh theme={null}
/opt/jboss/keycloak/bin/standalone.sh -Djboss.socket.binding.port-offset=100
```
4. Log in to Keycloak from the following URL:
```sh theme={null}
#Replace with your fully qualified domain name
https:///auth/admin/master/console
```
## Adding and editing user roles in Anaconda Server
Once roles have been mapped in Keycloak, you can manage users in Anaconda Server.
1. Click on the **My account** button in the top right.
2. In the dropdown, under **Admin**, select **User Management**.
3. On the **User Management** screen, you can see the **User Roles** table listing the current roles. Click on a role to edit it, or click the **+** icon to add a new role. You can also delete a role by clicking the **x** icon. This will prompt a window to confirm the deletion.
