> ## Documentation Index
> Fetch the complete documentation index at: https://anaconda.com/docs/llms.txt
> Use this file to discover all available pages before exploring further.
# Air-gapped installation
This topic provides guidance for installing Anaconda Server in an air-gapped environment.
To successfully install Anaconda Server in an air-gapped environment, you must have already prepared your environment according to the [Air gap environment preparation](../prep/airgap-prep) topic.
* [System validation checks](#system-validation-checks)
* [Installing Anaconda Server](#installing-anaconda-server)
* [Installing packages and CVEs in Anaconda Server](#installing-packages-and-cves-in-anaconda-server)
* [Restarting and logging in to Anaconda Server as admin](#restarting-and-logging-in-to-anaconda-server-as-admin)
* [Administering Anaconda Server in Keycloak](#administering-anaconda-server-in-keycloak)
* [Using Anaconda Server](#using-anaconda-server)
* [Accessing Anaconda Server hosted installers](#accessing-anaconda-server-hosted-installers)
## System validation checks
Run the following commands to gain information on your system and validate that it is ready for a Anaconda Server install.
Display what type of processor your system is running, including the number of CPUs present:
```sh theme={null}
$cat /proc/cpuinfo
```
Report the amount of free and used memory (both physical and swap) on the system, as well as the shared memory and buffers used by the kernel:
```sh theme={null}
$cat /proc/meminfo
```
A standard Unix command used to display the amount of available disk space for file systems on which the invoking user has appropriate read access:
```sh theme={null}
$df -h
```
Displays the operating system name as well as the system node name, operating system release, operating system version, hardware name, and processor type:
```sh theme={null}
$uname -a
```
Displays the operating system identification data:
```sh theme={null}
$cat /etc/os-release
```
Docker verification check:
```sh theme={null}
$docker-compose --version
```
## Installing Anaconda Server
Obtain the **Anaconda Server installer** and your **Anaconda Server license** from your Anaconda representative before proceeding.
Download Anaconda Server:
```sh theme={null}
# Replace with the installer .sh file
curl -O
```
Make it executable:
```sh theme={null}
$ chmod 700 te-installer-6.1.5-airgap-3d840d9.sh
```
Install Anaconda Server and providing ability to view the output file:
```sh theme={null}
# Replace with your IP address/FQDN
$ ./ate-installer.sh --keep -- --domain --default-user anaconda 2 > &1 | ate.install.output
```
Keep an eye out for the admin credentials generated during the install. **You’ll need these usernames and passwords later.**
The credentials will look like the following:
```sh theme={null}
User anaconda created, realm=dev, roles=admin
password:
User admin created, realm=master, roles=admin
password:
```
Example output:
```sh expandable theme={null}
net.ipv4.conf.all.forwarding = 1
Loading Repo images ...
Loaded image: nginx:6.1.5
Loaded image: keycloak:6.1.5
Loaded image: redis-ubi:6.1.5
Loaded image: postgres:9.6
Loaded image: prom/prometheus:v2.15.2
Loaded image: repo:6.1.5
Loaded image: repo-proxy:6.1.5
Successfully loaded images
Installing into /opt/anaconda/repo
Generated secret for repo-service
secret=978kb2M2BcrWR812PxY8yCvp62906C20
realm role=view-users
Generated secret for repo-account-sync
secret=h4ZkM1892p9gK95W8A68T4T0TA4aK5Z7
# Usernames and passwords below:
User anaconda created, realm=dev, roles=admin
password: T2206u7iNFS0226Qy2ro0lX1
User admin created, realm=master, roles=admin
password: 6kd01Rmqz46849gRh8U78Uu3
```
## Installing packages and CVEs in Anaconda Server
After downloading the zip files during [air gap environment preparation](../prep/airgap-prep#installing-packages-and-cve-files), move them to the preferred location. We have used `/repo/airgap/` in the following example:
```sh theme={null}
mv conda_main_airgap.zip /opt/anaconda/repo/airgap/
mv cve.zip /opt/anaconda/repo/airgap/
```
In the Anaconda Server base directory, update `REPO_CVE_DEFAULT_MIRROR` in the `.env` file to the following:
```sh theme={null}
REPO_CVE_DEFAULT_MIRROR=file://opt/anaconda/repo/airgap/cve.zip
```
## Restarting and logging in to Anaconda Server as admin
In your base Anaconda Server directory, run the following commands:
```sh theme={null}
docker-compose stop
docker-compose up -d
docker ps # to make sure all processes are up
```
Log in to Anaconda Server, either at `http://` or `http://`.
Use the following credentials when logging in:
**Username**: anaconda
**Password**: your generated password from when you installed Anaconda Server
On your very first login, you will be redirected to Keycloak to authenticate your access.
## Administering Anaconda Server in Keycloak
Once you’ve been redirected to Keycloak upon login, you can begin setting up your keycloak.
Log in using the following credentials:
**Username**: admin
**Password**: your generated password from when you installed Anaconda Server
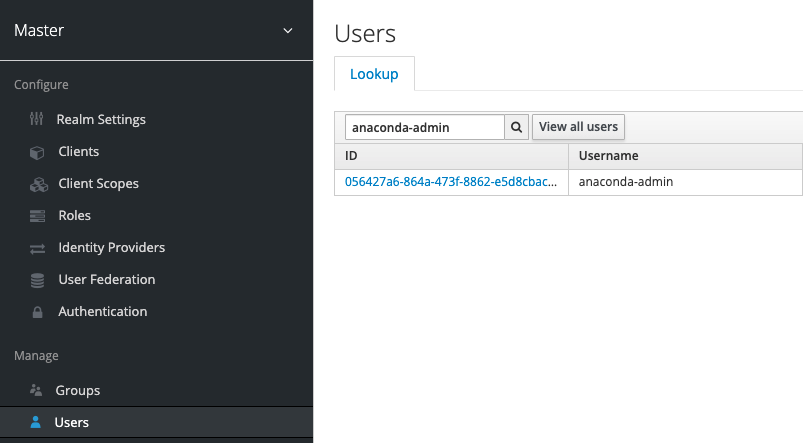
Once you have logged in to Keycloak, you will see the main page, as shown below. On the left-hand side, navigate to **Users**.
Click on the blue hyperlink in the ID column to take you to the admin profile.
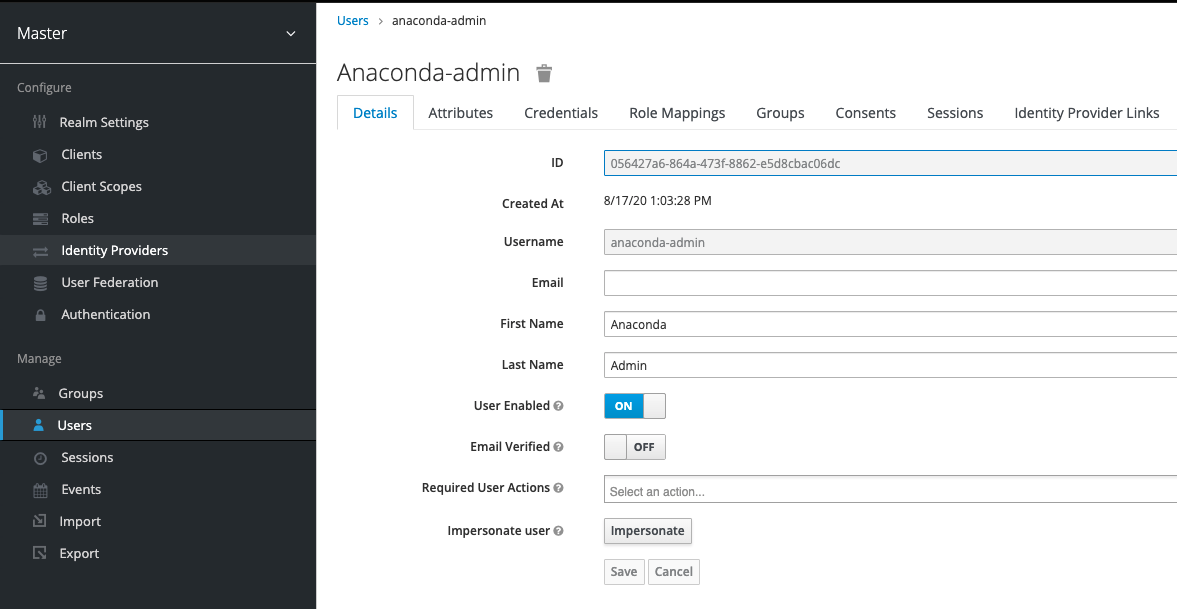
 From the **Details** tab, you can make changes to the profile.
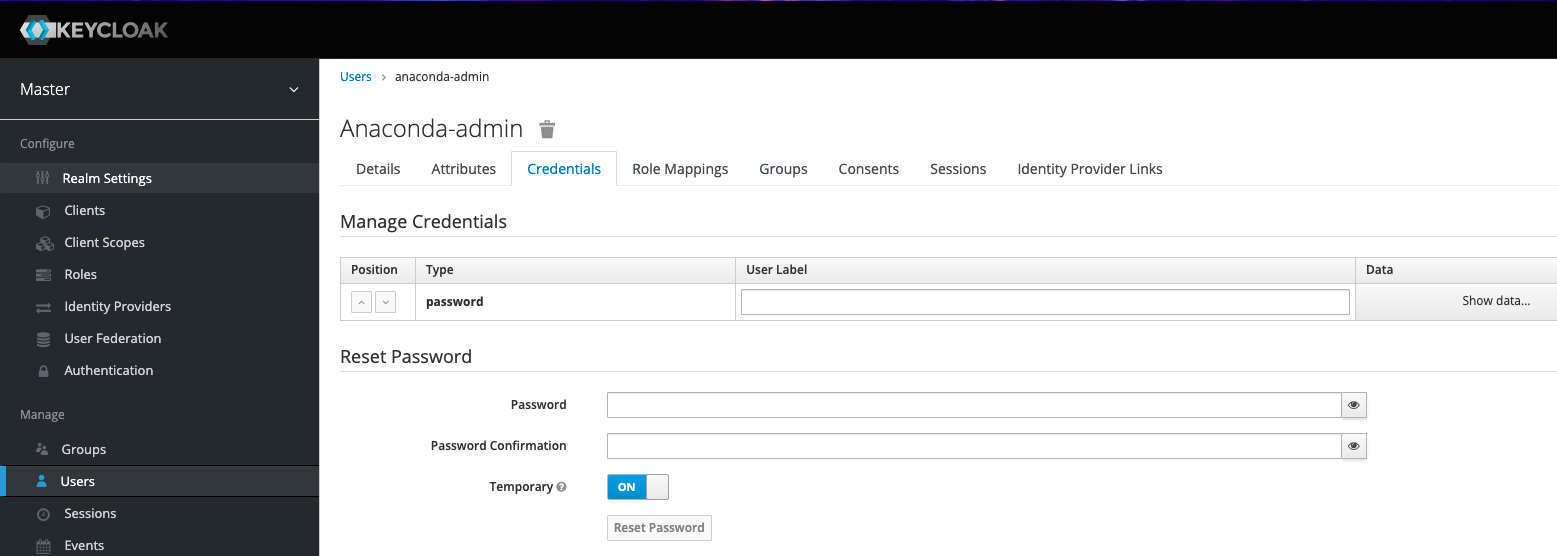
 From the **Credentials** tab, you can change the password.
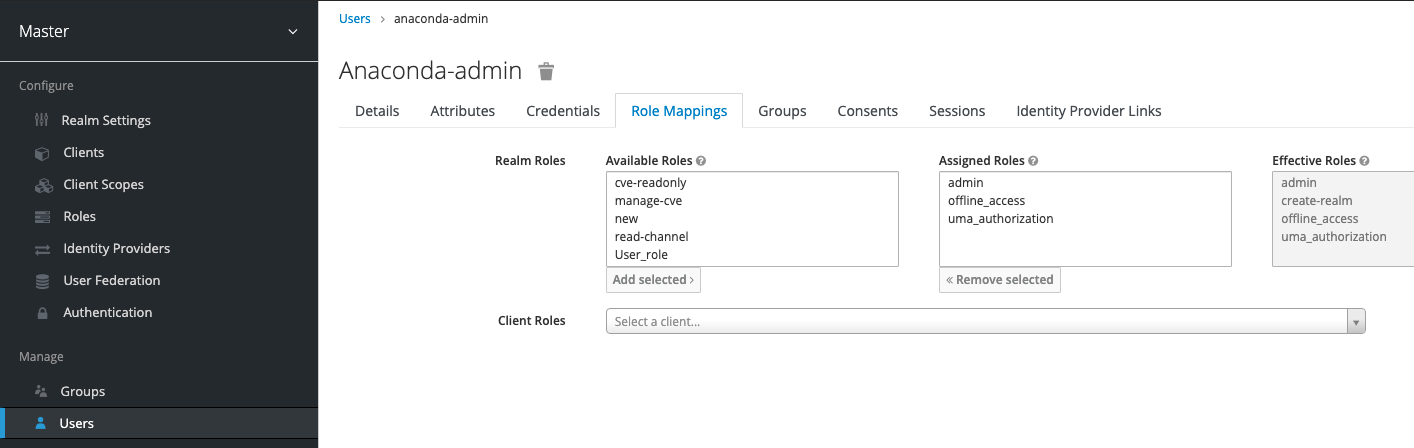
 From the **Role Mappings** tab, you can add or remove permissions.
 Once you have made your changes, you can log in to your Anaconda Server instance. You will be prompted to enter your license to continue. This is the license you obtained from your Anaconda representative.
## Using Anaconda Server
Log in to your Anaconda Server instance as administrator with the generated ID and password.
### Creating a channel
There are a few key things to note when creating a channel:
* If a channel name is already in use, create a new channel with a different name. That channel can then be set as the default channel on the **Settings** page under **My Account**.
* If an email is used as a username, the portion of the email before the "@" symbol (also known as the "local-part") will be used as the username. Because channel names are restricted to a limited set of characters (a-z 0-9 - \_), some characters may be replaced with `_`.
For example, if the email address `annie.anaconda@website.com` is used as a username, the channel `annie_anaconda` will be created.
* If you don’t see any way of creating a channel (as shown in the following section), you might be lacking the permission to do so. Ask your administrator about [modifying your permissions](../admin/Keycloak_config/user_roles) to allow you to create channels.
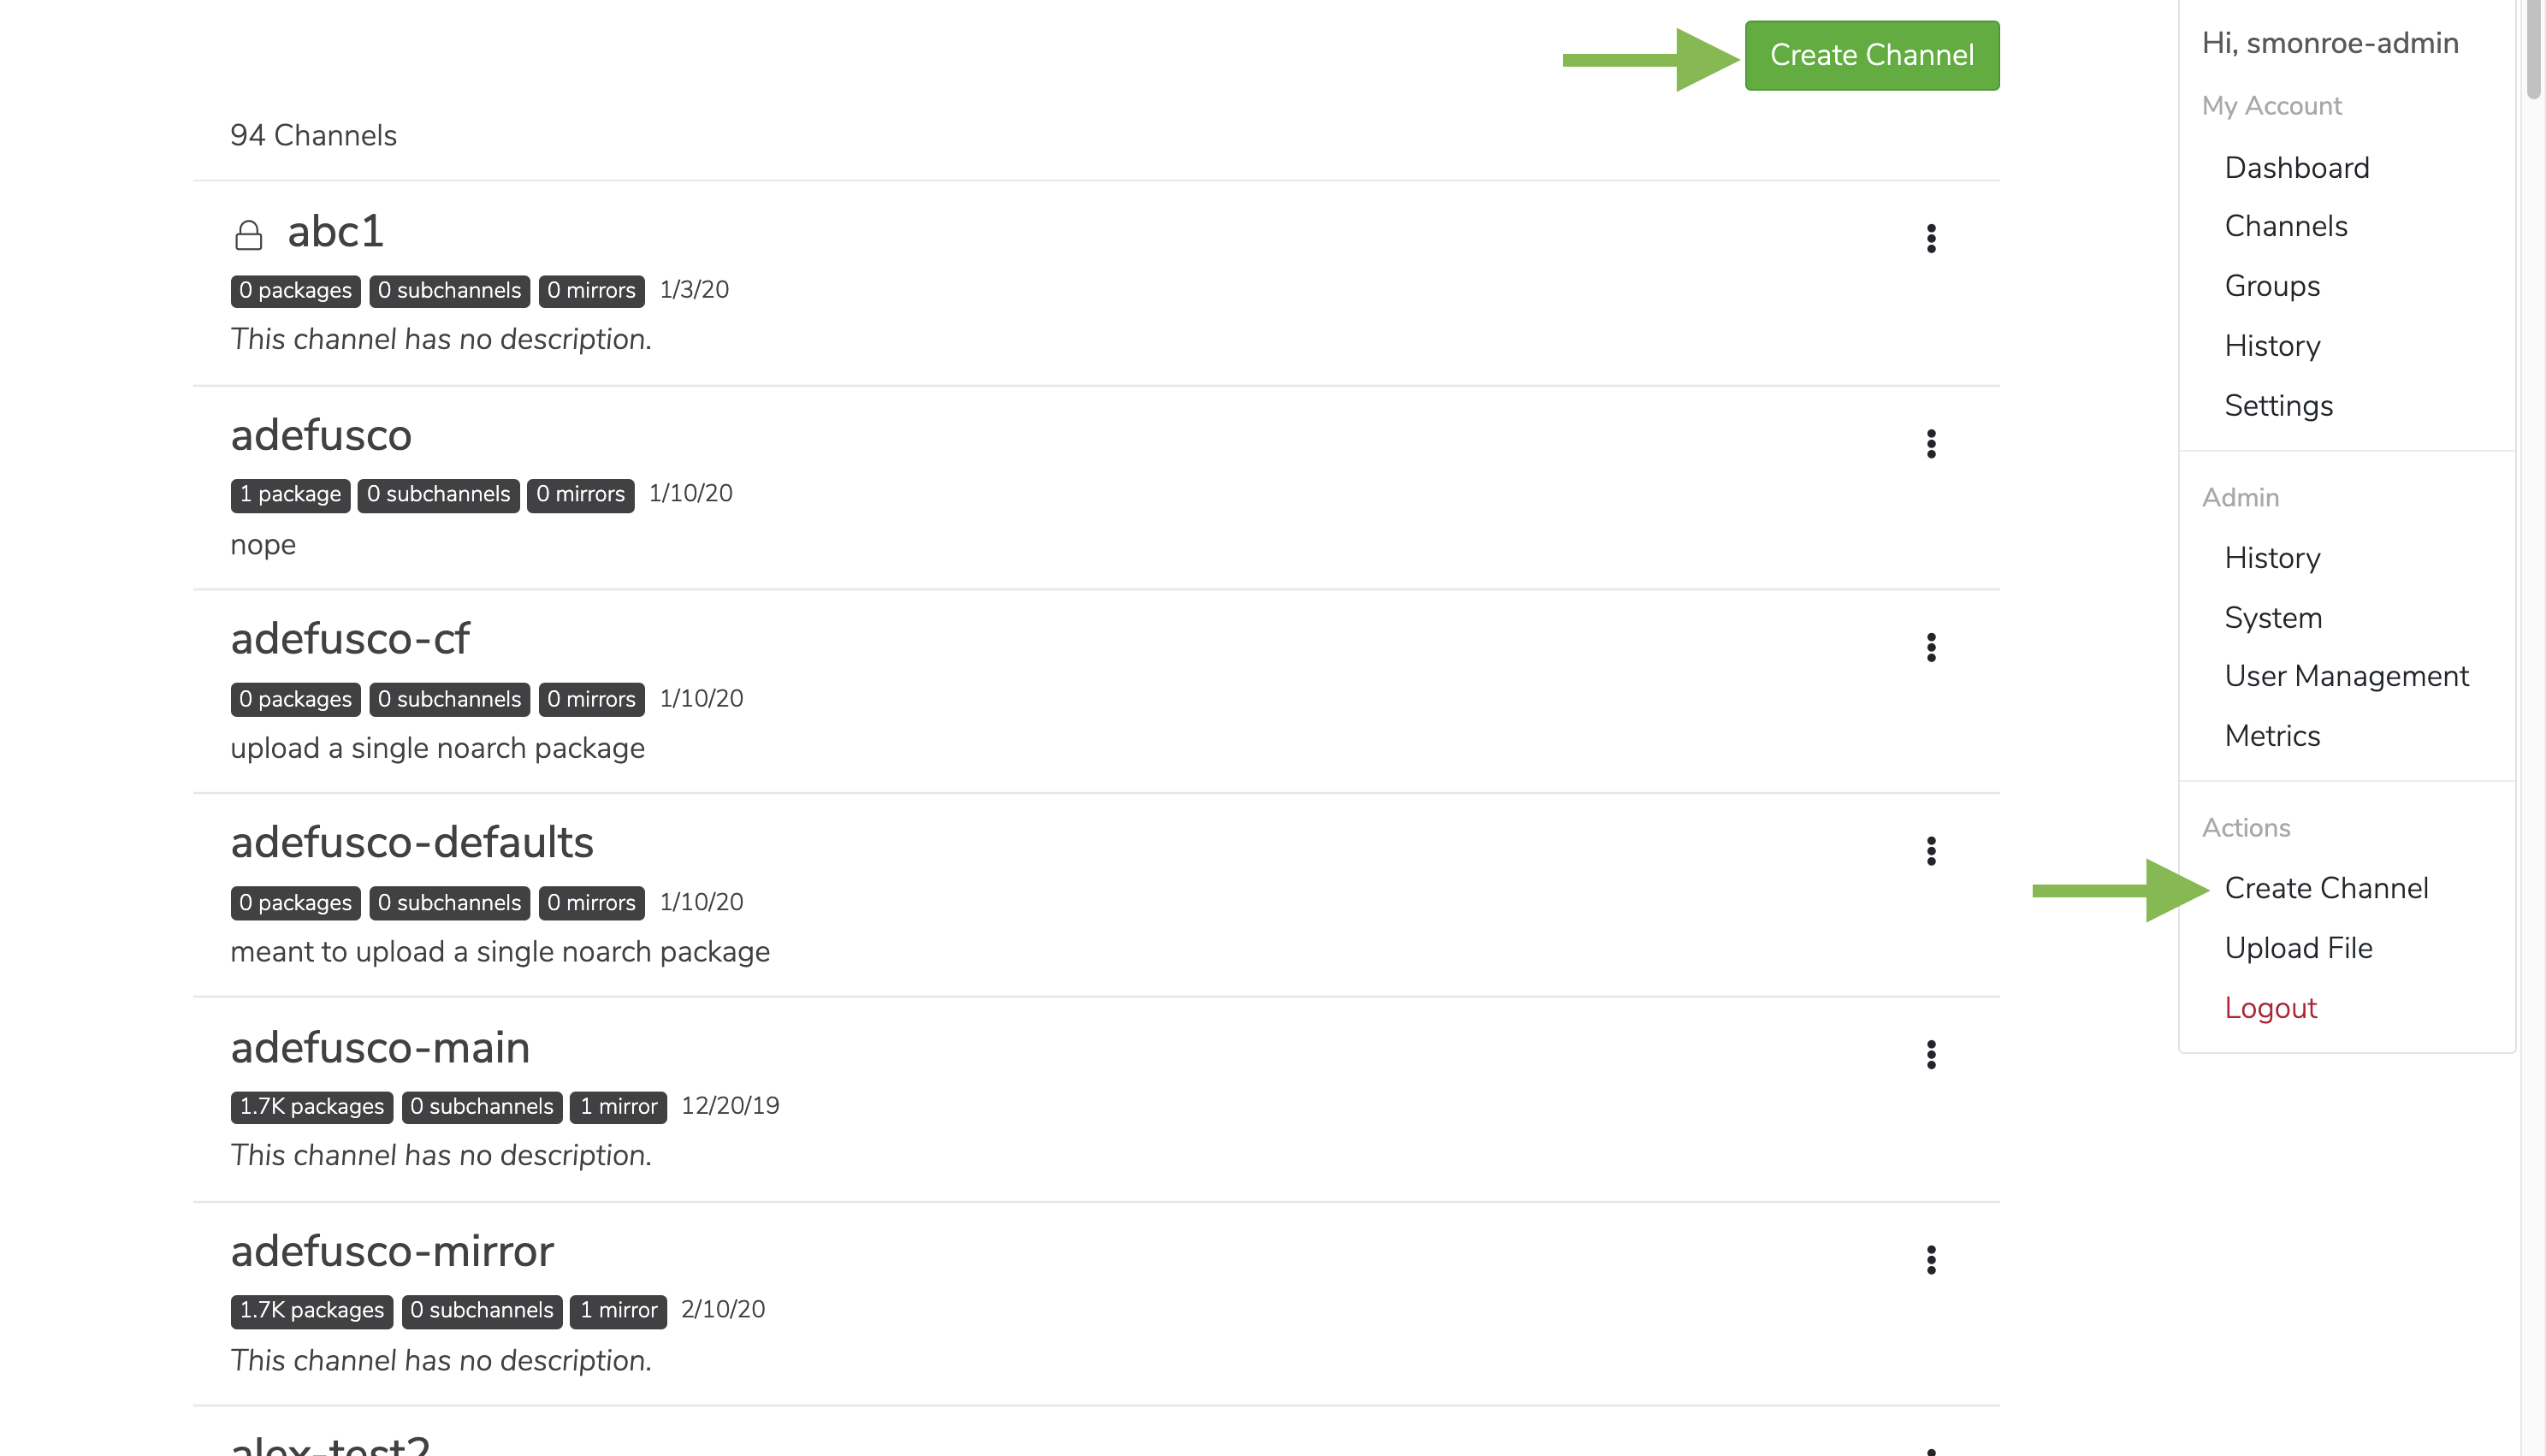
1. Click on the **My account** button in the top right, and then click **Create a Channel**. You can also create a channel by clicking the green **Create Channel** button from your channel page.
Once you have made your changes, you can log in to your Anaconda Server instance. You will be prompted to enter your license to continue. This is the license you obtained from your Anaconda representative.
## Using Anaconda Server
Log in to your Anaconda Server instance as administrator with the generated ID and password.
### Creating a channel
There are a few key things to note when creating a channel:
* If a channel name is already in use, create a new channel with a different name. That channel can then be set as the default channel on the **Settings** page under **My Account**.
* If an email is used as a username, the portion of the email before the "@" symbol (also known as the "local-part") will be used as the username. Because channel names are restricted to a limited set of characters (a-z 0-9 - \_), some characters may be replaced with `_`.
For example, if the email address `annie.anaconda@website.com` is used as a username, the channel `annie_anaconda` will be created.
* If you don’t see any way of creating a channel (as shown in the following section), you might be lacking the permission to do so. Ask your administrator about [modifying your permissions](../admin/Keycloak_config/user_roles) to allow you to create channels.
1. Click on the **My account** button in the top right, and then click **Create a Channel**. You can also create a channel by clicking the green **Create Channel** button from your channel page.
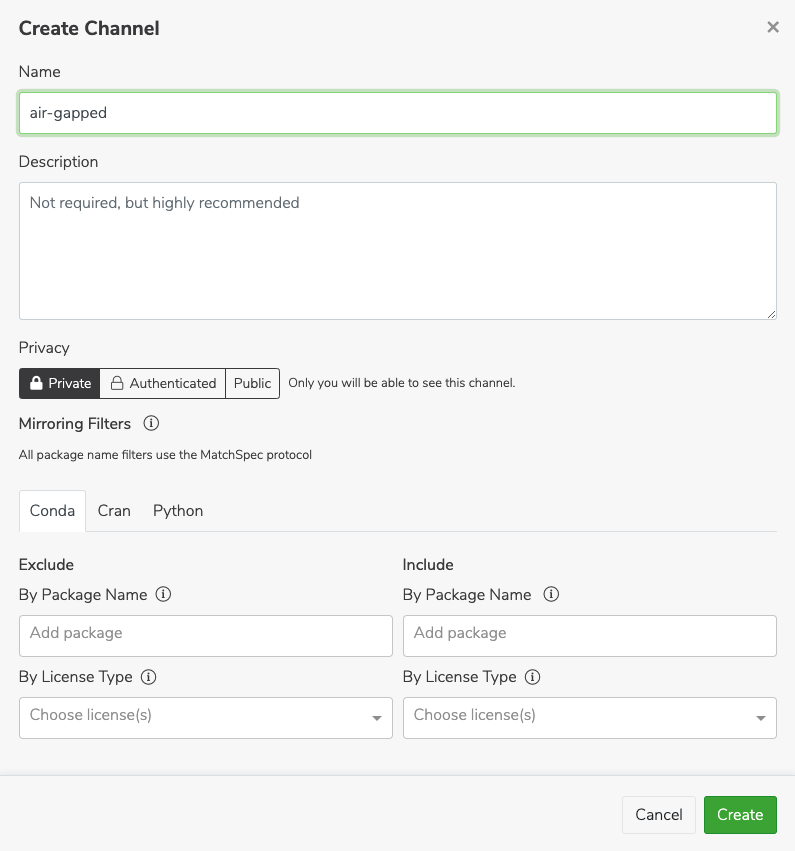
 2. Fill in a name and description when prompted.
 ### Creating a mirror
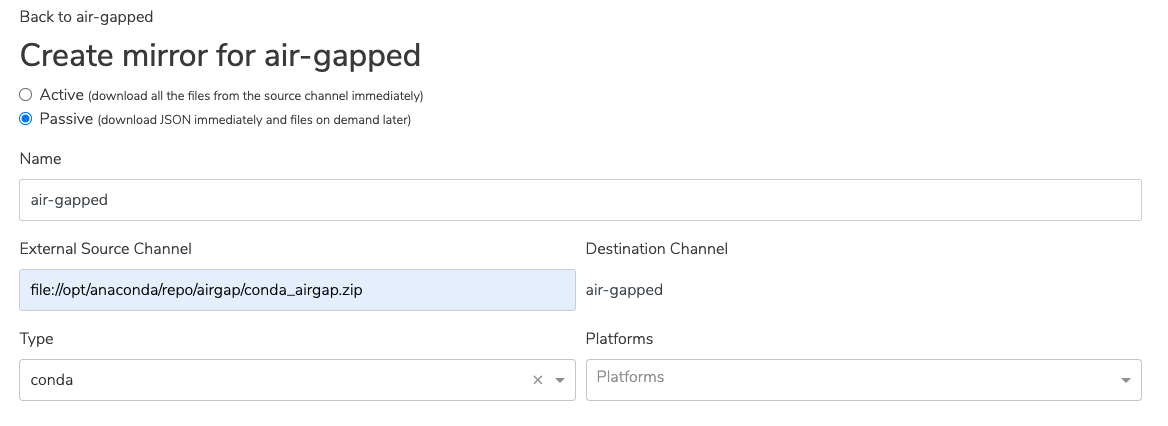
In the new channel, create a new mirror by clicking the green **Mirror** button in the channel.
Ensure **Passive** is selected at the top.
Mirroring passively reduces the storage space used. You will still get the packages you need, as they are already stored in the Anaconda Server instance.
In the field **External Source Channel**, enter the file path to the `conda_main_airgap.zip` file.
### Creating a mirror
In the new channel, create a new mirror by clicking the green **Mirror** button in the channel.
Ensure **Passive** is selected at the top.
Mirroring passively reduces the storage space used. You will still get the packages you need, as they are already stored in the Anaconda Server instance.
In the field **External Source Channel**, enter the file path to the `conda_main_airgap.zip` file.
 ***
Once you have created the mirror, you are all set to use Anaconda Server!
## Accessing Anaconda Server hosted installers
Access installers for your company’s use through Anaconda Server.
You must log in to the VPN provided by Anaconda to access the hosted installer files.
Get a valid `installers.zip` file from the s3 bucket:
```sh theme={null}
curl -O https://anaconda-airgap-te.s3.amazonaws.com/installers.zip
```
Move the `installers.zip` file to the airgap folder of Anaconda Server repository. The default path to this folder is `/opt/anaconda/repo/airgap`:
```sh theme={null}
sudo cp `/installers.zip /opt/anaconda/repo/airgap/`
```
Open the Anaconda Server `docker-compose.yml` file in the Anaconda Server installation directory.
Verify that the docker has access to the `airgap` folder contained in the `volumes` section.
For example:
```sh theme={null}
${BASE_INSTALL_DIR}/airgap:${BASE_INSTALL_DIR}/airgap
```
Add this line to the file in the `environments` section of the `.yml` file:
```sh theme={null}
REPO_MINICONDA_INSTALLERS_ZIP_PATH=/opt/anaconda/repo/airgap/installers.zip
```
Go to the main page of your Anaconda Server instance to download an available installer.
***
Once you have created the mirror, you are all set to use Anaconda Server!
## Accessing Anaconda Server hosted installers
Access installers for your company’s use through Anaconda Server.
You must log in to the VPN provided by Anaconda to access the hosted installer files.
Get a valid `installers.zip` file from the s3 bucket:
```sh theme={null}
curl -O https://anaconda-airgap-te.s3.amazonaws.com/installers.zip
```
Move the `installers.zip` file to the airgap folder of Anaconda Server repository. The default path to this folder is `/opt/anaconda/repo/airgap`:
```sh theme={null}
sudo cp `/installers.zip /opt/anaconda/repo/airgap/`
```
Open the Anaconda Server `docker-compose.yml` file in the Anaconda Server installation directory.
Verify that the docker has access to the `airgap` folder contained in the `volumes` section.
For example:
```sh theme={null}
${BASE_INSTALL_DIR}/airgap:${BASE_INSTALL_DIR}/airgap
```
Add this line to the file in the `environments` section of the `.yml` file:
```sh theme={null}
REPO_MINICONDA_INSTALLERS_ZIP_PATH=/opt/anaconda/repo/airgap/installers.zip
```
Go to the main page of your Anaconda Server instance to download an available installer.