> ## Documentation Index
> Fetch the complete documentation index at: https://anaconda.com/docs/llms.txt
> Use this file to discover all available pages before exploring further.
# Build a batch inference pipeline with XGBoost
This tutorial walks you through building a production batch inference pipeline with XGBoost. You will train a time series forecasting model, run batch inference on new data, and deploy both workflows to run automatically.
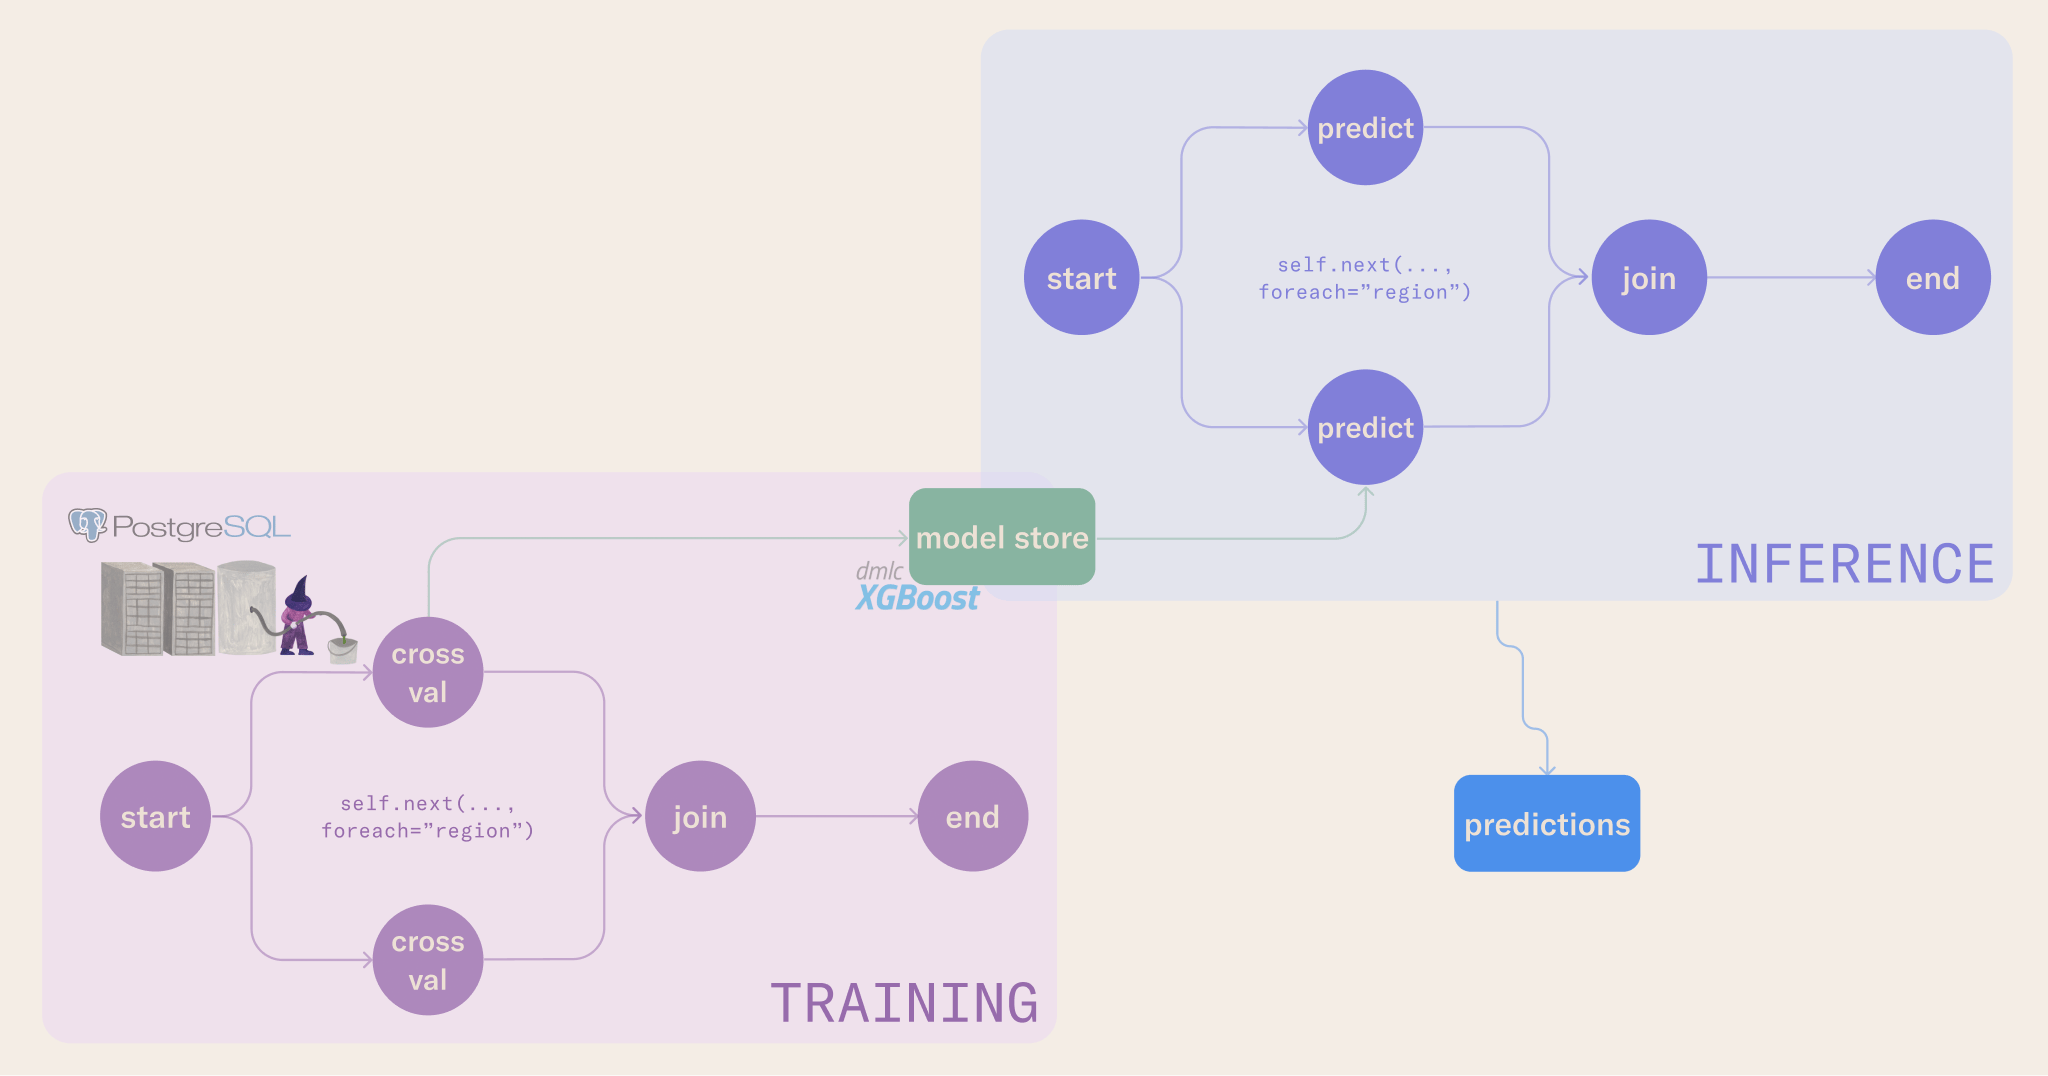 By the end of this tutorial, you will have:
* Compute pools for running the tutorial workloads
* A baseline training notebook and workflow
* A batch inference notebook and workflow
* A sensor workflow that monitors for new data
* Deployed training and inference workflows that run automatically
## Set up a compute pool
The tutorial's workflows run on a dedicated compute pool. Create a pool named `xgboost-tutorial` with at least 14 CPUs and the *Metaflow Tasks* usage type.
Creating a compute pool requires an administrator role. If you do not have administrator access, ask your administrator to create the pool before you begin.
## Download the tutorial content
Download the tutorial content to your workstation:
```bash theme={null}
outerbounds tutorials pull --url https://outerbounds-journeys-content.s3.us-west-2.amazonaws.com/main/journeys.tar.gz --destination-dir ~/learn
```
The XGBoost tutorial content is in `~/learn/ml-end-to-end`. If you prefer a different location, replace `~/learn` with a directory of your choice.
This command downloads all tutorial content as a single bundle. If you plan to work through other tutorials, you already have their content, so you do not need to run the command again.
## Run the baseline notebook
Open the notebook in `00-baseline-nb` from the `~/learn/ml-end-to-end` directory and run it in your workstation. You can study the code cell by cell, or click **Run All** to execute the full notebook.
## Run the baseline training workflow
The baseline workflow in `01-baseline-flow` moves the notebook's training logic into a Metaflow flow.
By the end of this tutorial, you will have:
* Compute pools for running the tutorial workloads
* A baseline training notebook and workflow
* A batch inference notebook and workflow
* A sensor workflow that monitors for new data
* Deployed training and inference workflows that run automatically
## Set up a compute pool
The tutorial's workflows run on a dedicated compute pool. Create a pool named `xgboost-tutorial` with at least 14 CPUs and the *Metaflow Tasks* usage type.
Creating a compute pool requires an administrator role. If you do not have administrator access, ask your administrator to create the pool before you begin.
## Download the tutorial content
Download the tutorial content to your workstation:
```bash theme={null}
outerbounds tutorials pull --url https://outerbounds-journeys-content.s3.us-west-2.amazonaws.com/main/journeys.tar.gz --destination-dir ~/learn
```
The XGBoost tutorial content is in `~/learn/ml-end-to-end`. If you prefer a different location, replace `~/learn` with a directory of your choice.
This command downloads all tutorial content as a single bundle. If you plan to work through other tutorials, you already have their content, so you do not need to run the command again.
## Run the baseline notebook
Open the notebook in `00-baseline-nb` from the `~/learn/ml-end-to-end` directory and run it in your workstation. You can study the code cell by cell, or click **Run All** to execute the full notebook.
## Run the baseline training workflow
The baseline workflow in `01-baseline-flow` moves the notebook's training logic into a Metaflow flow.
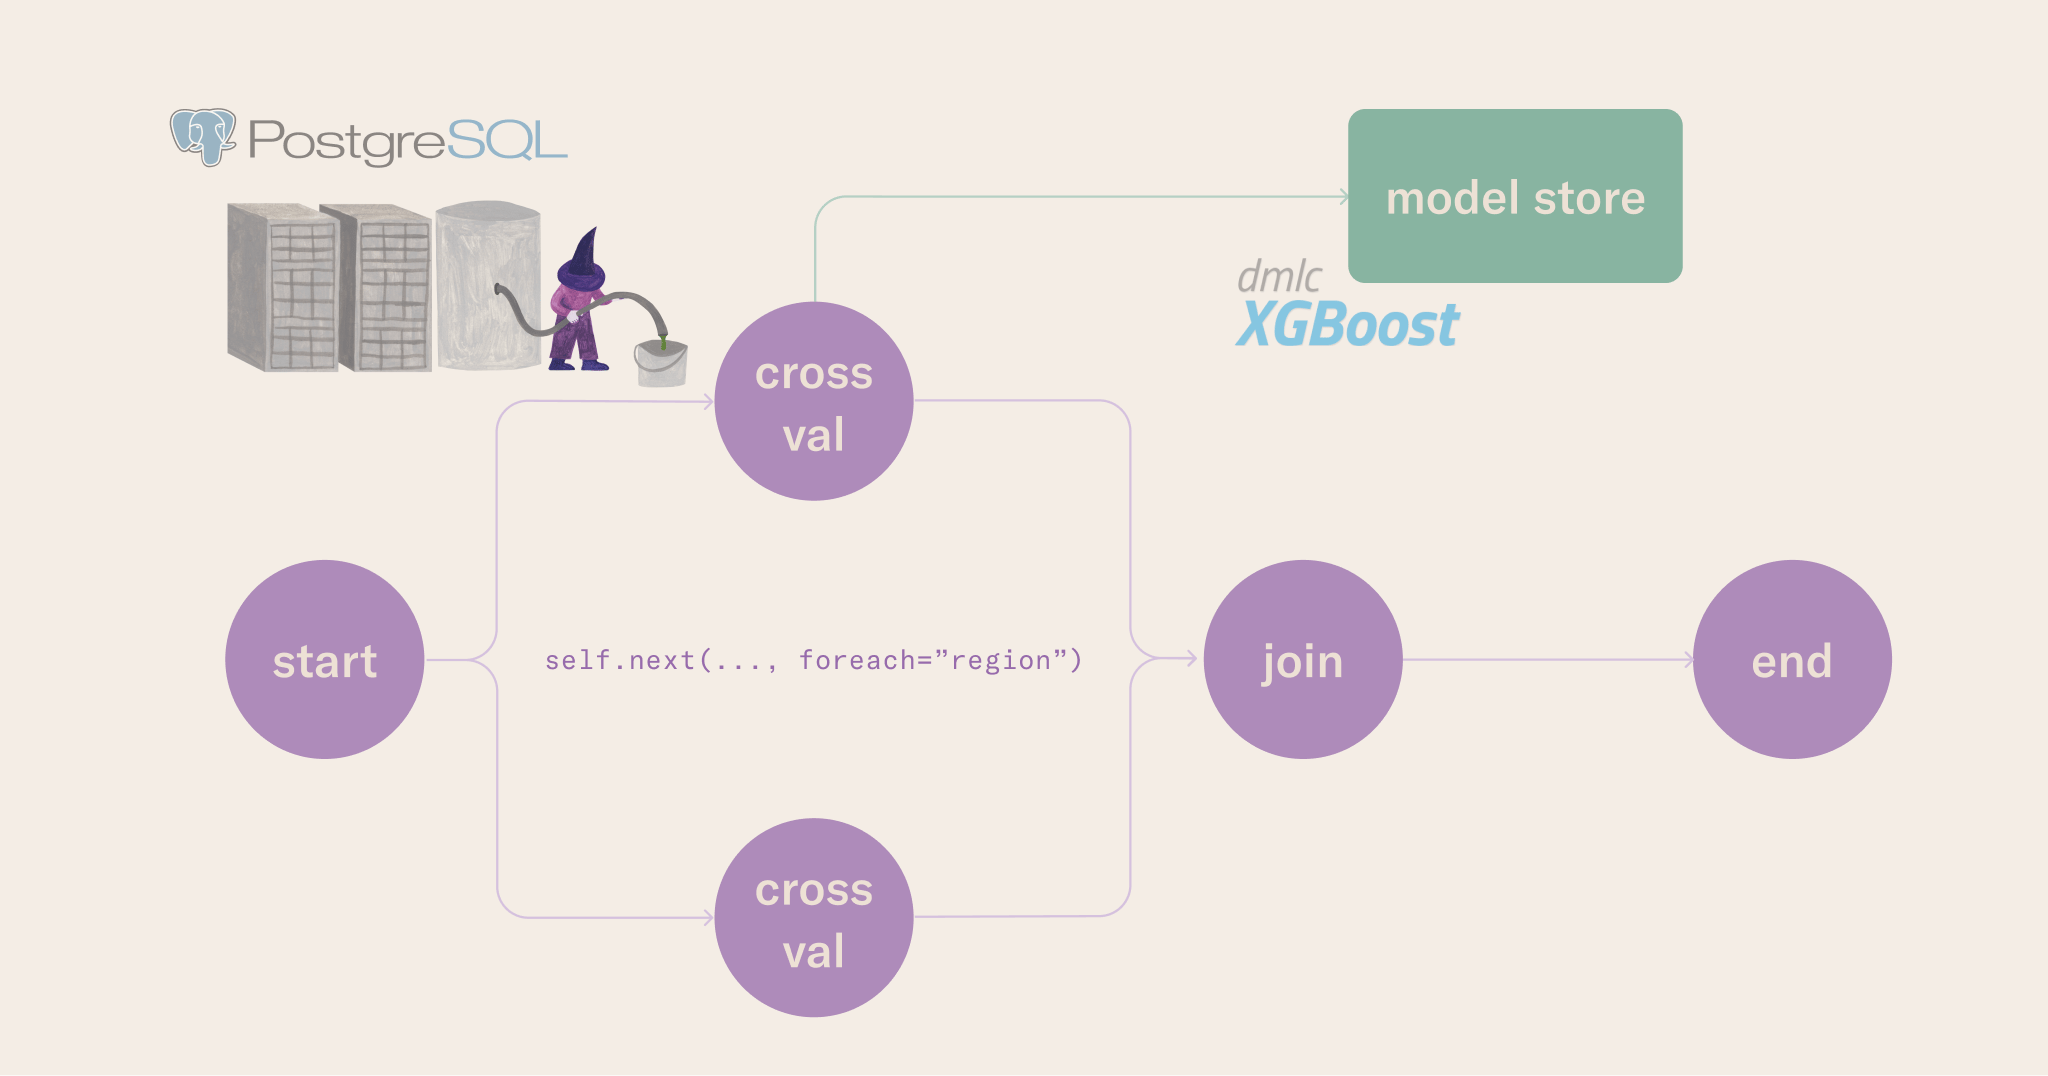 Key details of the run command:
* The `--environment=fast-bakery` flag tells Anaconda Platform how to build the environment for each step. For details, see [environments in Metaflow](https://docs.metaflow.org/scaling/dependencies).
* The `--with kubernetes` flag tells Anaconda Platform to run the workflow on Kubernetes. For details, see [scaling compute in Metaflow](https://docs.metaflow.org/scaling/remote-tasks/introduction).
* The `--smoke` flag trains for one region for one cross-validation fold. Use it to reduce costs and save time during development and integration testing.
```bash theme={null}
cd ~/learn/ml-end-to-end/01-baseline-flow
python flow.py --environment=fast-bakery run --with kubernetes:compute_pool=xgboost-tutorial --smoke True
```
To run the full workflow for all regions in the data, omit `--smoke True` from the command.
The CLI output includes a link to the **Runs** view where you can monitor the run in the Anaconda Platform UI.
## Run the baseline inference notebook
Open the notebook in `02-inference-nb` from the `~/learn/ml-end-to-end` directory and run it in your workstation. This notebook connects the baseline model to a batch inference pattern and shows how to fetch the model trained inside a workflow using the [Metaflow Client API](https://docs.metaflow.org/api/client).
You can also execute the notebook from the command line:
```bash theme={null}
jupyter execute 02-inference-nb/main.ipynb
```
## Run the baseline inference workflow
The inference workflow in `03-inference-flow` fetches the model stored by the training workflow and runs batch inference for the next day in the forecast. Predictions are stored as Metaflow artifacts (versioned by the flow run ID), so downstream consumers can fetch them and trace them back to the data and model that produced them.
```bash theme={null}
cd ~/learn/ml-end-to-end/03-inference-flow
python flow.py --environment=fast-bakery run --with kubernetes:compute_pool=xgboost-tutorial --smoke True
```
## Deploy the sensor workflow
So far, you have run the workflows manually. The sensor workflow runs every five minutes by default, checking the database for updates and triggering the inference workflow when new data is available. You can modify the interval in the `@schedule` decorator.
Two commands manage production deployments:
* `python flow.py argo-workflows create` packages the workflow and deploys it to the production orchestrator.
* `python flow.py argo-workflows trigger` manually triggers a run on the production orchestrator.
For details, see [automating workflows in Metaflow](https://docs.metaflow.org/production/introduction#reliably-running-automated-flows), which Anaconda Platform builds on.
```bash theme={null}
cd ~/learn/ml-end-to-end/06-sensor-flow
python flow.py --environment=fast-bakery argo-workflows create
```
## Monitor deployed workflows
You can monitor deployed workflows in the **Workflows** view. Open a workflow's detail page to see its runs, trigger it manually, or view its configuration.
## Deploy the baseline training workflow
Deploy the training workflow to the production orchestrator so the model retrains at a regular interval:
```bash theme={null}
cd ~/learn/ml-end-to-end/01-baseline-flow
python flow.py --environment=fast-bakery argo-workflows create
python flow.py --environment=fast-bakery argo-workflows trigger
```
The choice to retrain on a schedule is use case dependent. You might want to retrain based on triggers like [detecting change points](https://en.wikipedia.org/wiki/Change_detection), model performance degradation, or other exogenous events.
## Deploy the baseline inference workflow
Where the training workflow is scheduled, the inference workflow is triggered by the sensor workflow when new data is available. This pattern fits when you have a clear separation between training and inference, and you want predictions computed as soon as new data arrives:
```bash theme={null}
cd ~/learn/ml-end-to-end/03-inference-flow
python flow.py --environment=fast-bakery argo-workflows create
python flow.py --environment=fast-bakery argo-workflows trigger
```
## Next steps
You have built a production-ready system for time series forecasting at scale, connecting notebook-based experimentation to scheduled and event-driven batch inference pipelines.
Key details of the run command:
* The `--environment=fast-bakery` flag tells Anaconda Platform how to build the environment for each step. For details, see [environments in Metaflow](https://docs.metaflow.org/scaling/dependencies).
* The `--with kubernetes` flag tells Anaconda Platform to run the workflow on Kubernetes. For details, see [scaling compute in Metaflow](https://docs.metaflow.org/scaling/remote-tasks/introduction).
* The `--smoke` flag trains for one region for one cross-validation fold. Use it to reduce costs and save time during development and integration testing.
```bash theme={null}
cd ~/learn/ml-end-to-end/01-baseline-flow
python flow.py --environment=fast-bakery run --with kubernetes:compute_pool=xgboost-tutorial --smoke True
```
To run the full workflow for all regions in the data, omit `--smoke True` from the command.
The CLI output includes a link to the **Runs** view where you can monitor the run in the Anaconda Platform UI.
## Run the baseline inference notebook
Open the notebook in `02-inference-nb` from the `~/learn/ml-end-to-end` directory and run it in your workstation. This notebook connects the baseline model to a batch inference pattern and shows how to fetch the model trained inside a workflow using the [Metaflow Client API](https://docs.metaflow.org/api/client).
You can also execute the notebook from the command line:
```bash theme={null}
jupyter execute 02-inference-nb/main.ipynb
```
## Run the baseline inference workflow
The inference workflow in `03-inference-flow` fetches the model stored by the training workflow and runs batch inference for the next day in the forecast. Predictions are stored as Metaflow artifacts (versioned by the flow run ID), so downstream consumers can fetch them and trace them back to the data and model that produced them.
```bash theme={null}
cd ~/learn/ml-end-to-end/03-inference-flow
python flow.py --environment=fast-bakery run --with kubernetes:compute_pool=xgboost-tutorial --smoke True
```
## Deploy the sensor workflow
So far, you have run the workflows manually. The sensor workflow runs every five minutes by default, checking the database for updates and triggering the inference workflow when new data is available. You can modify the interval in the `@schedule` decorator.
Two commands manage production deployments:
* `python flow.py argo-workflows create` packages the workflow and deploys it to the production orchestrator.
* `python flow.py argo-workflows trigger` manually triggers a run on the production orchestrator.
For details, see [automating workflows in Metaflow](https://docs.metaflow.org/production/introduction#reliably-running-automated-flows), which Anaconda Platform builds on.
```bash theme={null}
cd ~/learn/ml-end-to-end/06-sensor-flow
python flow.py --environment=fast-bakery argo-workflows create
```
## Monitor deployed workflows
You can monitor deployed workflows in the **Workflows** view. Open a workflow's detail page to see its runs, trigger it manually, or view its configuration.
## Deploy the baseline training workflow
Deploy the training workflow to the production orchestrator so the model retrains at a regular interval:
```bash theme={null}
cd ~/learn/ml-end-to-end/01-baseline-flow
python flow.py --environment=fast-bakery argo-workflows create
python flow.py --environment=fast-bakery argo-workflows trigger
```
The choice to retrain on a schedule is use case dependent. You might want to retrain based on triggers like [detecting change points](https://en.wikipedia.org/wiki/Change_detection), model performance degradation, or other exogenous events.
## Deploy the baseline inference workflow
Where the training workflow is scheduled, the inference workflow is triggered by the sensor workflow when new data is available. This pattern fits when you have a clear separation between training and inference, and you want predictions computed as soon as new data arrives:
```bash theme={null}
cd ~/learn/ml-end-to-end/03-inference-flow
python flow.py --environment=fast-bakery argo-workflows create
python flow.py --environment=fast-bakery argo-workflows trigger
```
## Next steps
You have built a production-ready system for time series forecasting at scale, connecting notebook-based experimentation to scheduled and event-driven batch inference pipelines.
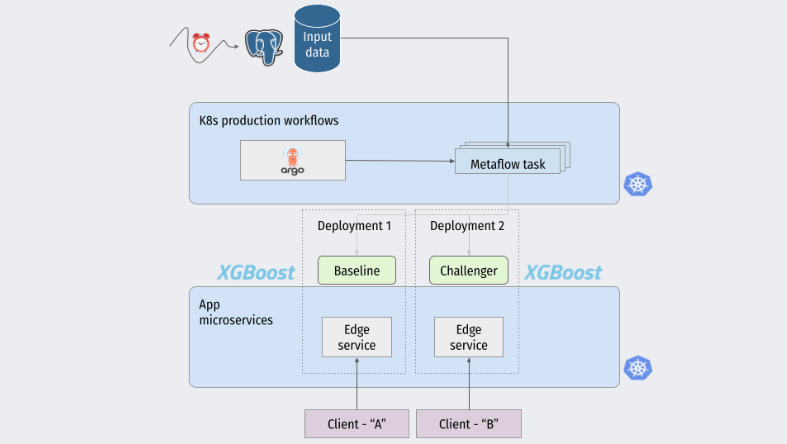 To build on this tutorial:
* Improve the features and modeling approach. The tutorial repository includes a starter pack with more advanced time series feature engineering methods.
* Deploy a challenger model alongside the baseline and compare their performance.
* Add alerting for prediction quality degradation.
To build on this tutorial:
* Improve the features and modeling approach. The tutorial repository includes a starter pack with more advanced time series feature engineering methods.
* Deploy a challenger model alongside the baseline and compare their performance.
* Add alerting for prediction quality degradation.