> ## Documentation Index
> Fetch the complete documentation index at: https://anaconda.com/docs/llms.txt
> Use this file to discover all available pages before exploring further.
# Configuring and using secrets
export const Comments = ({children}) => {
return ;
};
This guide assumes you have read [Connect and run your first flow](/docs/platform/getting-started/connect-and-first-run).
Metaflow provides a built-in mechanism, the [`@secrets` decorator](https://docs.metaflow.org/scaling/secrets), for securely accessing secrets such as database passwords and API keys in your tasks. Anaconda Platform stores and manages the secrets for you, so you can grant tasks access to the credentials they need without handling secret storage yourself.
By default, secrets are stored in the control plane account operated by Anaconda. If you would prefer to store secrets entirely within the data plane you control, contact [Anaconda support](https://support.anaconda.com/).
## Integrations and secrets
The **Integrations** page of your Anaconda Platform deployment is where you manage credentials and secrets for the external services your teams use. The page offers dedicated integrations for popular services, such as databases, cloud storage, IAM roles, and model providers, and each integration guides you through that service's setup process.
## Creating a custom secret
Admin only
For credentials that do not belong to a dedicated integration, such as an API token for an internal service, you can create a custom secret as a set of key-value pairs.
To create a custom secret:
1. Select **Integrations** in the left-hand navigation.
2. Click the **Custom** card.
3. Enter a **Name** and **Description** for the integration.
The name you enter is how you reference the secret in your flows.
4. Under **Key** and **Value**, enter each key-value pair you want the secret to contain. Click **Add row** to include more key-value pairs.
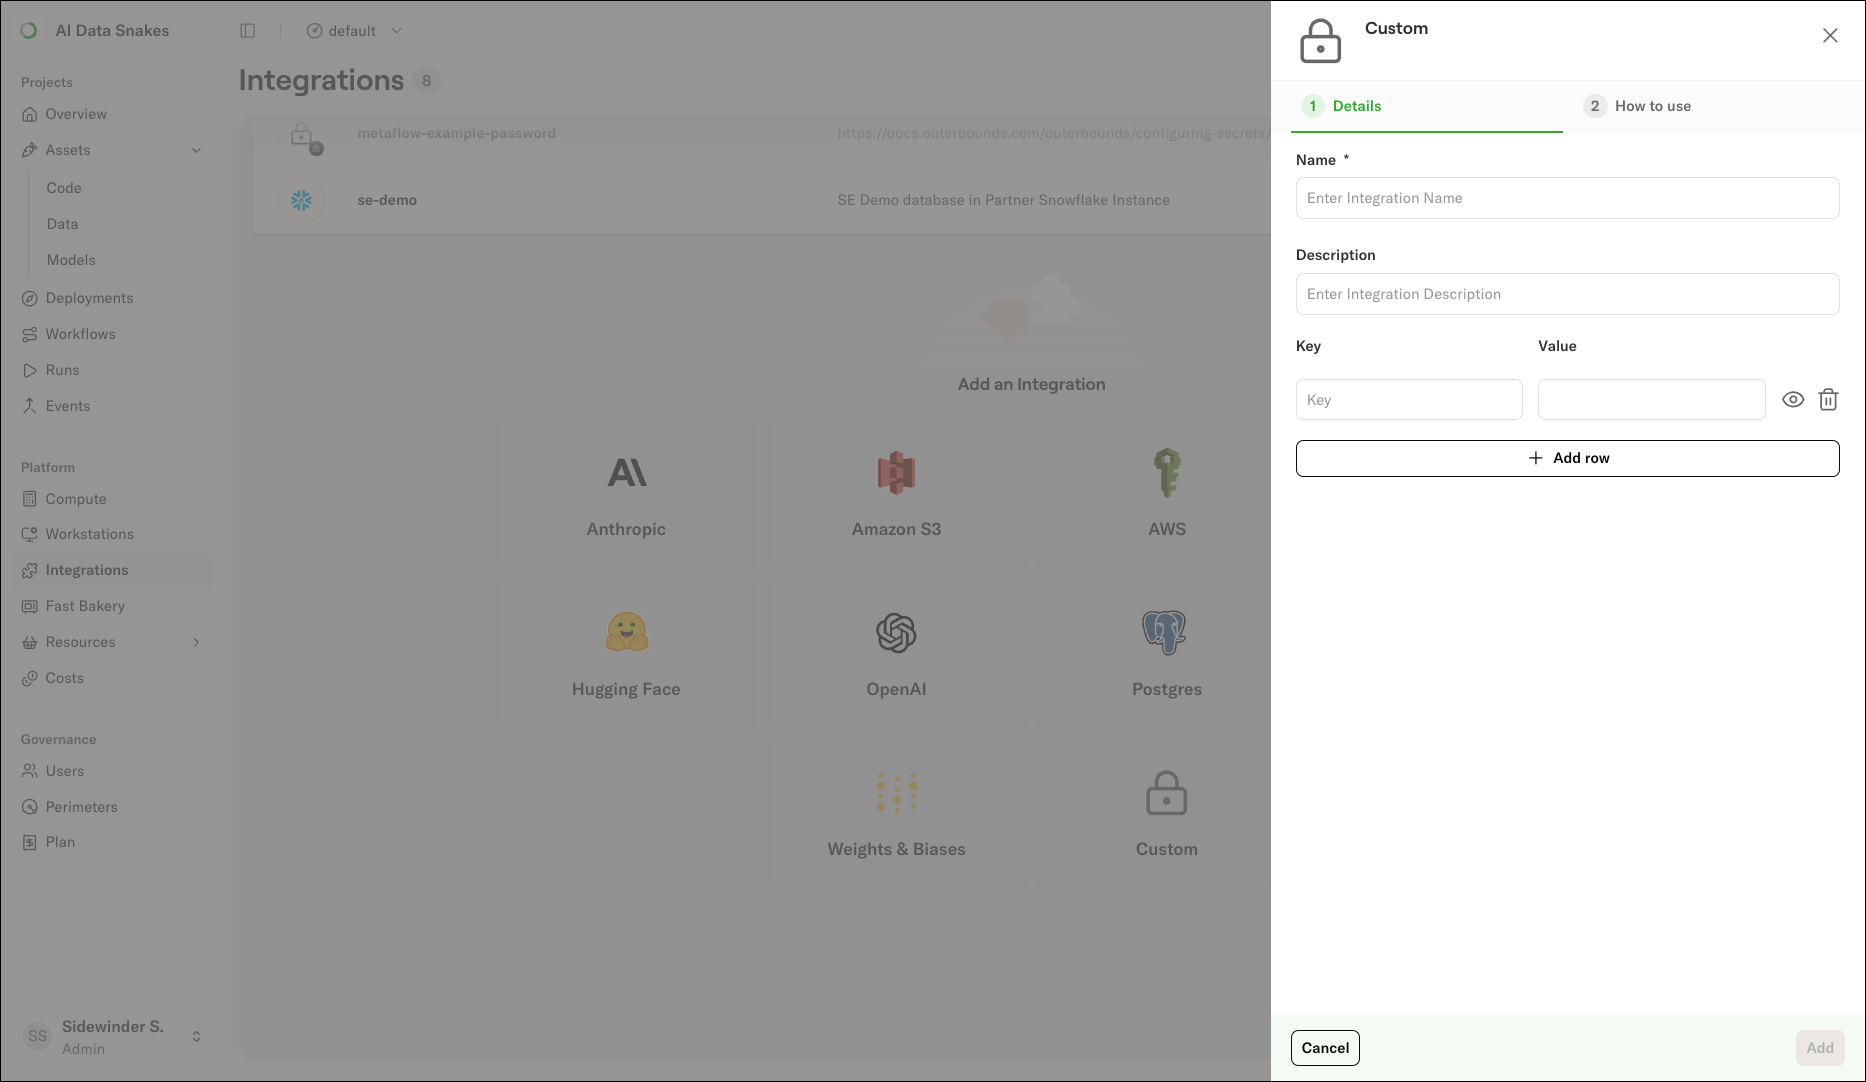 5. Click **Add** to store your key-value pairs as a secret on the platform and make them available to your tasks.
## Using secrets
After you create one or more secrets, access them in your flows with the [`@secrets` decorator](https://docs.metaflow.org/scaling/secrets). During task execution, the platform retrieves the secrets automatically and exposes each key as an environment variable.
Reference a custom secret by prefixing its name with `outerbounds.`, then read each key from the environment exactly as you entered it. For example, if you created a secret named `my-secret` containing the keys `api_key` and `api_url`:
```python highlight={4, 8-9} theme={null}
from metaflow import FlowSpec, step, secrets
class SecretsFlow(FlowSpec):
@secrets(sources=["outerbounds.my-secret"])
@step
def start(self):
from os import environ
api_key = environ["api_key"]
api_url = environ["api_url"]
```
Every integration includes a ready-to-use code snippet that contains the exact source string and environment variable names for that integration. To copy it, open the integration on the **Integrations** page and select the **How to use** tab.
## Using a custom IAM role
To access secrets stored in AWS Secrets Manager with a custom IAM role, create an AWS IAM integration and reference the role in your flow. This is useful when your secrets are stored in a different AWS account than the one where your tasks run. For more on storing secrets in AWS Secrets Manager directly, see [Configuring secrets with AWS Secrets Manager](/docs/platform/guides/security/configuring-secrets-with-aws-secret-manager).
### Setting up the IAM role integration
1. On the **Integrations** page, select the **AWS** card.
2. Enter a **Name** and **Description** for the integration.
3. In the **IAM Role ARN** field, enter the ARN of your IAM role. To create a new role or configure an existing one, expand **Getting your IAM role ARN?** and follow the instructions provided. The role needs:
* A trust policy that allows the platform to assume the role.
* A tag with the key `outerbounds.com/accessible-by-deployment` and the value set to your deployment name, as shown in the form. The tag allows the platform to discover the role.
* Permissions to access the secret. For example, grant `secretsmanager:GetSecretValue` for the secret's ARN and `kms:Decrypt` for the KMS key used to encrypt the secret.
For additional help managing tags on IAM roles, see the [official AWS documentation](https://docs.aws.amazon.com/IAM/latest/UserGuide/id_tags_roles.html#id_tags_roles_procs-console).
4. Click **Add**.
### Using the IAM role with secrets
Once you have created the IAM role integration, use it with the `@secrets` decorator by specifying the `role` parameter:
```python expandable theme={null}
from metaflow import FlowSpec, step, secrets
import os
class CustomRoleSecretsFlow(FlowSpec):
@secrets(
sources=[""],
role="arn:aws:iam:::role/"
)
@step
def start(self):
# The secret is available as an environment variable
print("secret value", os.environ['test_secret'])
self.next(self.end)
@step
def end(self):
pass
if __name__ == "__main__":
CustomRoleSecretsFlow()
```
Replace \ with the name of your secret in AWS Secrets Manager.
5. Click **Add** to store your key-value pairs as a secret on the platform and make them available to your tasks.
## Using secrets
After you create one or more secrets, access them in your flows with the [`@secrets` decorator](https://docs.metaflow.org/scaling/secrets). During task execution, the platform retrieves the secrets automatically and exposes each key as an environment variable.
Reference a custom secret by prefixing its name with `outerbounds.`, then read each key from the environment exactly as you entered it. For example, if you created a secret named `my-secret` containing the keys `api_key` and `api_url`:
```python highlight={4, 8-9} theme={null}
from metaflow import FlowSpec, step, secrets
class SecretsFlow(FlowSpec):
@secrets(sources=["outerbounds.my-secret"])
@step
def start(self):
from os import environ
api_key = environ["api_key"]
api_url = environ["api_url"]
```
Every integration includes a ready-to-use code snippet that contains the exact source string and environment variable names for that integration. To copy it, open the integration on the **Integrations** page and select the **How to use** tab.
## Using a custom IAM role
To access secrets stored in AWS Secrets Manager with a custom IAM role, create an AWS IAM integration and reference the role in your flow. This is useful when your secrets are stored in a different AWS account than the one where your tasks run. For more on storing secrets in AWS Secrets Manager directly, see [Configuring secrets with AWS Secrets Manager](/docs/platform/guides/security/configuring-secrets-with-aws-secret-manager).
### Setting up the IAM role integration
1. On the **Integrations** page, select the **AWS** card.
2. Enter a **Name** and **Description** for the integration.
3. In the **IAM Role ARN** field, enter the ARN of your IAM role. To create a new role or configure an existing one, expand **Getting your IAM role ARN?** and follow the instructions provided. The role needs:
* A trust policy that allows the platform to assume the role.
* A tag with the key `outerbounds.com/accessible-by-deployment` and the value set to your deployment name, as shown in the form. The tag allows the platform to discover the role.
* Permissions to access the secret. For example, grant `secretsmanager:GetSecretValue` for the secret's ARN and `kms:Decrypt` for the KMS key used to encrypt the secret.
For additional help managing tags on IAM roles, see the [official AWS documentation](https://docs.aws.amazon.com/IAM/latest/UserGuide/id_tags_roles.html#id_tags_roles_procs-console).
4. Click **Add**.
### Using the IAM role with secrets
Once you have created the IAM role integration, use it with the `@secrets` decorator by specifying the `role` parameter:
```python expandable theme={null}
from metaflow import FlowSpec, step, secrets
import os
class CustomRoleSecretsFlow(FlowSpec):
@secrets(
sources=[""],
role="arn:aws:iam:::role/"
)
@step
def start(self):
# The secret is available as an environment variable
print("secret value", os.environ['test_secret'])
self.next(self.end)
@step
def end(self):
pass
if __name__ == "__main__":
CustomRoleSecretsFlow()
```
Replace \ with the name of your secret in AWS Secrets Manager.
Replace \ with the ID of the AWS account that contains the IAM role.
Replace \ with the name of the IAM role you created for the integration.
This approach works whether the secrets are in the same AWS account as your deployment or in a different one. Make sure the IAM role has the necessary permissions for the specific secrets you need. You can also control access through the secret's resource-based policy as an alternative to IAM roles.
The AWS integration is not limited to secrets. Tasks run with a default task execution role that has limited permissions. When a task assumes a role with a wider scope of permissions through the integration's role ARN, it can access any AWS service that role allows.
For example, you can pass the role ARN to the `get_aws_client` helper in the Metaflow extensions to create a client for another AWS service:
```python theme={null}
@step
def perform_some_aws_task(self):
client = get_aws_client("dynamodb", role_arn="arn:aws:iam:::role/")
```
Replace \ with the ID of the AWS account that contains the IAM role.
Replace \ with the name of the IAM role you created for the integration.