> ## Documentation Index
> Fetch the complete documentation index at: https://anaconda.com/docs/llms.txt
> Use this file to discover all available pages before exploring further.
# Example project
export const TroubleshootSolution = ({children}) => <>
Solution
{children}
;
export const TroubleshootCause = ({children}) =>
Cause
{children}
;
export const TroubleshootTitle = ({children}) => <>
{children}
;
export const Troubleshoot = ({children}) => ;
This example project fetches the latest comic strip from [xkcd.com](https://xkcd.com), updates a data asset, and triggers a flow that explains the comic using a small visual language model running locally. You can also browse past comics through a deployed app and choose to explain any of them.
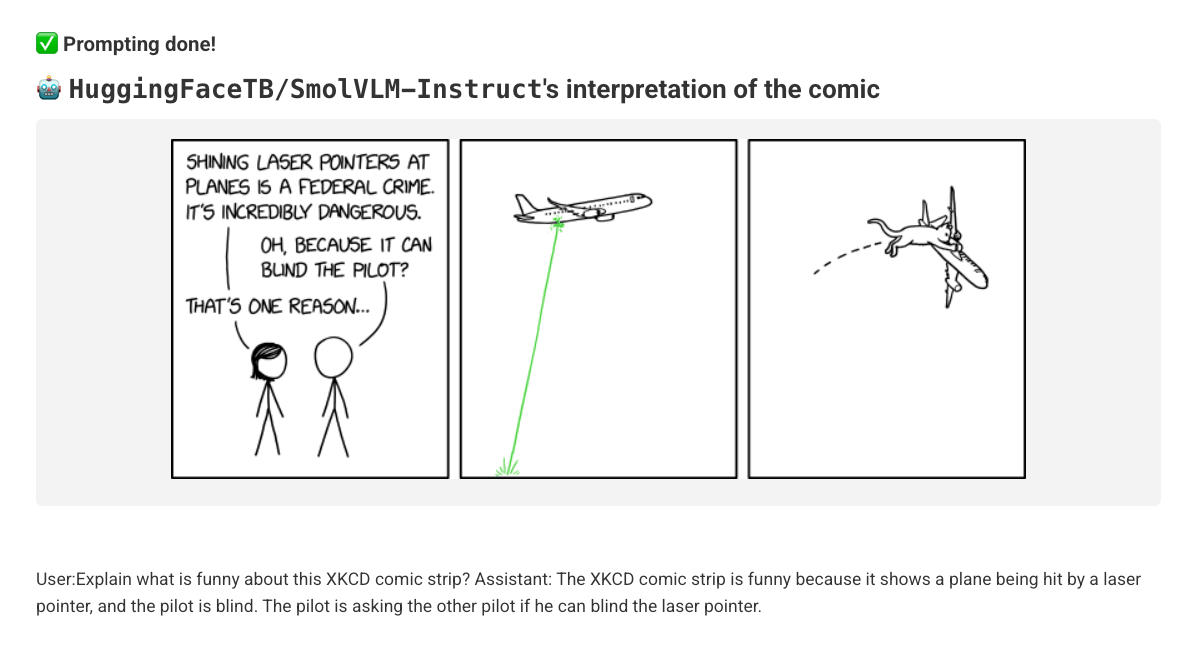 The example is not a gold standard for performant, accurate AI. Explaining one comic as a batch process with a small model on a CPU instance is deliberately modest, but it offers a good baseline. You can improve the example by adding a compute pool with GPUs, running larger batches of comics through the model, or upgrading the model itself.
More importantly, the example demonstrates concisely how [all the elements of a project](/docs/platform/guides/projects/project-structure) (flows, deployments, code, data, and models) come together to create a complete, live AI system powered by a local model. You can use the project as inspiration and as a template for your own projects.
## Deploying the example
Deploy the project following the steps in [Setting up a new project](/docs/platform/guides/projects/setting-up-a-new-project):
1. Clone the repository:
```sh theme={null}
git clone https://github.com/outerbounds/ob-project-starter.git
```
2. Change `platform` in [`obproject.toml`](https://github.com/outerbounds/ob-project-starter/blob/main/obproject.toml#L2) to match your platform URL.
3. Create a corresponding CI/CD machine user, as described in [Programmatic access with machine users](/docs/platform/guides/security/programmatic-access-via-machine-users).
4. Open a pull request and make a commit to trigger a project update.
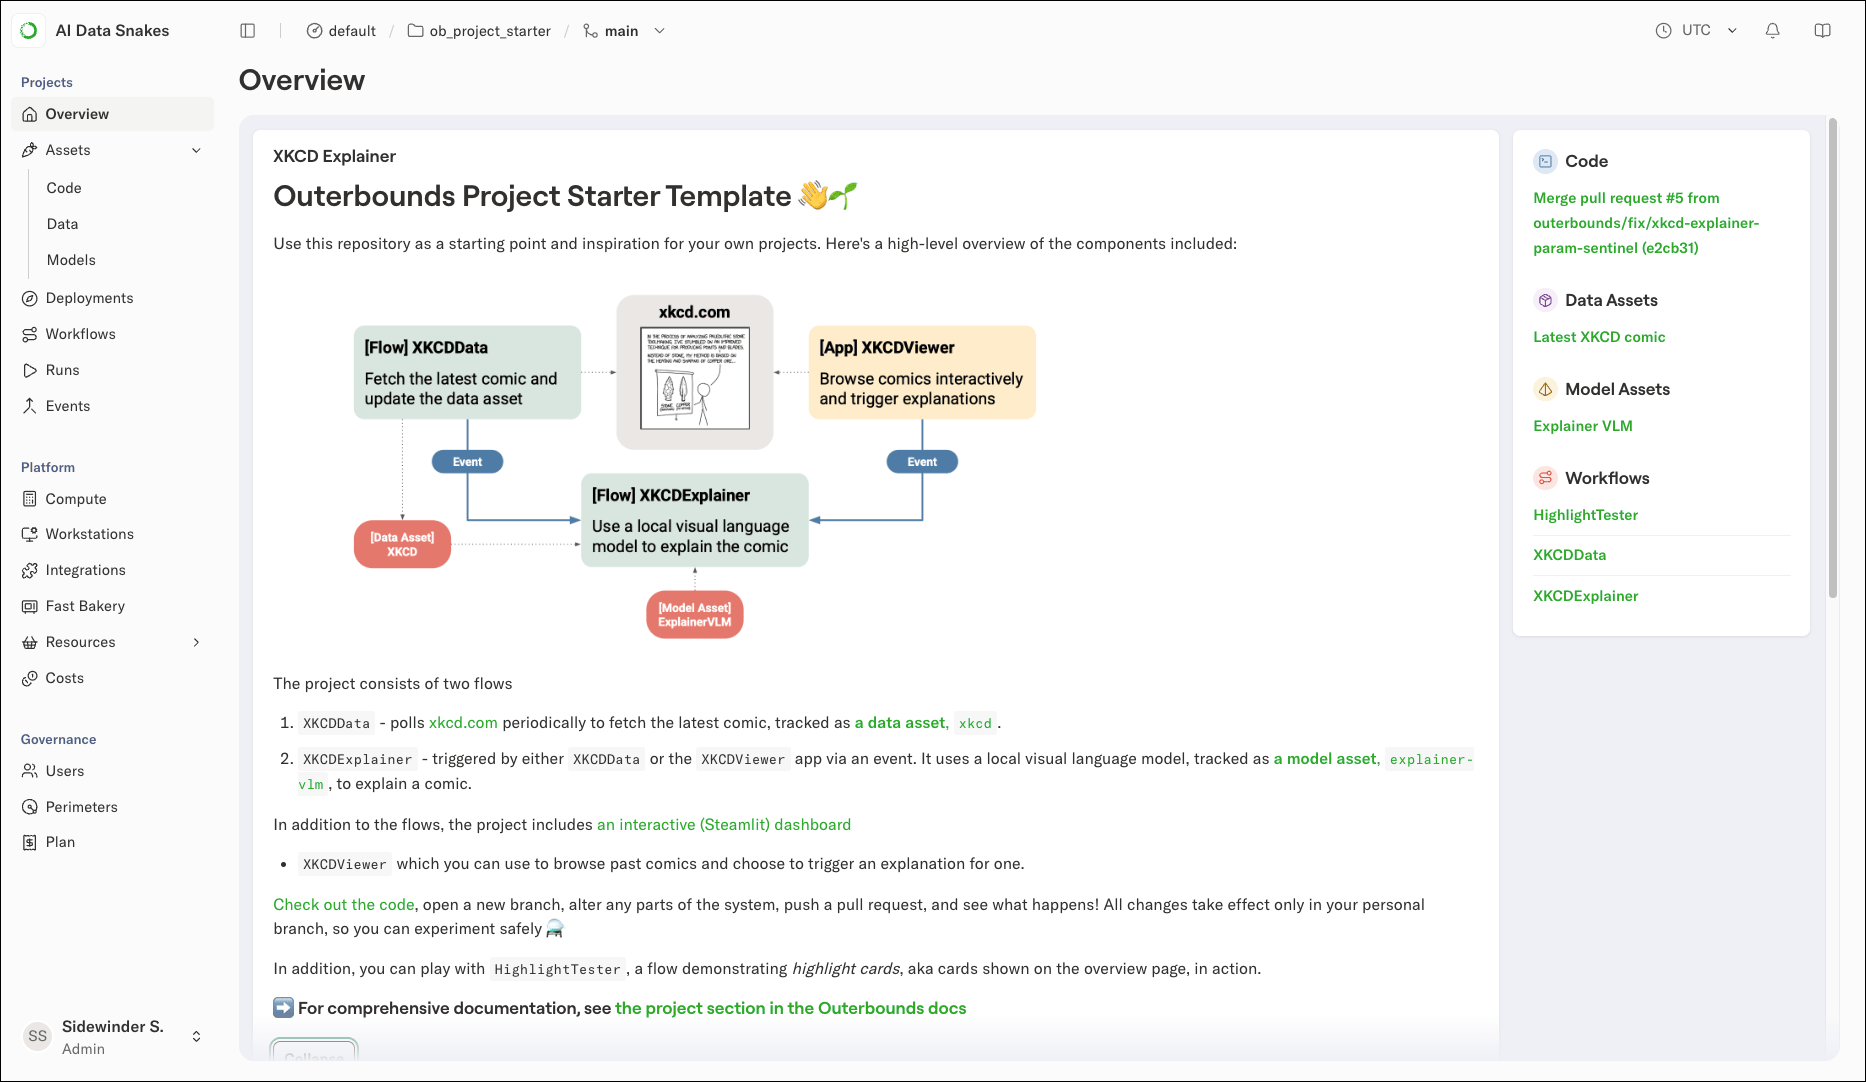
When the deploy completes, the project overview page looks like this, without the highlight cards, which appear only after the workflows have run:
The example is not a gold standard for performant, accurate AI. Explaining one comic as a batch process with a small model on a CPU instance is deliberately modest, but it offers a good baseline. You can improve the example by adding a compute pool with GPUs, running larger batches of comics through the model, or upgrading the model itself.
More importantly, the example demonstrates concisely how [all the elements of a project](/docs/platform/guides/projects/project-structure) (flows, deployments, code, data, and models) come together to create a complete, live AI system powered by a local model. You can use the project as inspiration and as a template for your own projects.
## Deploying the example
Deploy the project following the steps in [Setting up a new project](/docs/platform/guides/projects/setting-up-a-new-project):
1. Clone the repository:
```sh theme={null}
git clone https://github.com/outerbounds/ob-project-starter.git
```
2. Change `platform` in [`obproject.toml`](https://github.com/outerbounds/ob-project-starter/blob/main/obproject.toml#L2) to match your platform URL.
3. Create a corresponding CI/CD machine user, as described in [Programmatic access with machine users](/docs/platform/guides/security/programmatic-access-via-machine-users).
4. Open a pull request and make a commit to trigger a project update.
When the deploy completes, the project overview page looks like this, without the highlight cards, which appear only after the workflows have run:
 ### Testing highlight cards
The full explanation pipeline takes several minutes per comic. Before getting to XKCD, run a faster flow to confirm the project deployed correctly and to see how highlight cards work:
1. Select the project in the context picker.
2. Navigate to **Workflows** and select `HighlightTester`.
3. Click **Actions**, then click **Trigger a run**. The `style` field is pre-filled with `animals`; leave it as-is or enter another style (`nyan`, `image`, `small_square`, `tall_image`, `wide_image`, `revenue`, `busy`).
4. Click **Trigger**.
After the run completes, a highlight card appears on the project overview page:
### Testing highlight cards
The full explanation pipeline takes several minutes per comic. Before getting to XKCD, run a faster flow to confirm the project deployed correctly and to see how highlight cards work:
1. Select the project in the context picker.
2. Navigate to **Workflows** and select `HighlightTester`.
3. Click **Actions**, then click **Trigger a run**. The `style` field is pre-filled with `animals`; leave it as-is or enter another style (`nyan`, `image`, `small_square`, `tall_image`, `wide_image`, `revenue`, `busy`).
4. Click **Trigger**.
After the run completes, a highlight card appears on the project overview page:
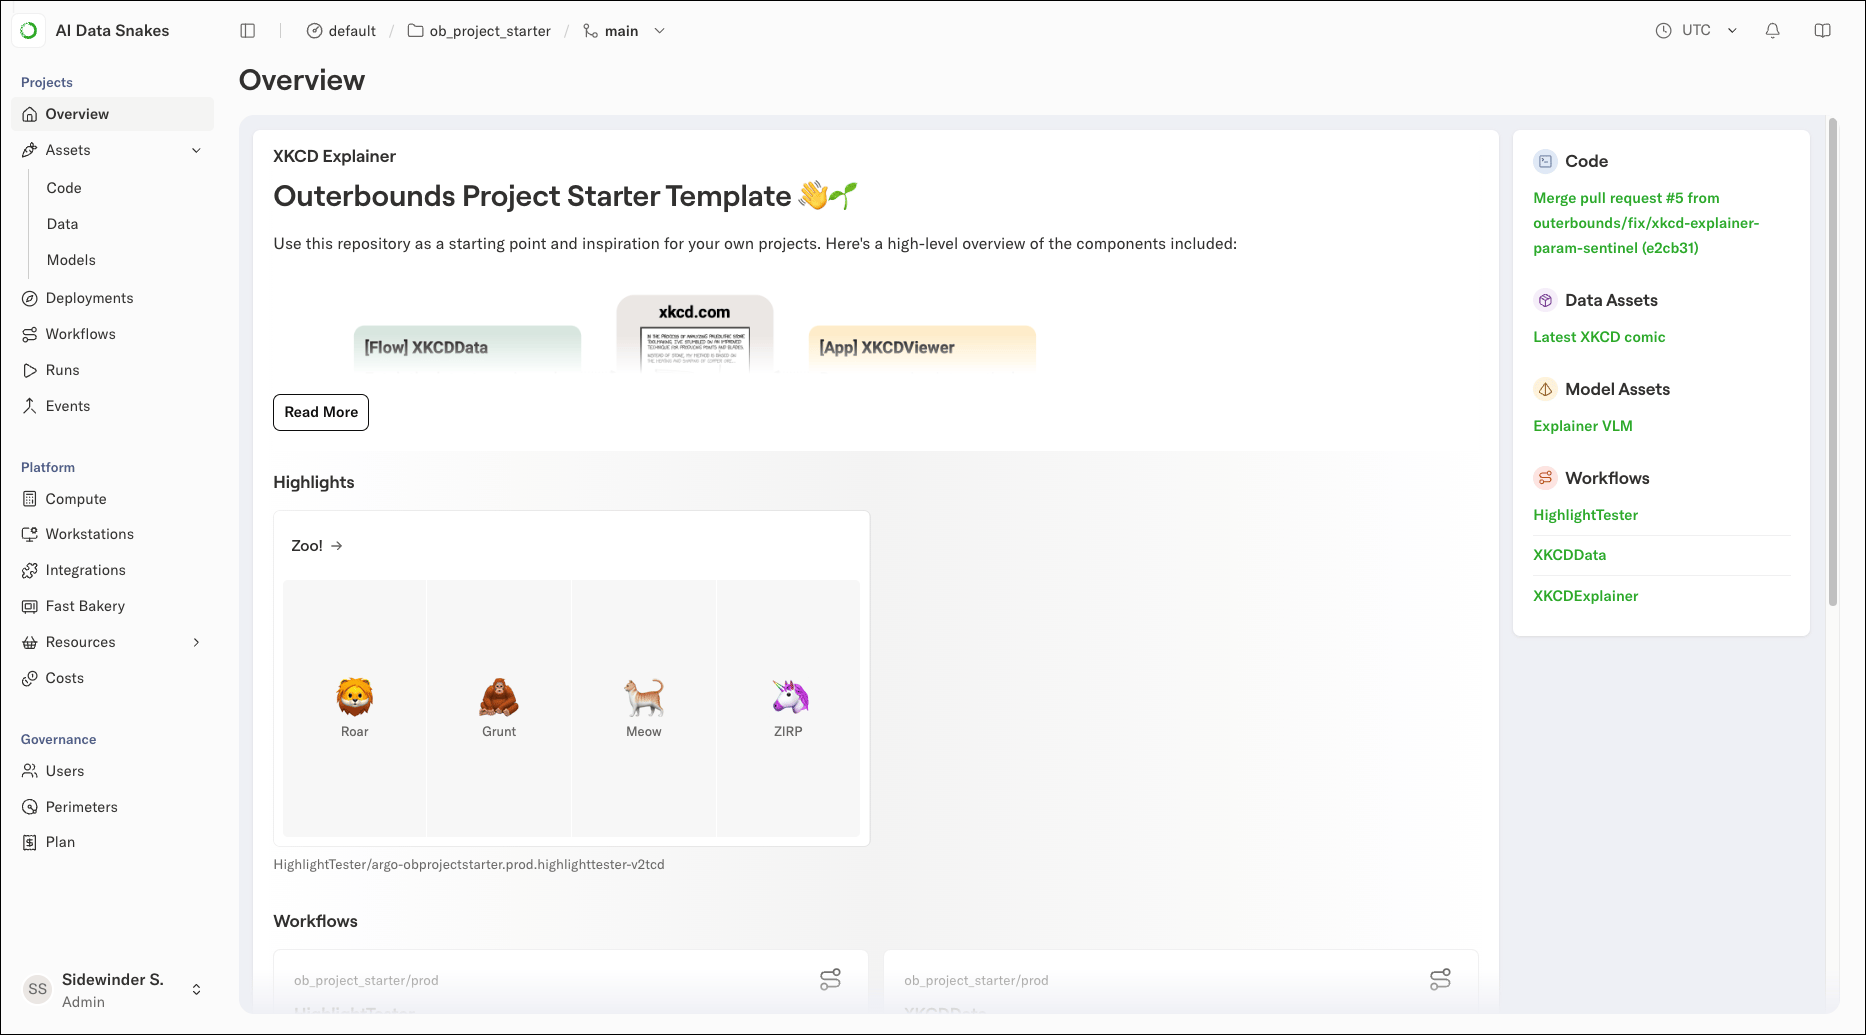 See [the source code of `HighlightTester`](https://github.com/outerbounds/ob-project-starter/blob/main/flows/highlight-tester/flow.py) to learn how you can render highlights of different styles for your own projects.
Any flow can define a `@highlight` card to make the system readily observable. The overview page reflects the highlights produced by the latest successful runs, so you can use them to surface KPIs and health indicators as a project dashboard. Highlights are concise by design; click a highlight to view the more detailed `@card` behind it.
## View a comic and trigger an explanation
The project includes a deployed app, `xkcd-viewer`: [a Streamlit app](https://github.com/outerbounds/ob-project-starter/blob/main/deployments/xkcd-viewer/app.py) that lets you browse past XKCD comics and trigger an explanation for any of them.
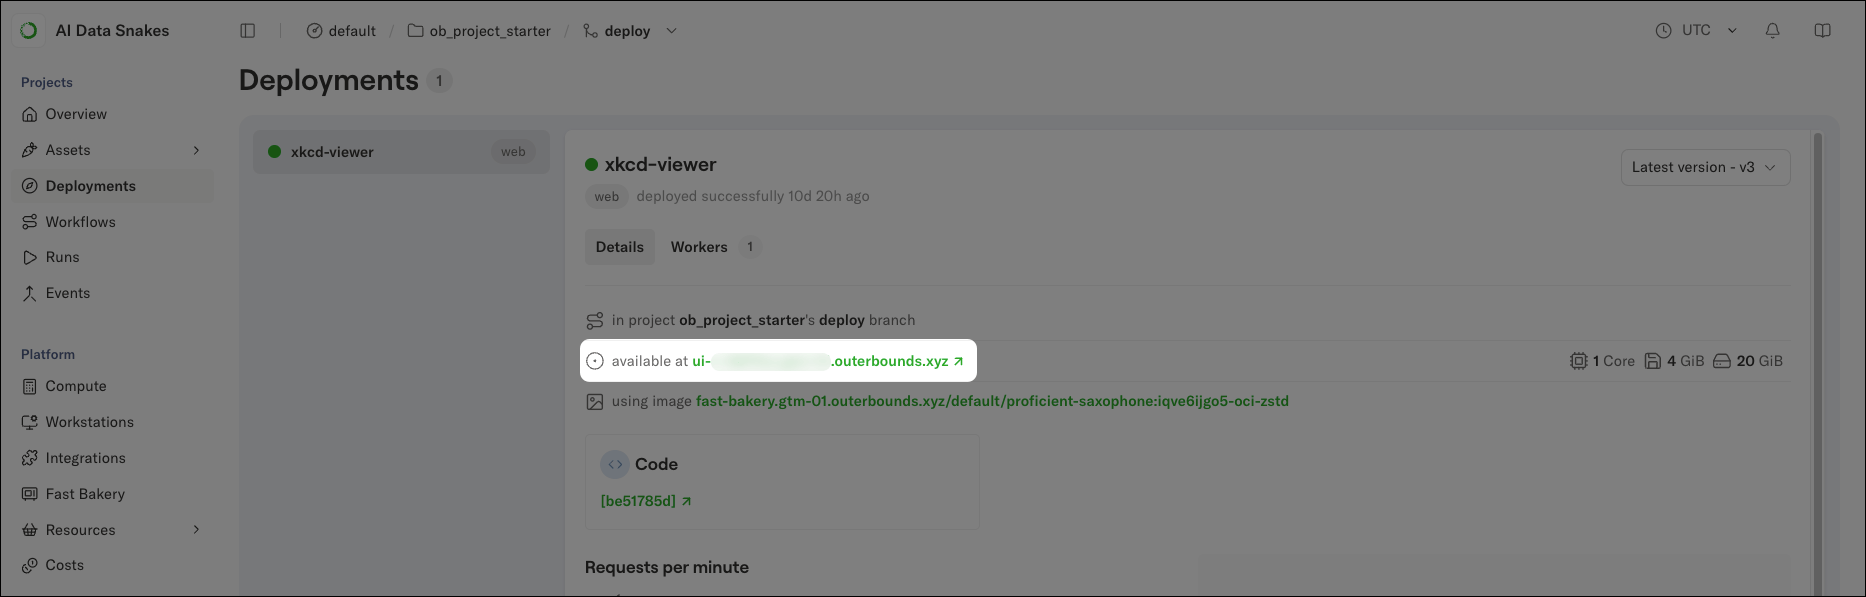
1. Navigate to **Deployments** to see the deployed app:
2. On the deployment's card, click the URL shown under the deployment name to open the viewer in a new tab.
See [the source code of `HighlightTester`](https://github.com/outerbounds/ob-project-starter/blob/main/flows/highlight-tester/flow.py) to learn how you can render highlights of different styles for your own projects.
Any flow can define a `@highlight` card to make the system readily observable. The overview page reflects the highlights produced by the latest successful runs, so you can use them to surface KPIs and health indicators as a project dashboard. Highlights are concise by design; click a highlight to view the more detailed `@card` behind it.
## View a comic and trigger an explanation
The project includes a deployed app, `xkcd-viewer`: [a Streamlit app](https://github.com/outerbounds/ob-project-starter/blob/main/deployments/xkcd-viewer/app.py) that lets you browse past XKCD comics and trigger an explanation for any of them.
1. Navigate to **Deployments** to see the deployed app:
2. On the deployment's card, click the URL shown under the deployment name to open the viewer in a new tab.
 3. In the viewer, browse to a comic and click **Trigger analysis**. This triggers a run of the `XKCDExplainer` flow.
4. Navigate to **Workflows → XKCDExplainer** to watch the run start, and follow its progress through logs and the run card.
While the explanation runs, click **Models** to see the model asset the flow uses. The model is defined in [`asset_config.toml`](https://github.com/outerbounds/ob-project-starter/blob/main/models/explainer-vlm/asset_config.toml), which keeps it decoupled from the code and explicitly visible, an important property for evaluation. In real AI projects, teams often iterate across multiple models, which makes tracking their performance crucial.
Instantiating a local VLM and prompting it takes 3-5 minutes on the small CPU instance the example uses by default. If you have a GPU compute pool configured, you can speed up prompting by [adding `gpu=1` to the `@resources` decorator of the `prompt_vlm` step](https://github.com/outerbounds/ob-project-starter/blob/main/flows/xkcd-explainer/flow.py#L86).
### The xkcd-viewer deployment does not appear
The **Deployments** view is empty because the deployment was not deployed to the perimeter or branch currently selected in the context picker, or the CI/CD deploy did not complete.
Confirm that the context picker shows the project and the perimeter where the CI/CD machine user deploys, and that you are viewing the branch you pushed to. Check your CI/CD run logs for errors during the deploy step; flows and deployments deploy together, so if `XKCDData` appears under **Workflows** but `xkcd-viewer` does not appear under **Deployments**, the deploy step likely failed partway.
## Trigger a data asset update
The `XKCDData` flow fetches the latest comic daily at midnight and creates the `xkcd` data asset. Until it runs, the **Data** view shows only an empty asset. You can trigger an update manually instead of waiting:
1. Navigate to **Workflows → XKCDData**.
2. Click **Actions**, then click **Trigger a run**.
3. Click **Trigger**.
4. After the run completes, return to the **Data** view to see the populated `xkcd` asset.
Whenever `XKCDData` finds a new comic, it triggers a run of `XKCDExplainer` automatically. You can observe the `explain` events facilitating this in the **Events** view.
## Connecting the dots
At this point you have touched all the parts of the system:
* The `XKCDData` and `XKCDExplainer` flows
* The `xkcd-viewer` app
* The `models`, `data`, `code`, and `events` that make the system work
3. In the viewer, browse to a comic and click **Trigger analysis**. This triggers a run of the `XKCDExplainer` flow.
4. Navigate to **Workflows → XKCDExplainer** to watch the run start, and follow its progress through logs and the run card.
While the explanation runs, click **Models** to see the model asset the flow uses. The model is defined in [`asset_config.toml`](https://github.com/outerbounds/ob-project-starter/blob/main/models/explainer-vlm/asset_config.toml), which keeps it decoupled from the code and explicitly visible, an important property for evaluation. In real AI projects, teams often iterate across multiple models, which makes tracking their performance crucial.
Instantiating a local VLM and prompting it takes 3-5 minutes on the small CPU instance the example uses by default. If you have a GPU compute pool configured, you can speed up prompting by [adding `gpu=1` to the `@resources` decorator of the `prompt_vlm` step](https://github.com/outerbounds/ob-project-starter/blob/main/flows/xkcd-explainer/flow.py#L86).
### The xkcd-viewer deployment does not appear
The **Deployments** view is empty because the deployment was not deployed to the perimeter or branch currently selected in the context picker, or the CI/CD deploy did not complete.
Confirm that the context picker shows the project and the perimeter where the CI/CD machine user deploys, and that you are viewing the branch you pushed to. Check your CI/CD run logs for errors during the deploy step; flows and deployments deploy together, so if `XKCDData` appears under **Workflows** but `xkcd-viewer` does not appear under **Deployments**, the deploy step likely failed partway.
## Trigger a data asset update
The `XKCDData` flow fetches the latest comic daily at midnight and creates the `xkcd` data asset. Until it runs, the **Data** view shows only an empty asset. You can trigger an update manually instead of waiting:
1. Navigate to **Workflows → XKCDData**.
2. Click **Actions**, then click **Trigger a run**.
3. Click **Trigger**.
4. After the run completes, return to the **Data** view to see the populated `xkcd` asset.
Whenever `XKCDData` finds a new comic, it triggers a run of `XKCDExplainer` automatically. You can observe the `explain` events facilitating this in the **Events** view.
## Connecting the dots
At this point you have touched all the parts of the system:
* The `XKCDData` and `XKCDExplainer` flows
* The `xkcd-viewer` app
* The `models`, `data`, `code`, and `events` that make the system work
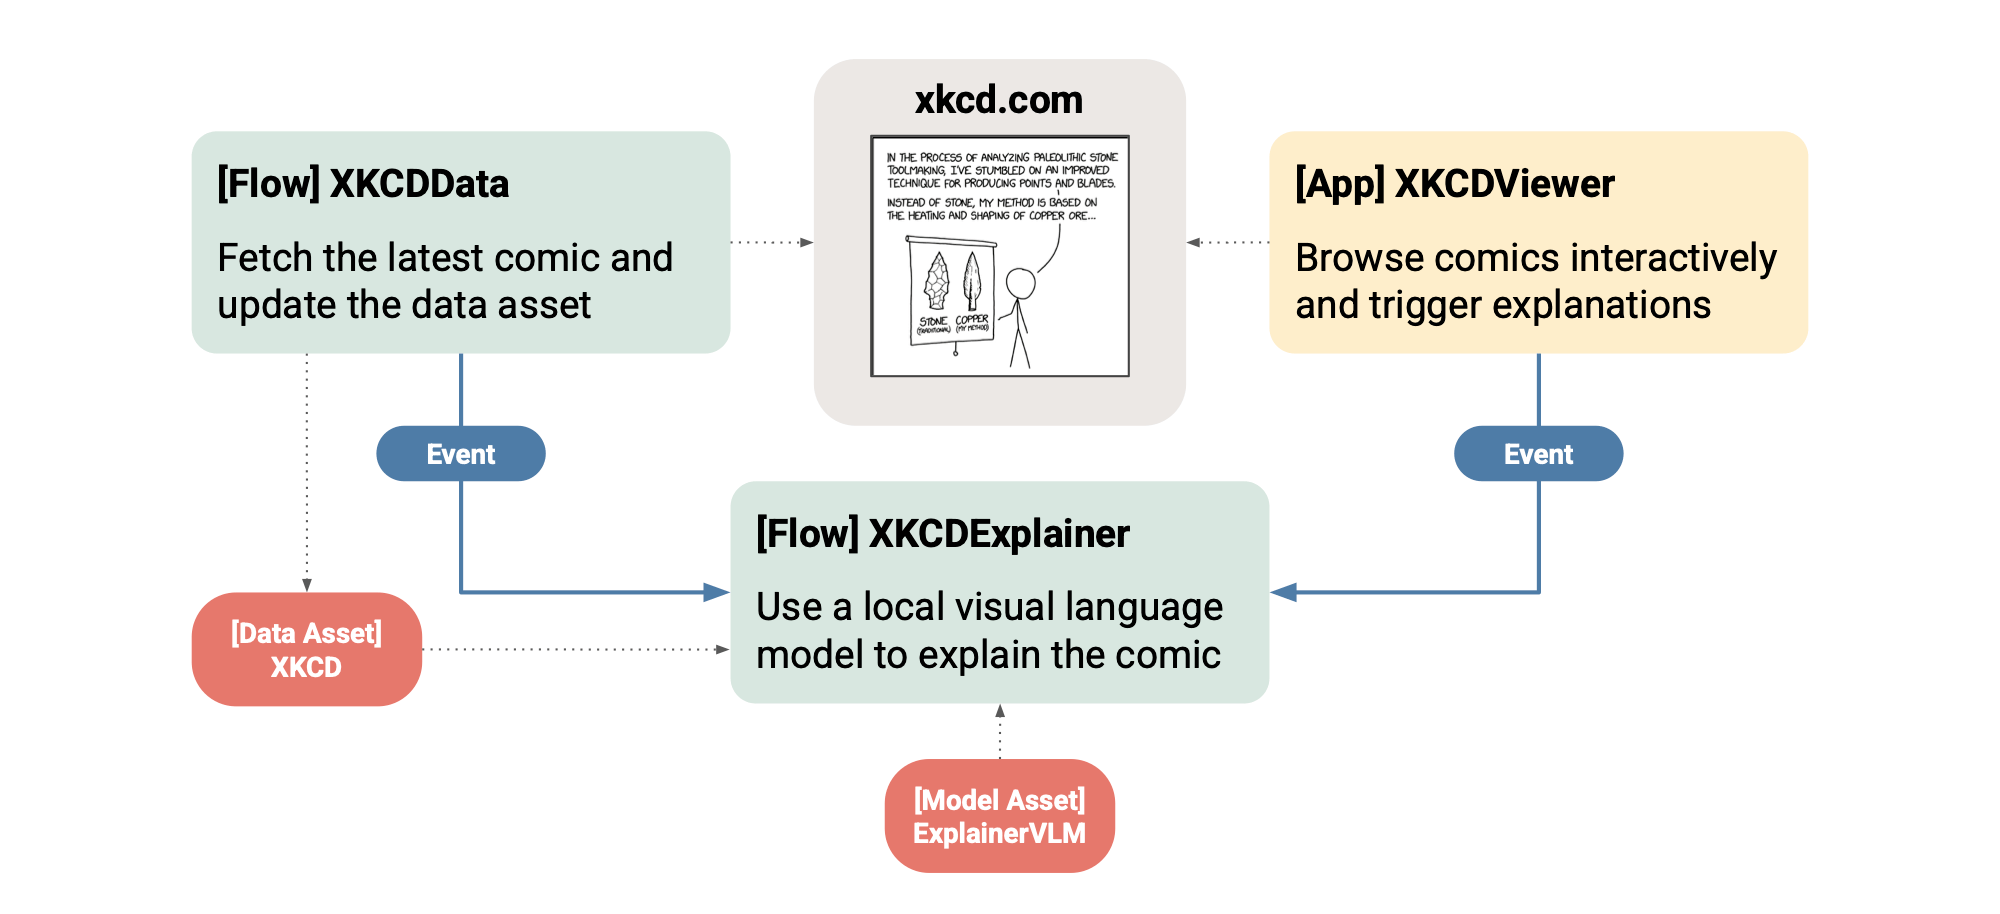 Note how the project uses [a small shared library, `xkcd_utils`](https://github.com/outerbounds/ob-project-starter/tree/main/src/xkcd_utils), to encapsulate logic used across flows and deployments.
## Developing and testing locally
A key strength of Metaflow is how easily it supports local development and testing, even when flows demand substantial compute resources. Project flows are no different.
For instance, to test `XKCDData` locally, run the following at the project root:
```sh theme={null}
python flows/xkcd-data/flow.py run
```
To test the explainer flow, which requires more computational resources including GPUs:
```sh theme={null}
python flows/xkcd-explainer/flow.py --environment=fast-bakery --with kubernetes run --xkcd_url https://imgs.xkcd.com/comics/every_data_table_2x.png
```
To avoid setting the environment option repeatedly, export it:
```sh theme={null}
export METAFLOW_ENVIRONMENT=fast-bakery
```
Local testing takes place in the **default project**, outside Git branches. Use the context picker to switch to the default project to observe locally started runs.
### Using assets during development
By default, `XKCDExplainer` fetches the latest data asset. During local development, you can configure which branch to *read* assets from while your *writes* remain isolated to your user namespace.
In `obproject.toml`, define:
```toml theme={null}
[dev-assets]
branch = 'main'
```
This lets you consume production assets from `main` while any assets you register go to your Metaflow user branch, such as `user.alice`, which prevents local experiments from contaminating production data.
## Iterate and evaluate
A key benefit of projects is that they let you iterate quickly and safely on every part of a production-grade system: code, data, and models across both offline and online components. For a deeper look at this pattern, see [Building standout AI](https://www.anaconda.com/blog/building-standout-ai-on-outerbounds).
To see how this works in practice, create a new branch for `ob-project-starter`, change any aspect of the system, test it locally, and open a pull request.
You can then observe your branch alongside the existing version, safely running in [its own isolated namespace](https://docs.metaflow.org/scaling/tagging), and compare the results. Colleagues can do the same at the same time, without interfering with each other's work.
Note how the project uses [a small shared library, `xkcd_utils`](https://github.com/outerbounds/ob-project-starter/tree/main/src/xkcd_utils), to encapsulate logic used across flows and deployments.
## Developing and testing locally
A key strength of Metaflow is how easily it supports local development and testing, even when flows demand substantial compute resources. Project flows are no different.
For instance, to test `XKCDData` locally, run the following at the project root:
```sh theme={null}
python flows/xkcd-data/flow.py run
```
To test the explainer flow, which requires more computational resources including GPUs:
```sh theme={null}
python flows/xkcd-explainer/flow.py --environment=fast-bakery --with kubernetes run --xkcd_url https://imgs.xkcd.com/comics/every_data_table_2x.png
```
To avoid setting the environment option repeatedly, export it:
```sh theme={null}
export METAFLOW_ENVIRONMENT=fast-bakery
```
Local testing takes place in the **default project**, outside Git branches. Use the context picker to switch to the default project to observe locally started runs.
### Using assets during development
By default, `XKCDExplainer` fetches the latest data asset. During local development, you can configure which branch to *read* assets from while your *writes* remain isolated to your user namespace.
In `obproject.toml`, define:
```toml theme={null}
[dev-assets]
branch = 'main'
```
This lets you consume production assets from `main` while any assets you register go to your Metaflow user branch, such as `user.alice`, which prevents local experiments from contaminating production data.
## Iterate and evaluate
A key benefit of projects is that they let you iterate quickly and safely on every part of a production-grade system: code, data, and models across both offline and online components. For a deeper look at this pattern, see [Building standout AI](https://www.anaconda.com/blog/building-standout-ai-on-outerbounds).
To see how this works in practice, create a new branch for `ob-project-starter`, change any aspect of the system, test it locally, and open a pull request.
You can then observe your branch alongside the existing version, safely running in [its own isolated namespace](https://docs.metaflow.org/scaling/tagging), and compare the results. Colleagues can do the same at the same time, without interfering with each other's work.