> ## Documentation Index
> Fetch the complete documentation index at: https://anaconda.com/docs/llms.txt
> Use this file to discover all available pages before exploring further.
# CI/CD integration
export const GCell = ({children, className}) =>
{children}
;
export const GTH = ({children, className}) =>
{children}
;
export const GRow = ({children}) => {children}
;
export const GBody = ({children}) => {children}
;
export const GHead = ({children}) => {children}
;
export const GTable = ({children, className, cols}) =>
{children}
;
export const Comments = ({children}) => {
return ;
};
Anaconda Platform integrates with CI/CD systems, so your teams can test and deploy flows automatically as part of their existing delivery pipelines. For more informational background on deploying ML/AI systems to production, read [How To Organize Continuous Delivery of ML/AI Systems](https://www.anaconda.com/blog/continuous-delivery-of-ml-ai).
## GitOps for Anaconda Platform
The following diagram illustrates a typical CI/CD pattern:
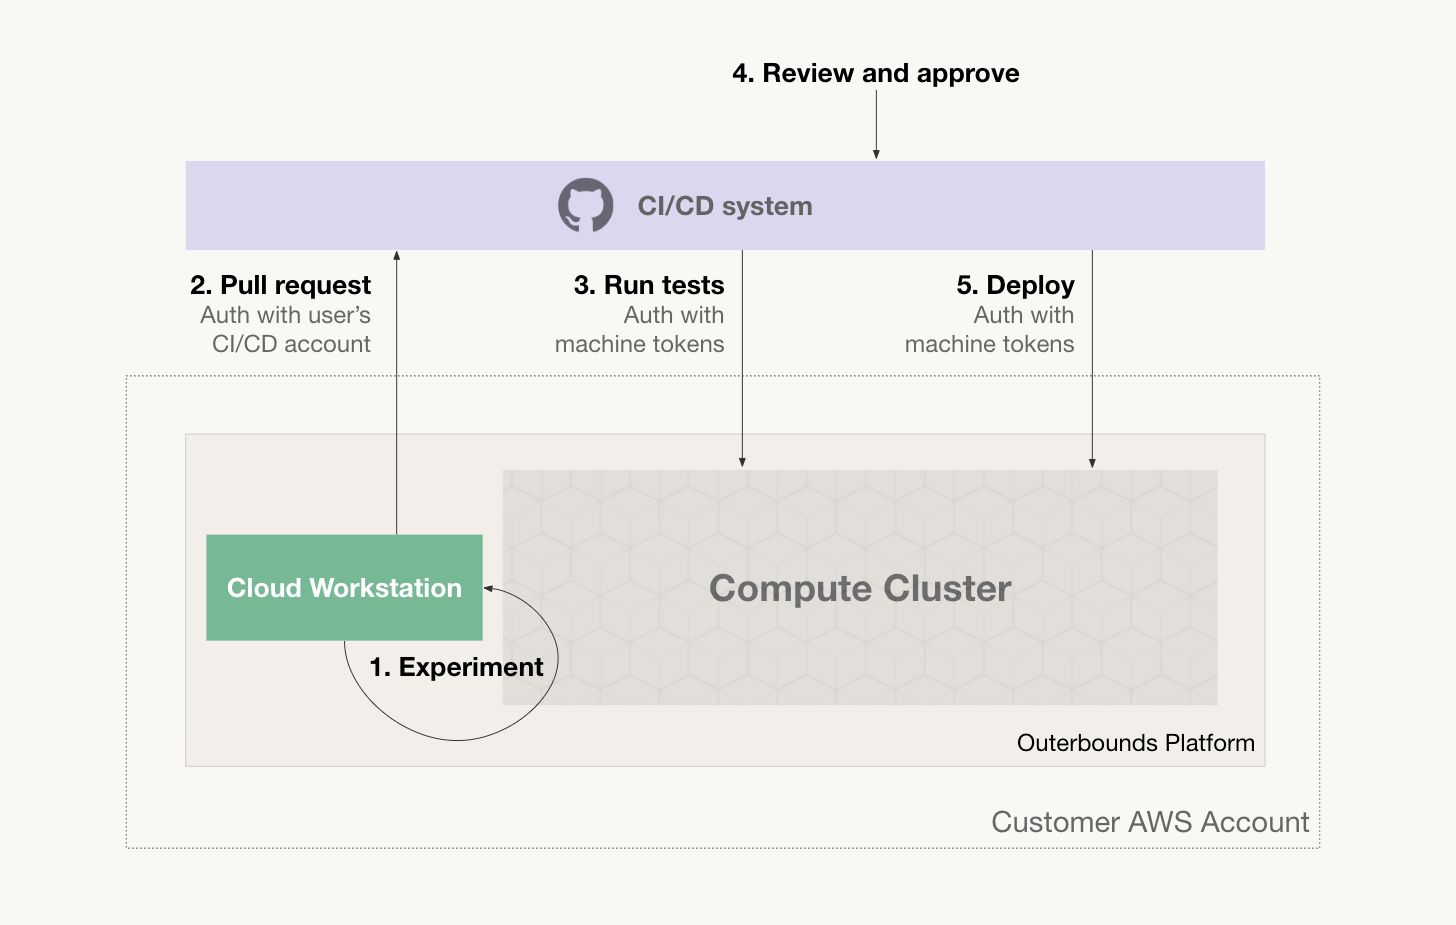 The user experiments and prototypes code on a cloud workstation or locally on a laptop. The user can test their code at scale quickly and autonomously on the platform's cluster.
When the code works adequately, the user commits it and opens a pull request. They authenticate with the CI/CD system using their personal credentials.
The CI/CD system, such as GitHub Actions or CircleCI, launches a test suite automatically when a pull request is opened. The CI/CD system submits workloads to the platform, authenticating as a machine user.
After tests pass, a human reviewer reviews the pull request. The reviewer can tag the pull request as approved, and [a corresponding Metaflow tag can be applied to test runs](https://www.anaconda.com/blog/five-ways-to-use-the-new-metaflow-tags) as well, signaling a successful PR.
After the PR is approved, the CI/CD system deploys the flow either as a new production version or as [a new `@project` variant](https://docs.metaflow.org/production/coordinating-larger-metaflow-projects), running concurrently with the production version so its performance can be evaluated live.
## Supported CI/CD platforms
Anaconda Platform supports all major CI/CD platforms through OIDC-based authentication:
* **GitHub Actions**: Native OIDC support
* **GitLab CI/CD**: Native OIDC support via `id_tokens`
* **Azure DevOps**: Azure AD federation
* **CircleCI**: OIDC token support
Each platform uses a similar pattern:
1. Configure a machine user on the platform. See [Programmatic access via machine users](/docs/platform/guides/security/programmatic-access-via-machine-users) for per-provider claim fields.
2. Set up OIDC authentication in your CI/CD config (YAML examples below).
3. Use `obproject-deploy` to deploy your project.
## Verifying your deploy
`obproject-deploy` tags each workflow it deploys with lineage metadata: the commit hash being deployed, and an identifier for the CI run that triggered the deploy when running in CI. To confirm a deployment succeeded, open the workflow in the UI: select the project, then **Workflows**, and then select the workflow. The workflow details show the tags applied to its runs:
The user experiments and prototypes code on a cloud workstation or locally on a laptop. The user can test their code at scale quickly and autonomously on the platform's cluster.
When the code works adequately, the user commits it and opens a pull request. They authenticate with the CI/CD system using their personal credentials.
The CI/CD system, such as GitHub Actions or CircleCI, launches a test suite automatically when a pull request is opened. The CI/CD system submits workloads to the platform, authenticating as a machine user.
After tests pass, a human reviewer reviews the pull request. The reviewer can tag the pull request as approved, and [a corresponding Metaflow tag can be applied to test runs](https://www.anaconda.com/blog/five-ways-to-use-the-new-metaflow-tags) as well, signaling a successful PR.
After the PR is approved, the CI/CD system deploys the flow either as a new production version or as [a new `@project` variant](https://docs.metaflow.org/production/coordinating-larger-metaflow-projects), running concurrently with the production version so its performance can be evaluated live.
## Supported CI/CD platforms
Anaconda Platform supports all major CI/CD platforms through OIDC-based authentication:
* **GitHub Actions**: Native OIDC support
* **GitLab CI/CD**: Native OIDC support via `id_tokens`
* **Azure DevOps**: Azure AD federation
* **CircleCI**: OIDC token support
Each platform uses a similar pattern:
1. Configure a machine user on the platform. See [Programmatic access via machine users](/docs/platform/guides/security/programmatic-access-via-machine-users) for per-provider claim fields.
2. Set up OIDC authentication in your CI/CD config (YAML examples below).
3. Use `obproject-deploy` to deploy your project.
## Verifying your deploy
`obproject-deploy` tags each workflow it deploys with lineage metadata: the commit hash being deployed, and an identifier for the CI run that triggered the deploy when running in CI. To confirm a deployment succeeded, open the workflow in the UI: select the project, then **Workflows**, and then select the workflow. The workflow details show the tags applied to its runs:
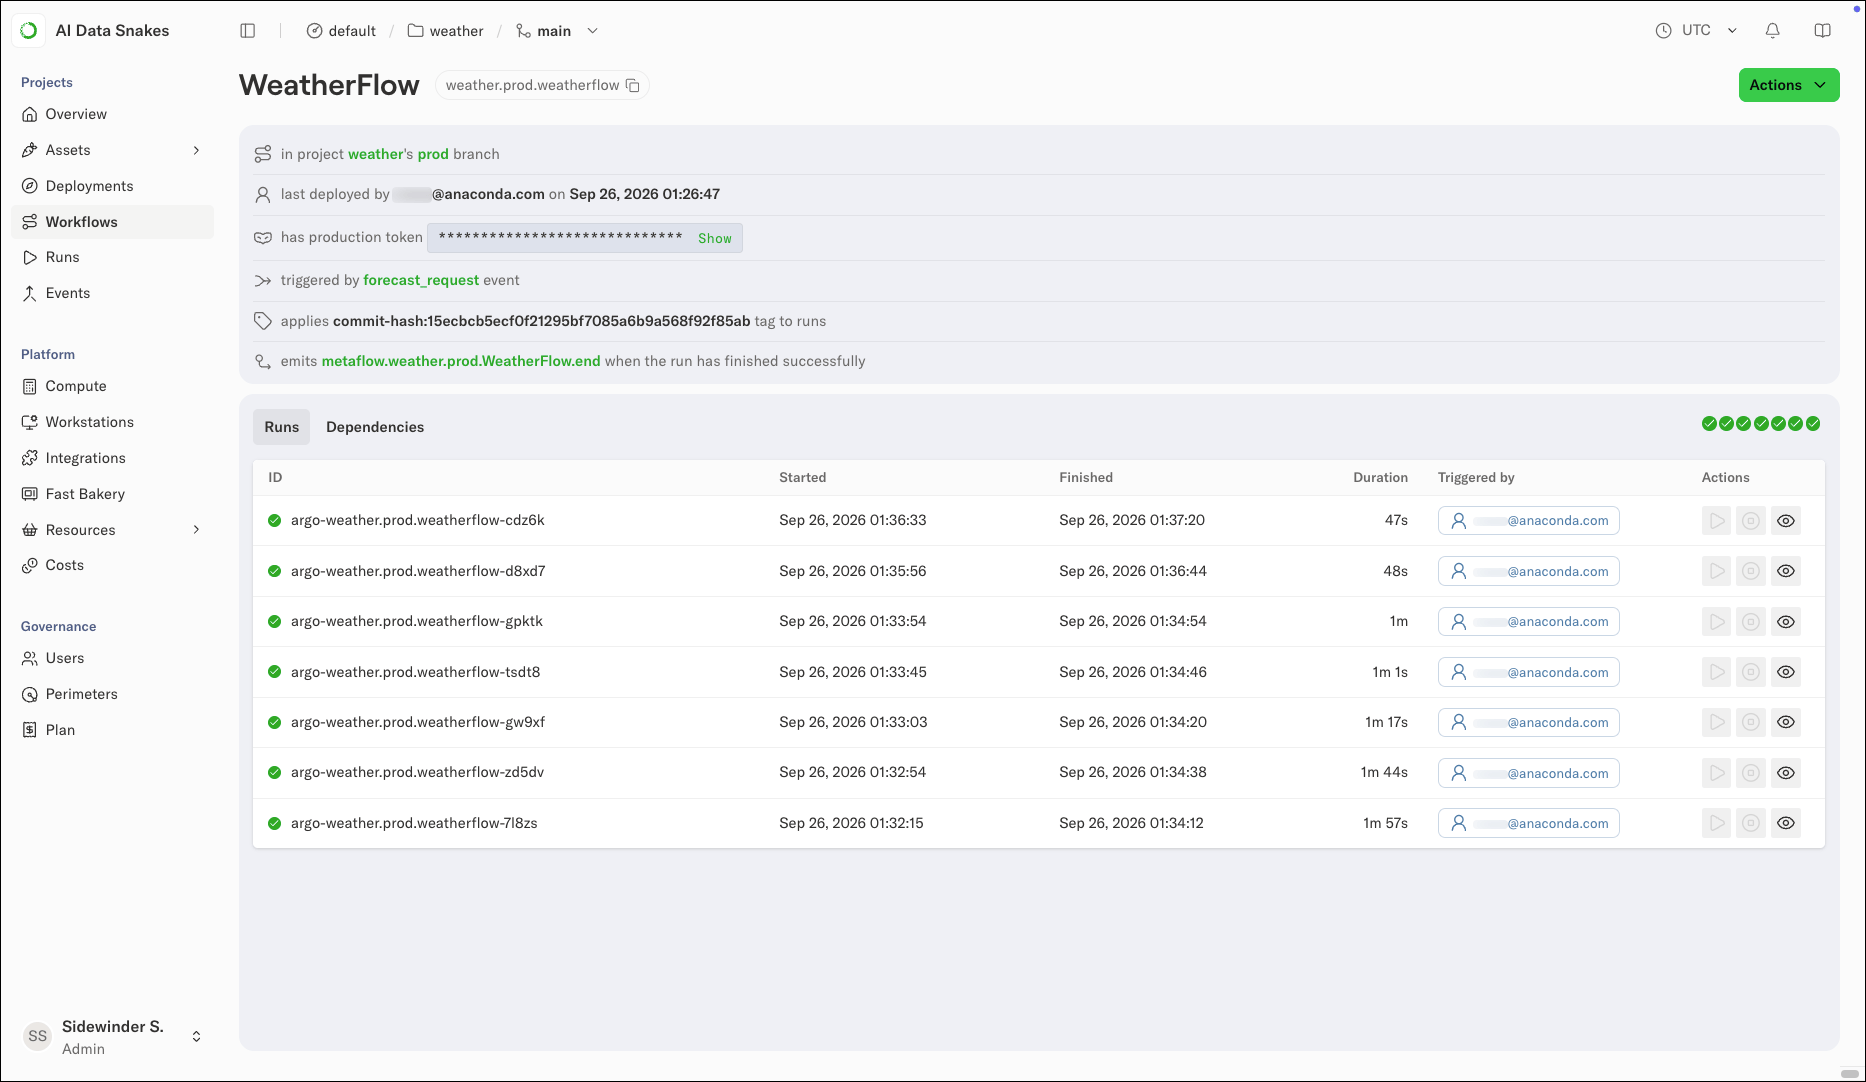 You can also see the tags in the deploy output, which prints a line such as `Tagging deployments with: commit-hash:15ecbcb5ecf0f21295bf7085a6b9a568f92f85ab`.
If you do not see the tags, the deploy did not complete. Check the CI job's logs for the `obproject-deploy` step and verify the machine user authenticated successfully against `auth.`.
## Machine user naming convention
The YAML examples below derive the machine user name from your project name:
```sh theme={null}
PROJECT_NAME=$(yq .project obproject.toml)
CICD_USER="${PROJECT_NAME//_/-}-cicd"
```
Two implications:
* The machine user must be named with hyphens rather than underscores. For example, `my-project-cicd`, not `my_project-cicd`. The underscore-to-hyphen normalization in the YAML exists so a project named `my_project` resolves to a machine user named `my-project-cicd`.
* To use a different name, such as a team-shared machine user across multiple projects, set `cicd_user` in `obproject.toml`:
```toml theme={null}
project = "my_project"
cicd_user = "team-shared-cicd"
```
The example YAML files read this value with `yq ".cicd_user // \"$DEFAULT\""`, so an explicit value takes precedence over the derived default.
## The `outerbounds service-principal-configure` flag reference
The auth command takes a different flag per provider:
Provider
Flag
Notes
GitHub Actions
`--github-actions`
Reads `$ACTIONS_ID_TOKEN_REQUEST_TOKEN` / `$ACTIONS_ID_TOKEN_REQUEST_URL` automatically
GitLab CI
`--jwt-token "$OUTERBOUNDS_ID_TOKEN"`
Token issued by GitLab's `id_tokens:` keyword
CircleCI
`--jwt-token "$CIRCLE_OIDC_TOKEN_V2"`
Requires a CircleCI context (can be empty) on the workflow
Azure DevOps
`--jwt-token "$idToken"`
`$idToken` is exposed by the `AzureCLI@2` task when `addSpnToEnvironment: true`
IAM-backed
(none; IAM credentials in the environment)
See [Identity by IAM](/docs/platform/guides/security/programmatic-access-via-machine-users#identity-by-iam)
In all cases, the command also takes `--name `, `--deployment-domain `, and `--perimeter `. To read these values from `obproject.toml` instead of passing them explicitly, use `--from-obproject-toml`.
## Using Anaconda Platform with GitHub Actions
The [GitHub Actions on OBP demo repository](https://github.com/outerbounds/github-actions-on-obp-demo/) walks through the key workflows in practice.
### Example GitHub Actions workflow
```yaml expandable theme={null}
name: Deploy Project
on:
push:
branches: [main]
pull_request:
branches: [main]
permissions:
id-token: write
contents: read
jobs:
deploy:
runs-on: ubuntu-latest
steps:
- uses: actions/checkout@v4
with:
fetch-depth: 0
- name: Set up Python
uses: actions/setup-python@v5
with:
python-version: "3.12"
- name: Install dependencies
run: pip install outerbounds ob-project-utils pyyaml
- name: Configure the machine user
run: |
PROJECT_NAME=$(yq .project obproject.toml)
PLATFORM=$(yq .platform obproject.toml)
CICD_USER="${PROJECT_NAME//_/-}-cicd"
outerbounds service-principal-configure \
--name $CICD_USER \
--deployment-domain $PLATFORM \
--perimeter default \
--github-actions
- name: Deploy Project
run: obproject-deploy
```
## Using Anaconda Platform with GitLab CI/CD
GitLab CI/CD supports OIDC authentication via the `id_tokens` keyword. Use the example below as a starting template.
The `aud` value in `id_tokens` must match your platform URL. GitLab evaluates `id_tokens` at pipeline creation time, before any scripts run, so the value cannot be read dynamically from `obproject.toml`. Update this value when setting up a new project.
### Example `.gitlab-ci.yml`
```yaml expandable theme={null}
stages:
- deploy
deploy:
stage: deploy
image: python:3.12
rules:
- if: $CI_PIPELINE_SOURCE == "merge_request_event"
- if: $CI_COMMIT_BRANCH == "main"
id_tokens:
OUTERBOUNDS_ID_TOKEN:
aud:
script:
- wget -qO /usr/local/bin/yq https://github.com/mikefarah/yq/releases/latest/download/yq_linux_amd64
- chmod +x /usr/local/bin/yq
- pip install outerbounds ob-project-utils pyyaml
- PROJECT_NAME=$(yq .project obproject.toml)
- PLATFORM=$(yq .platform obproject.toml)
- CICD_USER="${PROJECT_NAME//_/-}-cicd"
- |
outerbounds service-principal-configure \
--name $CICD_USER \
--deployment-domain $PLATFORM \
--perimeter default \
--jwt-token $OUTERBOUNDS_ID_TOKEN
- obproject-deploy
artifacts:
paths:
- deployment_summary.md
when: always
```
Replace \ with your deployment's URL.
## Using Anaconda Platform with Azure DevOps
Azure DevOps supports OIDC through Azure AD federation.
### Example `azure-pipelines.yml`
```yaml expandable theme={null}
trigger:
- main
pr:
- main
pool:
vmImage: ubuntu-latest
steps:
- checkout: self
- task: AzureCLI@2
displayName: 'Configure the machine user'
inputs:
azureSubscription: ''
addSpnToEnvironment: true
scriptType: bash
scriptLocation: inlineScript
inlineScript: |
wget -qO /usr/local/bin/yq https://github.com/mikefarah/yq/releases/latest/download/yq_linux_amd64
chmod +x /usr/local/bin/yq
PROJECT_NAME=$(yq .project obproject.toml)
PLATFORM=$(yq .platform obproject.toml)
CICD_USER="${PROJECT_NAME//_/-}-cicd"
pip install outerbounds ob-project-utils pyyaml
outerbounds service-principal-configure \
--name $CICD_USER \
--deployment-domain $PLATFORM \
--perimeter default \
--jwt-token $idToken
- script: obproject-deploy
displayName: 'Deploy Project'
env:
SYSTEM_ACCESSTOKEN: $(System.AccessToken)
```
Replace \ with the name of your Azure service connection.
## Using Anaconda Platform with CircleCI
CircleCI supports OIDC tokens for secure authentication.
### Example `.circleci/config.yml`
```yaml expandable theme={null}
version: 2.1
jobs:
deploy:
docker:
- image: cimg/python:3.12
steps:
- checkout
- run:
name: Install dependencies
command: |
wget -qO /usr/local/bin/yq https://github.com/mikefarah/yq/releases/latest/download/yq_linux_amd64
chmod +x /usr/local/bin/yq
pip install outerbounds ob-project-utils pyyaml
- run:
name: Configure the machine user
command: |
PROJECT_NAME=$(yq .project obproject.toml)
PLATFORM=$(yq .platform obproject.toml)
CICD_USER="${PROJECT_NAME//_/-}-cicd"
outerbounds service-principal-configure \
--name $CICD_USER \
--deployment-domain $PLATFORM \
--perimeter default \
--jwt-token $CIRCLE_OIDC_TOKEN_V2
- run:
name: Deploy Project
command: obproject-deploy
workflows:
deploy:
jobs:
- deploy:
context: []
filters:
branches:
only: [main]
```
Replace \ with the name of a CircleCI context with OIDC enabled. The context can be empty.
If you need help setting up GitOps in your environment, contact Anaconda support.
You can also see the tags in the deploy output, which prints a line such as `Tagging deployments with: commit-hash:15ecbcb5ecf0f21295bf7085a6b9a568f92f85ab`.
If you do not see the tags, the deploy did not complete. Check the CI job's logs for the `obproject-deploy` step and verify the machine user authenticated successfully against `auth.`.
## Machine user naming convention
The YAML examples below derive the machine user name from your project name:
```sh theme={null}
PROJECT_NAME=$(yq .project obproject.toml)
CICD_USER="${PROJECT_NAME//_/-}-cicd"
```
Two implications:
* The machine user must be named with hyphens rather than underscores. For example, `my-project-cicd`, not `my_project-cicd`. The underscore-to-hyphen normalization in the YAML exists so a project named `my_project` resolves to a machine user named `my-project-cicd`.
* To use a different name, such as a team-shared machine user across multiple projects, set `cicd_user` in `obproject.toml`:
```toml theme={null}
project = "my_project"
cicd_user = "team-shared-cicd"
```
The example YAML files read this value with `yq ".cicd_user // \"$DEFAULT\""`, so an explicit value takes precedence over the derived default.
## The `outerbounds service-principal-configure` flag reference
The auth command takes a different flag per provider:
Provider
Flag
Notes
GitHub Actions
`--github-actions`
Reads `$ACTIONS_ID_TOKEN_REQUEST_TOKEN` / `$ACTIONS_ID_TOKEN_REQUEST_URL` automatically
GitLab CI
`--jwt-token "$OUTERBOUNDS_ID_TOKEN"`
Token issued by GitLab's `id_tokens:` keyword
CircleCI
`--jwt-token "$CIRCLE_OIDC_TOKEN_V2"`
Requires a CircleCI context (can be empty) on the workflow
Azure DevOps
`--jwt-token "$idToken"`
`$idToken` is exposed by the `AzureCLI@2` task when `addSpnToEnvironment: true`
IAM-backed
(none; IAM credentials in the environment)
See [Identity by IAM](/docs/platform/guides/security/programmatic-access-via-machine-users#identity-by-iam)
In all cases, the command also takes `--name `, `--deployment-domain `, and `--perimeter `. To read these values from `obproject.toml` instead of passing them explicitly, use `--from-obproject-toml`.
## Using Anaconda Platform with GitHub Actions
The [GitHub Actions on OBP demo repository](https://github.com/outerbounds/github-actions-on-obp-demo/) walks through the key workflows in practice.
### Example GitHub Actions workflow
```yaml expandable theme={null}
name: Deploy Project
on:
push:
branches: [main]
pull_request:
branches: [main]
permissions:
id-token: write
contents: read
jobs:
deploy:
runs-on: ubuntu-latest
steps:
- uses: actions/checkout@v4
with:
fetch-depth: 0
- name: Set up Python
uses: actions/setup-python@v5
with:
python-version: "3.12"
- name: Install dependencies
run: pip install outerbounds ob-project-utils pyyaml
- name: Configure the machine user
run: |
PROJECT_NAME=$(yq .project obproject.toml)
PLATFORM=$(yq .platform obproject.toml)
CICD_USER="${PROJECT_NAME//_/-}-cicd"
outerbounds service-principal-configure \
--name $CICD_USER \
--deployment-domain $PLATFORM \
--perimeter default \
--github-actions
- name: Deploy Project
run: obproject-deploy
```
## Using Anaconda Platform with GitLab CI/CD
GitLab CI/CD supports OIDC authentication via the `id_tokens` keyword. Use the example below as a starting template.
The `aud` value in `id_tokens` must match your platform URL. GitLab evaluates `id_tokens` at pipeline creation time, before any scripts run, so the value cannot be read dynamically from `obproject.toml`. Update this value when setting up a new project.
### Example `.gitlab-ci.yml`
```yaml expandable theme={null}
stages:
- deploy
deploy:
stage: deploy
image: python:3.12
rules:
- if: $CI_PIPELINE_SOURCE == "merge_request_event"
- if: $CI_COMMIT_BRANCH == "main"
id_tokens:
OUTERBOUNDS_ID_TOKEN:
aud:
script:
- wget -qO /usr/local/bin/yq https://github.com/mikefarah/yq/releases/latest/download/yq_linux_amd64
- chmod +x /usr/local/bin/yq
- pip install outerbounds ob-project-utils pyyaml
- PROJECT_NAME=$(yq .project obproject.toml)
- PLATFORM=$(yq .platform obproject.toml)
- CICD_USER="${PROJECT_NAME//_/-}-cicd"
- |
outerbounds service-principal-configure \
--name $CICD_USER \
--deployment-domain $PLATFORM \
--perimeter default \
--jwt-token $OUTERBOUNDS_ID_TOKEN
- obproject-deploy
artifacts:
paths:
- deployment_summary.md
when: always
```
Replace \ with your deployment's URL.
## Using Anaconda Platform with Azure DevOps
Azure DevOps supports OIDC through Azure AD federation.
### Example `azure-pipelines.yml`
```yaml expandable theme={null}
trigger:
- main
pr:
- main
pool:
vmImage: ubuntu-latest
steps:
- checkout: self
- task: AzureCLI@2
displayName: 'Configure the machine user'
inputs:
azureSubscription: ''
addSpnToEnvironment: true
scriptType: bash
scriptLocation: inlineScript
inlineScript: |
wget -qO /usr/local/bin/yq https://github.com/mikefarah/yq/releases/latest/download/yq_linux_amd64
chmod +x /usr/local/bin/yq
PROJECT_NAME=$(yq .project obproject.toml)
PLATFORM=$(yq .platform obproject.toml)
CICD_USER="${PROJECT_NAME//_/-}-cicd"
pip install outerbounds ob-project-utils pyyaml
outerbounds service-principal-configure \
--name $CICD_USER \
--deployment-domain $PLATFORM \
--perimeter default \
--jwt-token $idToken
- script: obproject-deploy
displayName: 'Deploy Project'
env:
SYSTEM_ACCESSTOKEN: $(System.AccessToken)
```
Replace \ with the name of your Azure service connection.
## Using Anaconda Platform with CircleCI
CircleCI supports OIDC tokens for secure authentication.
### Example `.circleci/config.yml`
```yaml expandable theme={null}
version: 2.1
jobs:
deploy:
docker:
- image: cimg/python:3.12
steps:
- checkout
- run:
name: Install dependencies
command: |
wget -qO /usr/local/bin/yq https://github.com/mikefarah/yq/releases/latest/download/yq_linux_amd64
chmod +x /usr/local/bin/yq
pip install outerbounds ob-project-utils pyyaml
- run:
name: Configure the machine user
command: |
PROJECT_NAME=$(yq .project obproject.toml)
PLATFORM=$(yq .platform obproject.toml)
CICD_USER="${PROJECT_NAME//_/-}-cicd"
outerbounds service-principal-configure \
--name $CICD_USER \
--deployment-domain $PLATFORM \
--perimeter default \
--jwt-token $CIRCLE_OIDC_TOKEN_V2
- run:
name: Deploy Project
command: obproject-deploy
workflows:
deploy:
jobs:
- deploy:
context: []
filters:
branches:
only: [main]
```
Replace \ with the name of a CircleCI context with OIDC enabled. The context can be empty.
If you need help setting up GitOps in your environment, contact Anaconda support.