> ## Documentation Index
> Fetch the complete documentation index at: https://anaconda.com/docs/llms.txt
> Use this file to discover all available pages before exploring further.
# Managing dependencies
export const GCell = ({children, className}) =>
{children}
;
export const GTH = ({children, className}) =>
{children}
;
export const GRow = ({children}) => {children}
;
export const GBody = ({children}) => {children}
;
export const GHead = ({children}) => {children}
;
export const GTable = ({children, className, cols}) =>
{children}
;
export const DefinitionDescription = ({children}) => {children};
export const DefinitionTerm = ({children}) => {children};
export const DefinitionList = ({children}) => {children}
;
export const Comments = ({children}) => {
return ;
};
This guide assumes you have read [Structuring projects](/docs/platform/guides/compute/structuring-projects), which explains how Metaflow packages your code automatically.
In Anaconda Platform, every task and workstation runs inside a container image. Metaflow [packages your code for you](/docs/platform/guides/compute/structuring-projects), but you need to supply the dependencies your code requires, such as frameworks like `pytorch` or `keras` and their supporting libraries, using one of the methods described below:
Declare an environment
Declare the Python version and packages in your flow with a decorator such as `@anaconda_base`, `@conda_base`, or `@pypi_base`, and let the platform build the image for you.
Off-the-shelf image
Use an image published by a third party, such as PyTorch or Hugging Face.
Custom image
Use an image that your organization builds and maintains.
Each method has tradeoffs, and some are better suited for specific scenarios. If you are unsure where to start, declaring your environment's dependencies in your flow using a decorator is a strong choice. It's the least work to set up and maintains consistency by default. Move to using an off-the-shelf or custom image when you need system-level control, GPU drivers that must match the node's NVIDIA driver, or policy enforcement.
Declare an environment
Off-the-shelf image
Custom image
Starts quickly
After the first build
Yes
Yes
Easy to maintain
Yes
Yes
No
Flexible
Yes
No
Yes, slowly
Dev/prod consistency
Yes
With effort
With effort
Enforceable
No
Yes
Yes
*Enforceable* means an administrator can require all executions to use an approved image through an image allowlist perimeter policy.
An environment decorator, such as `@anaconda_base`, declares the Python version and packages your flow needs to run, including where those packages are sourced. Supply the environment declaration directly in your flow's code:
```python Example environment declaration theme={null}
@anaconda_base(
python="3.12.0",
packages={"pytorch": "2.14.*"},
)
```
Available decorators
Package source
`@anaconda_base`
Anaconda's curated `main` channel
`@conda_base`
`conda-forge`
`@pypi_base`
`PyPI`
**Benefits to declaring an environment in your flow:**
* You can run the flow in different environments without needing to change the dependencies or the code:
Local development
Run the flow with `--environment=anaconda`, and Metaflow builds the environment on your machine.
Cloud execution
Run the flow with `--environment=fast-bakery`, and the platform builds the declared dependencies into a container image.
Both environments are cached. The initial build takes a few minutes, but subsequent runs start immediately.
- Anyone can define or change the libraries they need without writing a `Dockerfile` or building images by hand.
- Teams can maintain any number of project-specific environments without coordinating image upgrades across projects.
- Developers can work in consistent environments on workstations or laptops without running Docker locally.
**Considerations when declaring an environment in your flow:**
* The environment is built at run time from your declared dependencies, so if your organization requires all executions to use an approved image, use one of the image-based approaches instead.
An off-the-shelf image is a container image that someone else publishes and maintains. Supply the image URI on the command line, and the platform runs your flow in it:
```sh Example: run a flow with the official PyTorch image theme={null}
python torchtest.py run --with kubernetes:image=pytorch/pytorch:2.4.0-cuda12.4-cudnn9-runtime
```
Well-known options include [the official PyTorch image](https://hub.docker.com/r/pytorch/pytorch), [Hugging Face's transformers image](https://hub.docker.com/r/huggingface/transformers-pytorch-gpu), and [the AWS deep learning containers](https://github.com/aws/deep-learning-containers/blob/master/available_images.md#ec2-framework-containers-tested-on-ec2-ecs-and-eks-only).
**Benefits of using an off-the-shelf image:**
* You get started quickly if you know the image you want, and someone else maintains it.
* The image can contain optimizations and system-level configuration that would be hard to express with an environment decorator.
* An administrator can require all projects to use an approved image through an image allowlist perimeter policy.
**Considerations when using an off-the-shelf image:**
* If you need a library or version the image does not provide, you cannot add it without changing the image.
* Consistency between development and production depends on the provider's versioning discipline, and on developing against the same image you deploy with.
* You execute a large amount of code you have not audited. You need to trust the image provider.
A custom image is a container image that your organization builds and maintains. If your organization already has an image that includes the dependencies your flows need, using it is often the simplest option. Supply the image URI the same way you would an off-the-shelf image:
```sh theme={null}
python torchtest.py run --with kubernetes:image=
```
Replace \ with the URI of your organization's image, for example `123456789012.dkr.ecr.us-west-2.amazonaws.com/ml-base:1.2.0`.
**Benefits of using a custom image:**
* You control exactly what the image contains.
* An administrator can require all projects to use an approved image through an image allowlist perimeter policy.
* Used as a workstation image, it keeps development and cloud executions consistent automatically. For details, see [Developing on a workstation with a custom image](#developing-on-a-workstation-with-a-custom-image).
**Considerations when using a custom image:**
* Your organization owns building, securing, and updating the image.
* Supporting project-specific dependencies becomes cumbersome when every project needs its own image.
## Managing dependencies for a workflow
The following example shows all three approaches using one flow using a PyTorch benchmark flow. The `TorchTestFlow` benchmark test squares a large tensor repeatedly and measures throughput. It resembles a realistic project that uses `pytorch`, optionally running on GPUs that require CUDA drivers.
### Running the benchmark with a declared environment
The CPU version of the benchmark declares its environment with `@anaconda_base`. Save the following as `torchtest.py`:
```python highlight={6-9} expandable theme={null}
from metaflow import FlowSpec, step, current, Flow, resources, anaconda_base, card
from metaflow.cards import Markdown
from metaflow.profilers import gpu_profile
import time
@anaconda_base(
python="3.12.0",
packages={"pytorch": "2.14.*"},
)
class TorchTestFlow(FlowSpec):
@card(type="blank", refresh_interval=1, id="status")
@step
def start(self):
t = self.create_tensor()
self.run_squarings(t)
self.next(self.end)
def create_tensor(self, dim=5000):
import torch # pylint: disable=import-error
print("Creating a random tensor")
self.tensor = t = torch.rand((dim, dim))
print("Tensor created! Shape", self.tensor.shape)
print("Tensor is stored on", self.tensor.device)
if torch.cuda.is_available():
print("CUDA available! Moving tensor to GPU memory")
t = self.tensor.to("cuda")
print("Tensor is now stored on", t.device)
else:
print("CUDA not available")
return t
def run_squarings(self, tensor, seconds=60):
import torch # pylint: disable=import-error
print("Starting benchmark")
counter = Markdown("# Starting to square...")
current.card["status"].append(counter)
current.card["status"].refresh()
count = 0
s = time.time()
while time.time() - s < seconds:
for i in range(25):
# square the tensor!
torch.matmul(tensor, tensor)
count += 25
counter.update(f"# {count} squarings completed ")
current.card["status"].refresh()
elapsed = time.time() - s
msg = f"⚡ {count/elapsed} squarings per second ⚡"
current.card["status"].append(Markdown(f"# {msg}"))
print(msg)
@step
def end(self):
# show that we persisted the tensor artifact
print("Tensor shape is still", self.tensor.shape)
if __name__ == "__main__":
TorchTestFlow()
```
```sh theme={null}
python torchtest.py --environment=anaconda run
```
Metaflow builds the declared environment on your machine and runs the flow inside it. The first run takes a few minutes while packages resolve. The environment is cached for subsequent runs, so the flow starts immediately.
```sh theme={null}
python torchtest.py --environment=fast-bakery run --with kubernetes
```
Anaconda Platform builds the declared dependencies into a container image and runs the flow on cloud compute. The first run takes a few minutes while the image builds.
### Running on a GPU with an off-the-shelf image
GPU tasks need the CUDA driver stack, which belongs in the container image rather than the declared environment. The libraries are large, and they must match the NVIDIA driver on the GPU node. For GPU workloads, use a prebuilt image that includes `pytorch` and CUDA, such as [the AWS deep learning containers](https://github.com/aws/deep-learning-containers/blob/master/available_images.md#ec2-framework-containers-tested-on-ec2-ecs-and-eks-only).
**Do I have GPUs in my cluster?**
Check the availability of GPU instances in your cluster as follows:
1. Select **Compute** in the left-hand navigation.
2. Click **Pools**.
3. Find a compute pool that displays `Has Access to GPUs`.
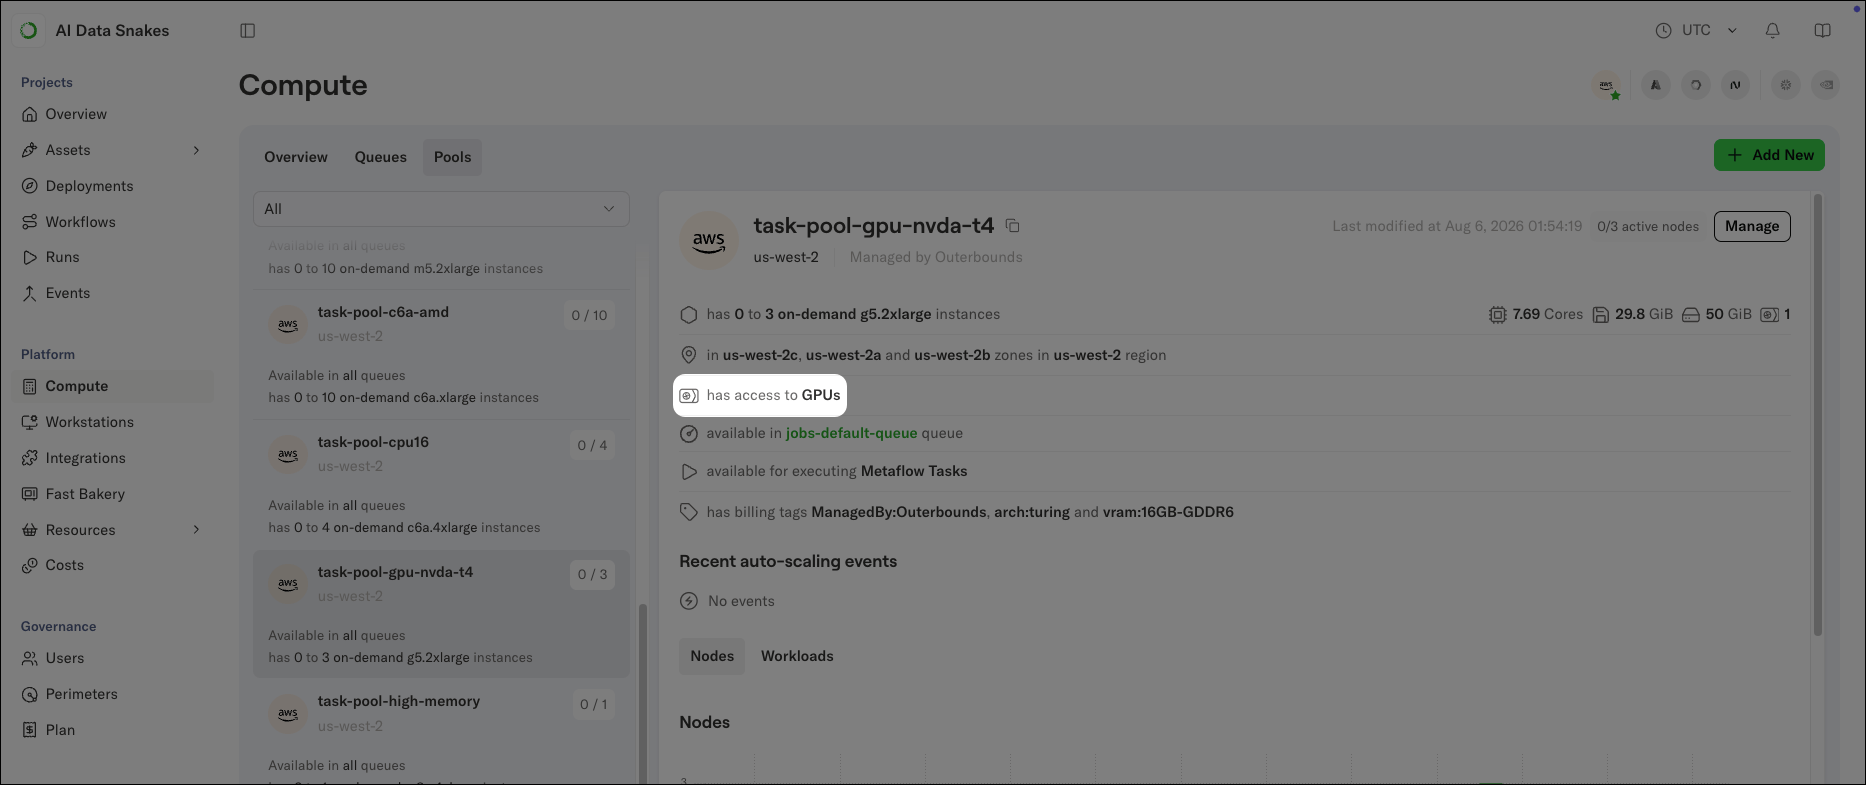 If you don't have access to a compute pool with GPUs, contact your administrator.
The GPU run needs its own version of the flow. Save this as `torchtest-gpu.py`:
```python highlight={6-7} expandable theme={null}
from metaflow import FlowSpec, step, current, Flow, resources, card
from metaflow.cards import Markdown
from metaflow.profilers import gpu_profile
import time
class TorchTestFlow(FlowSpec):
@resources(gpu=1)
@gpu_profile()
@card(type="blank", refresh_interval=1, id="status")
@step
def start(self):
t = self.create_tensor()
self.run_squarings(t)
self.next(self.end)
def create_tensor(self, dim=5000):
import torch # pylint: disable=import-error
print("Creating a random tensor")
self.tensor = t = torch.rand((dim, dim))
print("Tensor created! Shape", self.tensor.shape)
print("Tensor is stored on", self.tensor.device)
if torch.cuda.is_available():
print("CUDA available! Moving tensor to GPU memory")
t = self.tensor.to("cuda")
print("Tensor is now stored on", t.device)
else:
print("CUDA not available")
return t
def run_squarings(self, tensor, seconds=60):
import torch # pylint: disable=import-error
print("Starting benchmark")
counter = Markdown("# Starting to square...")
current.card["status"].append(counter)
current.card["status"].refresh()
count = 0
s = time.time()
while time.time() - s < seconds:
for i in range(25):
# square the tensor!
torch.matmul(tensor, tensor)
count += 25
counter.update(f"# {count} squarings completed ")
current.card["status"].refresh()
elapsed = time.time() - s
msg = f"⚡ {count/elapsed} squarings per second ⚡"
current.card["status"].append(Markdown(f"# {msg}"))
print(msg)
@step
def end(self):
# show that we persisted the tensor artifact
print("Tensor shape is still", self.tensor.shape)
if __name__ == "__main__":
TorchTestFlow()
```
This version differs from `torchtest.py` in two ways. First, it adds two decorators to the `start` step, highlighted above. `@resources(gpu=1)` requests a GPU, and `@gpu_profile()` shows a real-time GPU utilization card while the task runs. Second, it omits `@anaconda_base`, so the task uses the image's packages instead of building a declared environment.
Run it with the prebuilt image:
```sh theme={null}
python torchtest-gpu.py run --with kubernetes:image=763104351884.dkr.ecr.us-east-1.amazonaws.com/pytorch-training:2.3.0-gpu-py311-cu121-ubuntu20.04-ec2
```
Prebuilt GPU images are large (often 5 GB or more), so the first run takes a few minutes while the cluster pulls the image.
## Developing on a workstation with a custom image
Workstations accept custom images as well, so you can develop in the same environment your cloud tasks run in.
1. When creating the workstation, replace the prefilled value in the **Image** field with the following:
```text theme={null}
763104351884.dkr.ecr.us-east-1.amazonaws.com/pytorch-training:2.3.0-gpu-py311-cu121-ubuntu20.04-ec2
```
If you don't have access to a compute pool with GPUs, contact your administrator.
The GPU run needs its own version of the flow. Save this as `torchtest-gpu.py`:
```python highlight={6-7} expandable theme={null}
from metaflow import FlowSpec, step, current, Flow, resources, card
from metaflow.cards import Markdown
from metaflow.profilers import gpu_profile
import time
class TorchTestFlow(FlowSpec):
@resources(gpu=1)
@gpu_profile()
@card(type="blank", refresh_interval=1, id="status")
@step
def start(self):
t = self.create_tensor()
self.run_squarings(t)
self.next(self.end)
def create_tensor(self, dim=5000):
import torch # pylint: disable=import-error
print("Creating a random tensor")
self.tensor = t = torch.rand((dim, dim))
print("Tensor created! Shape", self.tensor.shape)
print("Tensor is stored on", self.tensor.device)
if torch.cuda.is_available():
print("CUDA available! Moving tensor to GPU memory")
t = self.tensor.to("cuda")
print("Tensor is now stored on", t.device)
else:
print("CUDA not available")
return t
def run_squarings(self, tensor, seconds=60):
import torch # pylint: disable=import-error
print("Starting benchmark")
counter = Markdown("# Starting to square...")
current.card["status"].append(counter)
current.card["status"].refresh()
count = 0
s = time.time()
while time.time() - s < seconds:
for i in range(25):
# square the tensor!
torch.matmul(tensor, tensor)
count += 25
counter.update(f"# {count} squarings completed ")
current.card["status"].refresh()
elapsed = time.time() - s
msg = f"⚡ {count/elapsed} squarings per second ⚡"
current.card["status"].append(Markdown(f"# {msg}"))
print(msg)
@step
def end(self):
# show that we persisted the tensor artifact
print("Tensor shape is still", self.tensor.shape)
if __name__ == "__main__":
TorchTestFlow()
```
This version differs from `torchtest.py` in two ways. First, it adds two decorators to the `start` step, highlighted above. `@resources(gpu=1)` requests a GPU, and `@gpu_profile()` shows a real-time GPU utilization card while the task runs. Second, it omits `@anaconda_base`, so the task uses the image's packages instead of building a declared environment.
Run it with the prebuilt image:
```sh theme={null}
python torchtest-gpu.py run --with kubernetes:image=763104351884.dkr.ecr.us-east-1.amazonaws.com/pytorch-training:2.3.0-gpu-py311-cu121-ubuntu20.04-ec2
```
Prebuilt GPU images are large (often 5 GB or more), so the first run takes a few minutes while the cluster pulls the image.
## Developing on a workstation with a custom image
Workstations accept custom images as well, so you can develop in the same environment your cloud tasks run in.
1. When creating the workstation, replace the prefilled value in the **Image** field with the following:
```text theme={null}
763104351884.dkr.ecr.us-east-1.amazonaws.com/pytorch-training:2.3.0-gpu-py311-cu121-ubuntu20.04-ec2
```
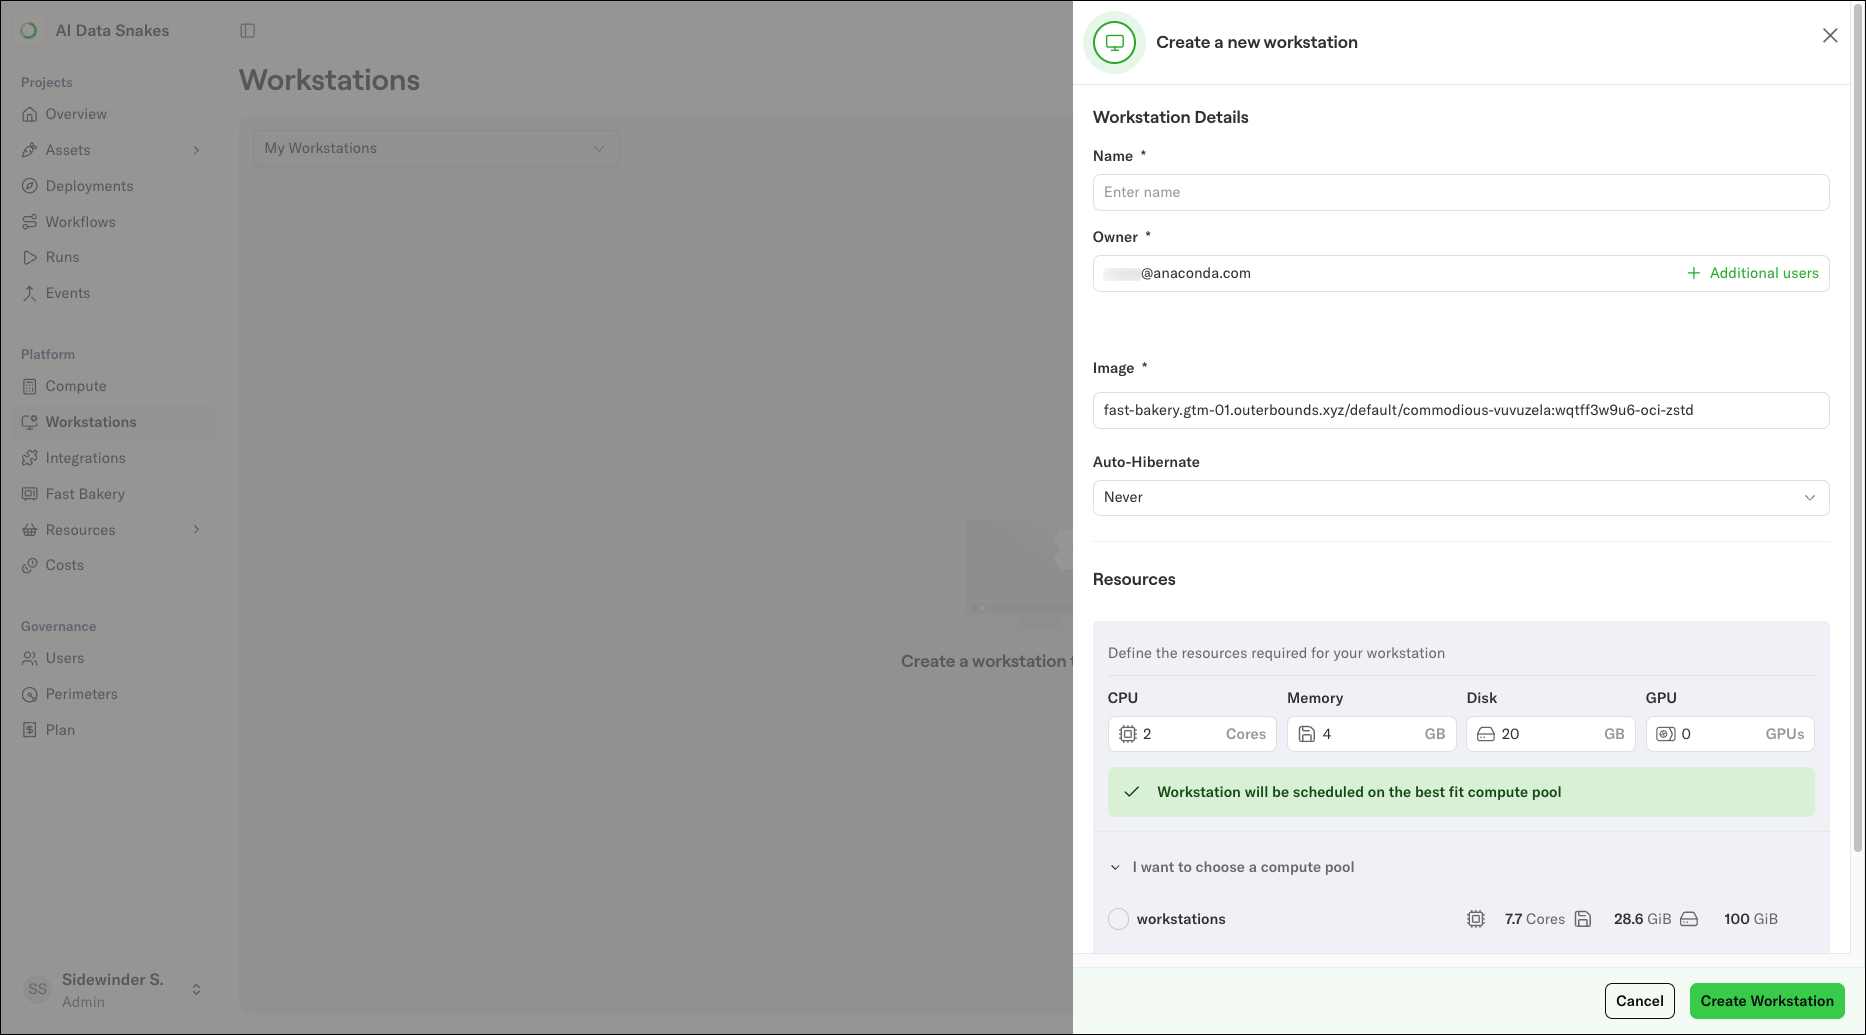 The URI can point to any publicly available image, or to an image in a private registry such as Amazon ECR, provided the registry is in the same cloud account as the platform deployment.
2. Once the workstation is running, run the flow on cloud compute:
```sh theme={null}
python torchtest.py run --with kubernetes
```
The platform uses the workstation's image for the cloud execution by default, so you do not need to specify the image on the command line. Code that runs on the workstation runs in the cloud with the same dependencies.
To override this behavior and use a different image for a run, pass the image explicitly:
```sh theme={null}
python torchtest.py run --with kubernetes:image=
```
Replace \ with the URI of the image to use for the cloud execution.
The URI can point to any publicly available image, or to an image in a private registry such as Amazon ECR, provided the registry is in the same cloud account as the platform deployment.
2. Once the workstation is running, run the flow on cloud compute:
```sh theme={null}
python torchtest.py run --with kubernetes
```
The platform uses the workstation's image for the cloud execution by default, so you do not need to specify the image on the command line. Code that runs on the workstation runs in the cloud with the same dependencies.
To override this behavior and use a different image for a run, pass the image explicitly:
```sh theme={null}
python torchtest.py run --with kubernetes:image=
```
Replace \ with the URI of the image to use for the cloud execution.