> ## Documentation Index
> Fetch the complete documentation index at: https://anaconda.com/docs/llms.txt
> Use this file to discover all available pages before exploring further.
# Deploy to production
The examples so far have been run manually. A defining feature of *production deployments* is that they run automatically and reliably without human supervision. Anaconda Platform includes a workflow orchestrator that allows you to deploy any flow to production with one command.
This page assumes you have installed the `outerbounds` package and connected to your platform instance. If you haven't, start with [Connect to the platform and run your first flow](/docs/platform/getting-started/connect-and-first-run).
## Deploying a scheduled flow to production
Weather forecasts are a good example of a workflow that needs to run in production at a regular cadence. This example calls the [Open-Meteo API](https://open-meteo.com/) to retrieve a forecast for a specified location.
1. Create a directory for the example and navigate to it:
```sh theme={null}
mkdir weatherflow && cd weatherflow
```
2. Create a file named `weatherflow.py` in that directory with the following contents:
```python highlight={17,18,20,21,58} expandable theme={null}
from metaflow import FlowSpec, step, Parameter, card, current, project, trigger, schedule, retry
from metaflow.cards import Markdown, VegaChart
GEOCODING = "https://geocoding-api.open-meteo.com/v1/search"
FORECAST = "https://api.open-meteo.com/v1/forecast"
CHART = {
"$schema": "https://vega.github.io/schema/vega-lite/v5.json",
"width": 600,
"height": 400,
"mark": {"type": "line", "tooltip": True},
"encoding": {
"x": {"field": "time", "type": "temporal"},
"y": {"field": "temperature", "type": "quantitative"},
},
}
# ⬇️ Enable this decorator if you want hourly forecasts
# @schedule(hourly=True)
@trigger(event="forecast_request")
@project(name="weather")
class WeatherFlow(FlowSpec):
location = Parameter("location", default="San Francisco")
unit = Parameter("unit", default="fahrenheit")
def parse_location(self):
import requests
resp = requests.get(GEOCODING, {"name": self.location, "count": 1}).json()
if "results" not in resp:
raise Exception(f"Location {self.location} not found")
else:
match = resp["results"][0]
self.latitude = match["latitude"]
self.longitude = match["longitude"]
self.loc_name = match["name"]
self.country = match["country"]
def get_forecast(self):
import requests
resp = requests.get(
FORECAST,
{
"latitude": self.latitude,
"longitude": self.longitude,
"hourly": "temperature_2m",
"forecast_days": 3,
"temperature_unit": self.unit,
},
).json()
forecast = resp["hourly"]
self.forecast = [
{"time": t, "temperature": x}
for t, x in zip(forecast["time"], forecast["temperature_2m"])
]
@retry
@card(type="blank")
@step
def start(self):
self.parse_location()
self.get_forecast()
current.card.append(
Markdown(f"# Temperature forecast for {self.loc_name}, {self.country} 🌤️")
)
CHART["data"] = {"values": self.forecast}
current.card.append(VegaChart(CHART))
self.next(self.end)
@step
def end(self):
pass
if __name__ == "__main__":
WeatherFlow()
```
The flow uses four decorators for production readiness:
* `@schedule` runs the flow automatically on a cadence. Uncomment it to run hourly. For details, see [scheduling flows](https://docs.metaflow.org/production/scheduling-metaflow-flows/scheduling-with-argo-workflows#scheduling-a-flow).
* `@trigger` starts the flow when an external event occurs. For details, see [event triggering](https://docs.metaflow.org/production/event-triggering).
* `@project` isolates deployments by developer, so multiple people can deploy the same flow without interfering with each other. For details, see [coordinating larger projects](https://docs.metaflow.org/production/coordinating-larger-metaflow-projects).
* `@retry` automatically retries a step if it fails. This example uses it to handle cases where the forecast API is temporarily unresponsive. For details, see [retrying tasks](https://docs.metaflow.org/scaling/failures#retrying-tasks-with-the-retry-decorator).
### Testing the flow locally
Before deploying, test the flow locally:
```sh theme={null}
python weatherflow.py run --location ulaanbaatar
```
The result is stored as an artifact called `forecast` and displayed as a card:
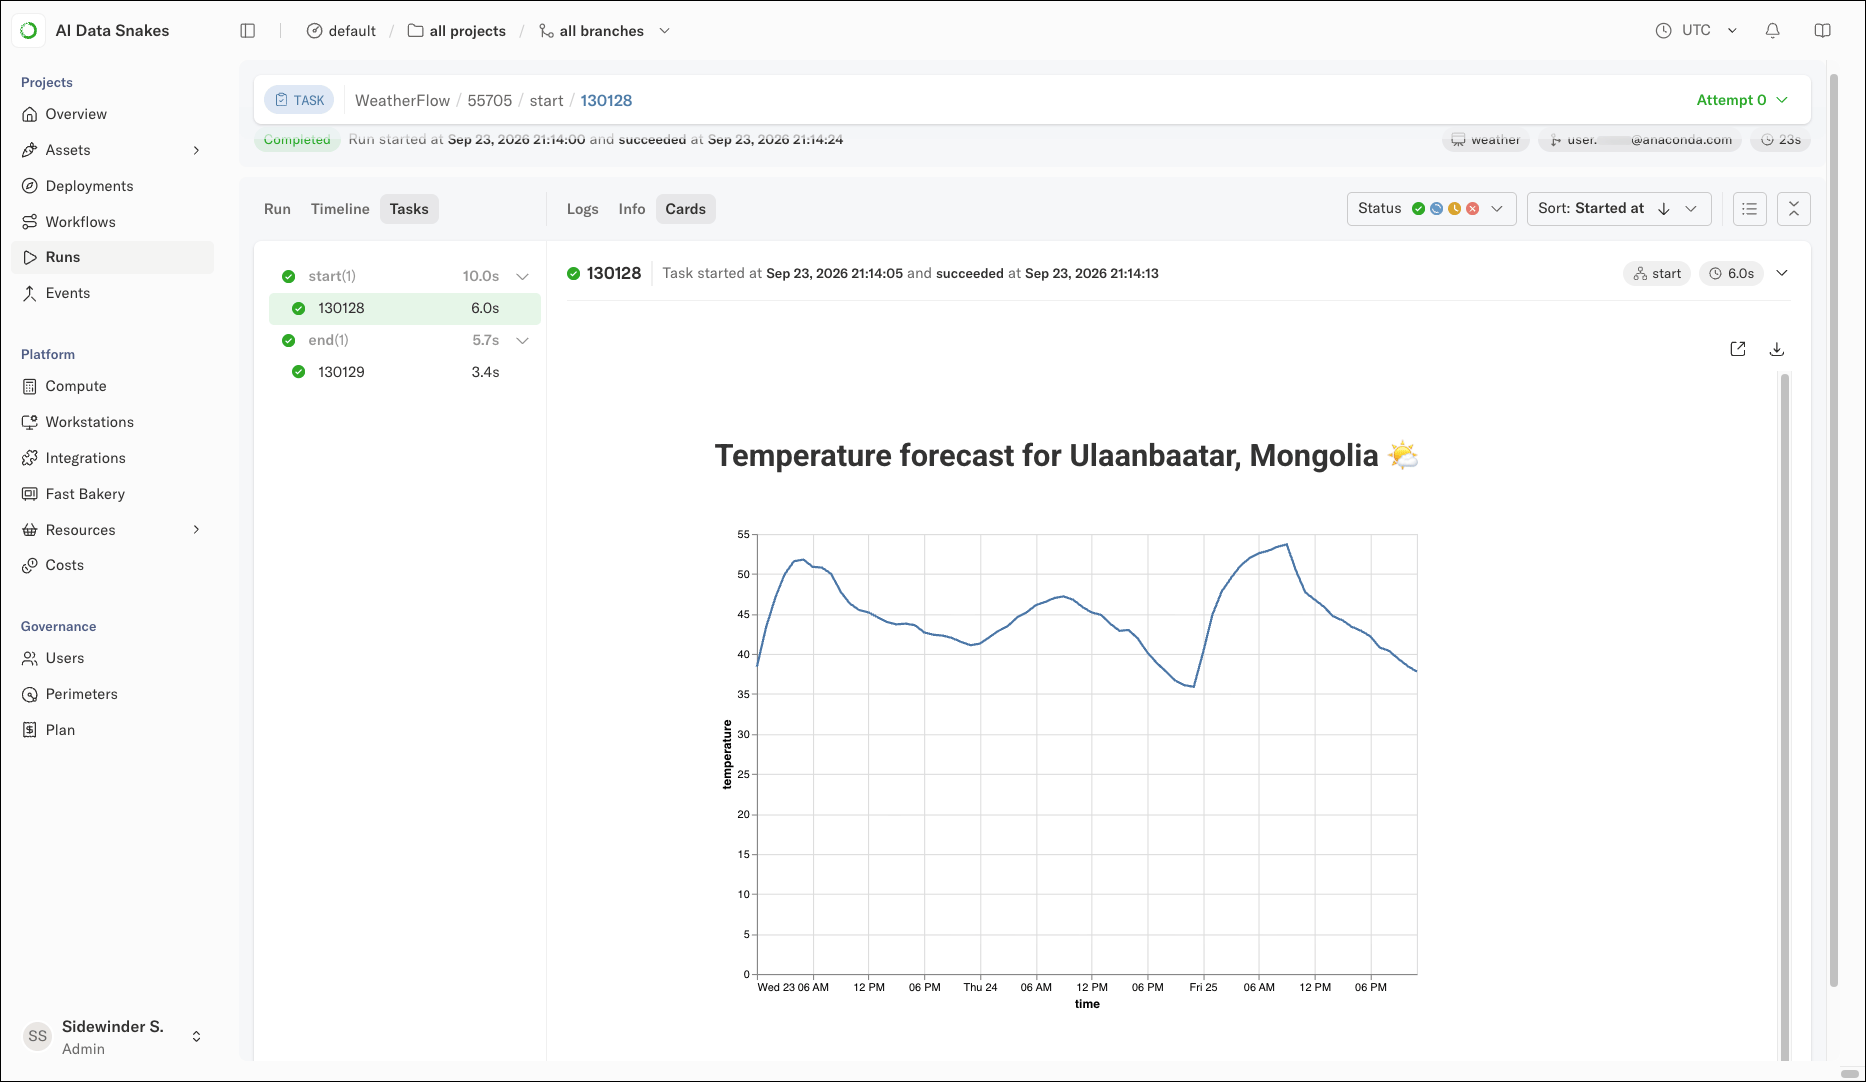 A test run like this is isolated from production by default through [Metaflow namespaces](https://docs.metaflow.org/scaling/tagging#namespaces). You can continue developing and running the flow locally after it is deployed, without affecting production.
## Deploying to production
To deploy the flow to production, run:
```sh theme={null}
python weatherflow.py argo-workflows create
```
The flow is now deployed and runs automatically without human intervention. You can shut down your laptop and the flow continues to run on the platform.
You can see deployed workflows in the **Workflows** view. By default, the `@project` decorator prefixes the deployment with your username, so the deployment appears as `weather.user..weatherflow`. This allows multiple developers to create their own isolated deployments.
To promote a deployment to be the singular production version, add the `--production` flag:
```sh theme={null}
python weatherflow.py --production argo-workflows create
```
To create branched deployments for use cases like A/B testing, use the `--branch` option.
## Triggering a production run
To trigger a production run from the command line:
```sh theme={null}
python weatherflow.py argo-workflows trigger --location 'Las Vegas'
```
You can pass any parameters to the `trigger` command. A key difference between `run` and `trigger` is that `trigger` starts a production run that is independent of your local machine. Even if you shut down your computer, the run continues on the platform.
Triggered runs appear in the **Workflows** view a few seconds before they appear in the **Runs** view, as the runs might take a while to get scheduled.
You can also trigger the flow in the **Workflows** view. Open the workflow's detail page, click **Actions**, and select *Trigger a run*.
A test run like this is isolated from production by default through [Metaflow namespaces](https://docs.metaflow.org/scaling/tagging#namespaces). You can continue developing and running the flow locally after it is deployed, without affecting production.
## Deploying to production
To deploy the flow to production, run:
```sh theme={null}
python weatherflow.py argo-workflows create
```
The flow is now deployed and runs automatically without human intervention. You can shut down your laptop and the flow continues to run on the platform.
You can see deployed workflows in the **Workflows** view. By default, the `@project` decorator prefixes the deployment with your username, so the deployment appears as `weather.user..weatherflow`. This allows multiple developers to create their own isolated deployments.
To promote a deployment to be the singular production version, add the `--production` flag:
```sh theme={null}
python weatherflow.py --production argo-workflows create
```
To create branched deployments for use cases like A/B testing, use the `--branch` option.
## Triggering a production run
To trigger a production run from the command line:
```sh theme={null}
python weatherflow.py argo-workflows trigger --location 'Las Vegas'
```
You can pass any parameters to the `trigger` command. A key difference between `run` and `trigger` is that `trigger` starts a production run that is independent of your local machine. Even if you shut down your computer, the run continues on the platform.
Triggered runs appear in the **Workflows** view a few seconds before they appear in the **Runs** view, as the runs might take a while to get scheduled.
You can also trigger the flow in the **Workflows** view. Open the workflow's detail page, click **Actions**, and select *Trigger a run*.
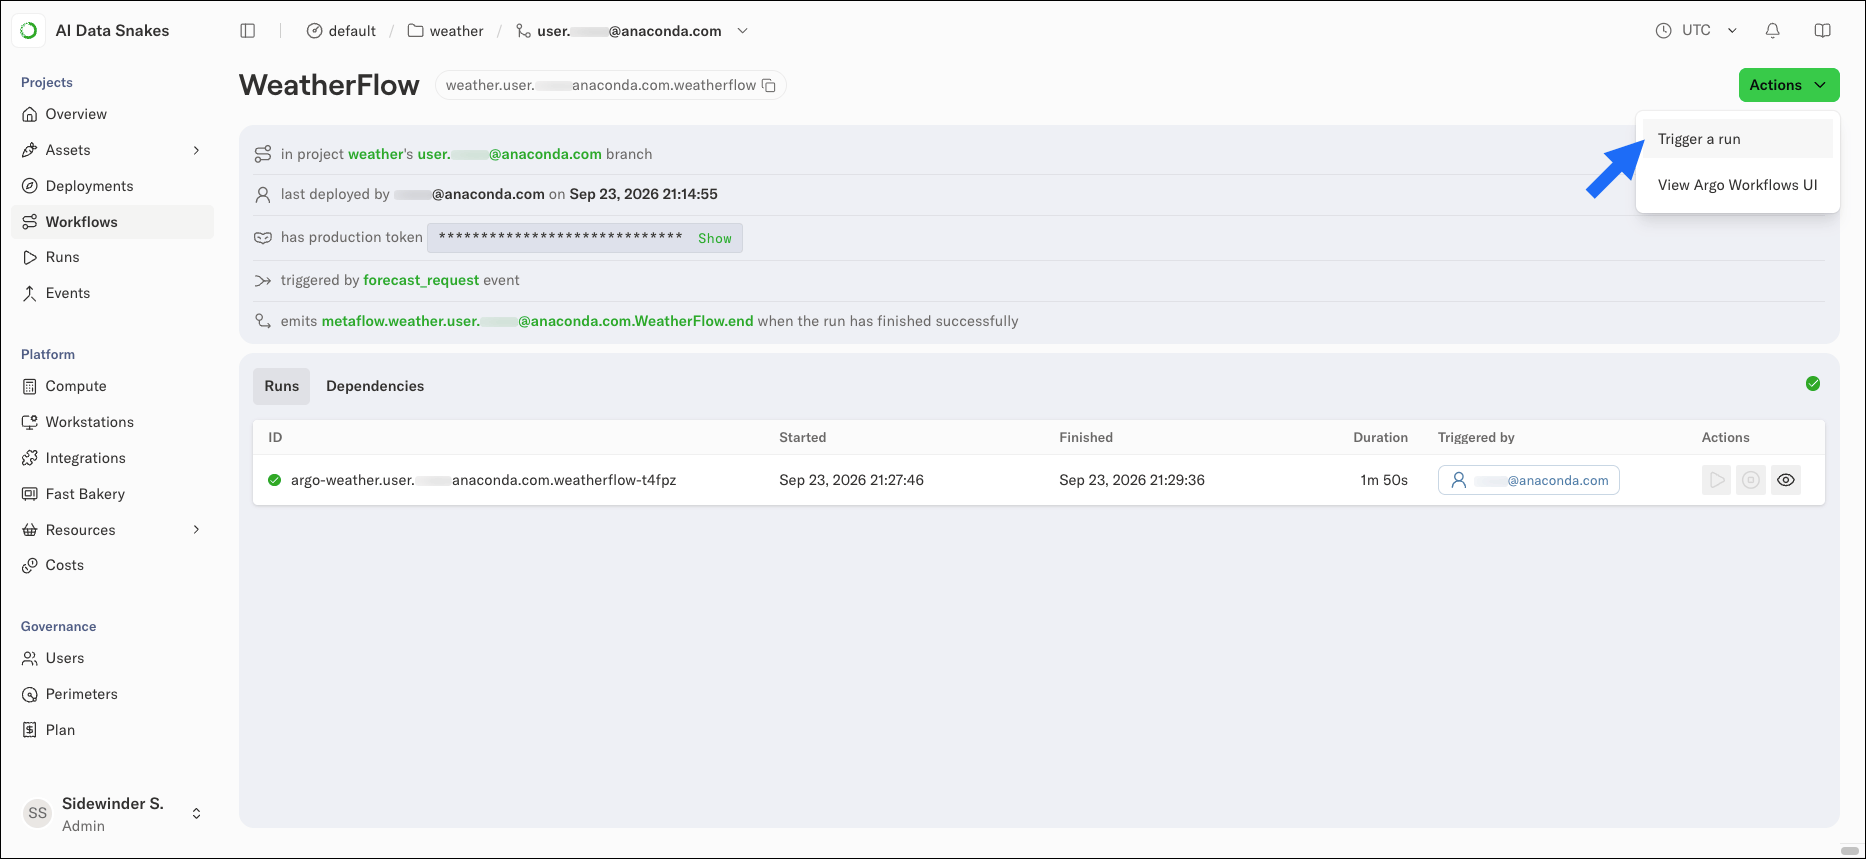 The Trigger Run panel opens with the flow's parameters pre-filled with their default values. Adjust them as needed, then click **Trigger**.
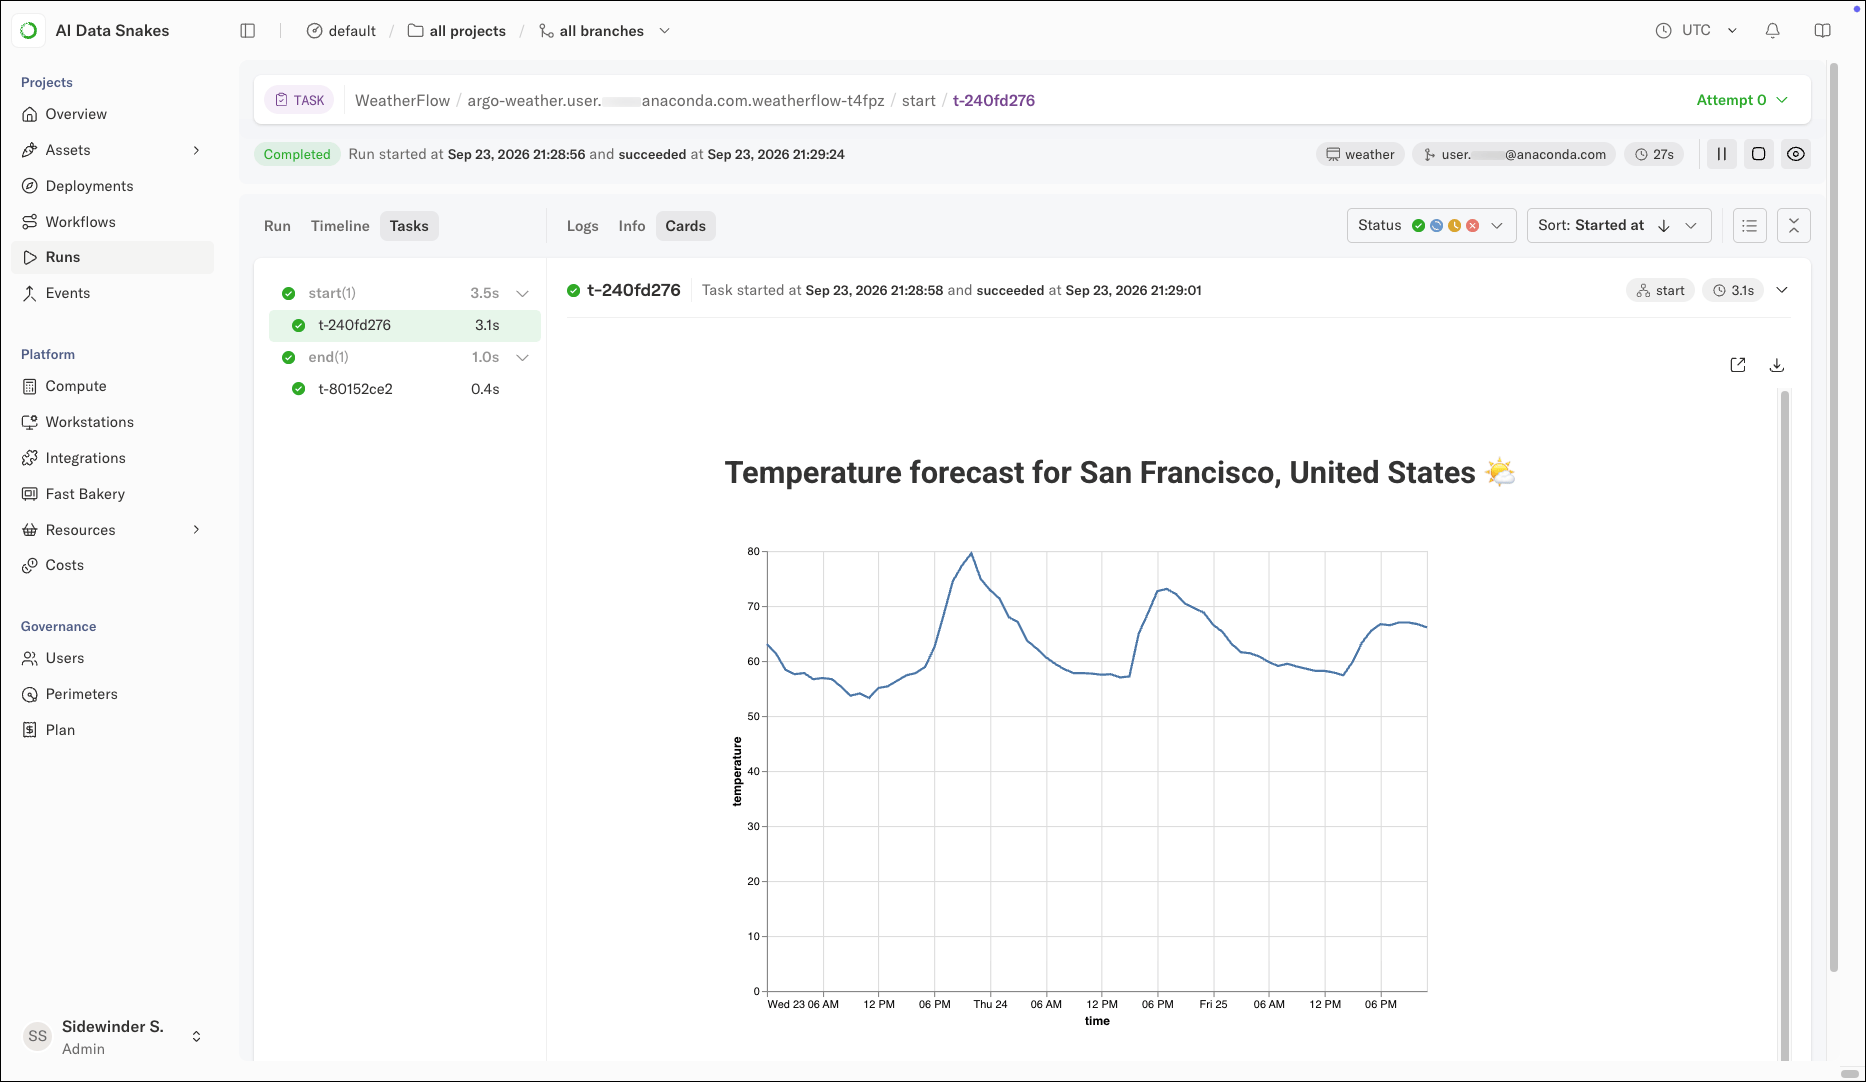
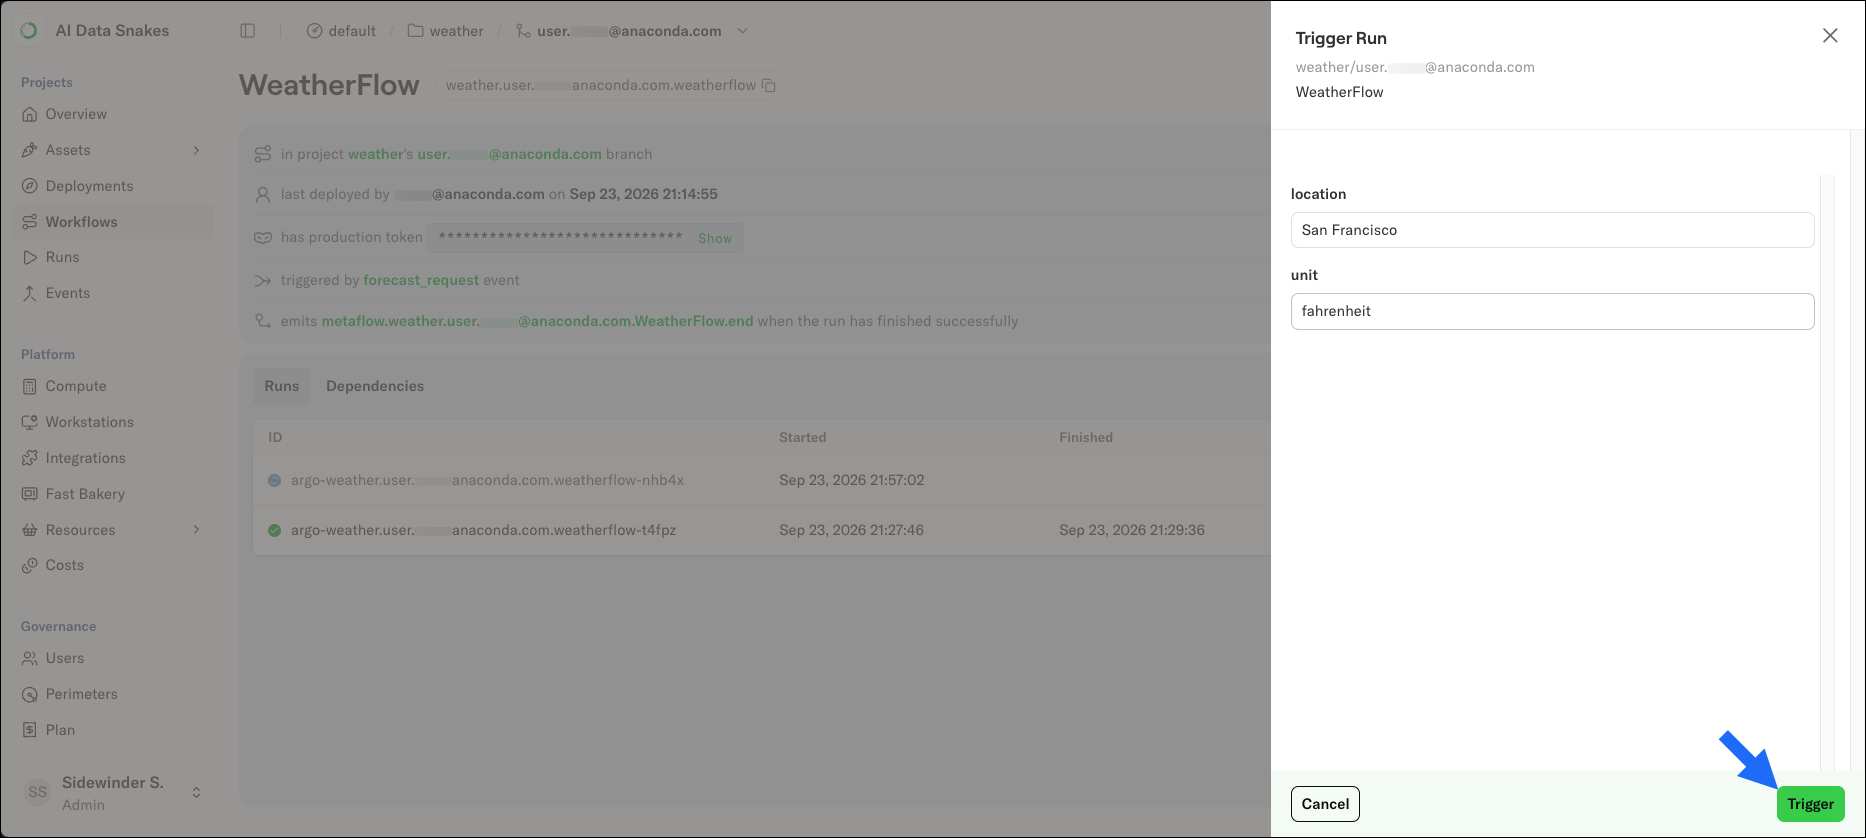 The triggered run produces the same forecast card as the local run:
 ### Deploying with stable production environments
An important reason for taking care of dependency management, as we covered in [defining the environment](/docs/platform/getting-started/defining-the-environment), is to ensure stable and reproducible production environments.
You can use [the `@conda`/`@pypi` approach or custom images](/docs/platform/guides/compute/managing-dependencies) to define production environments. For instance, you could deploy [our earlier example](/docs/platform/getting-started/defining-the-environment), `TorchTestFlow`, to production as follows (the environment variable `MYIMAGE` is defined for readability):
```sh theme={null}
export MYIMAGE=763104351884.dkr.ecr.us-east-1.amazonaws.com/pytorch-training:2.3.0-gpu-py311-cu121-ubuntu20.04-ec2
python torchtest.py --with kubernetes:image=$MYIMAGE argo-workflows create
```
Note that the `--with` option comes before the `argo-workflows` command.
### GitOps and continuous delivery
For production deployments at scale, users typically do not call `argo-workflows create` directly. Instead, deployment happens through [a CI/CD pipeline, such as GitHub Actions](/docs/platform/guides/deploy/cicd-integration).
Anaconda Platform gives you tools to separate staging and production environments securely, test flows before deployment automatically, deploy A/B experiments, and set up end-to-end continuous delivery workflows. [Read more here](https://www.anaconda.com/blog/continuous-delivery-of-ml-ai).
Also, occasionally things fail in production. Thanks to artifacts and consistent environments, you can [reproduce production issues locally](https://docs.metaflow.org/production/scheduling-metaflow-flows/scheduling-with-argo-workflows#reproducing-failed-production-runs) and deploy fixes back to production quickly.
## What's next
You are now ready to develop, scale, and deploy flows on Anaconda Platform:
1. **Develop** code in your existing environment or on a cloud workstation.
2. **Scale** to the cloud using your preferred libraries and hardware.
3. **Deploy** flows to run automatically in production.
To explore additional Anaconda Platform features, see the documentation. For questions, contact your account team.
### Deploying with stable production environments
An important reason for taking care of dependency management, as we covered in [defining the environment](/docs/platform/getting-started/defining-the-environment), is to ensure stable and reproducible production environments.
You can use [the `@conda`/`@pypi` approach or custom images](/docs/platform/guides/compute/managing-dependencies) to define production environments. For instance, you could deploy [our earlier example](/docs/platform/getting-started/defining-the-environment), `TorchTestFlow`, to production as follows (the environment variable `MYIMAGE` is defined for readability):
```sh theme={null}
export MYIMAGE=763104351884.dkr.ecr.us-east-1.amazonaws.com/pytorch-training:2.3.0-gpu-py311-cu121-ubuntu20.04-ec2
python torchtest.py --with kubernetes:image=$MYIMAGE argo-workflows create
```
Note that the `--with` option comes before the `argo-workflows` command.
### GitOps and continuous delivery
For production deployments at scale, users typically do not call `argo-workflows create` directly. Instead, deployment happens through [a CI/CD pipeline, such as GitHub Actions](/docs/platform/guides/deploy/cicd-integration).
Anaconda Platform gives you tools to separate staging and production environments securely, test flows before deployment automatically, deploy A/B experiments, and set up end-to-end continuous delivery workflows. [Read more here](https://www.anaconda.com/blog/continuous-delivery-of-ml-ai).
Also, occasionally things fail in production. Thanks to artifacts and consistent environments, you can [reproduce production issues locally](https://docs.metaflow.org/production/scheduling-metaflow-flows/scheduling-with-argo-workflows#reproducing-failed-production-runs) and deploy fixes back to production quickly.
## What's next
You are now ready to develop, scale, and deploy flows on Anaconda Platform:
1. **Develop** code in your existing environment or on a cloud workstation.
2. **Scale** to the cloud using your preferred libraries and hardware.
3. **Deploy** flows to run automatically in production.
To explore additional Anaconda Platform features, see the documentation. For questions, contact your account team.