> ## Documentation Index
> Fetch the complete documentation index at: https://anaconda.com/docs/llms.txt
> Use this file to discover all available pages before exploring further.
# Define the environment
Now that we have seen the basic building blocks of executing code in the cloud, the next step is to understand how to manage and run more complex projects. In particular, we need to package software dependencies, both our own code and any 3rd party libraries, for reliable cloud execution.
Dependency management in Python is [known to be a headache](https://xkcd.com/1987/) (in particular affecting ML/AI projects that have extra requirements due to large packages and GPU drivers), but Anaconda Platform streamlines the process while allowing you to choose an approach that works for your needs.
Specifically:
* Metaflow takes care of [packaging your code automatically](https://docs.metaflow.org/scaling/dependencies). You do not have to worry about packaging the project's Python files.
* Anaconda Platform makes it easier, faster, and more secure to work with 3rd party dependencies and Docker images. For details, see [managing dependencies](/docs/platform/guides/compute/managing-dependencies).
## Defining an environment for a PyTorch benchmark
This example walks through defining and running a PyTorch benchmark to show how Anaconda Platform handles dependencies. You will run the same benchmark three ways: locally, on cloud compute, and on a GPU.
These instructions assume you have installed the `outerbounds` package and connected to your platform instance. If you haven't, start with [Connect to the platform and run your first flow](/docs/platform/getting-started/connect-and-first-run).
The benchmark flow, `TorchTestFlow`, squares a large tensor repeatedly and measures throughput. PyTorch is a good test case for dependency management because it is a large framework with extra requirements beyond the package itself, particularly when GPUs are involved.
### Running the benchmark with a declared environment
1. Create a directory for the example and navigate to it:
```sh theme={null}
mkdir torchtest && cd torchtest
```
2. Create a file named `torchtest.py` in that directory with the following contents:
```python highlight={6-9} expandable theme={null}
from metaflow import FlowSpec, step, current, Flow, resources, anaconda_base, card
from metaflow.cards import Markdown
from metaflow.profilers import gpu_profile
import time
@anaconda_base(
python="3.12.0",
packages={"pytorch": "2.14.*"},
)
class TorchTestFlow(FlowSpec):
@card(type="blank", refresh_interval=1, id="status")
@step
def start(self):
t = self.create_tensor()
self.run_squarings(t)
self.next(self.end)
def create_tensor(self, dim=5000):
import torch # pylint: disable=import-error
print("Creating a random tensor")
self.tensor = t = torch.rand((dim, dim))
print("Tensor created! Shape", self.tensor.shape)
print("Tensor is stored on", self.tensor.device)
if torch.cuda.is_available():
print("CUDA available! Moving tensor to GPU memory")
t = self.tensor.to("cuda")
print("Tensor is now stored on", t.device)
else:
print("CUDA not available")
return t
def run_squarings(self, tensor, seconds=60):
import torch # pylint: disable=import-error
print("Starting benchmark")
counter = Markdown("# Starting to square...")
current.card["status"].append(counter)
current.card["status"].refresh()
count = 0
s = time.time()
while time.time() - s < seconds:
for i in range(25):
# square the tensor!
torch.matmul(tensor, tensor)
count += 25
counter.update(f"# {count} squarings completed ")
current.card["status"].refresh()
elapsed = time.time() - s
msg = f"⚡ {count/elapsed} squarings per second ⚡"
current.card["status"].append(Markdown(f"# {msg}"))
print(msg)
@step
def end(self):
# show that we persisted the tensor artifact
print("Tensor shape is still", self.tensor.shape)
if __name__ == "__main__":
TorchTestFlow()
```
The `@anaconda_base` decorator declares the environment for every step in the flow. In this case, it specifies Python 3.12 with `pytorch`. You do not need to build this environment by hand. The platform builds it for you when you run the flow.
3. Run the flow. The same file works locally and in the cloud; the only difference is the command.
```sh theme={null}
python torchtest.py --environment=anaconda run
```
When you run this command, Metaflow builds the declared environment on your machine and runs the flow inside it.
The first run takes a few minutes while packages resolve. The environment is cached for subsequent runs, so the flow starts immediately.
```sh theme={null}
python torchtest.py --environment=fast-bakery run --with kubernetes
```
When you run this command, Anaconda Platform builds the declared dependencies into a container image and runs the flow on cloud compute. The first run takes a few minutes while the image builds. Subsequent runs start faster because the image is cached.
Because the same declaration drives both local and cloud execution, environments stay consistent between development and production.
For information on using off-the-shelf or custom-built images instead of declaring dependencies, see [Managing dependencies](/docs/platform/guides/compute/managing-dependencies).
### Running the benchmark with a GPU
Tensor operations are significantly faster on a GPU. To see the difference, run the same benchmark on GPU hardware.
GPU tasks need the CUDA driver stack, which belongs in the container image rather than the declared environment. The libraries are large, and they must match the NVIDIA driver on the GPU node. For GPU workloads, use a prebuilt image that includes `pytorch` and CUDA, such as [the AWS deep learning containers](https://github.com/aws/deep-learning-containers/blob/master/available_images.md#ec2-framework-containers-tested-on-ec2-ecs-and-eks-only).
**Do I have GPUs in my cluster?**
Check the availability of GPU instances in your cluster as follows:
1. Select **Compute** in the left-hand navigation.
2. Click **Pools**.
3. Find a compute pool that displays `Has Access to GPUs`.
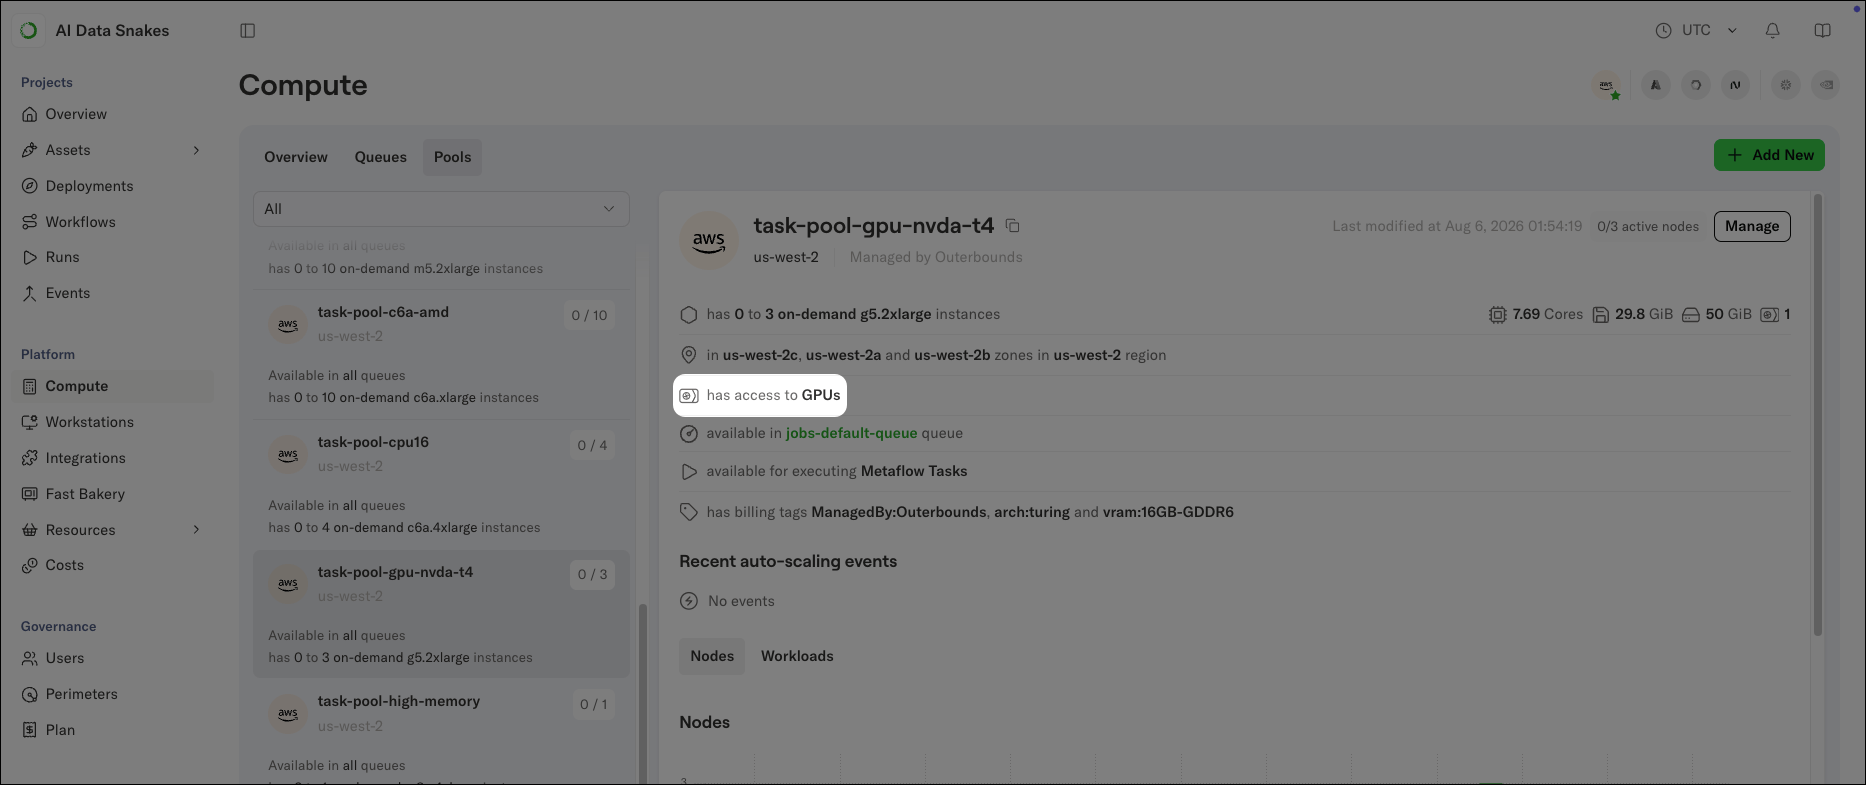 If you don't have access to a compute pool with GPUs, contact your administrator.
The GPU run needs its own version of the flow. Save this as `torchtest-gpu.py`:
```python highlight={6-7} expandable theme={null}
from metaflow import FlowSpec, step, current, Flow, resources, card
from metaflow.cards import Markdown
from metaflow.profilers import gpu_profile
import time
class TorchTestFlow(FlowSpec):
@resources(gpu=1)
@gpu_profile()
@card(type="blank", refresh_interval=1, id="status")
@step
def start(self):
t = self.create_tensor()
self.run_squarings(t)
self.next(self.end)
def create_tensor(self, dim=5000):
import torch # pylint: disable=import-error
print("Creating a random tensor")
self.tensor = t = torch.rand((dim, dim))
print("Tensor created! Shape", self.tensor.shape)
print("Tensor is stored on", self.tensor.device)
if torch.cuda.is_available():
print("CUDA available! Moving tensor to GPU memory")
t = self.tensor.to("cuda")
print("Tensor is now stored on", t.device)
else:
print("CUDA not available")
return t
def run_squarings(self, tensor, seconds=60):
import torch # pylint: disable=import-error
print("Starting benchmark")
counter = Markdown("# Starting to square...")
current.card["status"].append(counter)
current.card["status"].refresh()
count = 0
s = time.time()
while time.time() - s < seconds:
for i in range(25):
# square the tensor!
torch.matmul(tensor, tensor)
count += 25
counter.update(f"# {count} squarings completed ")
current.card["status"].refresh()
elapsed = time.time() - s
msg = f"⚡ {count/elapsed} squarings per second ⚡"
current.card["status"].append(Markdown(f"# {msg}"))
print(msg)
@step
def end(self):
# show that we persisted the tensor artifact
print("Tensor shape is still", self.tensor.shape)
if __name__ == "__main__":
TorchTestFlow()
```
This version differs from `torchtest.py` in two ways. First, it adds two decorators to the `start` step, highlighted above. `@resources(gpu=1)` requests a GPU, and `@gpu_profile()` shows a real-time GPU utilization card while the task runs. Second, it omits `@anaconda_base`, so the task uses the image's packages instead of building a declared environment.
Run it with the prebuilt image:
```sh theme={null}
python torchtest-gpu.py run --with kubernetes:image=763104351884.dkr.ecr.us-east-1.amazonaws.com/pytorch-training:2.3.0-gpu-py311-cu121-ubuntu20.04-ec2
```
The first GPU run takes a few minutes while the cluster launches a new GPU instance and pulls the image. When the flow runs:
1. A GPU instance starts to execute the task. You can see auto-scaling events on the **Pools** tab of the **Compute** page.
2. In the task view, you can observe GPU utilization from `@gpu_profile`.
3. You can also monitor the benchmark results in real time from the custom `@card`.
In this example, the GPU handles 106 squarings per second. A CPU-only laptop manages about 2.
Next, learn how to take a flow from development to production in [Deploying to production](/docs/platform/getting-started/deploying-to-production).
If you don't have access to a compute pool with GPUs, contact your administrator.
The GPU run needs its own version of the flow. Save this as `torchtest-gpu.py`:
```python highlight={6-7} expandable theme={null}
from metaflow import FlowSpec, step, current, Flow, resources, card
from metaflow.cards import Markdown
from metaflow.profilers import gpu_profile
import time
class TorchTestFlow(FlowSpec):
@resources(gpu=1)
@gpu_profile()
@card(type="blank", refresh_interval=1, id="status")
@step
def start(self):
t = self.create_tensor()
self.run_squarings(t)
self.next(self.end)
def create_tensor(self, dim=5000):
import torch # pylint: disable=import-error
print("Creating a random tensor")
self.tensor = t = torch.rand((dim, dim))
print("Tensor created! Shape", self.tensor.shape)
print("Tensor is stored on", self.tensor.device)
if torch.cuda.is_available():
print("CUDA available! Moving tensor to GPU memory")
t = self.tensor.to("cuda")
print("Tensor is now stored on", t.device)
else:
print("CUDA not available")
return t
def run_squarings(self, tensor, seconds=60):
import torch # pylint: disable=import-error
print("Starting benchmark")
counter = Markdown("# Starting to square...")
current.card["status"].append(counter)
current.card["status"].refresh()
count = 0
s = time.time()
while time.time() - s < seconds:
for i in range(25):
# square the tensor!
torch.matmul(tensor, tensor)
count += 25
counter.update(f"# {count} squarings completed ")
current.card["status"].refresh()
elapsed = time.time() - s
msg = f"⚡ {count/elapsed} squarings per second ⚡"
current.card["status"].append(Markdown(f"# {msg}"))
print(msg)
@step
def end(self):
# show that we persisted the tensor artifact
print("Tensor shape is still", self.tensor.shape)
if __name__ == "__main__":
TorchTestFlow()
```
This version differs from `torchtest.py` in two ways. First, it adds two decorators to the `start` step, highlighted above. `@resources(gpu=1)` requests a GPU, and `@gpu_profile()` shows a real-time GPU utilization card while the task runs. Second, it omits `@anaconda_base`, so the task uses the image's packages instead of building a declared environment.
Run it with the prebuilt image:
```sh theme={null}
python torchtest-gpu.py run --with kubernetes:image=763104351884.dkr.ecr.us-east-1.amazonaws.com/pytorch-training:2.3.0-gpu-py311-cu121-ubuntu20.04-ec2
```
The first GPU run takes a few minutes while the cluster launches a new GPU instance and pulls the image. When the flow runs:
1. A GPU instance starts to execute the task. You can see auto-scaling events on the **Pools** tab of the **Compute** page.
2. In the task view, you can observe GPU utilization from `@gpu_profile`.
3. You can also monitor the benchmark results in real time from the custom `@card`.
In this example, the GPU handles 106 squarings per second. A CPU-only laptop manages about 2.
Next, learn how to take a flow from development to production in [Deploying to production](/docs/platform/getting-started/deploying-to-production).