> ## Documentation Index
> Fetch the complete documentation index at: https://anaconda.com/docs/llms.txt
> Use this file to discover all available pages before exploring further.
# Connect to Anaconda Platform and run your first flow
There are two main ways to develop and execute code on Anaconda Platform:
1. You can use [cloud workstations](/docs/platform/concepts/what-is-a-workstation) through VS Code, Cursor, Windsurf, or SSH, backed by cloud instances hosted as part of the platform in your cloud account.
2. You can access the platform from any existing development environment, such as a laptop or a cloud-based environment.
## Invite users to the platform
Admin step
Before anyone can authenticate, invite them to the platform by adding their email in the user management view. After a user has been invited, they can log in to the platform with the configured SSO provider.
**Tokens are personal.**
Users should not share their personal access tokens. If you need shareable access tokens that are not tied to a person, see [Programmatic access via machine users](/docs/platform/guides/security/programmatic-access-via-machine-users).
## Connect to the platform
You can connect to the platform from your existing development environment or with a cloud workstation. If you have an existing installation of open-source Metaflow in your environment and you want to use Anaconda Platform in the same environment, use the third tab to avoid conflicts.
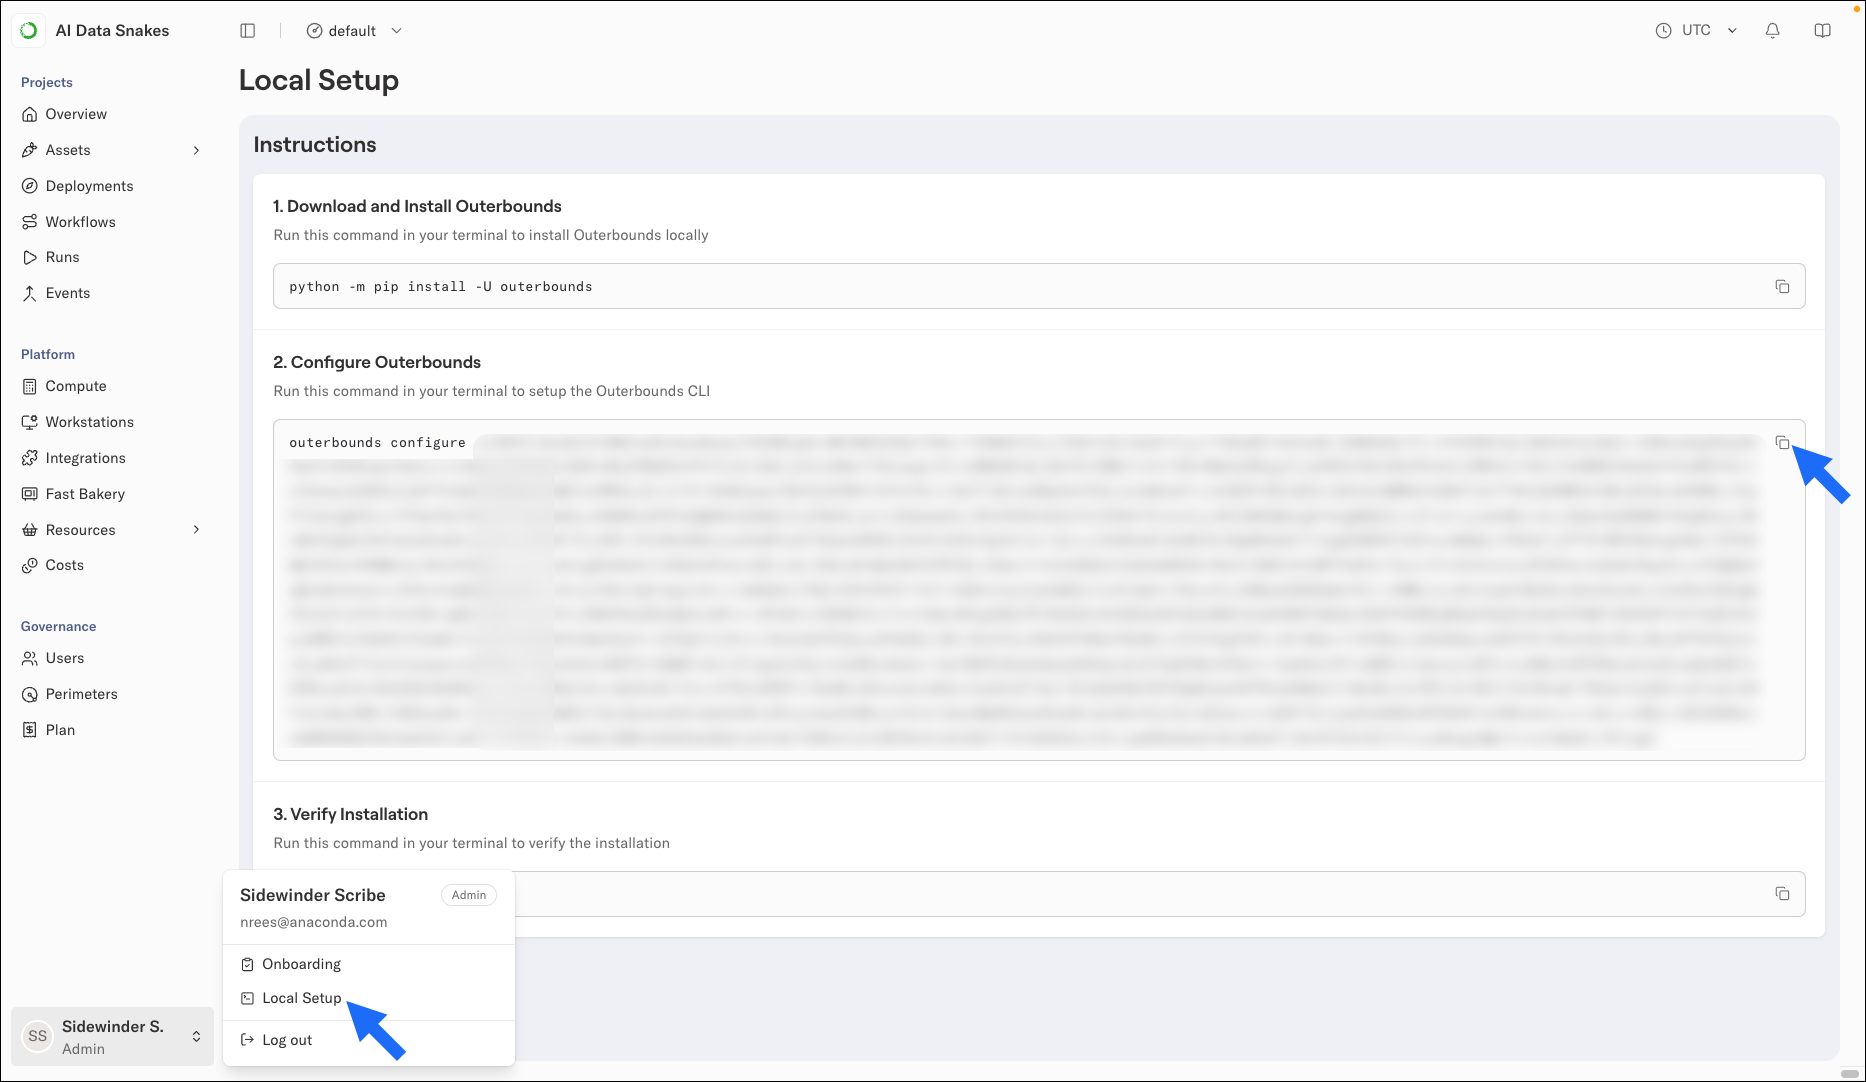
Click your profile in the lower-left corner to open your **Local Setup** page:
 Open a terminal and install the `outerbounds` package:
```sh theme={null}
conda install outerbounds
```
```sh theme={null}
uv pip install --upgrade outerbounds
```
```sh theme={null}
pip install -U outerbounds
```
You can install the package in an isolated environment, but it is not required. Next, copy the configuration command shown on your Local Setup page and run it in your terminal:
```sh theme={null}
outerbounds configure
```
The command saves your access token in a system-wide configuration file.
**You are now ready to start using the platform.**
**Troubleshooting the connection.**
If you ever run into problems with the connection, execute `outerbounds check -v` to see details about your setup. You should see a row of **OK**s if everything works correctly. Otherwise, contact your administrator.
You can develop with cloud workstations by following these steps:
1. First, an administrator [sets up a cloud workstation](/docs/platform/guides/develop/setting-up-a-cloud-workstation) for each user.
2. After this, users can [connect to their personal cloud workstation](/docs/platform/guides/develop/connecting-to-a-cloud-workstation) through Visual Studio Code.
**Troubleshooting workstations.**
If you run into problems with the connection, execute `outerbounds check -w` to see details about your setup. You should see a row of **OK**s if everything works correctly. If you have any questions about workstations, contact your administrator.
Click your profile in the lower-left corner to open your **Local Setup** page:
1. Create a new environment for the `outerbounds` package to avoid conflicts between `metaflow` and `outerbounds`:
```sh theme={null}
conda create --name ob python=3.11 outerbounds
conda activate ob
```
```sh theme={null}
python -m venv ob
source ob/bin/activate
pip install outerbounds
```
2. When configuring the access token, use the `--profile` option to create a new configuration profile instead of overwriting your existing Metaflow config:
```sh theme={null}
outerbounds configure --profile ob
```
3. To use the platform, set an environment variable:
```bash theme={null}
export METAFLOW_PROFILE=ob
```
**You are now ready to start using the platform.**
**Troubleshooting the connection.**
If you ever run into problems with the connection, execute `METAFLOW_PROFILE=ob outerbounds check -v` to see details about your setup. You should see a row of **OK**s if everything works correctly. Otherwise, contact your administrator.
## Run your first flow
After you have configured access to the platform, run a simple Metaflow flow to confirm that everything works.
If you are new to Metaflow, take a quick look at the [Metaflow documentation](https://docs.metaflow.org/metaflow/introduction). All features of Metaflow work on Anaconda Platform.
Save the following code snippet in a file called `hello.py`:
```python theme={null}
from metaflow import FlowSpec, step
class HelloFlow(FlowSpec):
@step
def start(self):
print("Hello world! 👋")
self.next(self.end)
@step
def end(self):
pass
if __name__ == "__main__":
HelloFlow()
```
Then, execute it:
```bash theme={null}
python hello.py run
```
If you see `Hello World!` in the output, the flow ran successfully. In the output, you should also see a link to the **Runs** view, which shows all executions, both prototyping and production, taking place on the platform. You can click the latest `HelloFlow` run to explore information about the run that you just executed.
### Hello artifacts
Extend the above example with the following lines, storing data in `self.` variables that are persisted automatically as [artifacts](https://docs.metaflow.org/metaflow/basics#artifacts), a core concept of Metaflow:
```python theme={null}
from metaflow import FlowSpec, step, card
class HelloFlow(FlowSpec):
@card
@step
def start(self):
self.greeting = "Hello world!"
self.x = 1
self.next(self.end)
@card
@step
def end(self):
print(self.greeting)
self.x += 10
print("x is", self.x)
if __name__ == "__main__":
HelloFlow()
```
Note how we refer to the variables `self.x` and `self.greeting` both in the `start` and `end` steps. By design, this does not seem that special, but notably the steps could execute on separate cloud instances, as you will see when [executing the code in the cloud](/docs/platform/getting-started/scaling-to-the-cloud). The data is moved automatically between steps and stored for later inspection.
Run the flow as before:
```bash theme={null}
python hello.py run
```
Check the **Runs** view again for the latest run. Navigate to the `start` task and observe a new card section in the task view, as shown in this clip:
The card section is produced by [the `@card` decorator](https://docs.metaflow.org/metaflow/visualizing-results), which allows you to attach custom visualizations in the UI. Note how the card shows how the value of `x` changes between the `start` and `end` steps. Metaflow versions data automatically, and you can use this feature to track metrics, models, dataframes, or any other data across prototypes and production runs.
If you are feeling adventurous, explore the options for [visualizing artifacts through cards](https://docs.metaflow.org/metaflow/visualizing-results). Feel free to hack `HelloFlow`. You cannot break anything.
Open a terminal and install the `outerbounds` package:
```sh theme={null}
conda install outerbounds
```
```sh theme={null}
uv pip install --upgrade outerbounds
```
```sh theme={null}
pip install -U outerbounds
```
You can install the package in an isolated environment, but it is not required. Next, copy the configuration command shown on your Local Setup page and run it in your terminal:
```sh theme={null}
outerbounds configure
```
The command saves your access token in a system-wide configuration file.
**You are now ready to start using the platform.**
**Troubleshooting the connection.**
If you ever run into problems with the connection, execute `outerbounds check -v` to see details about your setup. You should see a row of **OK**s if everything works correctly. Otherwise, contact your administrator.
You can develop with cloud workstations by following these steps:
1. First, an administrator [sets up a cloud workstation](/docs/platform/guides/develop/setting-up-a-cloud-workstation) for each user.
2. After this, users can [connect to their personal cloud workstation](/docs/platform/guides/develop/connecting-to-a-cloud-workstation) through Visual Studio Code.
**Troubleshooting workstations.**
If you run into problems with the connection, execute `outerbounds check -w` to see details about your setup. You should see a row of **OK**s if everything works correctly. If you have any questions about workstations, contact your administrator.
Click your profile in the lower-left corner to open your **Local Setup** page:
1. Create a new environment for the `outerbounds` package to avoid conflicts between `metaflow` and `outerbounds`:
```sh theme={null}
conda create --name ob python=3.11 outerbounds
conda activate ob
```
```sh theme={null}
python -m venv ob
source ob/bin/activate
pip install outerbounds
```
2. When configuring the access token, use the `--profile` option to create a new configuration profile instead of overwriting your existing Metaflow config:
```sh theme={null}
outerbounds configure --profile ob
```
3. To use the platform, set an environment variable:
```bash theme={null}
export METAFLOW_PROFILE=ob
```
**You are now ready to start using the platform.**
**Troubleshooting the connection.**
If you ever run into problems with the connection, execute `METAFLOW_PROFILE=ob outerbounds check -v` to see details about your setup. You should see a row of **OK**s if everything works correctly. Otherwise, contact your administrator.
## Run your first flow
After you have configured access to the platform, run a simple Metaflow flow to confirm that everything works.
If you are new to Metaflow, take a quick look at the [Metaflow documentation](https://docs.metaflow.org/metaflow/introduction). All features of Metaflow work on Anaconda Platform.
Save the following code snippet in a file called `hello.py`:
```python theme={null}
from metaflow import FlowSpec, step
class HelloFlow(FlowSpec):
@step
def start(self):
print("Hello world! 👋")
self.next(self.end)
@step
def end(self):
pass
if __name__ == "__main__":
HelloFlow()
```
Then, execute it:
```bash theme={null}
python hello.py run
```
If you see `Hello World!` in the output, the flow ran successfully. In the output, you should also see a link to the **Runs** view, which shows all executions, both prototyping and production, taking place on the platform. You can click the latest `HelloFlow` run to explore information about the run that you just executed.
### Hello artifacts
Extend the above example with the following lines, storing data in `self.` variables that are persisted automatically as [artifacts](https://docs.metaflow.org/metaflow/basics#artifacts), a core concept of Metaflow:
```python theme={null}
from metaflow import FlowSpec, step, card
class HelloFlow(FlowSpec):
@card
@step
def start(self):
self.greeting = "Hello world!"
self.x = 1
self.next(self.end)
@card
@step
def end(self):
print(self.greeting)
self.x += 10
print("x is", self.x)
if __name__ == "__main__":
HelloFlow()
```
Note how we refer to the variables `self.x` and `self.greeting` both in the `start` and `end` steps. By design, this does not seem that special, but notably the steps could execute on separate cloud instances, as you will see when [executing the code in the cloud](/docs/platform/getting-started/scaling-to-the-cloud). The data is moved automatically between steps and stored for later inspection.
Run the flow as before:
```bash theme={null}
python hello.py run
```
Check the **Runs** view again for the latest run. Navigate to the `start` task and observe a new card section in the task view, as shown in this clip:
The card section is produced by [the `@card` decorator](https://docs.metaflow.org/metaflow/visualizing-results), which allows you to attach custom visualizations in the UI. Note how the card shows how the value of `x` changes between the `start` and `end` steps. Metaflow versions data automatically, and you can use this feature to track metrics, models, dataframes, or any other data across prototypes and production runs.
If you are feeling adventurous, explore the options for [visualizing artifacts through cards](https://docs.metaflow.org/metaflow/visualizing-results). Feel free to hack `HelloFlow`. You cannot break anything.