> ## Documentation Index
> Fetch the complete documentation index at: https://anaconda.com/docs/llms.txt
> Use this file to discover all available pages before exploring further.
# Getting started with the platform CLI
export const GCell = ({children, className}) =>
{children}
;
export const GTH = ({children, className}) =>
{children}
;
export const GRow = ({children}) => {children}
;
export const GBody = ({children}) => {children}
;
export const GHead = ({children}) => {children}
;
export const GTable = ({children, className, cols}) =>
{children}
;
export const Comments = ({children}) => {
return ;
};
Anaconda Platform uses the `outerbounds` CLI to interact with your organization from a terminal. It enables you to download models from the [model catalog](/docs/platform/concepts/what-is-the-model-catalog), run flows on your organization's compute, deploy and manage long-running services, and manage platform resources.
## Installing the CLI
The `outerbounds` CLI is available as a conda package from the `main` channel and as a Python package from PyPI:
```sh theme={null}
conda install --name outerbounds
```
Replace \ with the name of the environment where you want to install the CLI.
```sh theme={null}
uv pip install outerbounds
```
```sh theme={null}
python -m pip install -U outerbounds
```
The model catalog commands (`outerbounds mc`) require `outerbounds` 0.12.45 or later. To upgrade an existing installation, run `conda update outerbounds` or `pip install --upgrade outerbounds`.
The open-source `metaflow` package conflicts with the Metaflow distribution bundled with the `outerbounds` CLI. If `metaflow` is already installed in your environment, uninstall it by running `python -m pip uninstall metaflow`, then reinstall `outerbounds`.
## Authenticating to your Anaconda Platform organization
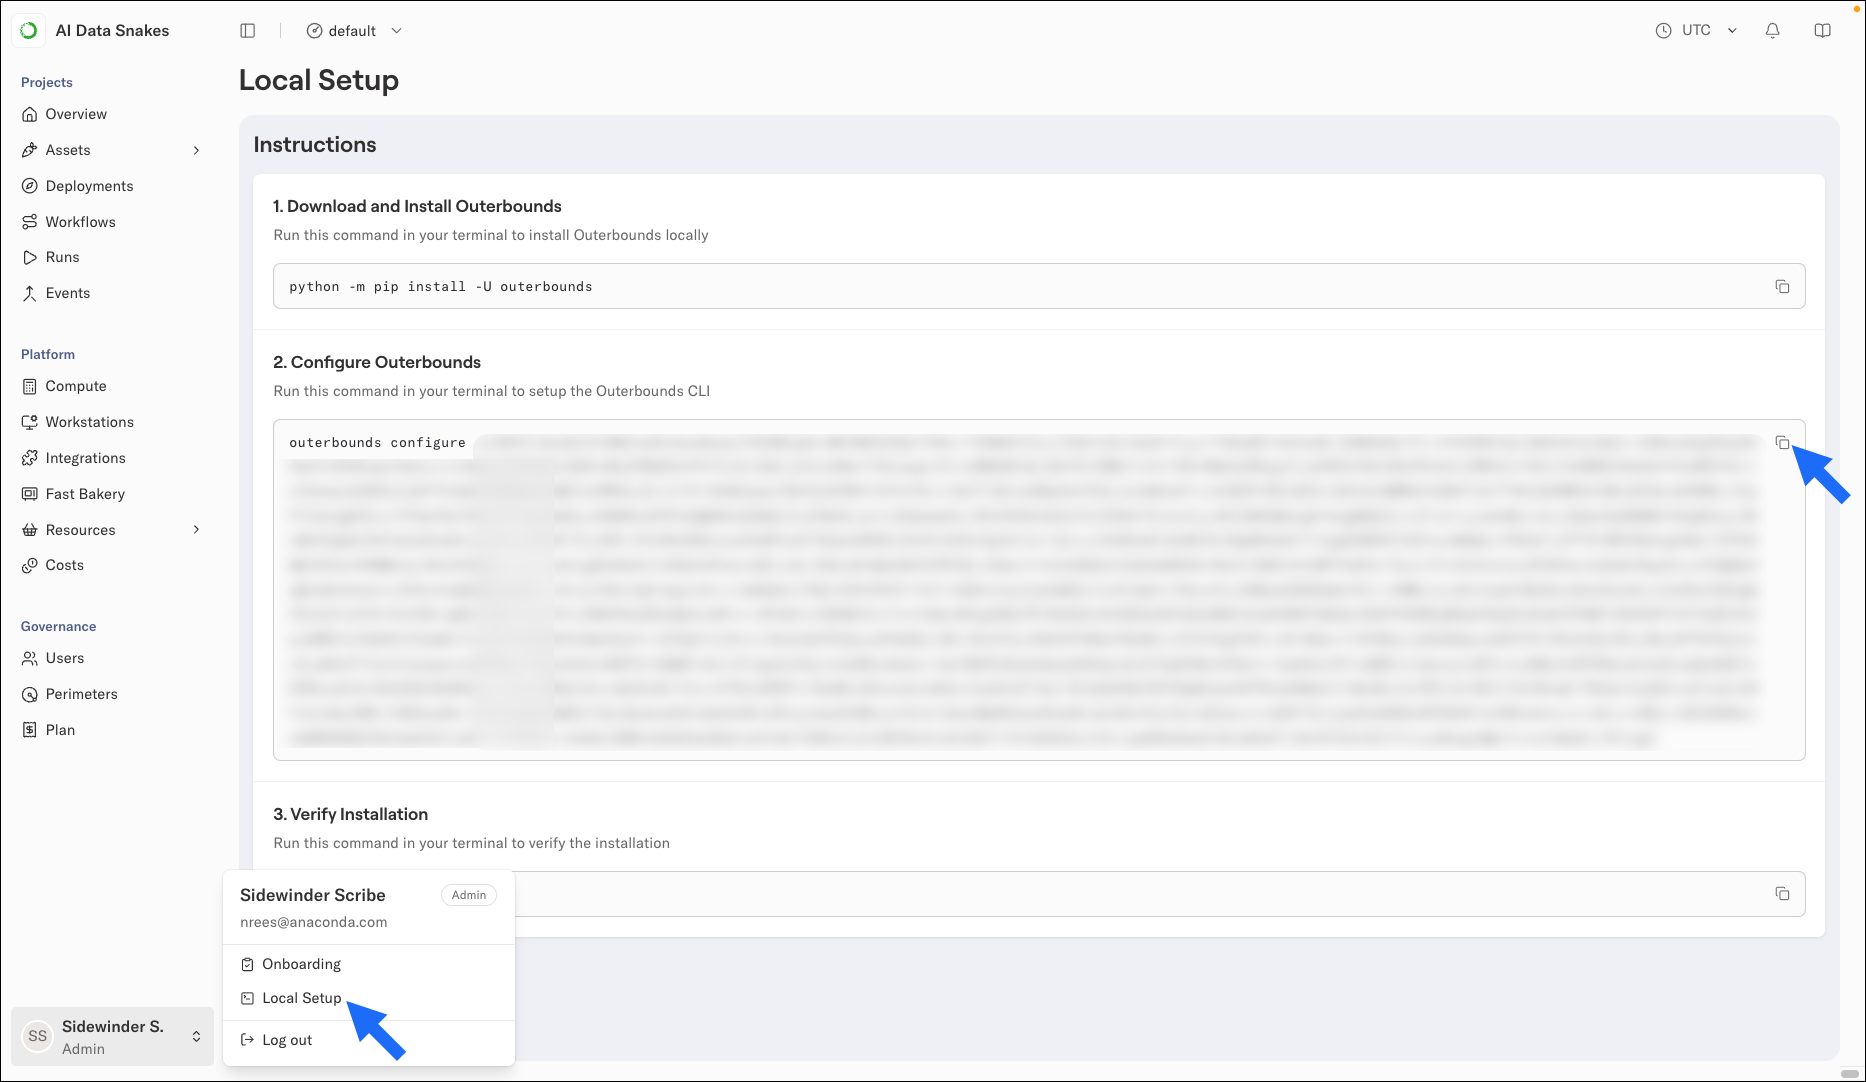
Your organization generates a personal configuration string for you, displayed in the Anaconda Platform UI as a ready-to-run `configure` command.
On a [workstation](/docs/platform/concepts/what-is-a-workstation), the CLI is already installed and configured for you. If you're working in a workstation, skip ahead to [Downloading models from the catalog](#downloading-models-from-the-catalog).
To authenticate the CLI:
1. Log in to your Anaconda Platform organization.
2. Open your user settings by clicking on your profile in the lower-left corner, then select **Local Setup**.
3. Under **Configure Outerbounds**, copy the command shown and run it in your terminal. The command includes your personal configuration string.
 4. To verify your installation and configuration, run:
```sh theme={null}
outerbounds check
```
If the check reports a problem, run `outerbounds check --verbose` for details.
The `configure` command decodes the string and writes a configuration file to `~/.metaflowconfig`. You only need to configure the CLI once per machine for each organization you belong to. Most users only belong to one organization.
The configuration string is specific to you and to the perimeter selected in the UI. If the **Local Setup** page does not show a configuration command, you might not have the required access to the perimeter. Contact your administrator.
### Configure options
Option
Default
Description
`-d, --config-dir `
`~/.metaflowconfig`
Path to the Metaflow configuration directory
`-p, --profile `
Save the configuration as a named profile instead of the default. Use the `METAFLOW_PROFILE` environment variable to switch between profiles. See [Working with multiple organizations](#working-with-multiple-organizations).
`-e, --echo`
`false`
Print the configuration values to stdout
`-f, --force`
`false`
Overwrite an existing configuration without prompting
### Working with multiple organizations
To work with more than one organization, write each organization's configuration to a named profile, then set the `METAFLOW_PROFILE` environment variable to select the profile the CLI uses:
```sh theme={null}
outerbounds configure --profile
export METAFLOW_PROFILE=
```
Replace \ with a name for the profile, such as your organization's name.
4. To verify your installation and configuration, run:
```sh theme={null}
outerbounds check
```
If the check reports a problem, run `outerbounds check --verbose` for details.
The `configure` command decodes the string and writes a configuration file to `~/.metaflowconfig`. You only need to configure the CLI once per machine for each organization you belong to. Most users only belong to one organization.
The configuration string is specific to you and to the perimeter selected in the UI. If the **Local Setup** page does not show a configuration command, you might not have the required access to the perimeter. Contact your administrator.
### Configure options
Option
Default
Description
`-d, --config-dir `
`~/.metaflowconfig`
Path to the Metaflow configuration directory
`-p, --profile `
Save the configuration as a named profile instead of the default. Use the `METAFLOW_PROFILE` environment variable to switch between profiles. See [Working with multiple organizations](#working-with-multiple-organizations).
`-e, --echo`
`false`
Print the configuration values to stdout
`-f, --force`
`false`
Overwrite an existing configuration without prompting
### Working with multiple organizations
To work with more than one organization, write each organization's configuration to a named profile, then set the `METAFLOW_PROFILE` environment variable to select the profile the CLI uses:
```sh theme={null}
outerbounds configure --profile
export METAFLOW_PROFILE=
```
Replace \ with a name for the profile, such as your organization's name.
Replace \ with the organization's configuration string, shown on its **Local Setup** page.
## Authenticating the CLI in CI/CD pipelines
Machine users are identities for automated pipelines and jobs, such as deploying a project from a CI/CD workflow. Unlike human users, machine users authenticate with a token issued by their identity provider rather than a configuration string from the UI.
To configure the CLI for a machine user, run:
```sh theme={null}
outerbounds service-principal-configure --name --deployment-domain --perimeter --jwt-token
```
Replace \ with the name of the machine user to authenticate.
Replace \ with the full domain of your organization.
Replace \ with the name of the perimeter where the machine user operates. If you omit the perimeter, the CLI uses the perimeter named default.
Replace \ with the OIDC token issued by the machine user's identity provider.
If your project contains an `obproject.toml` file, you can pass `--from-obproject-toml` instead of `--name`, `--deployment-domain`, and `--perimeter`. The CLI reads those values from the file. For more on project setup, see [Working with projects](/docs/platform/guides/projects/working-with-projects).
The token flag depends on the machine user's identity provider:
Provider
How to authenticate
GitHub Actions
Pass `--github-actions` instead of `--jwt-token`. The CLI reads the OIDC token from the workflow environment automatically.
GitLab CI
Pass `--jwt-token "$OUTERBOUNDS_ID_TOKEN"`, issued by GitLab's `id_tokens` keyword
CircleCI
Pass `--jwt-token "$CIRCLE_OIDC_TOKEN_V2"`
Other OIDC providers
Pass `--jwt-token` with the OIDC token your provider issues
The **Use** page for a machine user in the Anaconda Platform UI provides configuration commands and example CI/CD workflows, pre-filled for that machine user. To find it, select **Users** under **Governance**, open the **Machines** tab, and then select the machine user. For machine users backed by an AWS IAM role, the **Use** page provides an `outerbounds configure` command instead, which retrieves the configuration from AWS Secrets Manager and requires IAM credentials in the environment.
For the full CI/CD setup, see [Working with projects](/docs/platform/guides/projects/working-with-projects).
## Downloading models from the catalog
The `outerbounds mc pull` command downloads a model from the [model catalog](/docs/platform/concepts/what-is-the-model-catalog) to your local machine or a workstation. For usage, options, and examples, see [`outerbounds mc pull`](/docs/platform/cli/mc/pull).
## Deploying and managing apps
The `outerbounds app` commands deploy services on the platform and manage their lifecycle:
```sh theme={null}
outerbounds app deploy --config-file
```
Replace \ with the path to your deployment configuration file, in YAML or JSON format.
The CLI creates deployments in your active perimeter. To change it, run `outerbounds perimeter switch`. For the full reference, including updating, inspecting, logs, and deletion, see the [app commands](/docs/platform/cli/app/deploy).
## Command overview
The CLI includes command groups for working with platform resources. For the full reference, see the [command overview](/docs/platform/cli/commands).
The `outerbounds` package also bundles Metaflow, the framework you use to develop and run flows:
```sh theme={null}
python myflow.py run
```
For more information on building and running flows, see [Connecting to the platform and running your first flow](/docs/platform/getting-started/connect-and-first-run).