> ## Documentation Index
> Fetch the complete documentation index at: https://anaconda.com/docs/llms.txt
> Use this file to discover all available pages before exploring further.
# Intro to conda workflows
export const LearnMore = ({children}) => {
return
;
};
export const CodeCopy = () => {
return ;
};
Welcome! If you're new to conda, you're in the right place. This tutorial walks through creating and using your first conda environment as part of a real Python workflow. You'll create an environment, install packages, and use that environment to run a small Python program.
**Purpose**: This tutorial teaches you the basics of creating and using conda environments for Python development.
**Outcome**: You'll create a new environment, add packages using both conda and pip, and configure Visual Studio Code to use your environment. By the end, you'll have created a fun Python program (featuring an ASCII cow!) and learned how to set up environments for your own projects.
**Audience**: Beginners new to environment management
**Duration**: 20 minutes
## Prerequisites and requirements
Before you begin, make sure you have an internet connection and the following software installed on your machine:
* Conda
Conda comes bundled with both [Anaconda Distribution](/docs/getting-started/concepts/anaconda-or-miniconda) and [Miniconda](/docs/getting-started/concepts/anaconda-or-miniconda). Pick whichever installer you prefer, as both will work identically for this tutorial. Not sure which to choose? See [Choosing between Anaconda Distribution and Miniconda](/docs/getting-started/concepts/anaconda-or-miniconda) to compare the two.
* [Visual Studio Code](https://code.visualstudio.com/download), also known as VS Code, a popular IDE from Microsoft
* [Microsoft's Python extension](https://marketplace.visualstudio.com/items?itemName=ms-python.python) for VS Code
* Some familiarity with using a command line interface
New to using the command line? Review Mozilla's [command line crash course](https://developer.mozilla.org/en-US/docs/Learn_web_development/Getting_started/Environment_setup/Command_line) for an overview of how to use it.
## Creating your project's conda environment
The conda installation process creates an environment called `base`, which is where conda itself is installed. However, when starting work on a new project, it's best practice to create a new environment. This keeps your environments maintainable and reproducible while also keeping your `base` environment stable.
Let's create a new environment called `hello-env` with Python 3.14 as the interpreter.
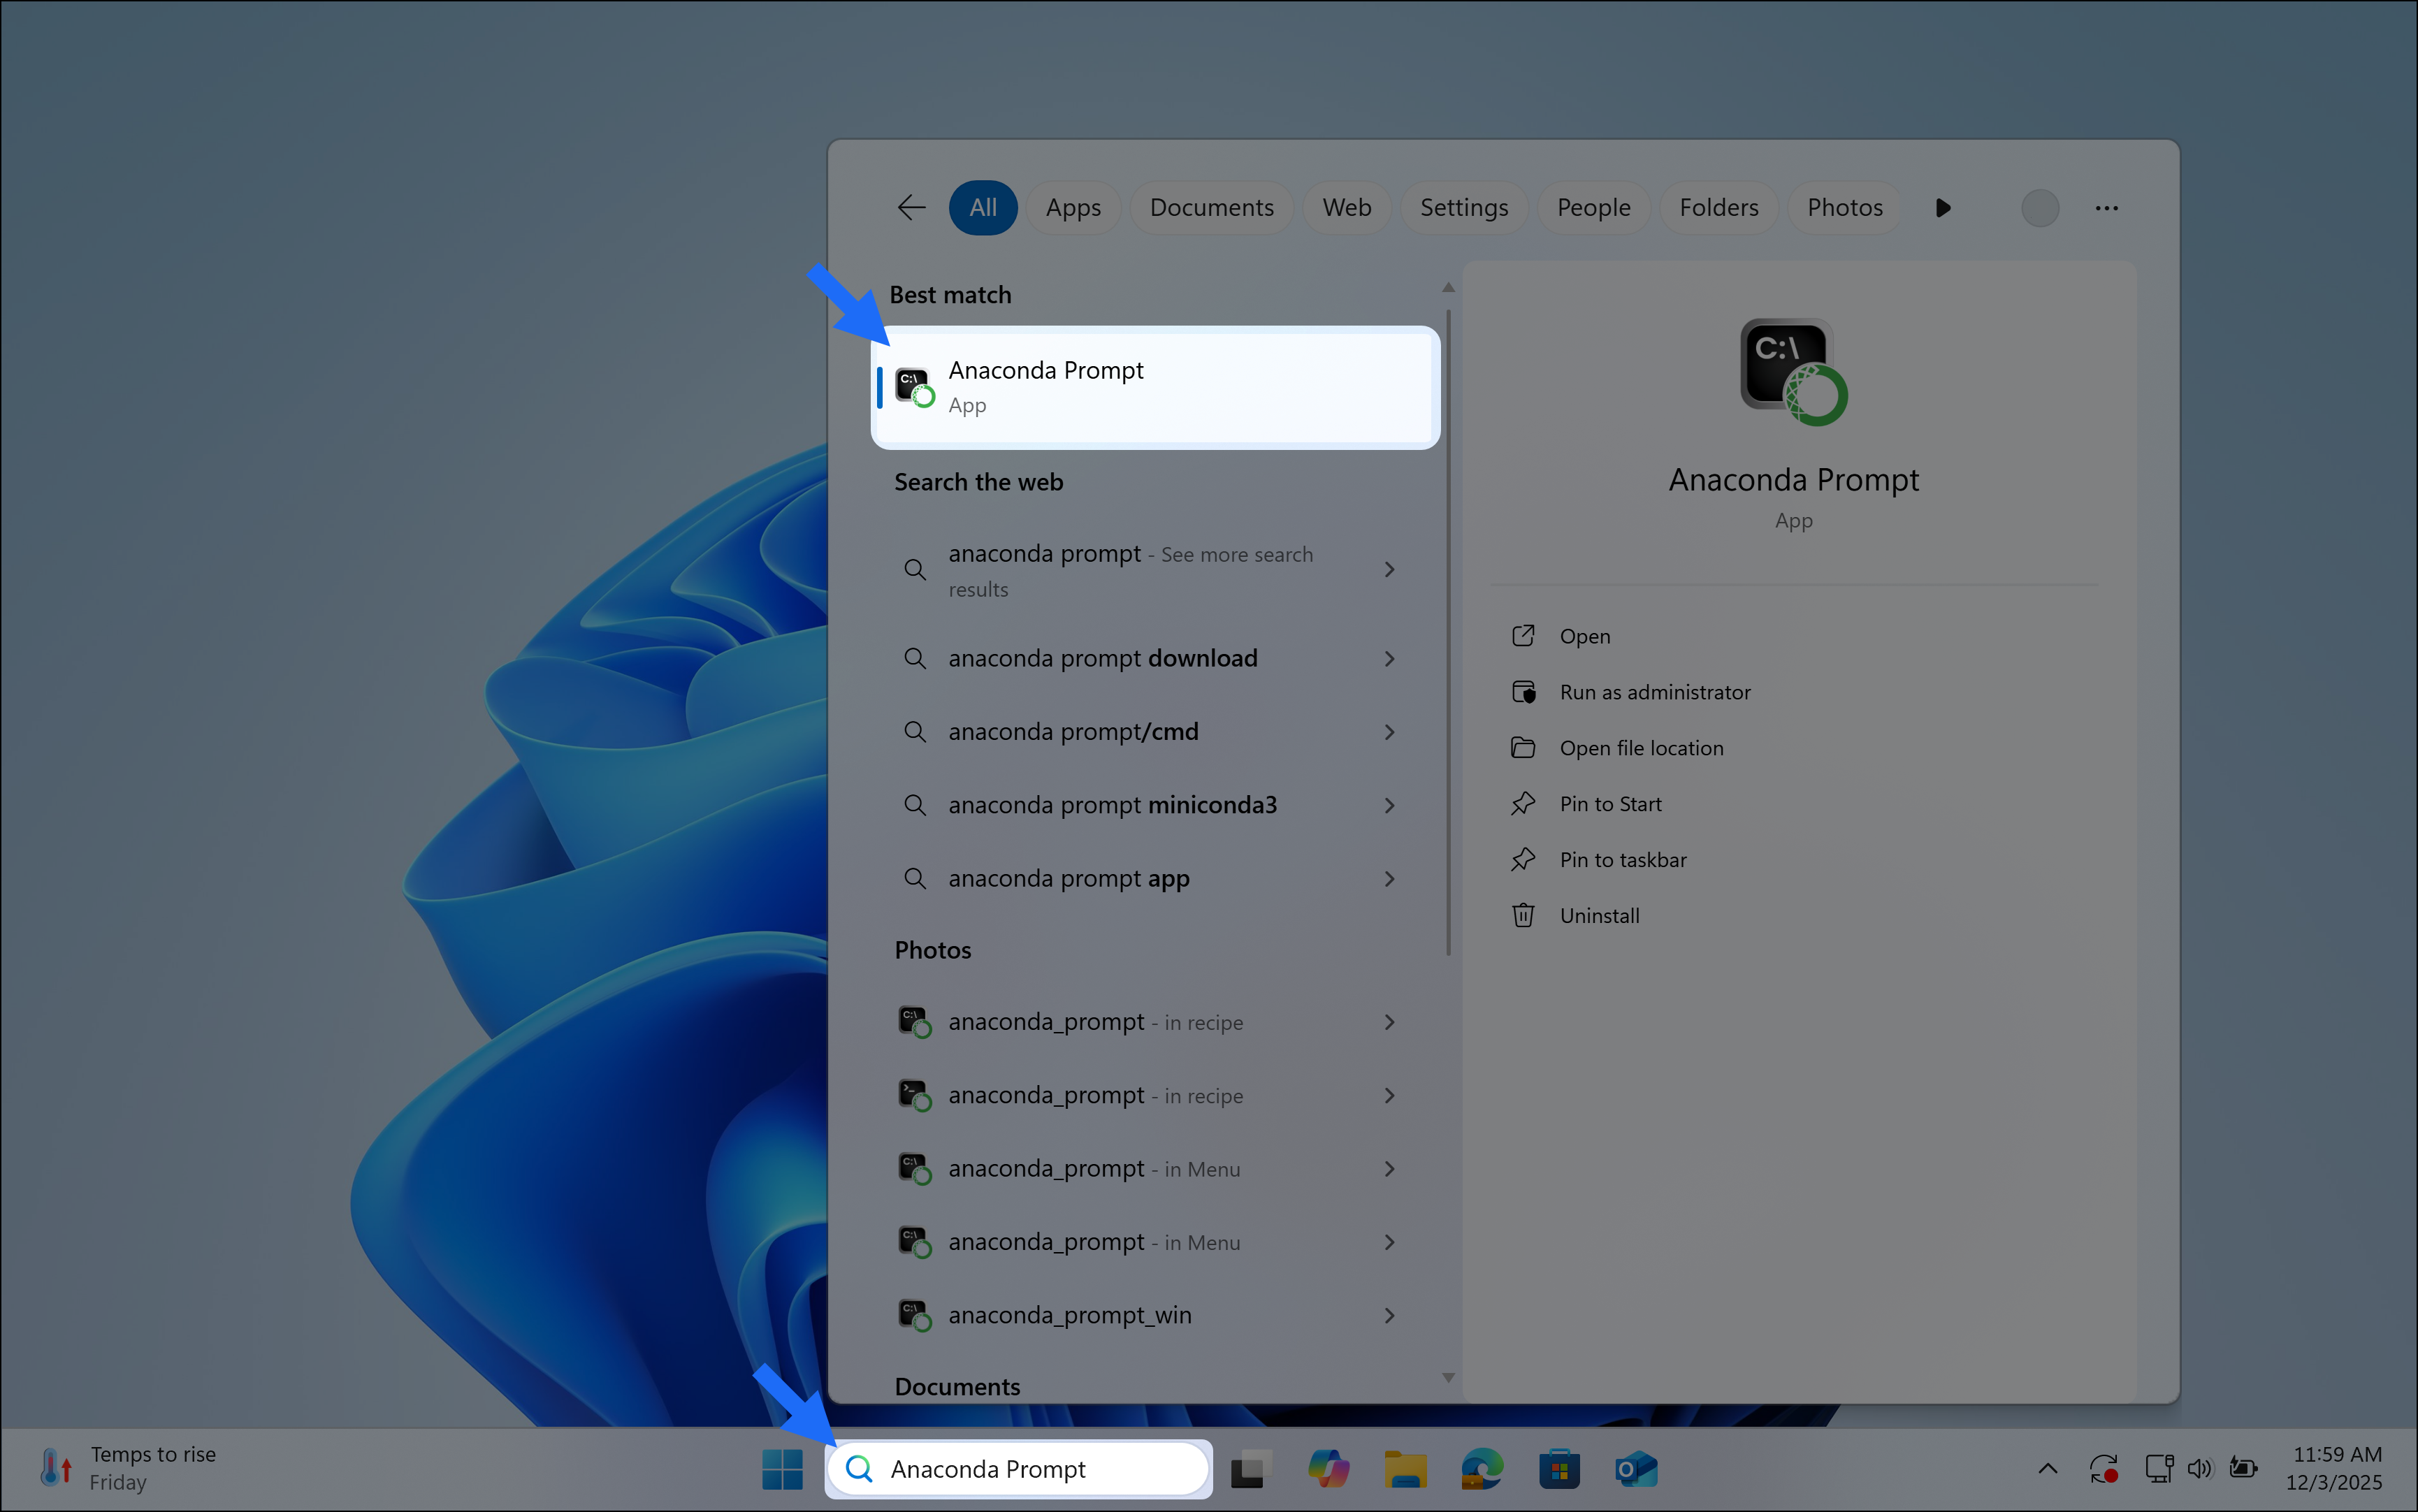
Conda is a command line interface (CLI) tool, which means you'll use a shell application to run conda commands. For Windows users, you'll use an application called Anaconda Prompt, which comes installed with Anaconda Distribution and Miniconda. For macOS and Linux users, you'll use your system's Terminal application.
To open Anaconda Prompt, type "Anaconda Prompt" in the Windows search bar, then select **Anaconda Prompt**.
Open Terminal:
* On macOS, open Spotlight with Cmd + Spacebar, then search for "Terminal".
* On Linux, press Ctrl + Alt + T or search for "Terminal" in your application menu.
Use the **copy** button to copy the following command, paste it into your shell application, and press Enter (Windows)/ Return (macOS/Linux) to run it:
```sh theme={null}
conda create --name hello-env python=3.14
```
The `--name` flag sets the new environment's name.
You'll need to activate your newly created environment before you can use it. Run the following command to activate `hello-env`:
```sh theme={null}
conda activate hello-env
```
Conda displays the currently active environment in your shell application beside the input line:
```sh Windows example theme={null}
(hello-env) C:\Users\username>
```
```sh macOS/Linux example theme={null}
(hello-env) ~
```
Your new project's environment is now active!
Review the following resources to learn more about the topics covered in this section, or continue on to the next section.
* [What is an environment?](/docs/getting-started/concepts/what-is-an-environment)
* [Working with environments](/docs/getting-started/working-with-conda/environments)
## Adding packages to your project's environment
Right now, your environment only has Python 3.14 and its dependencies installed. However, our project uses functionality that is not provided by the Python standard library, so we must install third-party packages to provide that functionality.
We can find the additional conda packages that we need for our project on the conda-forge community channel.
Conda-forge is a community-maintained collection of conda packages. Conda-forge packages are open source and free to use.
Our project requires the `requests` and `emoji` packages. Install the packages and their dependencies:
```sh theme={null}
conda install --channel conda-forge requests emoji
```
The `--channel` flag tells conda to give the specified channel top priority for installing packages and their dependencies.
The `requests` and `emoji` Python packages are now available in your environment.
Our project still requires one last package. However, this package is only available from Python's package index (also known as PyPI) and must be installed using Python's package manager, pip. Pip is a dependency of Python, so it was installed when you created your environment with Python in it. You can use it directly in the `hello-env` environment.
Using conda and pip together requires care to avoid dependency conflicts. Install conda packages first, then use pip only for packages unavailable in conda channels. Review the [Installing pip packages](/docs/getting-started/working-with-conda/packages/pip-install) page to understand how to safely use conda and pip together for your own projects.
Use pip to install `cowsay` from PyPI:
```sh theme={null}
pip install cowsay
```
Your `hello-env` environment now includes Python 3.14, `requests`, `emoji`, `cowsay`, and all their dependencies.
Review the following resources to learn more about the topics covered in this section, or continue on to the next section.
* [What is a channel?](/docs/getting-started/concepts/what-is-a-channel)
* [Channel priority](/docs/getting-started/concepts/what-is-a-channel#channel-priority)
* [What is a package?](/docs/getting-started/concepts/what-is-a-package)
* [Installing conda packages](/docs/getting-started/working-with-conda/packages/install-packages)
* [Installing pip packages](/docs/getting-started/working-with-conda/packages/pip-install)
* [Conda-forge](https://conda-forge.org/)
## Using your project's environment in VS Code
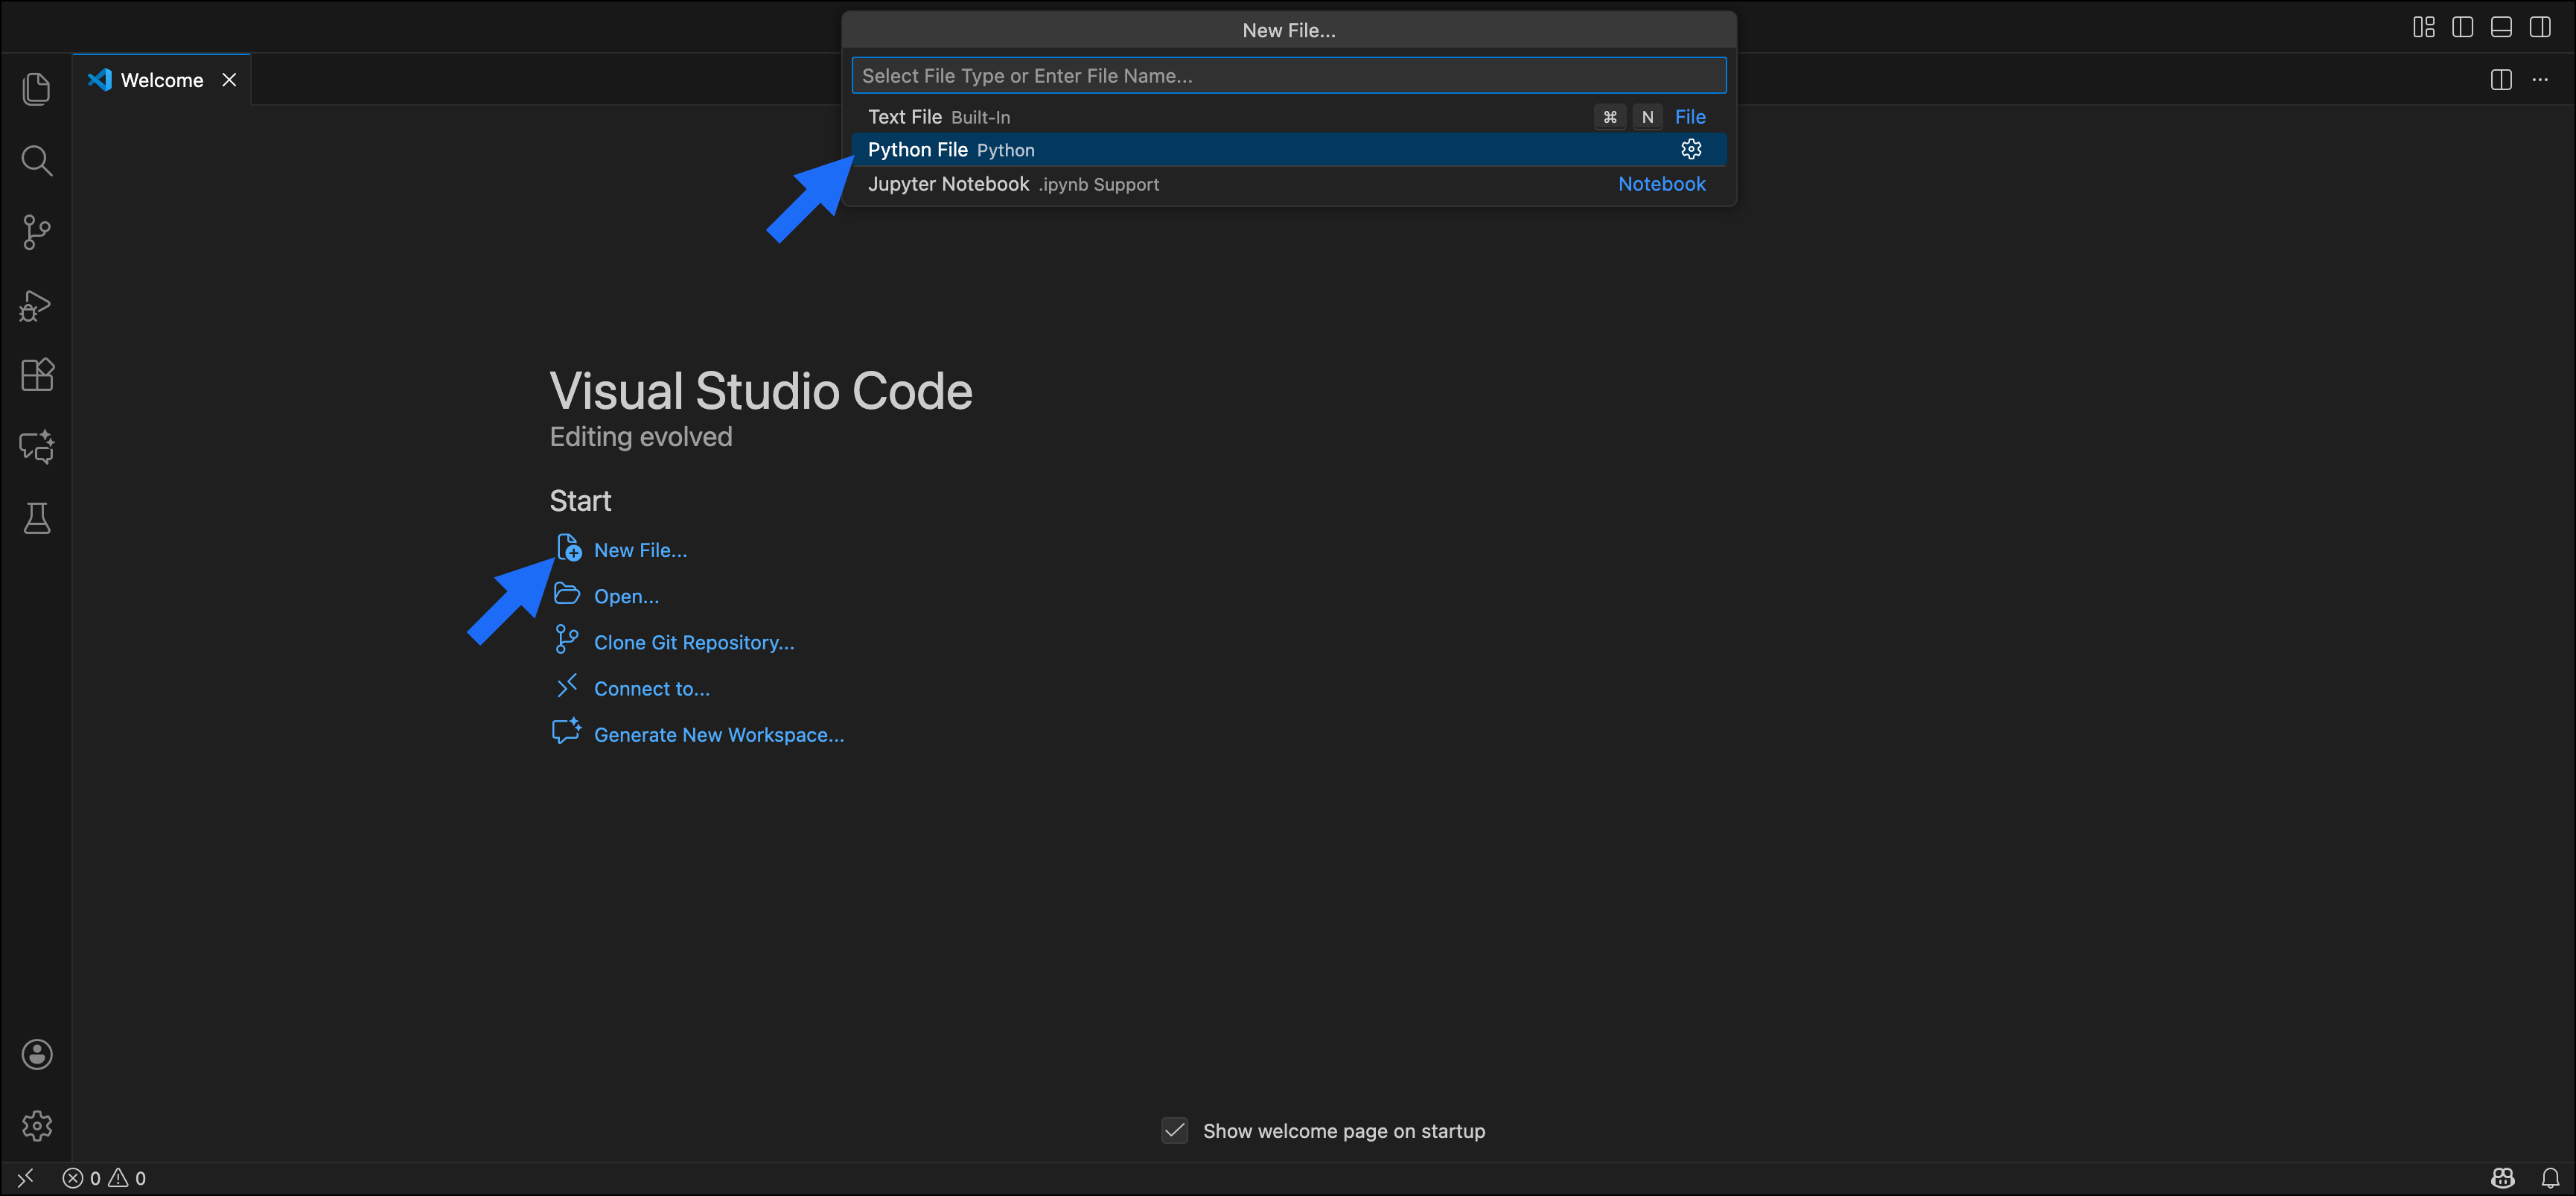
First, open VS Code and click **New File...** on the Welcome tab.
Then, select **Python File** to create a new untitled Python file.
Press Ctrl+S (Windows/ Linux) or Cmd+S (macOS) to open the **Save As...** dialogue and save your new file as `factual-cow.py`.
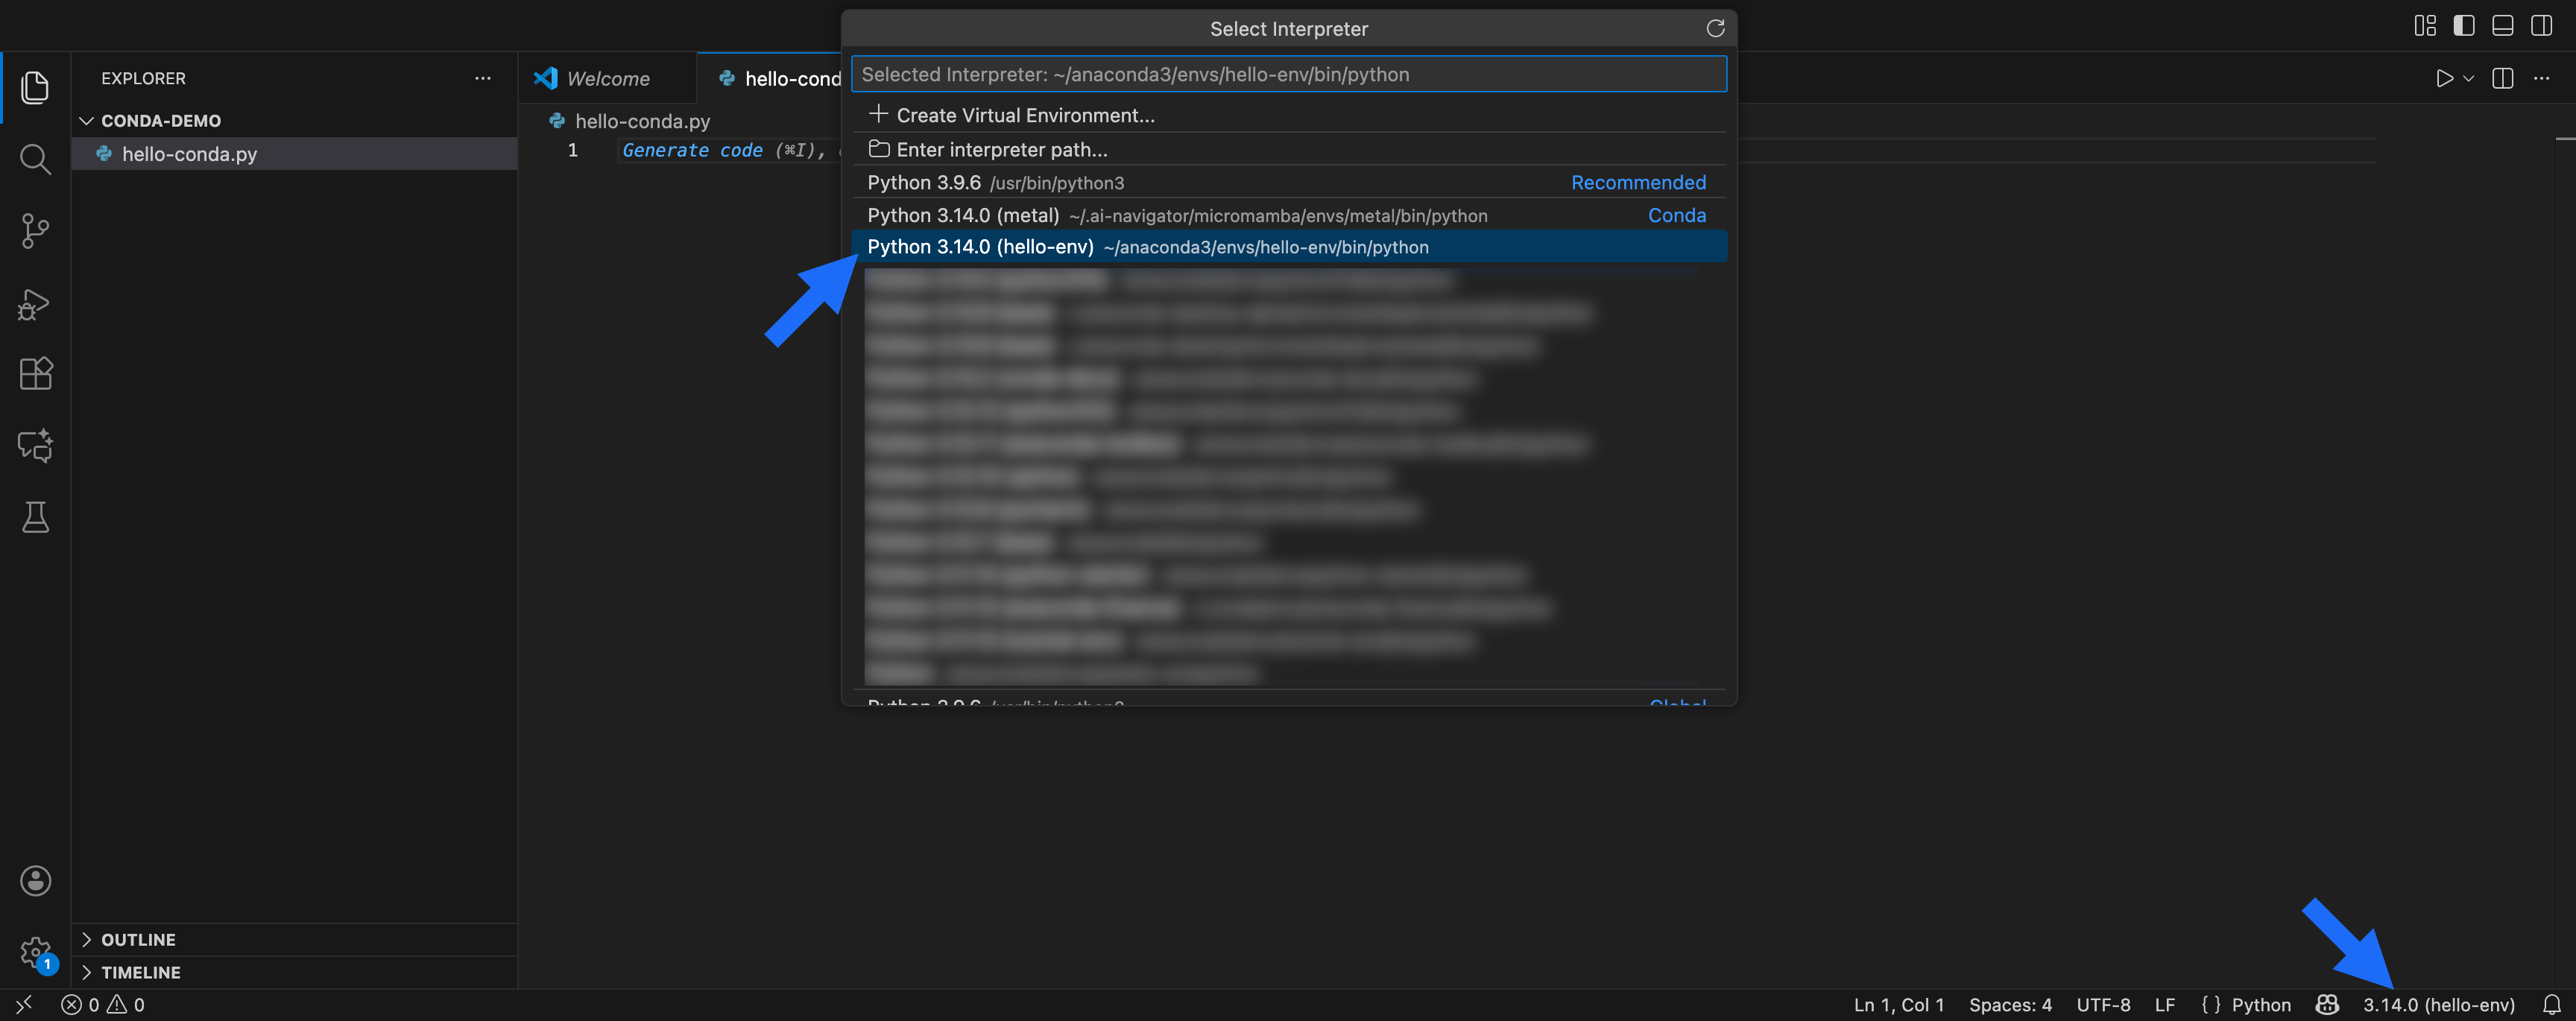
Next, select `hello-env` as the file's Python interpreter.
The Python interpreter is the Python installation that will run your code. By selecting `hello-env`, you're telling VS Code to use the Python from your new environment.
To set the interpreter, click the interpreter button in the bottom right corner, then select *Python 3.14.0 (hello-env)* from the dropdown:
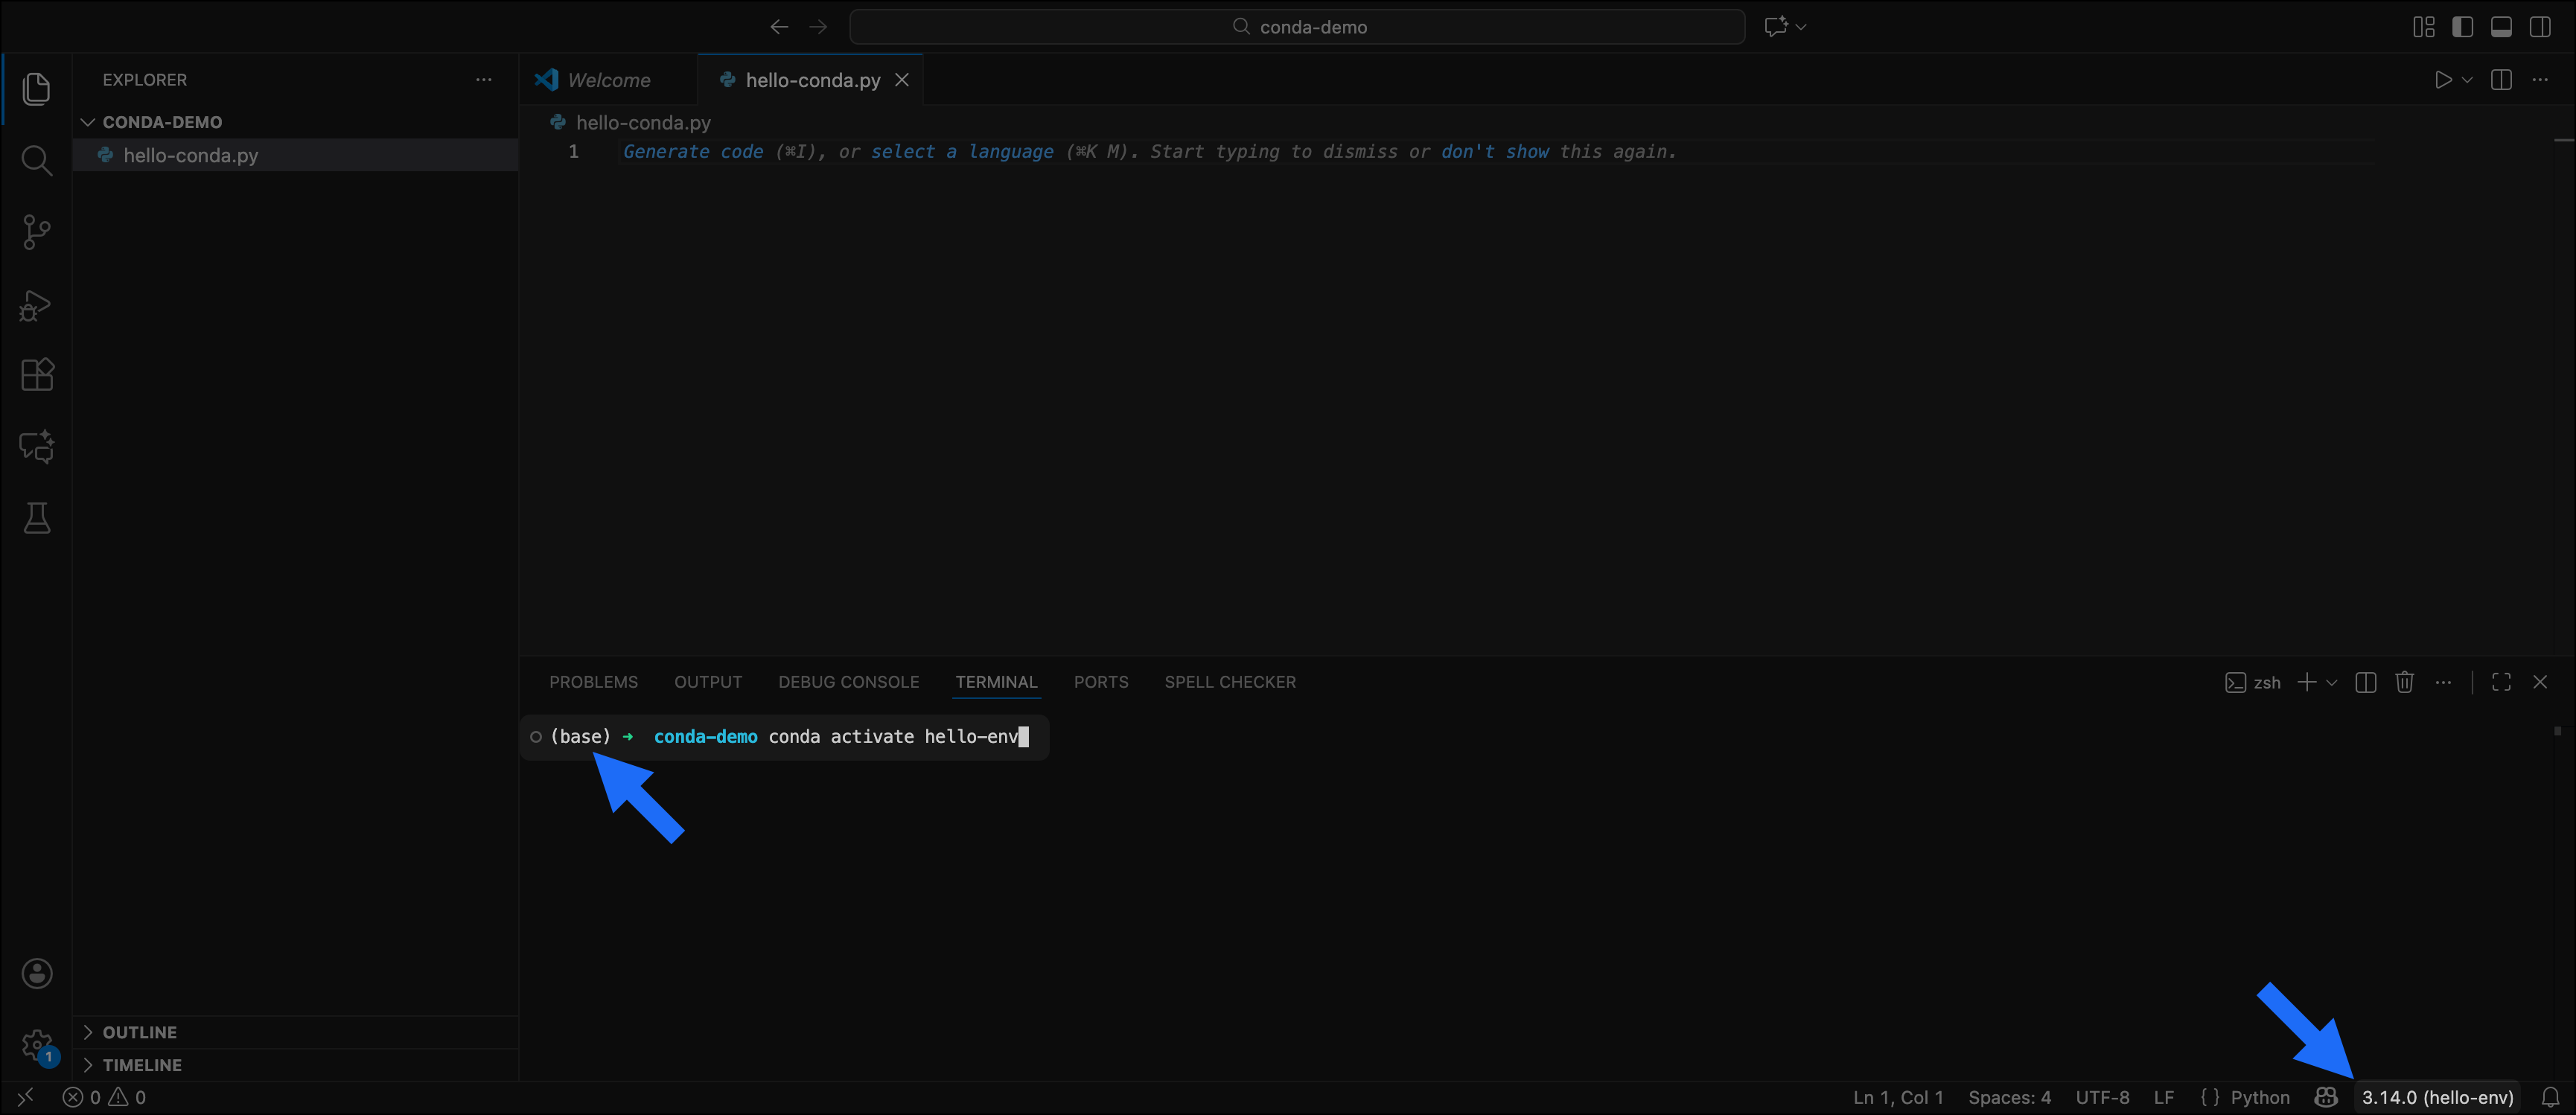
If you open a VS Code terminal, your terminal might show `(base)`, even though your interpreter in the bottom right shows `Python 3.14.0 (hello-env)`. The Python interpreter and the terminal are separate: the interpreter runs your .py files, while the terminal is for running commands. If you want to run conda commands from the VS Code terminal (for example, to add packages to your environment), activate the `hello-env` environment by running the following command in the VS Code terminal: `conda activate hello-env`.
Your Python interpreter is now set to Python 3.14.0 (hello-env).
Now that we've set the interpreter, let's import our packages. Add the following to the top of the `factual-cow.py` file:
```py theme={null}
import requests
import emoji
import cowsay
```
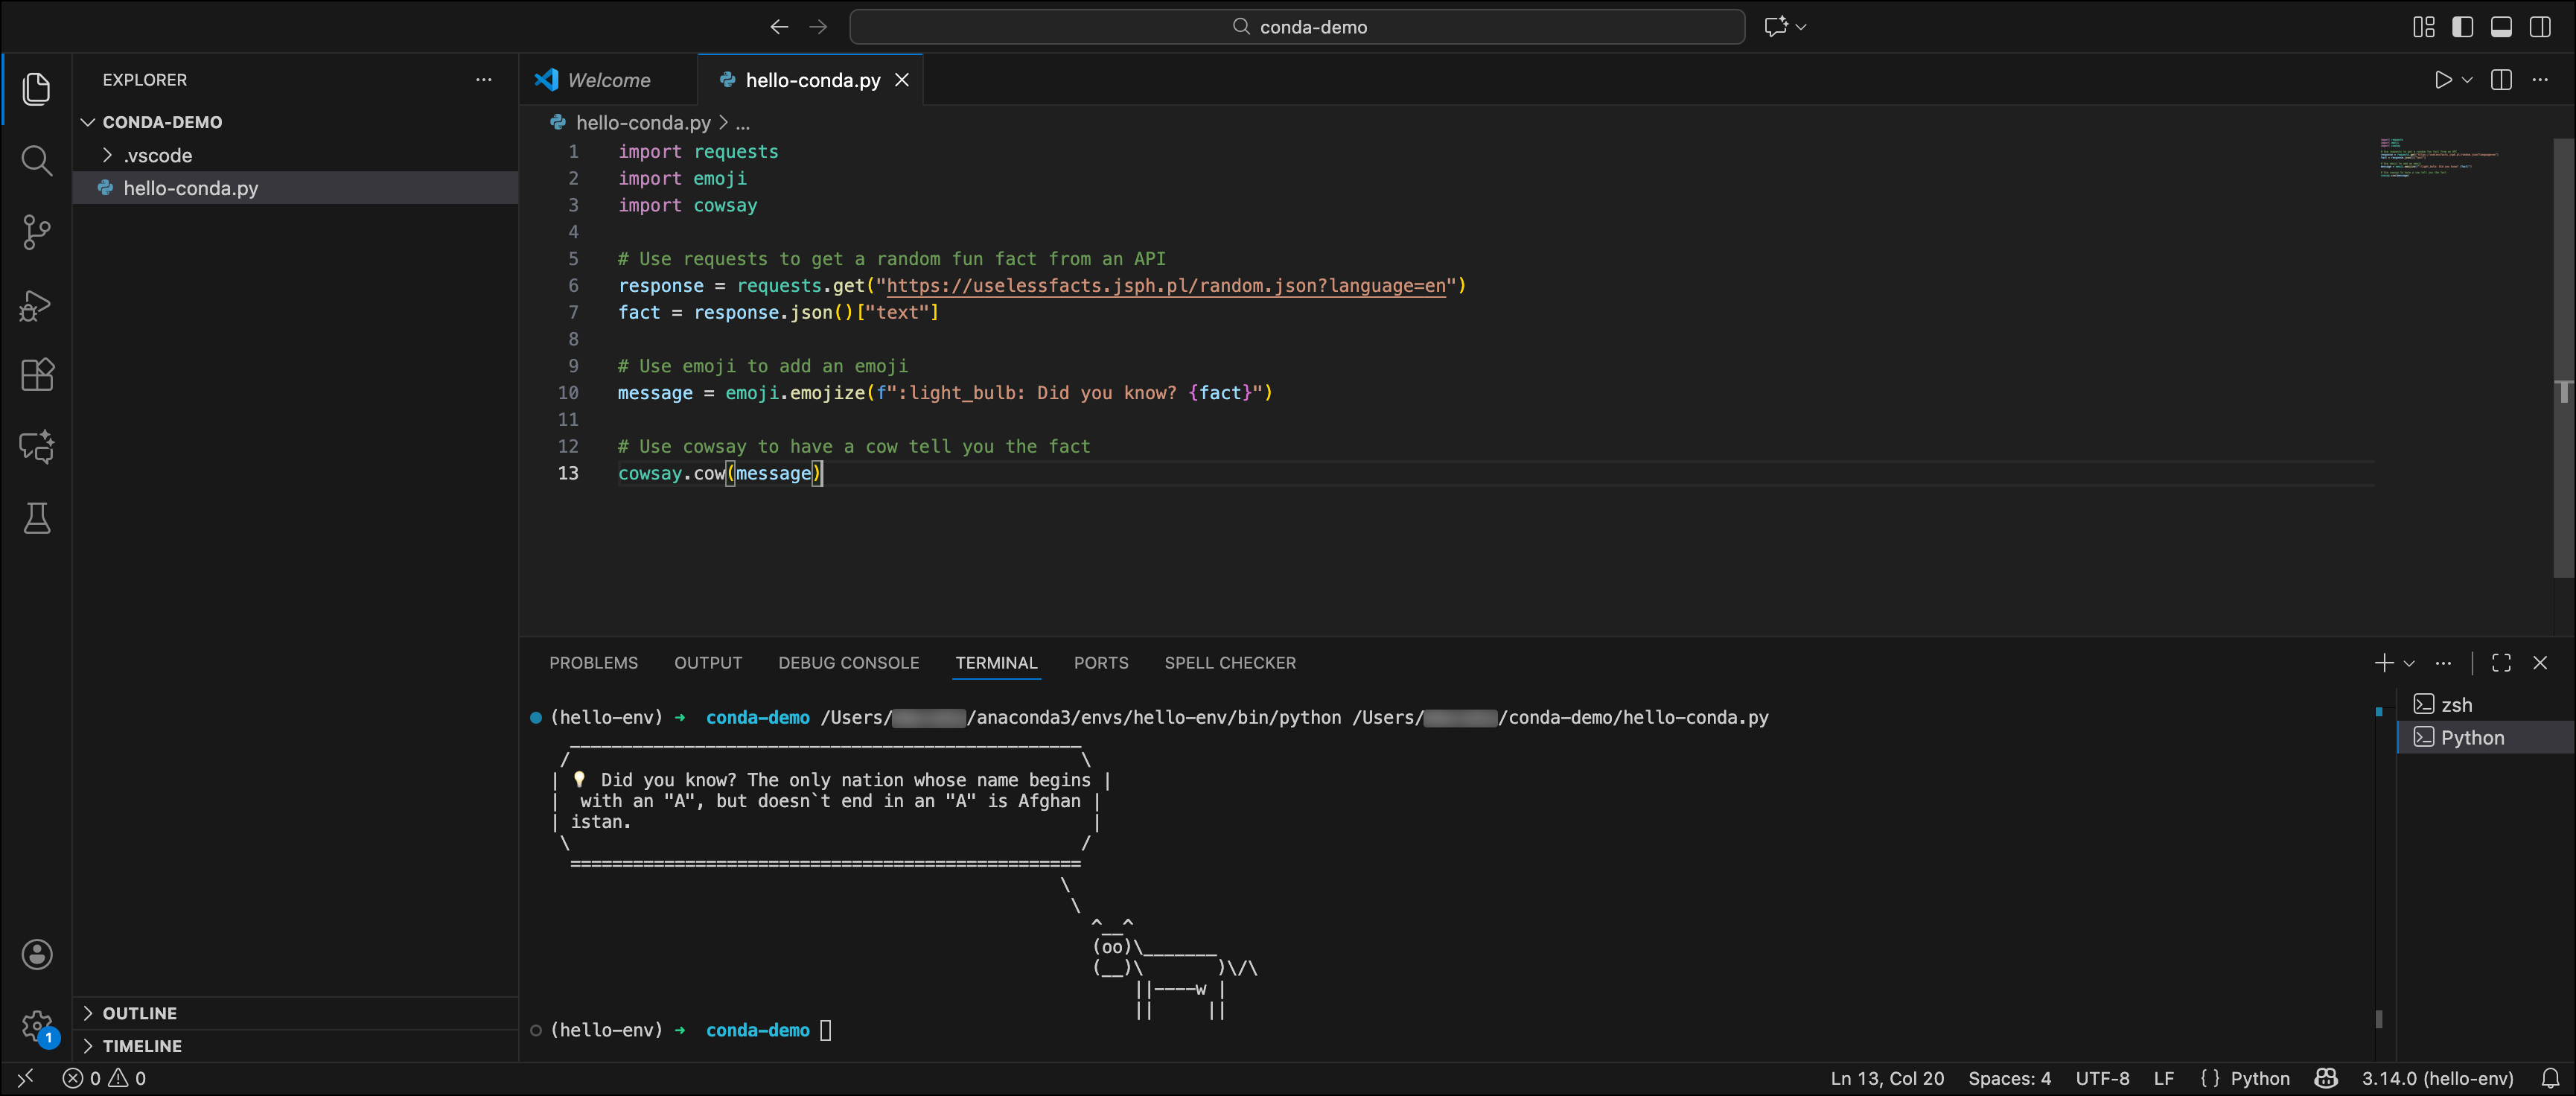
Click **Run** to run the code. If there are no errors in the terminal, your imports were successful.
Let's write a simple program that uses all three packages we imported. Add the following code below your import statements:
```py Factual cow code theme={null}
# Use requests to get a random fun fact from an API
response = requests.get("https://uselessfacts.jsph.pl/api/v2/facts/random?language=en")
fact = response.json()["text"]
# Use emoji to add an emoji
message = emoji.emojize(f":light_bulb: Did you know? {fact}")
# Use cowsay to have a cow tell you the fact
cowsay.cow(message)
```
```py Full code example theme={null}
import requests
import emoji
import cowsay
# Use requests to get a random fun fact from an API
response = requests.get("https://uselessfacts.jsph.pl/api/v2/facts/random?language=en")
fact = response.json()["text"]
# Use emoji to add an emoji
message = emoji.emojize(f":light_bulb: Did you know? {fact}")
# Use cowsay to have a cow tell you the fact
cowsay.cow(message)
```
Click **Run** to run the code. Your terminal will display a fun fact from a knowledgeable cow!
Review the following resources to learn more about the topics covered in this section, or continue on to the next section.
* [Python environments in VS Code](https://code.visualstudio.com/docs/python/environments)
* [Run Python code in VS Code](https://code.visualstudio.com/docs/python/run#_run-python-code)
## Tutorial wrap up
Congratulations! You've just created your first conda environment, installed packages using both conda and pip, and used your environment in VS Code to run Python code.
If you want to clean up after completing this tutorial, you can delete the `hello-env` environment.
Return to Anaconda Prompt (Windows) or Terminal (macOS/Linux).
Terminal is your system's terminal application, not VS Code's terminal.
First, deactivate your `hello-env` environment:
```sh theme={null}
conda deactivate
```
Then, delete the hello-env environment:
```sh theme={null}
conda remove --name hello-env --all
```
The `hello-env` environment is deleted and deregistered.
**What you learned**
* How to create and activate conda environments
* How to install packages from conda-forge and PyPI
* How to configure VS Code to use your environment
* How to make a cow tell you fun facts
* How to delete an environment
**Next steps**
* The [Concepts](/docs/getting-started/concepts/what-is-conda) section is a great place to learn the basics of the conda ecosystem.
* The [Conda Basics](https://learning.anaconda.com/courses/conda-basics) course teaches you to manage conda environments, use common commands, and work with channels.
* The [Working with conda](/docs/getting-started/working-with-conda/main) section offers more in-depth documentation on how to use conda.
* The [official conda site](https://docs.conda.io/projects/conda/en/stable/index.html) provides an even deeper level of technical detail on conda's use, as well as a full [index](https://docs.conda.io/projects/conda/en/stable/commands/index.html) of conda commands.
* The [IDE guides](/docs/getting-started/working-with-conda/ides/python-path) offer step-by-step instructions on how to use conda with other popular IDEs like PyCharm and JupyterLab.
**Have feedback?**
Use the **Yes** or **No** feedback buttons below to let us know what you thought about this tutorial and help us improve.
 Press Ctrl+S (Windows/ Linux) or Cmd+S (macOS) to open the **Save As...** dialogue and save your new file as `factual-cow.py`.