> ## Documentation Index
> Fetch the complete documentation index at: https://anaconda.com/docs/llms.txt
> Use this file to discover all available pages before exploring further.
# Configuring workload resource profiles
Each project editor session and deployment consumes compute resources within the Workbench cluster. If you need to run applications that require more memory or compute power than Anaconda provides by default, you can create customized resource profiles and configure the number of cores and amount of memory/RAM available for them. You can then allow users to access your customized resource profiles either globally or based on their role, assigned group, or as individual users. For more information about groups and roles in Workbench, see [Roles](/docs/data-science/latest/admin/user-mgmt/groups#roles).
For example, if your installation includes nodes with GPUs, you can add a GPU resource profile so users can access the GPUs to accelerate computation within their projects, which is essential for AI/ML model training.
Resource profiles that you create are listed for users when they [create](/docs/data-science/latest/data-science-workflows/projects/main#creating-a-new-project) or [deploy](/docs/data-science/latest/data-science-workflows/deployments/main#deploying-a-project) a project. You can create as many resource profiles as needed.
## Configuring resource profiles via Helm chart
Workbench includes either a `values.k3s.yaml` or a `values.byok.*.yaml` (depending on your implementation) file that overrides the default values in the top-level Helm chart. If you are performing your initial configurations, use the examples below to add the necessary `resource-profiles:` and `gpu-profile:` sections to the bottom of your file, then continue your environment preparation and installation.
Otherwise, follow the steps for [Setting platform configurations using the Helm chart](/docs/data-science/latest/admin/advanced/settings#setting-platform-configurations-using-the-helm-chart) to add or update the `resource-profiles:` and `gpu-profile:` configurations to the bottom of your `helm_values.yaml` file as needed for your system setup.
```yaml theme={null}
resource-profiles:
resource-profile:
description: Custom resource profile (global)
user_visible: true
resources:
limits:
cpu: "2"
memory: 4096Mi
roles_profile:
description: Custom resource profile (roles)
user_visible: true
resources:
limits:
cpu: "3"
memory: 4096Mi
acl:
roles:
- ae-creator
groups_profile:
description: Custom resource profile (groups)
user_visible: true
resources:
limits:
cpu: "4"
memory: 4096Mi
acl:
groups:
- managers
users_profile:
description: Custom resource profile (users)
user_visible: true
resources:
limits:
cpu: "1"
memory: 4096Mi
acl:
users:
- user2
not_visible_to_anyone:
description: Custom resource profile (not visible)
resources:
limits:
cpu: "3"
memory: 4096Mi
user_visible: false
gpu-profile:
description: Custom resource profile (GPU resource)
resources:
limits:
cpu: "4"
memory: 8Gi
nvidia.com/gpu: 1
requests:
cpu: "1"
memory: 2048Mi
nvidia.com/gpu: 1
user_visible: true
gpu-profile:
description: Custom resource profile (GPU with limited idle time threshold)
user_visible: true
cleanup-threshold: '2 days'
resources:
limits:
cpu: "4"
memory: 8Gi
nvidia.com/gpu: 1
requests:
cpu: "1"
memory: 2048Mi
nvidia.com/gpu: 1
```
Resource profiles display their `description`: as their name. Profiles are listed in alphabetical order, after the default profile.
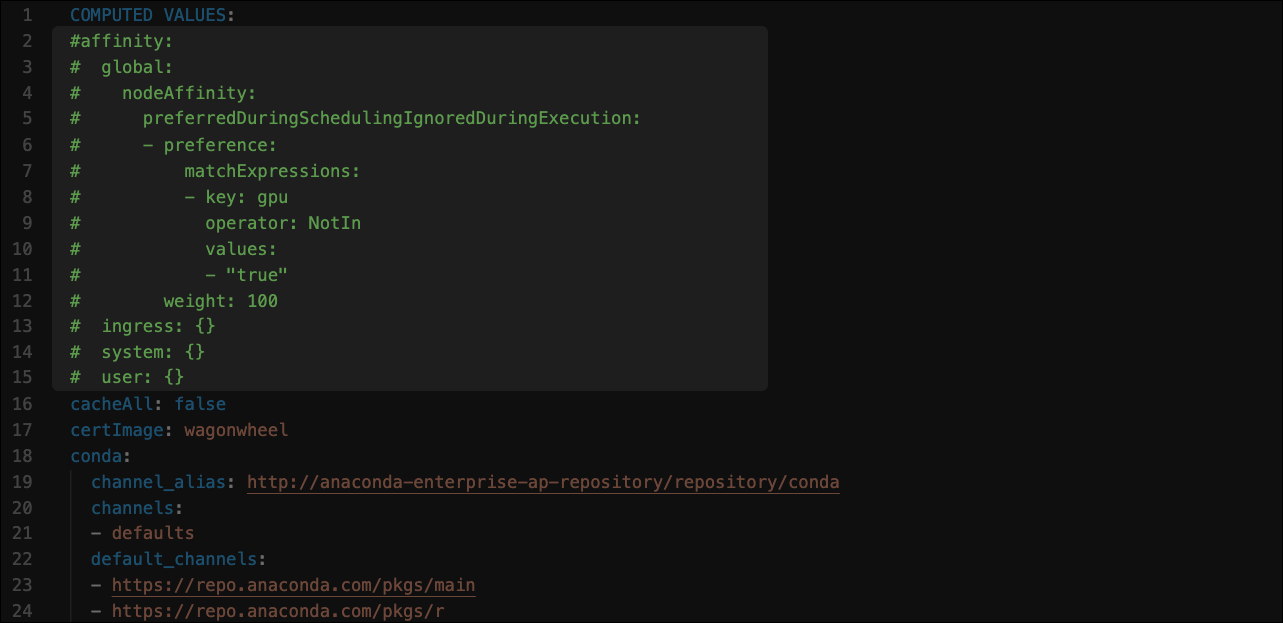
By default, CPU sessions and deployments are allowed to run on GPU nodes. To reserve your GPU nodes for sessions and deployments that require them, comment out the `affinity:` configuration in the file as shown:
 If you need to schedule user workloads on a specific node, add a `node_selector` to your resource profile. Use node selectors when running different CPU types, such as Intel and AMD; or different GPU types, such as Tesla v100 and p100. To enable a node selector, add `node_selector` to the bottom of your resource profile, with the `model:` value matching the label you have applied to your worker node.
```yaml theme={null}
gpu-profile:
description: GPU resource profile
resources:
limits:
cpu: "4"
memory: 8Gi
nvidia.com/gpu: 1
requests:
cpu: "1"
memory: 2048Mi
nvidia.com/gpu: 1
user_visible: true
node_selector:
model: v100
```
Once you have run the Helm upgrade command, verify that the resource profiles you added appear in the **Resource Profile** dropdown under your project’s **Settings**.
If you need to schedule user workloads on a specific node, add a `node_selector` to your resource profile. Use node selectors when running different CPU types, such as Intel and AMD; or different GPU types, such as Tesla v100 and p100. To enable a node selector, add `node_selector` to the bottom of your resource profile, with the `model:` value matching the label you have applied to your worker node.
```yaml theme={null}
gpu-profile:
description: GPU resource profile
resources:
limits:
cpu: "4"
memory: 8Gi
nvidia.com/gpu: 1
requests:
cpu: "1"
memory: 2048Mi
nvidia.com/gpu: 1
user_visible: true
node_selector:
model: v100
```
Once you have run the Helm upgrade command, verify that the resource profiles you added appear in the **Resource Profile** dropdown under your project’s **Settings**.