> ## Documentation Index
> Fetch the complete documentation index at: https://anaconda.com/docs/llms.txt
> Use this file to discover all available pages before exploring further.
# Adding Anaconda Assistant to Workbench
noindex: true
Anaconda Assistant is the AI pair programmer developed by Anaconda to assist you with coding in your Jupyter Notebooks. You can install the Anaconda Assistant as an optional component of the Data Science & AI Workbench.
## Installing Anaconda Assistant
1. Open a browser and log in to Workbench as the `anaconda-enterprise` user.
2. Open any existing project and view its settings.
3. If necessary, change the **Default Editor** to *JupyterLab*.
4. Open a project session.
5. Open a terminal window in your project session.
6. Download the Anaconda Assistant tarball and its checksum by running the following commands:
```sh theme={null}
curl -O https://airgap-svc.s3.amazonaws.com/misc/jupyter_anaconda_toolbox.tgz
curl -O https://airgap-svc.s3.amazonaws.com/misc/jupyter_anaconda_toolbox.tgz.sha256
```
7. Verify the checksum of the files you downloaded by running the following command:
```sh theme={null}
sha256sum --check jupyter_anaconda_toolbox.tgz.sha256
```
If the checksum is valid, you will receive `jupyter_anaconda_toolbox.tgz: OK` in the return.
8. Unpack the tarball you just downloaded into the tools directory by running the following command:
```sh theme={null}
tar xvzf jupyter_anaconda_toolbox.tgz -C /tools
```
9. Create a symbolic link to this new Jupyter environment.
```sh theme={null}
ln -s /tools/jlab_anaconda_toolbox /tools/jupyter
```
10. Start a new session in a different project to verify the newly built environment launches Jupyterlab successfully and the asssistant is present.
* Keep this session open while you enable and test the Anaconda Assistant.
* If for any reason the new Jupyterlab environment does not launch successfully, you can remove the symbolic link to revert Jupyterlab projects to opening with the default `lab_launch` environment by navigating to the `tools/` directory and running the following command:
```sh theme={null}
rm jupyter
```
## Enabling the Anaconda Assistant
### Obtaining an API Authentication token
To enable the Anaconda Assistant, you must have an Anaconda.com account. If you do not have an Anaconda.com account, [create one now](https://anaconda.com/app/sign-up).
You must obtain your token from a machine that has connectivity to `https://anaconda.com`.
Anaconda Assistant utilizes a token that must be generated using the `anaconda-auth` package, which is available in Anaconda’s default channel. This token provides your Workbench instance with access to the Anaconda Assistant API.
1. Open a terminal application *outside* of Workbench on your machine.
2. Install `anaconda-auth` by running the following command:
```sh theme={null}
conda install --name base anaconda-auth --channel https://repo.anaconda.cloud/repo/anaconda-tools --override-channels
```
3. Authenticate to Anaconda by running the following command:
```sh theme={null}
anaconda login
```
4. If prompted, select `anaconda.com` and press Enter (Windows)/Return (Mac).
5. Use the browser window that appears to log in to Anaconda using your account credentials.
You can close the window once you are logged in.
6. Return to your terminal application (outside of Workbench) and generate your authentication token by running the following command:
```sh theme={null}
anaconda auth api-key
```
The command returns a random string of characters. That is your authentication token!
Store your token in a secure location!
### Setting environment variables
1. Connect to your instance of Workbench.
2. Edit the `anaconda-enterprise-env-var-config` configmap by following the process for [setting global config variables](./global_config).
3. Include the following lines:
```sh theme={null}
# Replace with the your cloud API token (do not include single quotes from token output)
ANACONDA_AE5_CLOUD_TOKEN:
ANACONDA_ASSISTANT_ENVIRONMENT_TYPE: enterprise-notebooks-prod
```
## Verifying installation
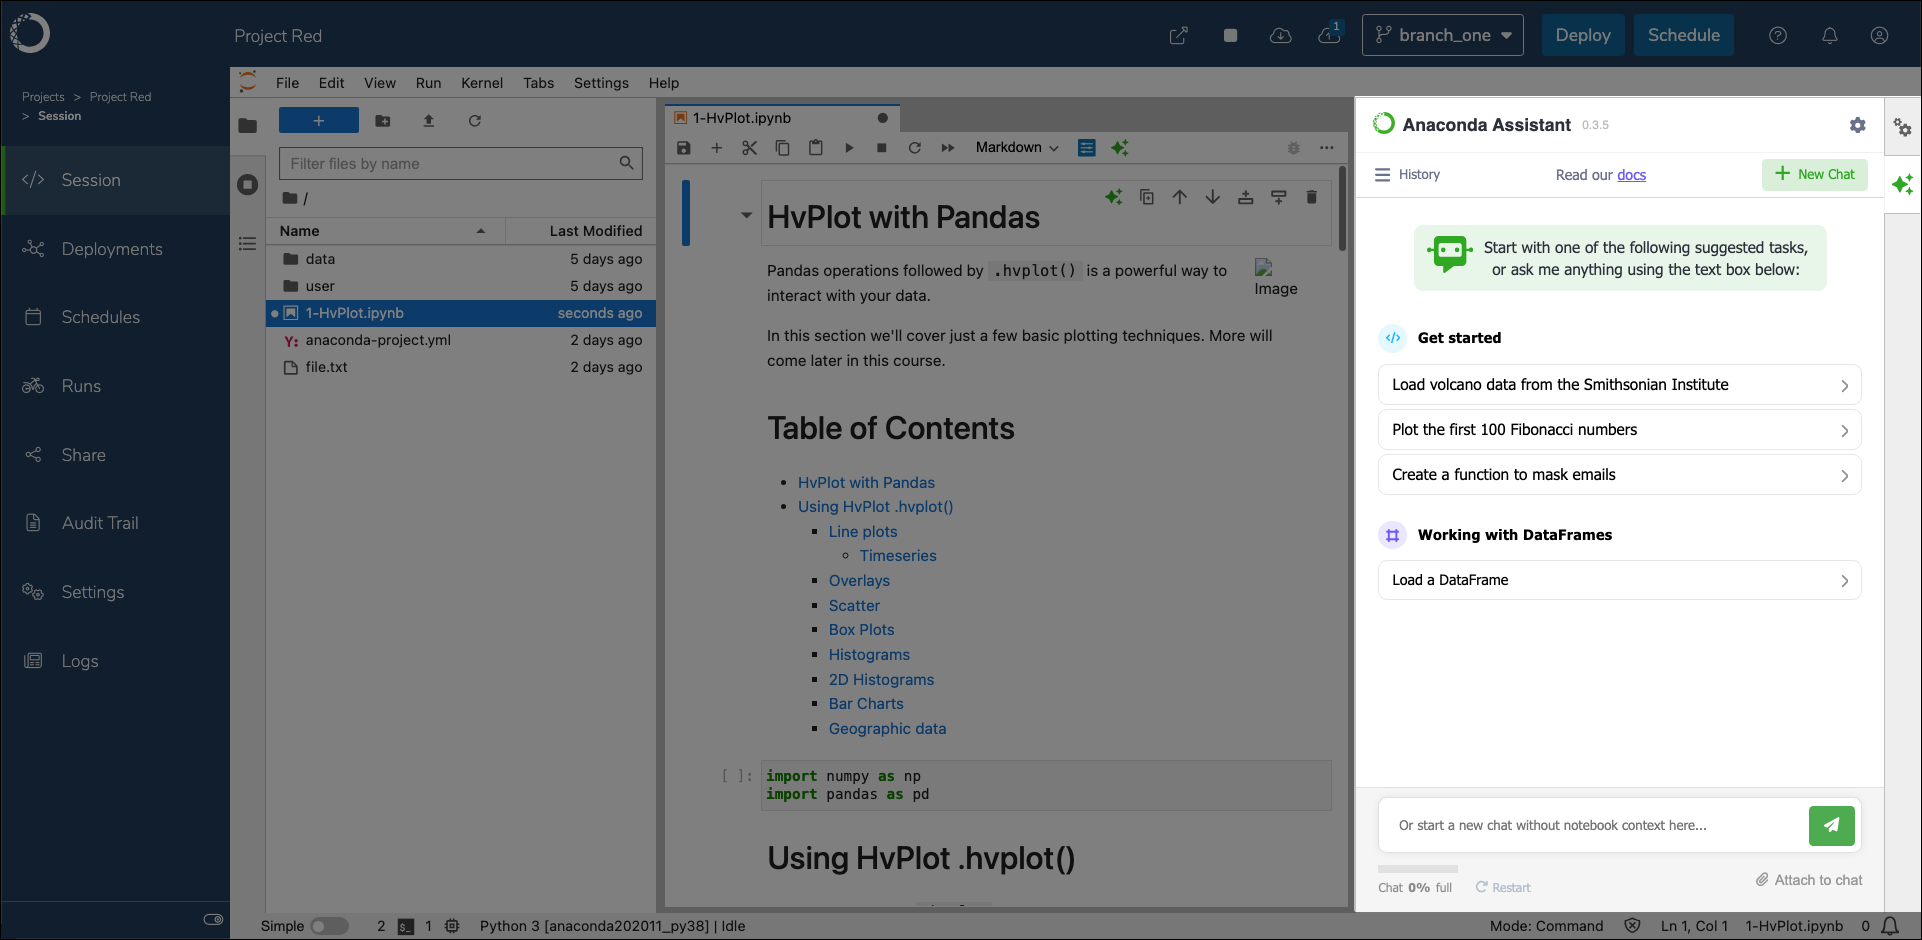
With the tarball extracted into the `/tools` volume and your Anaconda API key stored as a system variable, return to Workbench and create a new project with JupyterLab as its default editor. You will see the Anaconda Assistant on the right hand side of the screen when you open a notebook (`.ipynb`) file.
 For more information about how to use the Assistant, see the [Anaconda Assistant quickstart guide](/docs/anaconda-platform/notebooks/anaconda-toolbox/anaconda-assistant).