> ## Documentation Index
> Fetch the complete documentation index at: https://anaconda.com/docs/llms.txt
> Use this file to discover all available pages before exploring further.
# Hadoop / Spark
If your Data Science & AI Workbench Administrator has configured Livy server for Hadoop and Spark access, you’ll be able to access them within the platform.
The `Hadoop/Spark` project template includes sample code to connect to the following resources, with and without [Kerberos authentication](#using-kerberos-authentication):
* [Spark](#using-spark)
* [Hadoop Distributed File System (HDFS)](#using-hdfs)
* [Hive](#using-hive)
* [Impala](#using-impala)
In the editor session there are two environments created. `anaconda50_hadoop` contains the packages consistent with the Python 3.6 template plus additional packages to access Hadoop and Spark resources. The `anaconda50_impyla` environment contains packages consistent with the Python 2.7 template plus additional packages to access Impala tables using the Impyla Python package.
## Using Kerberos authentication
If the Hadoop cluster is configured to use Kerberos authentication—and your Administrator has configured Workbench to work with Kerberos—you can use it to authenticate yourself and gain access to system resources. The process is the same for all services and languages: Spark, HDFS, Hive, and Impala.
You’ll need to contact your Administrator to get your Kerberos *principal*, which is the combination of your username and security domain.
To perform the authentication, open an environment-based terminal in the interface. This is normally in the Launchers panel, in the bottom row of icons, and is the right-most icon.
When the interface appears, run this command:
```
kinit myname@mydomain.com
```
Replace `myname@mydomain.com` with the Kerberos *principal*, the combination of your username and security domain, which was provided to you by your Administrator.
Executing the command requires you to enter a password. If there is no error message, authentication has succeeded. You can verify by issuing the `klist` command. If it responds with some entries, you are authenticated.
You can also use a keytab to do this. Upload it to a project and execute a command like this:
```
kinit myname@mydomain.com -kt mykeytab.keytab
```
Kerberos authentication will lapse after some time, requiring you to repeat the above process. The length of time is determined by your cluster security administration, and on many clusters is set to 24 hours.
For deployments that require Kerberos authentication, Anaconda recommends generating a
shared Kerberos keytab that has access to the resources needed by the
deployment, and adding a `kinit` command that uses the keytab as part of the
deployment command.
Alternatively, the deployment can include a form that asks for user credentials
and executes the `kinit` command.
## Using Spark
Apache Spark is an open source analytics engine that runs on compute clusters to provide in-memory operations, data parallelism, fault tolerance, and very high performance. Spark is a general purpose engine and highly effective for many uses, including ETL, batch, streaming, real-time, big data, data science, and machine learning workloads.
Using Workbench with Spark requires Livy and Sparkmagic. The `Hadoop/Spark` project template includes Sparkmagic, but your Administrator must have configured Workbench to work with a Livy server.
### Supported versions
The following combinations of the multiple tools are supported:
* Python 2 and 3
* Apache Livy 0.7.1-incubating
* Apache Spark 2.4.7
### Livy
Apache Livy is an open source REST interface to submit and manage jobs on a
Spark cluster, including code written in Java, Scala, Python, and R. These jobs
are managed in Spark contexts, and the Spark contexts are controlled by a
resource manager such as Apache Hadoop YARN. This provides fault tolerance and
high reliability as multiple users interact with a Spark cluster concurrently.
With Workbench, you can connect to a remote Spark cluster using Apache
Livy with any of the available clients, including Jupyter notebooks with
Sparkmagic. Workbench provides Sparkmagic, which includes Spark,
PySpark, and SparkR notebook kernels for deployment.
The Apache Livy architecture gives you the ability to submit jobs from any
remote machine or analytics cluster, even where a Spark client is not available.
It removes the requirement to install Jupyter and Anaconda directly on an edge
node in the Spark cluster.
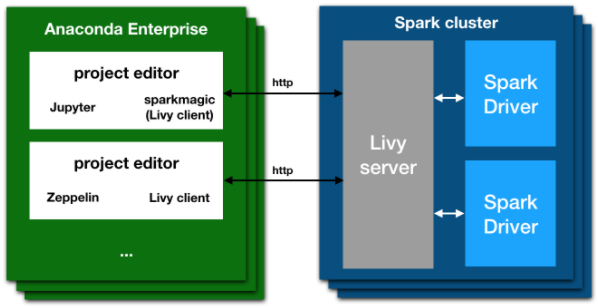 Livy and Sparkmagic work as a REST server and client that:
* Retains the interactivity and multi-language support of Spark
* Does not require any code changes to existing Spark jobs
* Maintains all of Spark’s features such as the sharing of cached RDDs and Spark Dataframes, and
* Provides an easy way of creating a secure connection to a Kerberized Spark cluster.
When Livy is installed, you can connect to a remote Spark cluster when creating
a new project by selecting the Spark template.
### Kernels
When you copy the project template “Hadoop/Spark” and open a Jupyter editing
session, you will see several kernels such as these available:
* `Python 3`
* `PySpark`
* `PySpark3`
* `R`
* `Spark`
* `SparkR`
* `Python 2`
To work with Livy and Python, use `PySpark`. Do not use
`PySpark3`.
To work with Livy and Scala, use `Spark`.
You can use Spark with Workbench in two ways:
1. Starting a notebook with one of the Spark kernels, in which case all code will be executed on the cluster and not locally.
Note that a connection and all cluster resources will be assigned as soon as you execute any ordinary code cell, that is, any cell not marked as `%%local`.
2. Starting a normal notebook with a Python kernel, and using `%load_ext sparkmagic.magics`. That command will enable a set of functions to run code on the cluster. See [examples](https://github.com/jupyter-incubator/sparkmagic/blob/master/examples/Magics%20in%20IPython%20Kernel.ipynb) (external link).
To display graphical output directly from the cluster, you must use SQL commands. This is also the only way to have results passed back to your local Python kernel, so that you can do further manipulation on it with `pandas` or other packages.
In the common case, the configuration provided for you in the Session will be correct and not require modification. However, in other cases you might need to use sandbox or ad-hoc environments that require the modifications described below.
### Overriding session settings
Certain jobs may require more cores or memory, or custom environment variables
such as Python worker settings. The configuration passed to Livy is generally
defined in the file `~/.sparkmagic/conf.json`.
You may inspect this file, particularly the section `"session_configs"`, or
you may refer to the example file in the `spark` directory,
`sparkmagic_conf.example.json`. Note that the example file has not been
tailored to your specific cluster.
In a Sparkmagic kernel such as PySpark, SparkR, or similar, you can change the
configuration with the magic `%%configure`. This syntax is pure JSON, and the
values are passed directly to the driver application.
EXAMPLE:
```
%%configure -f
{"executorMemory": "4G", "executorCores":4}
```
To use a different environment, use the Spark configuration to set
`spark.driver.python` and `spark.executor.python` on all compute nodes in
your Spark cluster.
EXAMPLE:
If all nodes in your Spark cluster have Python 2 deployed at `/opt/anaconda2`
and Python 3 deployed at `/opt/anaconda3`, then you can select Python 2 on all
execution nodes with this code:
```
%%configure -f
{"conf": {"spark.driver.python": "/opt/anaconda2/bin/python", "spark.executor.python": "/opt/anaconda2/bin/python"}}
```
If all nodes in your Spark cluster have Python 2 deployed at `/opt/anaconda2`
and Python 3 deployed at `/opt/anaconda3`, then you can select Python 3 on all
execution nodes with this code:
```
%%configure -f
{"conf": {"spark.driver.python": "/opt/anaconda3/bin/python", "spark.executor.python": "/opt/anaconda3/bin/python"}}
```
If you are using a Python kernel and have done `%load_ext sparkmagic.magics`,
you can use the `%manage_spark` command to set configuration options. The
session options are in the “Create Session” pane under “Properties”.
Overriding session settings can be used to target multiple Python
interpreters, including Python interpreters coming from different Anaconda
parcels.
### Using custom Anaconda parcels and management packs
Workbench Administrators can generate custom parcels for CDP or custom management packs for Hortonworks Data Platform (HDP) to distribute customized versions of Anaconda across a Hadoop/Spark cluster using Cloudera Manager for CDP or Apache Ambari for HDP. See [Using installers, parcels and management packs](../installers) for more information.
As a platform user, you can then select a specific version of Anaconda and Python on a per-project basis by including the following configuration in the first cell of a Sparkmagic-based Jupyter Notebook.
For example:
```
%%configure -f
{"conf": {"spark.yarn.appMasterEnv.PYSPARK_PYTHON": "/opt/anaconda/bin/python",
"spark.yarn.appMasterEnv.PYSPARK_DRIVER_PYTHON": "/opt/anaconda/bin/python",
"spark.yarn.executorEnv.PYSPARK_PYTHON": "/opt/anaconda/bin/python",
"spark.pyspark.python": "/opt/anaconda/bin/python",
"spark.pyspark.driver.python": "/opt/anaconda/bin/python"
}
}
```
Replace `/opt/anaconda/` with the prefix of the name and location for the particular parcel or management pack.
Livy and Sparkmagic work as a REST server and client that:
* Retains the interactivity and multi-language support of Spark
* Does not require any code changes to existing Spark jobs
* Maintains all of Spark’s features such as the sharing of cached RDDs and Spark Dataframes, and
* Provides an easy way of creating a secure connection to a Kerberized Spark cluster.
When Livy is installed, you can connect to a remote Spark cluster when creating
a new project by selecting the Spark template.
### Kernels
When you copy the project template “Hadoop/Spark” and open a Jupyter editing
session, you will see several kernels such as these available:
* `Python 3`
* `PySpark`
* `PySpark3`
* `R`
* `Spark`
* `SparkR`
* `Python 2`
To work with Livy and Python, use `PySpark`. Do not use
`PySpark3`.
To work with Livy and Scala, use `Spark`.
You can use Spark with Workbench in two ways:
1. Starting a notebook with one of the Spark kernels, in which case all code will be executed on the cluster and not locally.
Note that a connection and all cluster resources will be assigned as soon as you execute any ordinary code cell, that is, any cell not marked as `%%local`.
2. Starting a normal notebook with a Python kernel, and using `%load_ext sparkmagic.magics`. That command will enable a set of functions to run code on the cluster. See [examples](https://github.com/jupyter-incubator/sparkmagic/blob/master/examples/Magics%20in%20IPython%20Kernel.ipynb) (external link).
To display graphical output directly from the cluster, you must use SQL commands. This is also the only way to have results passed back to your local Python kernel, so that you can do further manipulation on it with `pandas` or other packages.
In the common case, the configuration provided for you in the Session will be correct and not require modification. However, in other cases you might need to use sandbox or ad-hoc environments that require the modifications described below.
### Overriding session settings
Certain jobs may require more cores or memory, or custom environment variables
such as Python worker settings. The configuration passed to Livy is generally
defined in the file `~/.sparkmagic/conf.json`.
You may inspect this file, particularly the section `"session_configs"`, or
you may refer to the example file in the `spark` directory,
`sparkmagic_conf.example.json`. Note that the example file has not been
tailored to your specific cluster.
In a Sparkmagic kernel such as PySpark, SparkR, or similar, you can change the
configuration with the magic `%%configure`. This syntax is pure JSON, and the
values are passed directly to the driver application.
EXAMPLE:
```
%%configure -f
{"executorMemory": "4G", "executorCores":4}
```
To use a different environment, use the Spark configuration to set
`spark.driver.python` and `spark.executor.python` on all compute nodes in
your Spark cluster.
EXAMPLE:
If all nodes in your Spark cluster have Python 2 deployed at `/opt/anaconda2`
and Python 3 deployed at `/opt/anaconda3`, then you can select Python 2 on all
execution nodes with this code:
```
%%configure -f
{"conf": {"spark.driver.python": "/opt/anaconda2/bin/python", "spark.executor.python": "/opt/anaconda2/bin/python"}}
```
If all nodes in your Spark cluster have Python 2 deployed at `/opt/anaconda2`
and Python 3 deployed at `/opt/anaconda3`, then you can select Python 3 on all
execution nodes with this code:
```
%%configure -f
{"conf": {"spark.driver.python": "/opt/anaconda3/bin/python", "spark.executor.python": "/opt/anaconda3/bin/python"}}
```
If you are using a Python kernel and have done `%load_ext sparkmagic.magics`,
you can use the `%manage_spark` command to set configuration options. The
session options are in the “Create Session” pane under “Properties”.
Overriding session settings can be used to target multiple Python
interpreters, including Python interpreters coming from different Anaconda
parcels.
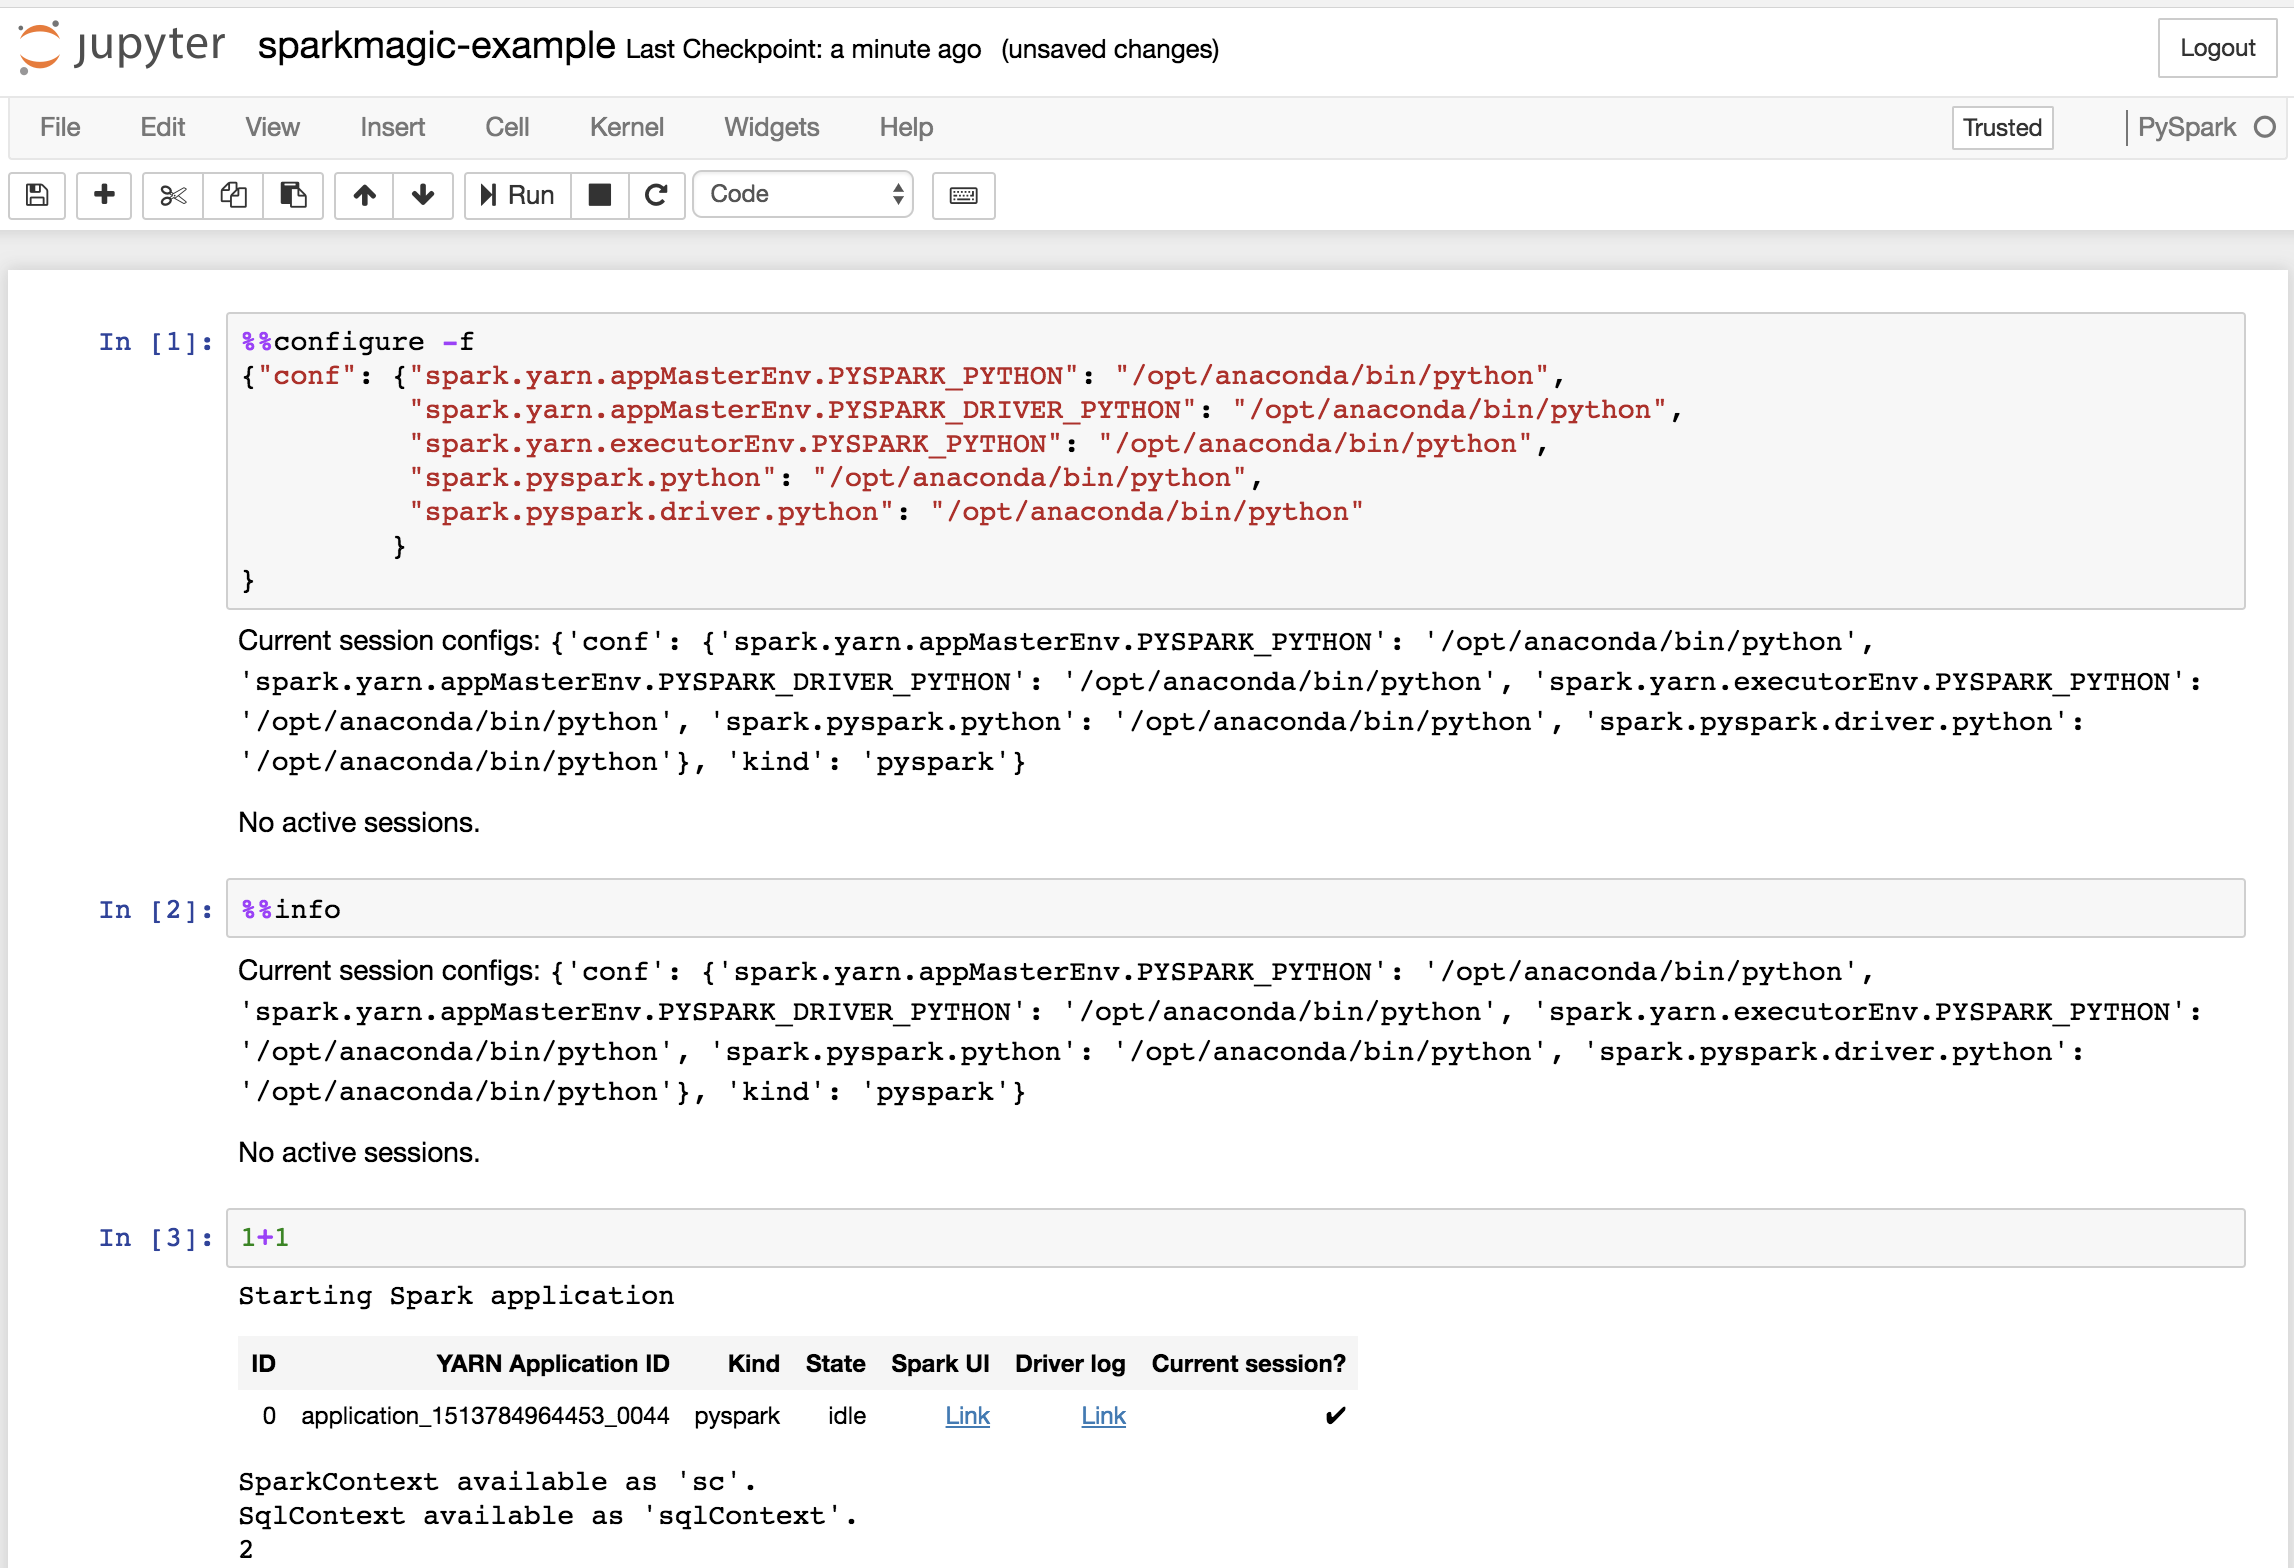
### Using custom Anaconda parcels and management packs
Workbench Administrators can generate custom parcels for CDP or custom management packs for Hortonworks Data Platform (HDP) to distribute customized versions of Anaconda across a Hadoop/Spark cluster using Cloudera Manager for CDP or Apache Ambari for HDP. See [Using installers, parcels and management packs](../installers) for more information.
As a platform user, you can then select a specific version of Anaconda and Python on a per-project basis by including the following configuration in the first cell of a Sparkmagic-based Jupyter Notebook.
For example:
```
%%configure -f
{"conf": {"spark.yarn.appMasterEnv.PYSPARK_PYTHON": "/opt/anaconda/bin/python",
"spark.yarn.appMasterEnv.PYSPARK_DRIVER_PYTHON": "/opt/anaconda/bin/python",
"spark.yarn.executorEnv.PYSPARK_PYTHON": "/opt/anaconda/bin/python",
"spark.pyspark.python": "/opt/anaconda/bin/python",
"spark.pyspark.driver.python": "/opt/anaconda/bin/python"
}
}
```
Replace `/opt/anaconda/` with the prefix of the name and location for the particular parcel or management pack.
 ### Overriding basic settings
In some more experimental situations, you might want to change the Kerberos or
Livy connection settings. This could be done when first configuring the platform
for a cluster, usually by an administrator with intimate knowledge of the
cluster’s security model.
Users could override basic settings if their administrators have not configured
Livy, or to connect to a cluster other than the default cluster.
In these cases, Anaconda recommends creating a `krb5.conf` file and a
`sparkmagic_conf.json` file in the project directory so they will be saved
along with the project itself. An example Sparkmagic configuration is included,
`sparkmagic_conf.example.json`, listing the fields that are typically set. The
`"url"` and `"auth"` keys in each of the kernel sections are especially
important.
The `krb5.conf` file is normally copied from the Hadoop cluster, rather than
written manually, and may refer to additional configuration or certificate
files. These files must all be uploaded using the interface.
To use these alternate configuration files, set the `KRB5_CONFIG` variable
default to point to the full path of `krb5.conf` and set the values of
`SPARKMAGIC_CONF_DIR` and `SPARKMAGIC_CONF_FILE` to point to the Sparkmagic
config file. You can set these either by using the Project pane on the left of
the interface, or by directly editing the `anaconda-project.yml` file.
For example, the final file’s variables section may look like this:
```
variables:
KRB5_CONFIG:
description: Location of config file for kerberos authentication
default: /opt/continuum/project/krb5.conf
SPARKMAGIC_CONF_DIR:
description: Location of sparkmagic configuration file
default: /opt/continuum/project
SPARKMAGIC_CONF_FILE:
description: Name of sparkmagic configuration file
default: sparkmagic_conf.json
```
You must perform these actions **before** running `kinit` or starting any notebook/kernel.
If you misconfigure a `.json` file, all Sparkmagic kernels will fail to launch. You can test your Sparkmagic configuration by running the following Python command in an interactive shell: `python -m json.tool sparkmagic_conf.json`.
If you have formatted the JSON correctly, this command will run without error. Additional edits may be required, depending on your Livy settings. See [Apache Livy and Workbench](../../admin/advanced/livy-server) and [Configuring Livy server for Hadoop Spark access](../../admin/advanced/config-livy-server) for information on installing and
configuring Livy.
### Python
Example code showing Python with a Spark kernel:
```
sc
data = sc.parallelize(range(1, 100))
data.mean()
import pandas as pd
df = pd.DataFrame([("foo", 1), ("bar", 2)], columns=("col1", "col2"))
sparkdf = sqlContext.createDataFrame(df)
sparkdf.select("col1").show()
sparkdf.filter(sparkdf['col2'] == 2).show()
```
## Using HDFS
The Hadoop Distributed File System (HDFS) is an open source, distributed,
scalable, and fault tolerant Java based file system for storing large volumes of
data on the disks of many computers. It works with batch, interactive, and
real-time workloads.
### Dependencies
* `python-hdfs`
### Supported versions
* Python 2 or 3
* Hadoop 3.1.1
### Kernels
* `[anaconda50_hadoop] Python 3`
### Connecting
To connect to an HDFS cluster you need the address and port to the HDFS
Namenode, normally port 50070.
To use the `hdfscli` command line, configure the `~/.hdfscli.cfg` file:
```
[global]
default.alias = dev
[dev.alias]
url = http://:port
```
Once the library is configured, you can use it to perform actions on HDFS with
the command line by starting a terminal based on the `[anaconda50_hadoop] Python 3`
environment and executing the `hdfscli` command. For example:
```
$ hdfscli
Welcome to the interactive HDFS python shell.
The HDFS client is available as `CLIENT`.
In [1]: CLIENT.list("/")
Out[1]: ['hbase', 'solr', 'tmp', 'user']
```
### Python
Sample code showing Python with HDFS without Kerberos:
```
from hdfs import InsecureClient
client = InsecureClient('http://:50070')
client.list("/")
```
Python with HDFS with Kerberos:
```
from hdfs.ext.kerberos import KerberosClient
client = KerberosClient('http://:50070')
client.list("/")
```
## Using Hive
Hive is an open source data warehouse project for queries and data analysis. It
provides an SQL-like interface called HiveQL to access distributed data stored
in various databases and file systems.
Hive is very flexible in its connection methods and there are multiple ways to
connect to it, such ODBC and Thrift.
### Dependencies
* `pyhive`
### Supported versions
* Python 2 or 3
* Hive 3.1.3000
### Kernels
* `[anaconda50_hadoop] Python 3`
### Drivers
**ODBC**
Using ODBC requires downloading a driver for the specific version of Hive that
you are using. This driver is also specific to the vendor you are using.
Cloudare EXAMPLE:
* [Hive ODBC Connector 2.5.4 - Download](https://downloads.cloudera.com/connectors/hive_odbc_2.5.24.1017/Linux/EL5/ClouderaHiveODBC-2.5.24.1017-1.el5.x86_64.rpm)
* [Hive ODBC Connection 2.5.4 - Documentation](https://docs.cloudera.com/documentation/other/connectors/hive-odbc/2-5-24)
Anaconda recommends downloading the respective ODBC drivers to either your managed persistence directory, or to an NFS directory mounted in the session.
### Connecting
To connect to a Hive cluster you need the address and port to a running Hive
Server 2, normally port 10000.
To use PyHive, open a Python notebook based on the `[anaconda50_hadoop] Python 3`
environment and run:
```
from pyhive import hive
conn = hive.connect('', port=10000)
cursor = conn.cursor()
cursor.execute('SHOW DATABASES')
cursor.fetchall()
```
### Python
Anaconda recommends the Thrift method to connect to Hive from Python. With
Thrift you can use all the functionality of Hive, including security features
such as SSL connectivity and Kerberos authentication. Thrift does not require
special drivers, which improves code portability.
Instead of using an ODBC driver for connecting to the SQL engines, a Thrift
client uses its own protocol based on a service definition to communicate with a
Thrift server. This definition can be used to generate libraries in any
language, including Python.
Hive using PyHive:
```
from pyhive import hive
conn = hive.connect('', port=10000, auth='KERBEROS', kerberos_service_name='hive')
cursor.execute('SHOW TABLES')
cursor.fetchall()
# This prints: [('iris',), ('t1',)]
cursor.execute('SELECT * FROM iris')
cursor.fetchall()
# This prints the output of that table
```
Hive using ODBC with Kerberos:
```
cnxnstr = 'Driver={/opt/cloudera/hiveodbc/lib/64/libclouderahiveodbc64.so};
HIVESERVERTYPE=2;
HOST=;
PORT=;
UID=1002;
PWD=password;
Schema=;
AuthMECH=4;
HTTPPath=http://;
AllowSelfSignedServerCert=1;
CAIssuedCertNamesMismatch=1'
```
The output will be different, depending on the tables available on the cluster.
## Using Impala
Apache Impala is an open source, native analytic SQL query engine for Apache
Hadoop. It uses massively parallel processing (MPP) for high performance, and
works with commonly used big data formats such as Apache Parquet.
Impala is very flexible in its connection methods and there are multiple ways to
connect to it, such as ODBC and Thrift.
### Dependencies
* `impyla`
* `implyr`
### Supported versions
* Python 2 or 3
* Impala 3.4.0
### Connecting
To connect to an Impala cluster you need the address and port to a
running Impala Daemon, normally port 21050.
To use Impyla, open a Python Notebook based on the `Python 2`
environment and run:
```
from impala.dbapi import connect
conn = connect('', port=21050)
cursor = conn.cursor()
cursor.execute('SHOW DATABASES')
cursor.fetchall()
```
### Python
Anaconda recommends the Thrift method to connect to Impala from Python. With
Thrift you can use all the functionality of Impala, including security features
such as SSL connectivity and Kerberos authentication. Thrift does not require
special drivers, which improves code portability.
Instead of using an ODBC driver for connecting to the SQL engines, a Thrift
client uses its own protocol based on a service definition to communicate with
a Thrift server. This definition can be used to generate libraries in any
language, including Python.
Impala using Impyla:
```
from impala.dbapi import connect
conn = connect(host='', port=21050, auth_mechanism='GSSAPI', kerberos_service_name='impala')
cursor = conn.cursor()
cursor.execute('SHOW TABLES')
results = cursor.fetchall()
results
# This prints: [('iris',),]
cursor.execute('SELECT * FROM iris')
cursor.fetchall()
# This prints the output of that table
```
The output will be different, depending on the tables available on the cluster.
### Overriding basic settings
In some more experimental situations, you might want to change the Kerberos or
Livy connection settings. This could be done when first configuring the platform
for a cluster, usually by an administrator with intimate knowledge of the
cluster’s security model.
Users could override basic settings if their administrators have not configured
Livy, or to connect to a cluster other than the default cluster.
In these cases, Anaconda recommends creating a `krb5.conf` file and a
`sparkmagic_conf.json` file in the project directory so they will be saved
along with the project itself. An example Sparkmagic configuration is included,
`sparkmagic_conf.example.json`, listing the fields that are typically set. The
`"url"` and `"auth"` keys in each of the kernel sections are especially
important.
The `krb5.conf` file is normally copied from the Hadoop cluster, rather than
written manually, and may refer to additional configuration or certificate
files. These files must all be uploaded using the interface.
To use these alternate configuration files, set the `KRB5_CONFIG` variable
default to point to the full path of `krb5.conf` and set the values of
`SPARKMAGIC_CONF_DIR` and `SPARKMAGIC_CONF_FILE` to point to the Sparkmagic
config file. You can set these either by using the Project pane on the left of
the interface, or by directly editing the `anaconda-project.yml` file.
For example, the final file’s variables section may look like this:
```
variables:
KRB5_CONFIG:
description: Location of config file for kerberos authentication
default: /opt/continuum/project/krb5.conf
SPARKMAGIC_CONF_DIR:
description: Location of sparkmagic configuration file
default: /opt/continuum/project
SPARKMAGIC_CONF_FILE:
description: Name of sparkmagic configuration file
default: sparkmagic_conf.json
```
You must perform these actions **before** running `kinit` or starting any notebook/kernel.
If you misconfigure a `.json` file, all Sparkmagic kernels will fail to launch. You can test your Sparkmagic configuration by running the following Python command in an interactive shell: `python -m json.tool sparkmagic_conf.json`.
If you have formatted the JSON correctly, this command will run without error. Additional edits may be required, depending on your Livy settings. See [Apache Livy and Workbench](../../admin/advanced/livy-server) and [Configuring Livy server for Hadoop Spark access](../../admin/advanced/config-livy-server) for information on installing and
configuring Livy.
### Python
Example code showing Python with a Spark kernel:
```
sc
data = sc.parallelize(range(1, 100))
data.mean()
import pandas as pd
df = pd.DataFrame([("foo", 1), ("bar", 2)], columns=("col1", "col2"))
sparkdf = sqlContext.createDataFrame(df)
sparkdf.select("col1").show()
sparkdf.filter(sparkdf['col2'] == 2).show()
```
## Using HDFS
The Hadoop Distributed File System (HDFS) is an open source, distributed,
scalable, and fault tolerant Java based file system for storing large volumes of
data on the disks of many computers. It works with batch, interactive, and
real-time workloads.
### Dependencies
* `python-hdfs`
### Supported versions
* Python 2 or 3
* Hadoop 3.1.1
### Kernels
* `[anaconda50_hadoop] Python 3`
### Connecting
To connect to an HDFS cluster you need the address and port to the HDFS
Namenode, normally port 50070.
To use the `hdfscli` command line, configure the `~/.hdfscli.cfg` file:
```
[global]
default.alias = dev
[dev.alias]
url = http://:port
```
Once the library is configured, you can use it to perform actions on HDFS with
the command line by starting a terminal based on the `[anaconda50_hadoop] Python 3`
environment and executing the `hdfscli` command. For example:
```
$ hdfscli
Welcome to the interactive HDFS python shell.
The HDFS client is available as `CLIENT`.
In [1]: CLIENT.list("/")
Out[1]: ['hbase', 'solr', 'tmp', 'user']
```
### Python
Sample code showing Python with HDFS without Kerberos:
```
from hdfs import InsecureClient
client = InsecureClient('http://:50070')
client.list("/")
```
Python with HDFS with Kerberos:
```
from hdfs.ext.kerberos import KerberosClient
client = KerberosClient('http://:50070')
client.list("/")
```
## Using Hive
Hive is an open source data warehouse project for queries and data analysis. It
provides an SQL-like interface called HiveQL to access distributed data stored
in various databases and file systems.
Hive is very flexible in its connection methods and there are multiple ways to
connect to it, such ODBC and Thrift.
### Dependencies
* `pyhive`
### Supported versions
* Python 2 or 3
* Hive 3.1.3000
### Kernels
* `[anaconda50_hadoop] Python 3`
### Drivers
**ODBC**
Using ODBC requires downloading a driver for the specific version of Hive that
you are using. This driver is also specific to the vendor you are using.
Cloudare EXAMPLE:
* [Hive ODBC Connector 2.5.4 - Download](https://downloads.cloudera.com/connectors/hive_odbc_2.5.24.1017/Linux/EL5/ClouderaHiveODBC-2.5.24.1017-1.el5.x86_64.rpm)
* [Hive ODBC Connection 2.5.4 - Documentation](https://docs.cloudera.com/documentation/other/connectors/hive-odbc/2-5-24)
Anaconda recommends downloading the respective ODBC drivers to either your managed persistence directory, or to an NFS directory mounted in the session.
### Connecting
To connect to a Hive cluster you need the address and port to a running Hive
Server 2, normally port 10000.
To use PyHive, open a Python notebook based on the `[anaconda50_hadoop] Python 3`
environment and run:
```
from pyhive import hive
conn = hive.connect('', port=10000)
cursor = conn.cursor()
cursor.execute('SHOW DATABASES')
cursor.fetchall()
```
### Python
Anaconda recommends the Thrift method to connect to Hive from Python. With
Thrift you can use all the functionality of Hive, including security features
such as SSL connectivity and Kerberos authentication. Thrift does not require
special drivers, which improves code portability.
Instead of using an ODBC driver for connecting to the SQL engines, a Thrift
client uses its own protocol based on a service definition to communicate with a
Thrift server. This definition can be used to generate libraries in any
language, including Python.
Hive using PyHive:
```
from pyhive import hive
conn = hive.connect('', port=10000, auth='KERBEROS', kerberos_service_name='hive')
cursor.execute('SHOW TABLES')
cursor.fetchall()
# This prints: [('iris',), ('t1',)]
cursor.execute('SELECT * FROM iris')
cursor.fetchall()
# This prints the output of that table
```
Hive using ODBC with Kerberos:
```
cnxnstr = 'Driver={/opt/cloudera/hiveodbc/lib/64/libclouderahiveodbc64.so};
HIVESERVERTYPE=2;
HOST=;
PORT=;
UID=1002;
PWD=password;
Schema=;
AuthMECH=4;
HTTPPath=http://;
AllowSelfSignedServerCert=1;
CAIssuedCertNamesMismatch=1'
```
The output will be different, depending on the tables available on the cluster.
## Using Impala
Apache Impala is an open source, native analytic SQL query engine for Apache
Hadoop. It uses massively parallel processing (MPP) for high performance, and
works with commonly used big data formats such as Apache Parquet.
Impala is very flexible in its connection methods and there are multiple ways to
connect to it, such as ODBC and Thrift.
### Dependencies
* `impyla`
* `implyr`
### Supported versions
* Python 2 or 3
* Impala 3.4.0
### Connecting
To connect to an Impala cluster you need the address and port to a
running Impala Daemon, normally port 21050.
To use Impyla, open a Python Notebook based on the `Python 2`
environment and run:
```
from impala.dbapi import connect
conn = connect('', port=21050)
cursor = conn.cursor()
cursor.execute('SHOW DATABASES')
cursor.fetchall()
```
### Python
Anaconda recommends the Thrift method to connect to Impala from Python. With
Thrift you can use all the functionality of Impala, including security features
such as SSL connectivity and Kerberos authentication. Thrift does not require
special drivers, which improves code portability.
Instead of using an ODBC driver for connecting to the SQL engines, a Thrift
client uses its own protocol based on a service definition to communicate with
a Thrift server. This definition can be used to generate libraries in any
language, including Python.
Impala using Impyla:
```
from impala.dbapi import connect
conn = connect(host='', port=21050, auth_mechanism='GSSAPI', kerberos_service_name='impala')
cursor = conn.cursor()
cursor.execute('SHOW TABLES')
results = cursor.fetchall()
results
# This prints: [('iris',),]
cursor.execute('SELECT * FROM iris')
cursor.fetchall()
# This prints the output of that table
```
The output will be different, depending on the tables available on the cluster.