> ## Documentation Index
> Fetch the complete documentation index at: https://anaconda.com/docs/llms.txt
> Use this file to discover all available pages before exploring further.
# Developing a project
To enable Data Science & AI Workbench to manage the dependencies for your project—so
you can run it and deploy it—you need to configure the following settings for
each project you create or upload:
* [Include all the packages used by the project](#adding-packages-to-a-project)(for example, conda, pip, system).
* [Create a custom conda environment](#custom-project-environment).
* [Specify the deployment command required to run the project](#adding-deployment-commands-to-a-project).
* [Specify environment variables to use in editor sessions and deployments](#environment-variables).
All dependencies are tracked in a project’s `anaconda-project.yml` file.
While there are various ways to modify this file—using the user interface or
a command-line interface—any changes to a project’s configuration *will
persist for future project sessions and deployments*, regardless of the method
you use.
This is different than using `conda install` to add a package using the
conda environment during a session, as that method impacts the project
temporarily, *during the current session only*.
**Jupyter Notebook** supports `anaconda-project` commands only.
You’ll need to run these commands in a terminal.
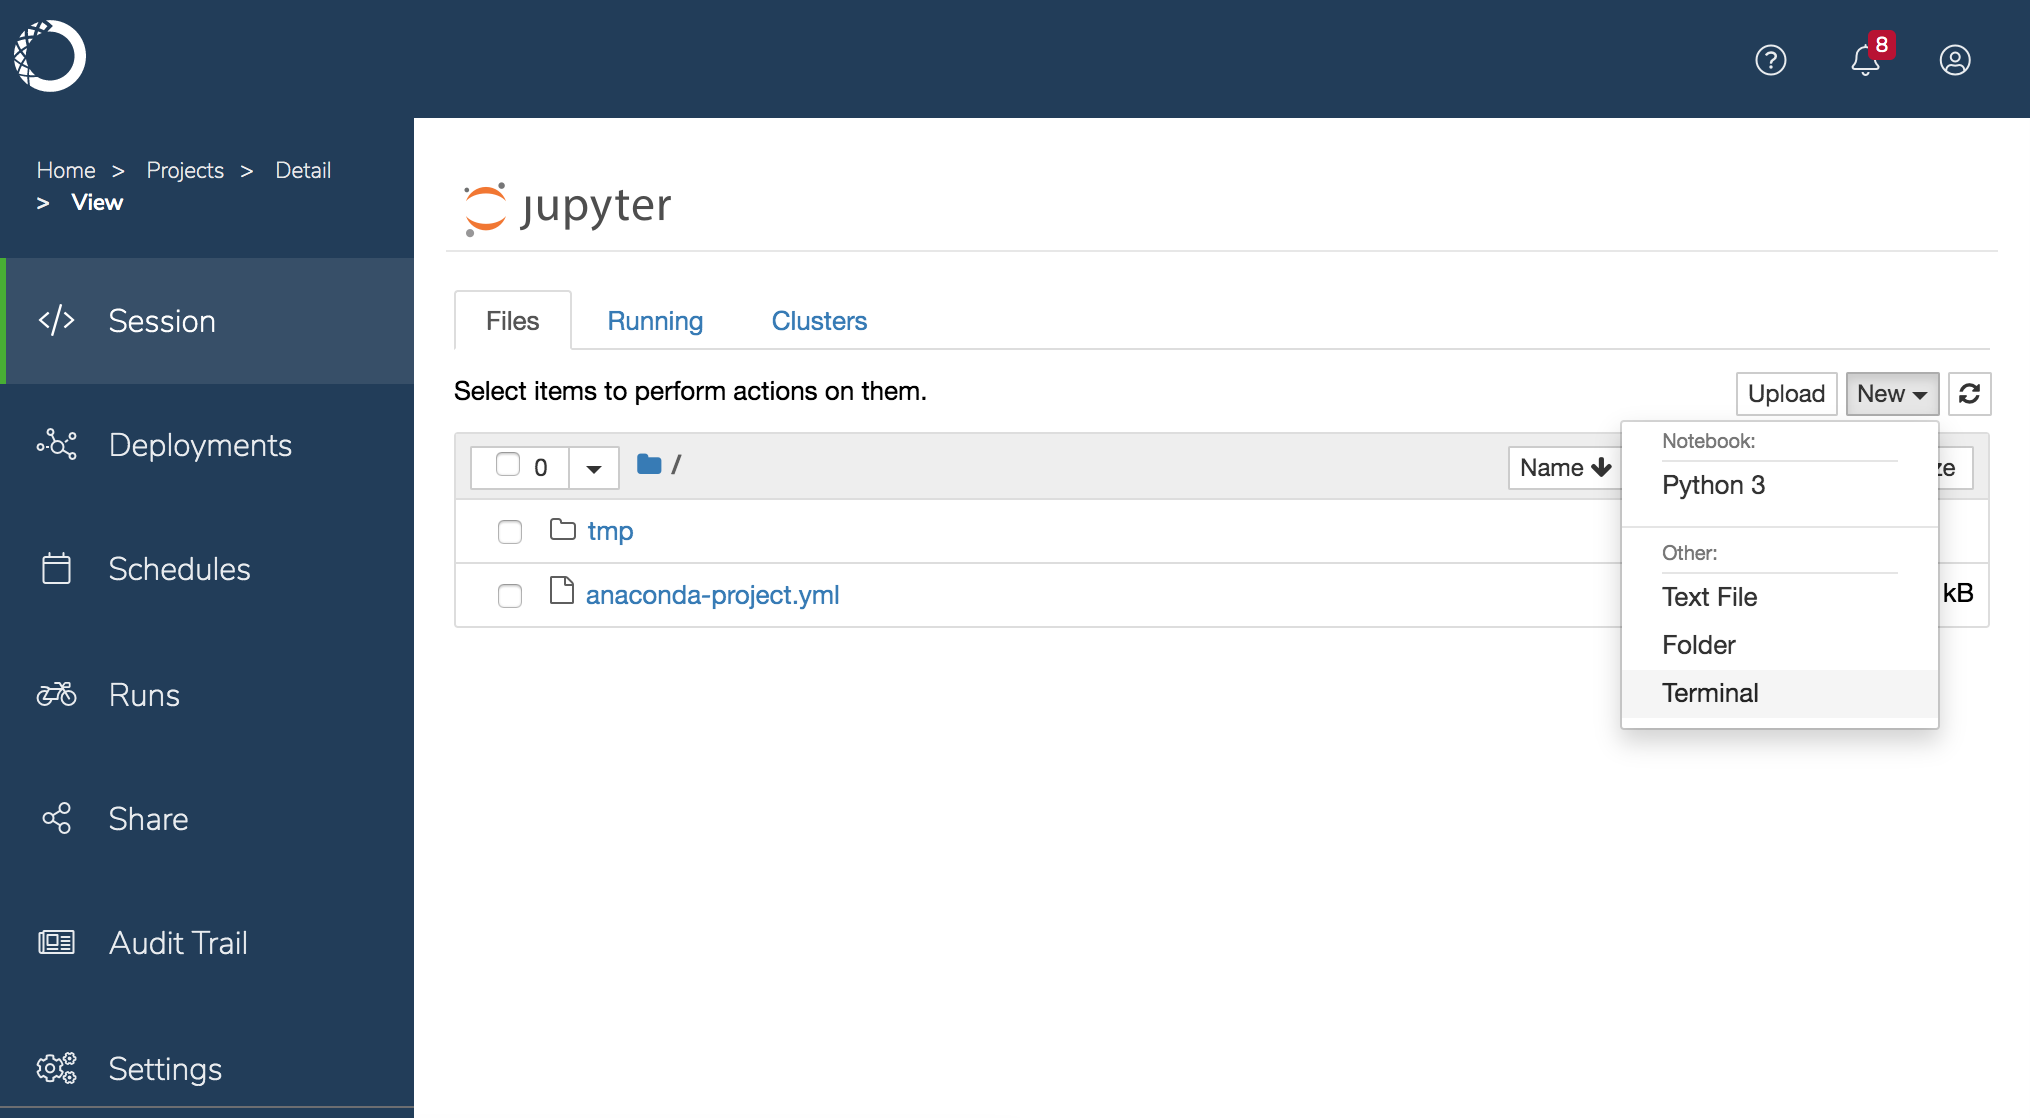
To open a terminal window within a Jupyter Notebook editor session, click **New**, then select **Terminal** in the dropdown:
 ## Adding packages to a project
Workbench offers several ways to add packages to a project, so you can choose the method you prefer:
* In a JupyterLab editing session, click the **Project** tab on the far left and click the Edit pencil icon in the **PACKAGES** field. Add your packages and click **Save**.
—or—
* In a terminal run `anaconda-project add-packages` followed by the package names and optionally the versions.
EXAMPLE: `anaconda-project add-packages hvplot pandas=0.25`
The command may take a moment to run as it collects the dependencies and downloads the packages. The packages will be visible in the project’s `anaconda-project.yml` file. If this file is already open, close it and reopen it to see your changes.
To install packages *from a specific channel*:
EXAMPLE: `anaconda-project add-packages -c conda-forge tranquilizer`
`anaconda-project` commands must be run from the `lab_launch` environment. This is the default environment when using the Jupyter Notebook terminal. For JupyterLab, it will be the first terminal on left. If your terminal prompt is not `(lab_launch)`, you can activate it with the command `conda activate lab_launch`.
The default `channel_alias` for conda in Workbench is configured to point to *the internal package repository*, which means that short channel names will refer to channels in the internal package repository.
**To use packages from an external or online package repository**, you will need to specify the full channel URL such as `anaconda-project add-packages bokeh -c https://conda.anaconda.org/pyviz` in a command or in `anaconda-project.yml`. The `channel_alias` can be [customized by an administrator](../../admin/advanced/settings), which affects all sessions and deployments.
**If you are working in an air-gapped environment** (without internet access), your Administrator will need to [mirror the packages into your organization’s internal package repository](../../admin/chan-pkg/mirror) for you to be able to access them.
### To install pip packages:
List the packages in the `pip:` section of `anaconda-project.yml`. For example:
```
packages:
- six>=1.4.0
- gunicorn==19.1.0
- pip:
- python-mimeparse
- falcon==1.0.0
```
After editing the `anaconda-project.yml` file to include the pip packages you want to install, run the `anaconda-project prepare` command to install the packages.
### To install system packages:
In a terminal, run `sudo yum install` followed by the package name.
EXAMPLE: `sudo yum install sqlite`
Any system packages you install from the command line are available *during the current session only*. If you want them to persist, add them to the project’s `anaconda-project.yml` file. **The system package must be available in a Workbench channel** for it to be installed correctly via the `anaconda-project.yml` file.
## Custom project environment
Each project only supports the use of a single environment.
For the [standard template projects](../templates/main) the conda environments have been pre-built as a bootstrap to reduce initialization time when additional packages are added as described above. However, you might want to create a custom environment specification.
You can use the terminal and command line to specify the environment for a project. For example, to create an environment called `new_env` with notebook, pandas, and bokeh:
```
anaconda-project add-env-spec --name new_env
anaconda-project add-packages --env-spec new_env notebook pandas=0.25 panel=0.6
```
Remove the original environment that corresponds to the template you chose when you initially created the project. For example, to remove the Python 3.6 environment:
```
anaconda-project remove-env-spec anaconda50_py36
```
For your changes to take effect, you must [commit all changes to the project](./commit-changes), then [stop and re-start the project](./edit-session).
You must include the `notebook` package for the environment to edit and run notebooks in either the Jupyter Notebook or JupyterLab editors.
Using the `anaconda-project` command ensures that the environment will prepare correctly when the session is restarted. For more information about `anaconda-project` commands type `anaconda-project --help`.
**To verify whether an environment has been initialized for a Notebook session:**
1. Within the Notebook session, open a terminal window:
2. Run the following commands to list the contents of the parent directory:
## Adding packages to a project
Workbench offers several ways to add packages to a project, so you can choose the method you prefer:
* In a JupyterLab editing session, click the **Project** tab on the far left and click the Edit pencil icon in the **PACKAGES** field. Add your packages and click **Save**.
—or—
* In a terminal run `anaconda-project add-packages` followed by the package names and optionally the versions.
EXAMPLE: `anaconda-project add-packages hvplot pandas=0.25`
The command may take a moment to run as it collects the dependencies and downloads the packages. The packages will be visible in the project’s `anaconda-project.yml` file. If this file is already open, close it and reopen it to see your changes.
To install packages *from a specific channel*:
EXAMPLE: `anaconda-project add-packages -c conda-forge tranquilizer`
`anaconda-project` commands must be run from the `lab_launch` environment. This is the default environment when using the Jupyter Notebook terminal. For JupyterLab, it will be the first terminal on left. If your terminal prompt is not `(lab_launch)`, you can activate it with the command `conda activate lab_launch`.
The default `channel_alias` for conda in Workbench is configured to point to *the internal package repository*, which means that short channel names will refer to channels in the internal package repository.
**To use packages from an external or online package repository**, you will need to specify the full channel URL such as `anaconda-project add-packages bokeh -c https://conda.anaconda.org/pyviz` in a command or in `anaconda-project.yml`. The `channel_alias` can be [customized by an administrator](../../admin/advanced/settings), which affects all sessions and deployments.
**If you are working in an air-gapped environment** (without internet access), your Administrator will need to [mirror the packages into your organization’s internal package repository](../../admin/chan-pkg/mirror) for you to be able to access them.
### To install pip packages:
List the packages in the `pip:` section of `anaconda-project.yml`. For example:
```
packages:
- six>=1.4.0
- gunicorn==19.1.0
- pip:
- python-mimeparse
- falcon==1.0.0
```
After editing the `anaconda-project.yml` file to include the pip packages you want to install, run the `anaconda-project prepare` command to install the packages.
### To install system packages:
In a terminal, run `sudo yum install` followed by the package name.
EXAMPLE: `sudo yum install sqlite`
Any system packages you install from the command line are available *during the current session only*. If you want them to persist, add them to the project’s `anaconda-project.yml` file. **The system package must be available in a Workbench channel** for it to be installed correctly via the `anaconda-project.yml` file.
## Custom project environment
Each project only supports the use of a single environment.
For the [standard template projects](../templates/main) the conda environments have been pre-built as a bootstrap to reduce initialization time when additional packages are added as described above. However, you might want to create a custom environment specification.
You can use the terminal and command line to specify the environment for a project. For example, to create an environment called `new_env` with notebook, pandas, and bokeh:
```
anaconda-project add-env-spec --name new_env
anaconda-project add-packages --env-spec new_env notebook pandas=0.25 panel=0.6
```
Remove the original environment that corresponds to the template you chose when you initially created the project. For example, to remove the Python 3.6 environment:
```
anaconda-project remove-env-spec anaconda50_py36
```
For your changes to take effect, you must [commit all changes to the project](./commit-changes), then [stop and re-start the project](./edit-session).
You must include the `notebook` package for the environment to edit and run notebooks in either the Jupyter Notebook or JupyterLab editors.
Using the `anaconda-project` command ensures that the environment will prepare correctly when the session is restarted. For more information about `anaconda-project` commands type `anaconda-project --help`.
**To verify whether an environment has been initialized for a Notebook session:**
1. Within the Notebook session, open a terminal window:
2. Run the following commands to list the contents of the parent directory:
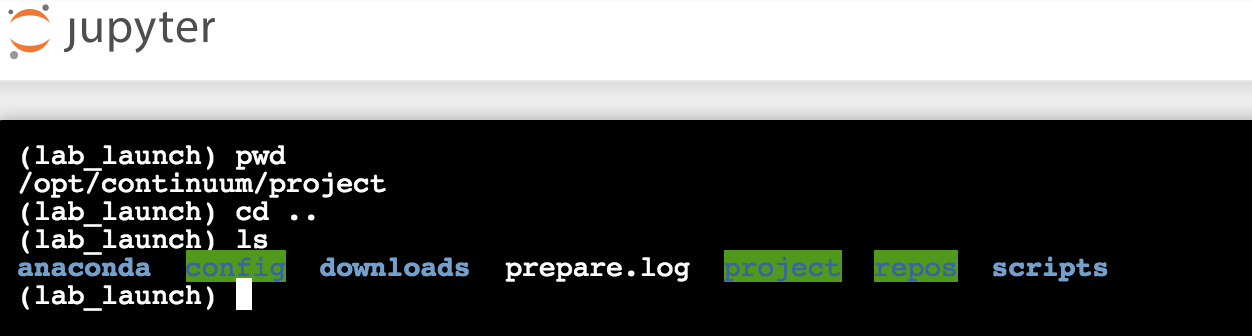 If the environment is being initialized, you’ll see a file named `preparing`. When the environment has finished initializing, it will be replaced by a file named `prepare.log`.
If you need to troubleshoot session startup, you can use a terminal to view the session startup logs. When session startup begins, the output of the `anaconda-project prepare` command is written to `/opt/continuum/preparing`, and when the command completes, the log is moved to `/opt/continuum/prepare.log`.
## Adding deployment commands to a project
You can use Workbench to deploy projects containing notebooks, Bokeh applications, and generic scripts or web frameworks. Before you can [deploy a project](../deployments/main), it needs to have an appropriate deployment command associated with it.
Each of the following methods can be used to add a deployment command in the project’s config file `anaconda-project.yml`:
* In a JupyterLab editing session, click the **Project** tab on the far left and click the plus sign to the right of the **COMMANDS** field. Add information about the command and click **Save**.
This method is available within the JupyterLab editor only, so you’ll need to set that as your default editor—in the project’s **Settings**—and restart the project session to see this option in the user interface. The two methods described below do not show notifications in the user interface.
—or—
* Use the command line interface:
EXAMPLE: `anaconda-project add-command --type notebook default data-science-notebook.ipynb`
**For a Notebook:**
```
commands:
default:
notebook: your-notebook.ipynb
```
**For a project with a Bokeh (version 0.12) app defined in a** `main.py` **file**:
```
commands:
default:
bokeh_app: .
supports_http_options: True
```
**For a Panel dashboard (panel must be installed in your project)**:
```
commands:
default:
unix: panel serve script-or-notebook-file
supports_http_options: True
```
**For a generic script or web framework, including Python or R:**
```
commands:
default:
unix: bash run.sh
supports_http_options: true
```
```
commands:
default:
unix: python your-script.py
supports_http_options: true
```
```
commands:
default:
unix: Rscript your-script.R
supports_http_options: true
```
For deployment commands that can handle `anaconda-project--` arguments (like Panel) `supports_http_options: True` must be added to the command.
To validate your `anaconda-project.yml` and verify your project will deploy successfully:
1. Within the Notebook session, open a terminal window:
2. Run the following command, replacing `anaconda44_py35` with the name of your environment, if it’s different:
```
anaconda-project prepare --env-spec anaconda44_py35
```
If the environment includes everything needed to deploy the project, you’ll see a message like the following:
If the environment is being initialized, you’ll see a file named `preparing`. When the environment has finished initializing, it will be replaced by a file named `prepare.log`.
If you need to troubleshoot session startup, you can use a terminal to view the session startup logs. When session startup begins, the output of the `anaconda-project prepare` command is written to `/opt/continuum/preparing`, and when the command completes, the log is moved to `/opt/continuum/prepare.log`.
## Adding deployment commands to a project
You can use Workbench to deploy projects containing notebooks, Bokeh applications, and generic scripts or web frameworks. Before you can [deploy a project](../deployments/main), it needs to have an appropriate deployment command associated with it.
Each of the following methods can be used to add a deployment command in the project’s config file `anaconda-project.yml`:
* In a JupyterLab editing session, click the **Project** tab on the far left and click the plus sign to the right of the **COMMANDS** field. Add information about the command and click **Save**.
This method is available within the JupyterLab editor only, so you’ll need to set that as your default editor—in the project’s **Settings**—and restart the project session to see this option in the user interface. The two methods described below do not show notifications in the user interface.
—or—
* Use the command line interface:
EXAMPLE: `anaconda-project add-command --type notebook default data-science-notebook.ipynb`
**For a Notebook:**
```
commands:
default:
notebook: your-notebook.ipynb
```
**For a project with a Bokeh (version 0.12) app defined in a** `main.py` **file**:
```
commands:
default:
bokeh_app: .
supports_http_options: True
```
**For a Panel dashboard (panel must be installed in your project)**:
```
commands:
default:
unix: panel serve script-or-notebook-file
supports_http_options: True
```
**For a generic script or web framework, including Python or R:**
```
commands:
default:
unix: bash run.sh
supports_http_options: true
```
```
commands:
default:
unix: python your-script.py
supports_http_options: true
```
```
commands:
default:
unix: Rscript your-script.R
supports_http_options: true
```
For deployment commands that can handle `anaconda-project--` arguments (like Panel) `supports_http_options: True` must be added to the command.
To validate your `anaconda-project.yml` and verify your project will deploy successfully:
1. Within the Notebook session, open a terminal window:
2. Run the following command, replacing `anaconda44_py35` with the name of your environment, if it’s different:
```
anaconda-project prepare --env-spec anaconda44_py35
```
If the environment includes everything needed to deploy the project, you’ll see a message like the following:
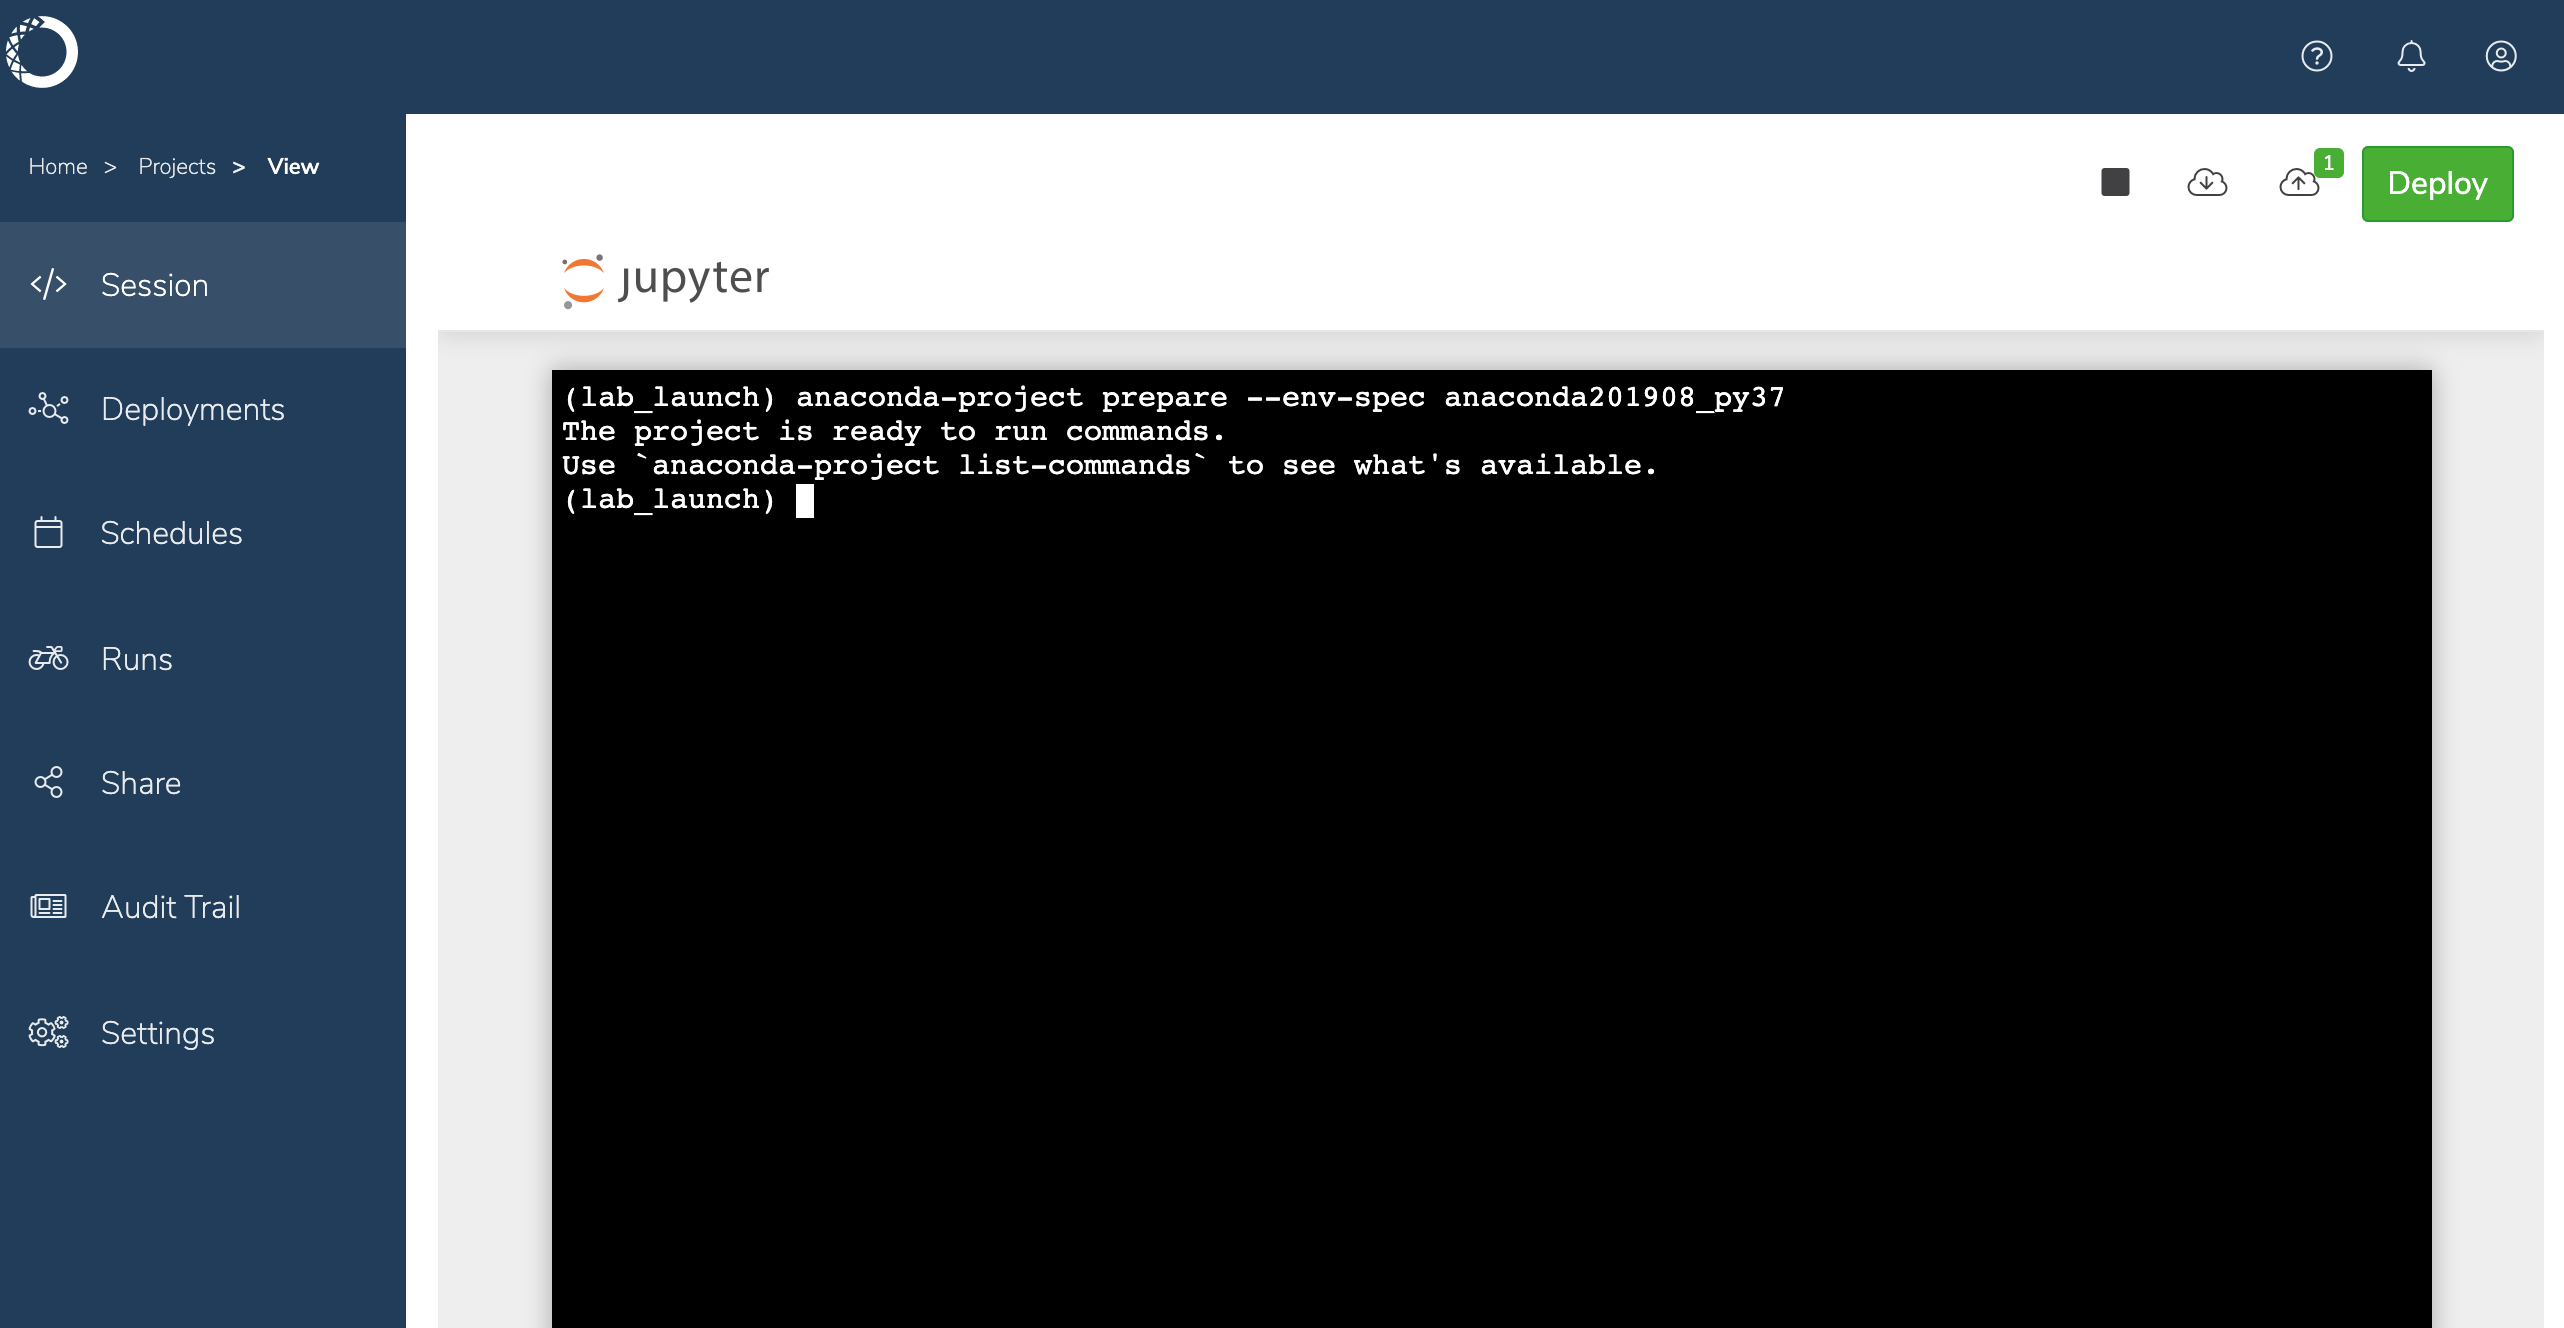 Otherwise, any errors preventing a successful deployment will be identified.
**If you want to test the deployment immediately after preparing the environment**, run the following command instead:
```
anaconda-project run
```
If there are any errors preventing a successful deployment, they will be displayed in the terminal.
## Testing project deployments
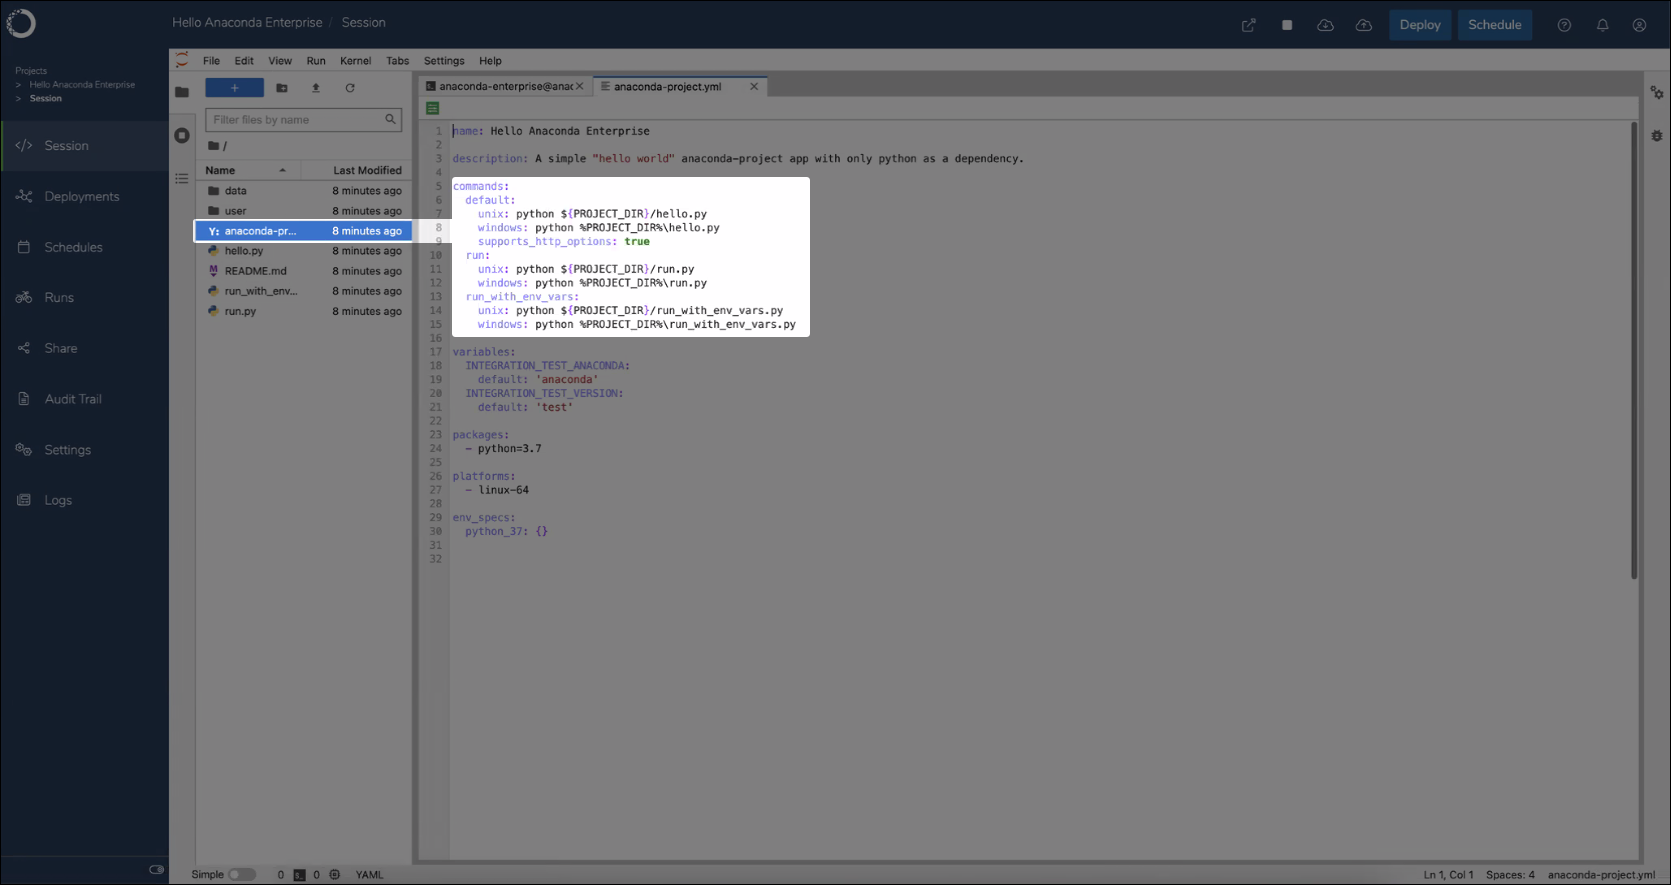
Once deployment commands have been added to your project, you can test the deployment using the `test_deployment` command. You can view the deployment commands for your project from the projects `.yml` configuration file.
Otherwise, any errors preventing a successful deployment will be identified.
**If you want to test the deployment immediately after preparing the environment**, run the following command instead:
```
anaconda-project run
```
If there are any errors preventing a successful deployment, they will be displayed in the terminal.
## Testing project deployments
Once deployment commands have been added to your project, you can test the deployment using the `test_deployment` command. You can view the deployment commands for your project from the projects `.yml` configuration file.
 To test a project deployment, complete the following steps:
1. Open a project session.
2. Open a terminal.
3. Test a deployment command you’ve added to your project by running the following command:
```
# Replace with an available deployment command
test_deployment
```
If you do not supply a deployment command to test, the first command listed under the `commands:` section of the projects `.yml` configuration file will be run.
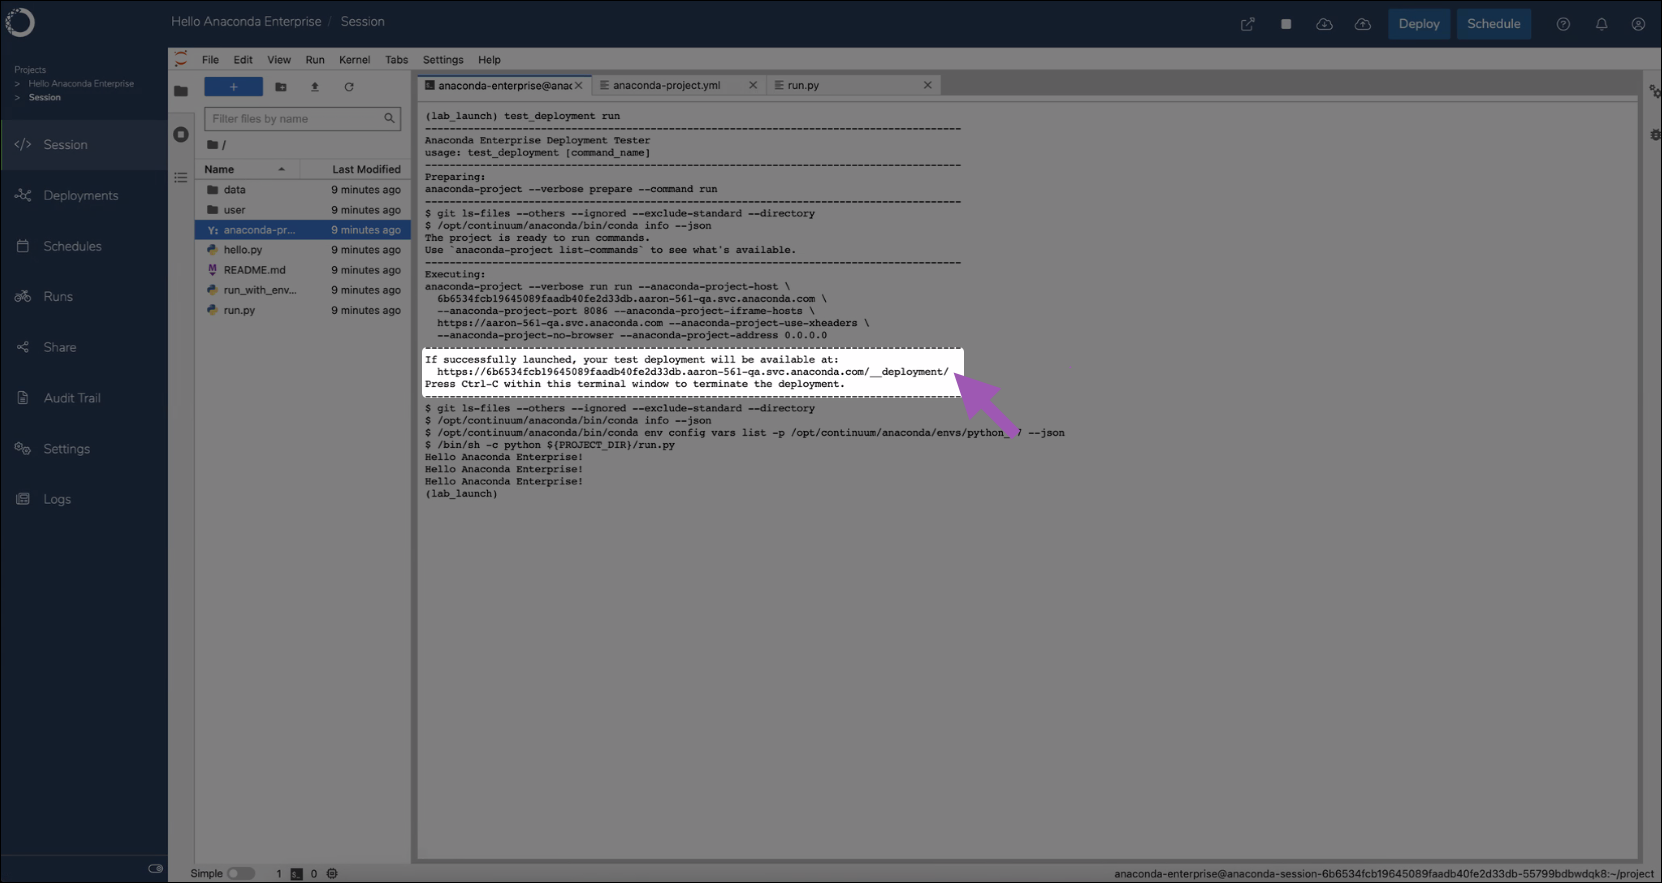
4. Navigate to the web address returned by the command to verify your project deployed successfully.
To test a project deployment, complete the following steps:
1. Open a project session.
2. Open a terminal.
3. Test a deployment command you’ve added to your project by running the following command:
```
# Replace with an available deployment command
test_deployment
```
If you do not supply a deployment command to test, the first command listed under the `commands:` section of the projects `.yml` configuration file will be run.
4. Navigate to the web address returned by the command to verify your project deployed successfully.
 ## Environment variables
You can add environment variables that will be set when you run notebooks in an editor session and at the start of a deployment command.
* In a JupyterLab editing session, click the **Project** tab on the far left and click the `+` button next to **VARIABLES**. Provide the name, description and default value of all variables you require.
—or—
* You can use the terminal and command line. For example, to add an environment variable that sets `MY_VAR` to `hello`.:
```
anaconda-project add-variable --default hello MY_VAR
```
## Environment variables
You can add environment variables that will be set when you run notebooks in an editor session and at the start of a deployment command.
* In a JupyterLab editing session, click the **Project** tab on the far left and click the `+` button next to **VARIABLES**. Provide the name, description and default value of all variables you require.
—or—
* You can use the terminal and command line. For example, to add an environment variable that sets `MY_VAR` to `hello`.:
```
anaconda-project add-variable --default hello MY_VAR
```