> ## Documentation Index
> Fetch the complete documentation index at: https://anaconda.com/docs/llms.txt
> Use this file to discover all available pages before exploring further.
# Roles and groups
Assigning access and permissions for a user is a time consuming process. For an enterprise of hundreds or thousands of users, this would be too time consuming for an IT administrator to realistically perform.
Don’t worry! Data Science & AI Workbench lets you utilize roles and groups within Keycloak to take this impossible task and break it down into a manageable workflow. But before you begin creating groups and assigning roles to them, you should understand exactly what each provides you with as an IT administrator.
## Roles
Roles determine the level of access a user has within Anaconda. Some custom roles have been embedded into Keycloak to provide users with varying levels of access to the software’s available features.
* **ae-admin**: provides the user with full access to the platform and the administrative console
* **ae-creator**: allows the user to create new projects
* **ae-deployer**: allows the user to create new deployments from projects
* **ae-uploader**: allows the user to upload packages
If the default Anaconda roles do not suit your use case, you can [create a custom role](#creating-custom-roles) for your users.
## Groups
The most important idea to understand about groups is that any permissions that can be granted to an individual by assigning them a role can also be granted to multiple people by assigning the role to a group.
To get you started, Anaconda provides a set of default groups with different roles mapped for each. You can use these defaults as is, or as an example for creating your own groups.
The groups provided by anaconda are structured as follows:
* **admins**
* Roles:
* ae-admin
* **developers**
* Roles:
* ae-deployer
* ae-uploader
* ae-creator
* **everyone**
* Roles:
* none
* **managers**
* Roles:
* none
* **product managers**
* Roles:
* ae-deployer
* ae-uploader
* ae-creator
## Managing roles and groups
For Workbench customers, Anaconda has several possible user personas. IT administrators, Business Analysts, Data Scientists, Dev Ops Engineers, and Data Engineers all benefit from using Workbench, but each persona also has different needs based on their work.
You can give every one of your users exactly what they need by using roles and groups!
As stated before, Anaconda utilizes Keycloak to manage roles and groups. This includes:
* Viewing available roles and groups
* Creating new roles
* Creating new groups
* Assigning roles to groups
* Configuring the default groups
* Configuring the default roles
**To access Keycloak:**
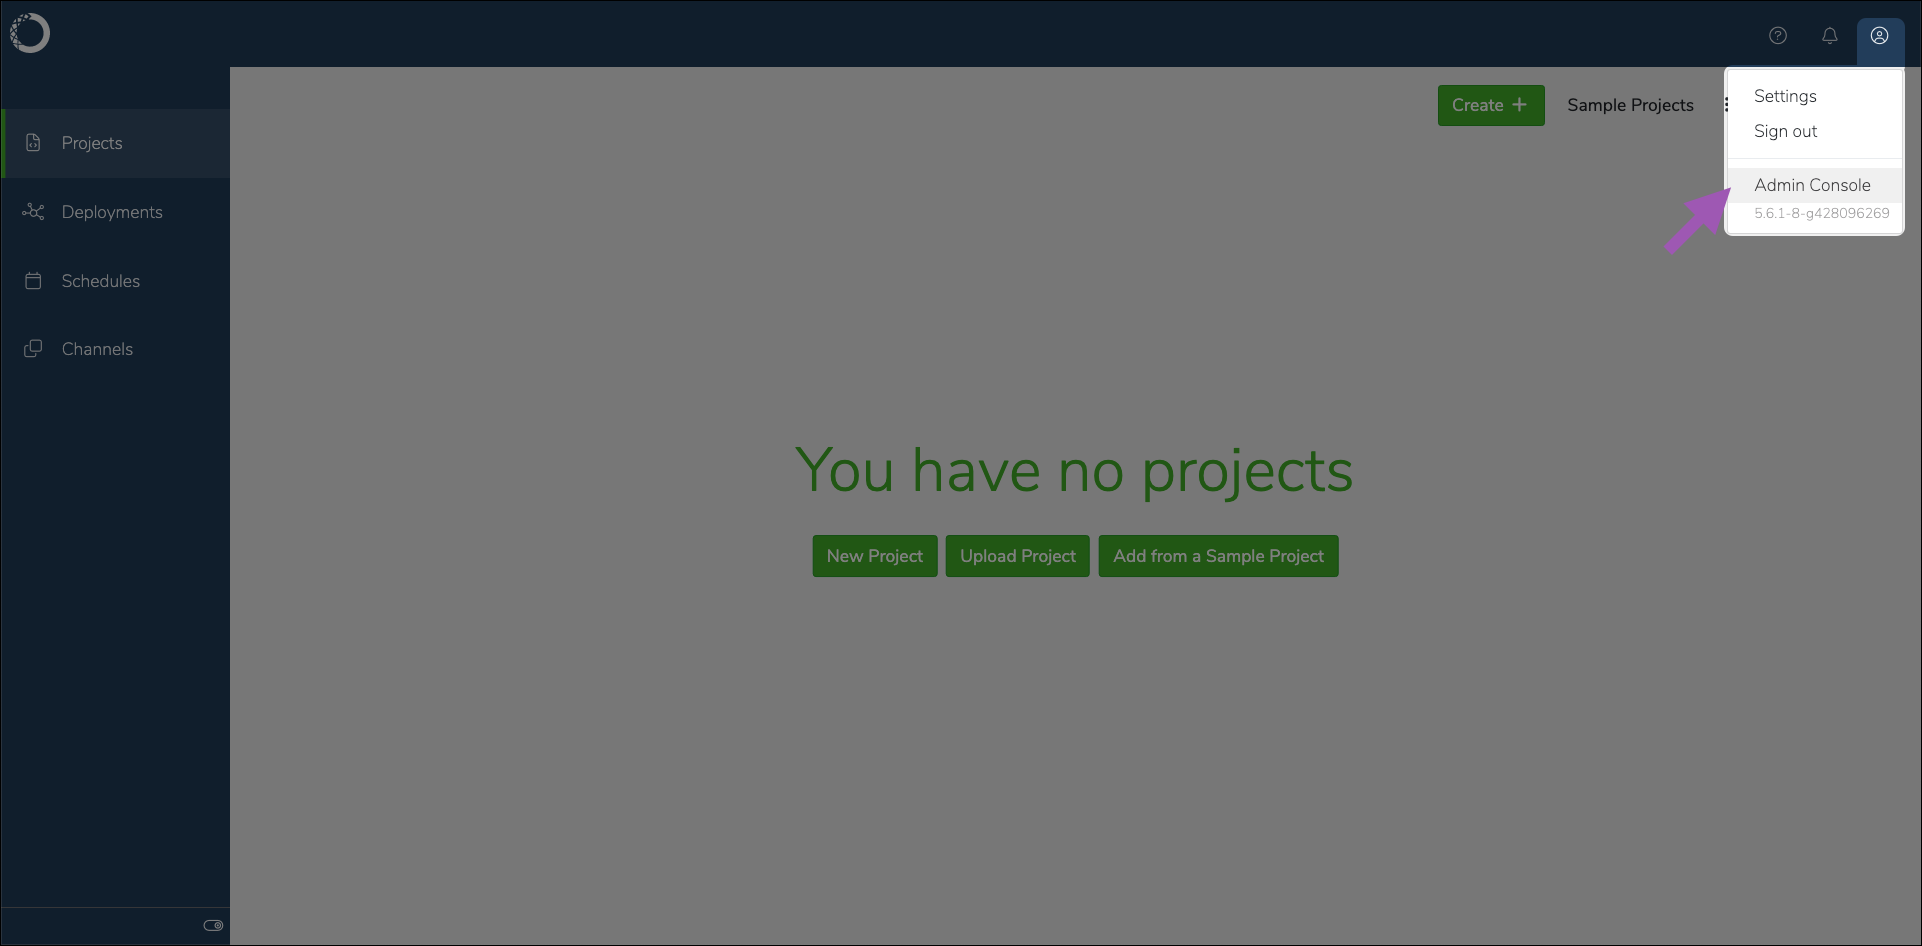
1. Log in to Workbench.
2. Navigate to the **Admin Console**.
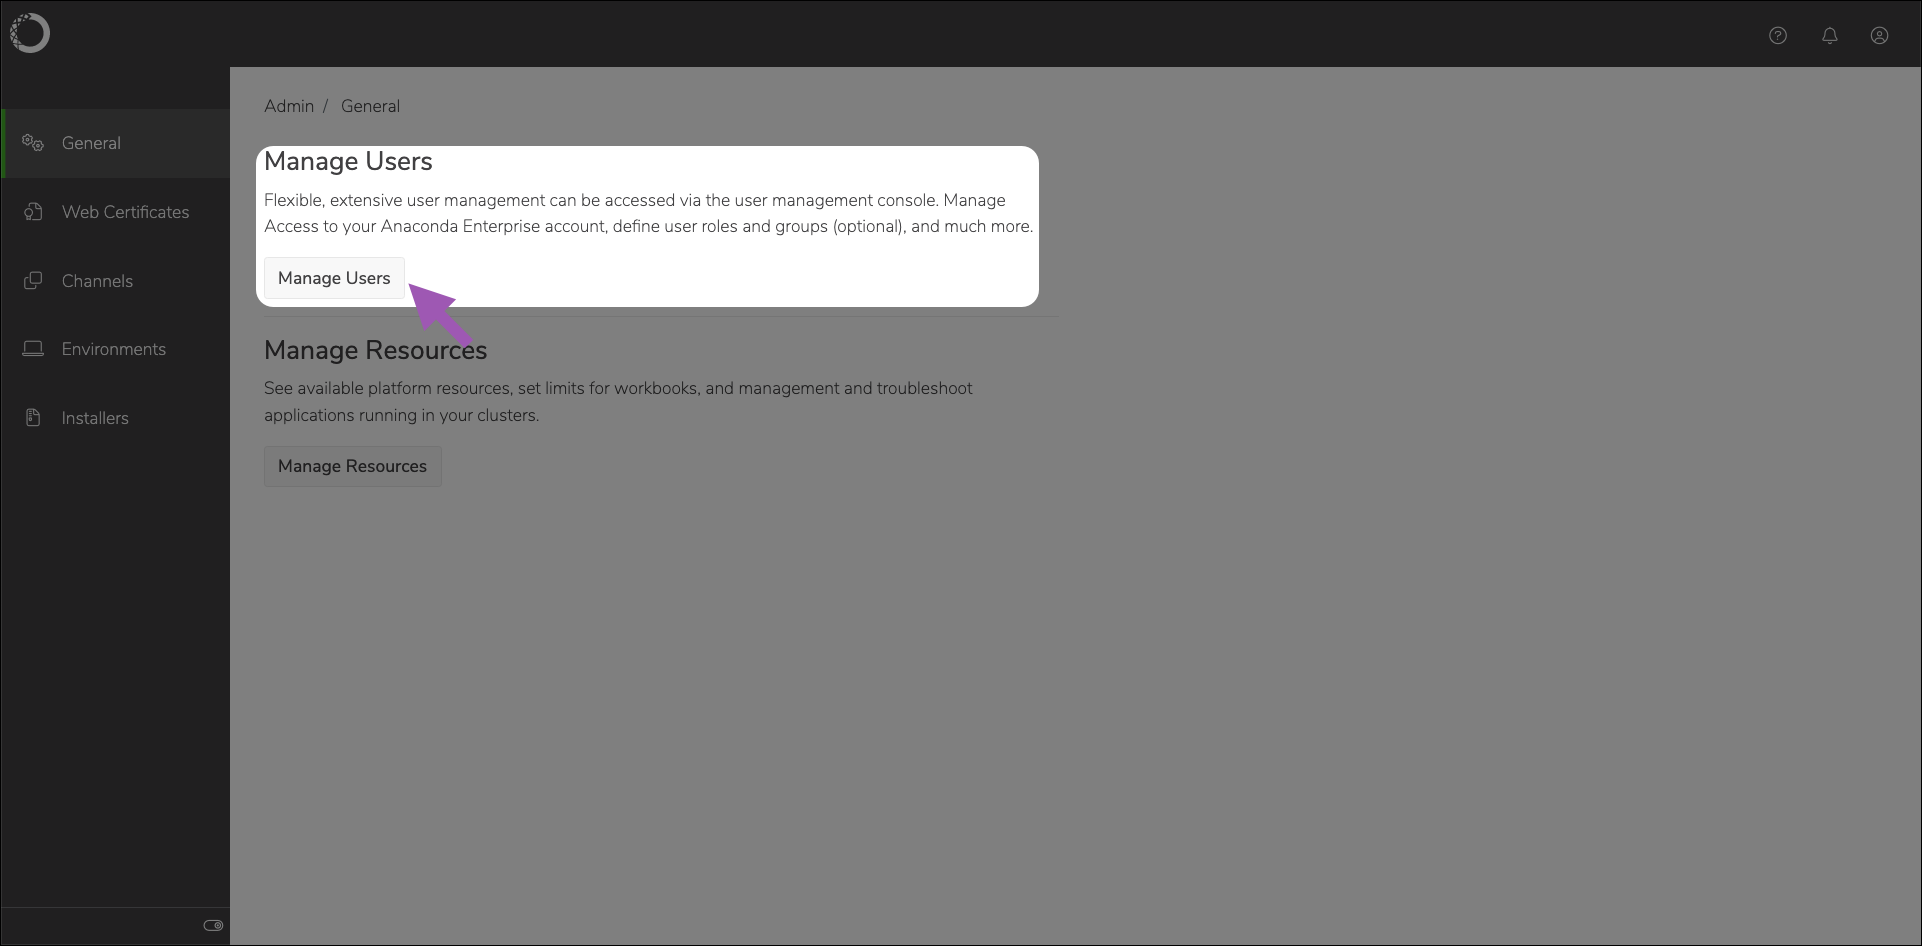
 3. Select **Manage Users** to access the Keycloak user interface (UI).
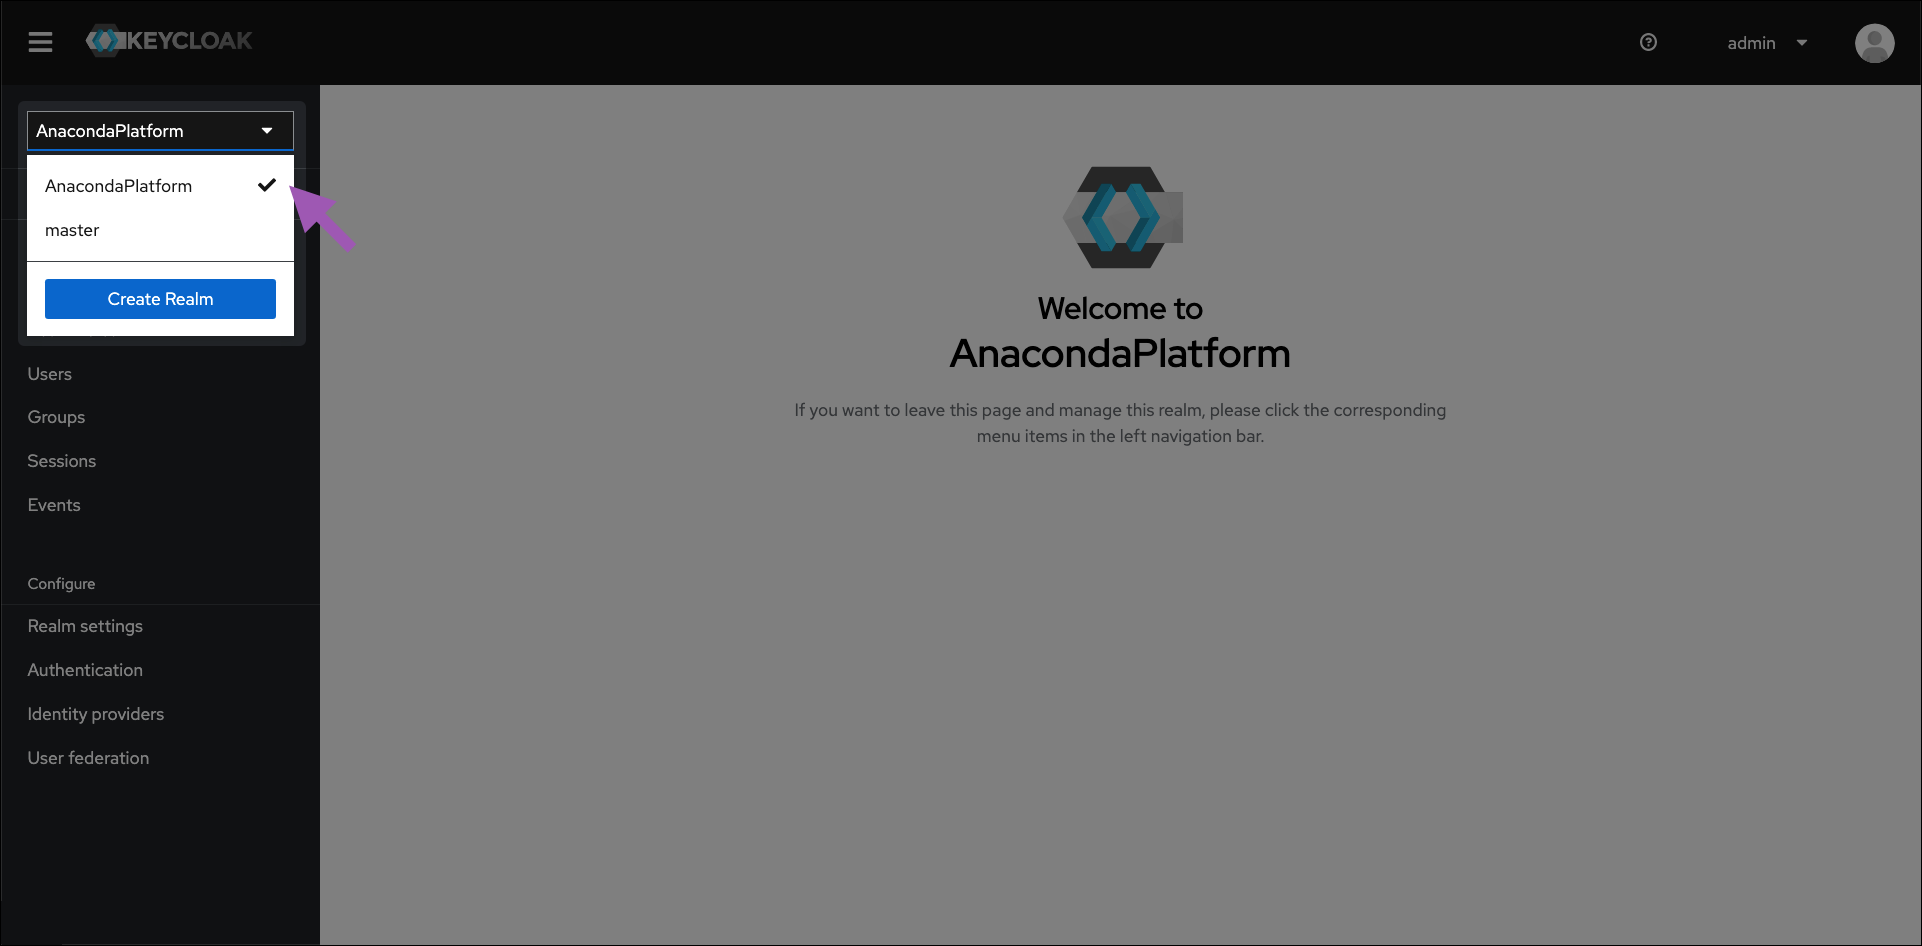
 4. Log in using your Keycloak admin account credentials.
{" "}
Verify that you are working on the **AnacondaPlatform** realm when working
with roles and groups for Workbench.
4. Log in using your Keycloak admin account credentials.
{" "}
Verify that you are working on the **AnacondaPlatform** realm when working
with roles and groups for Workbench.
 ### Viewing roles and groups
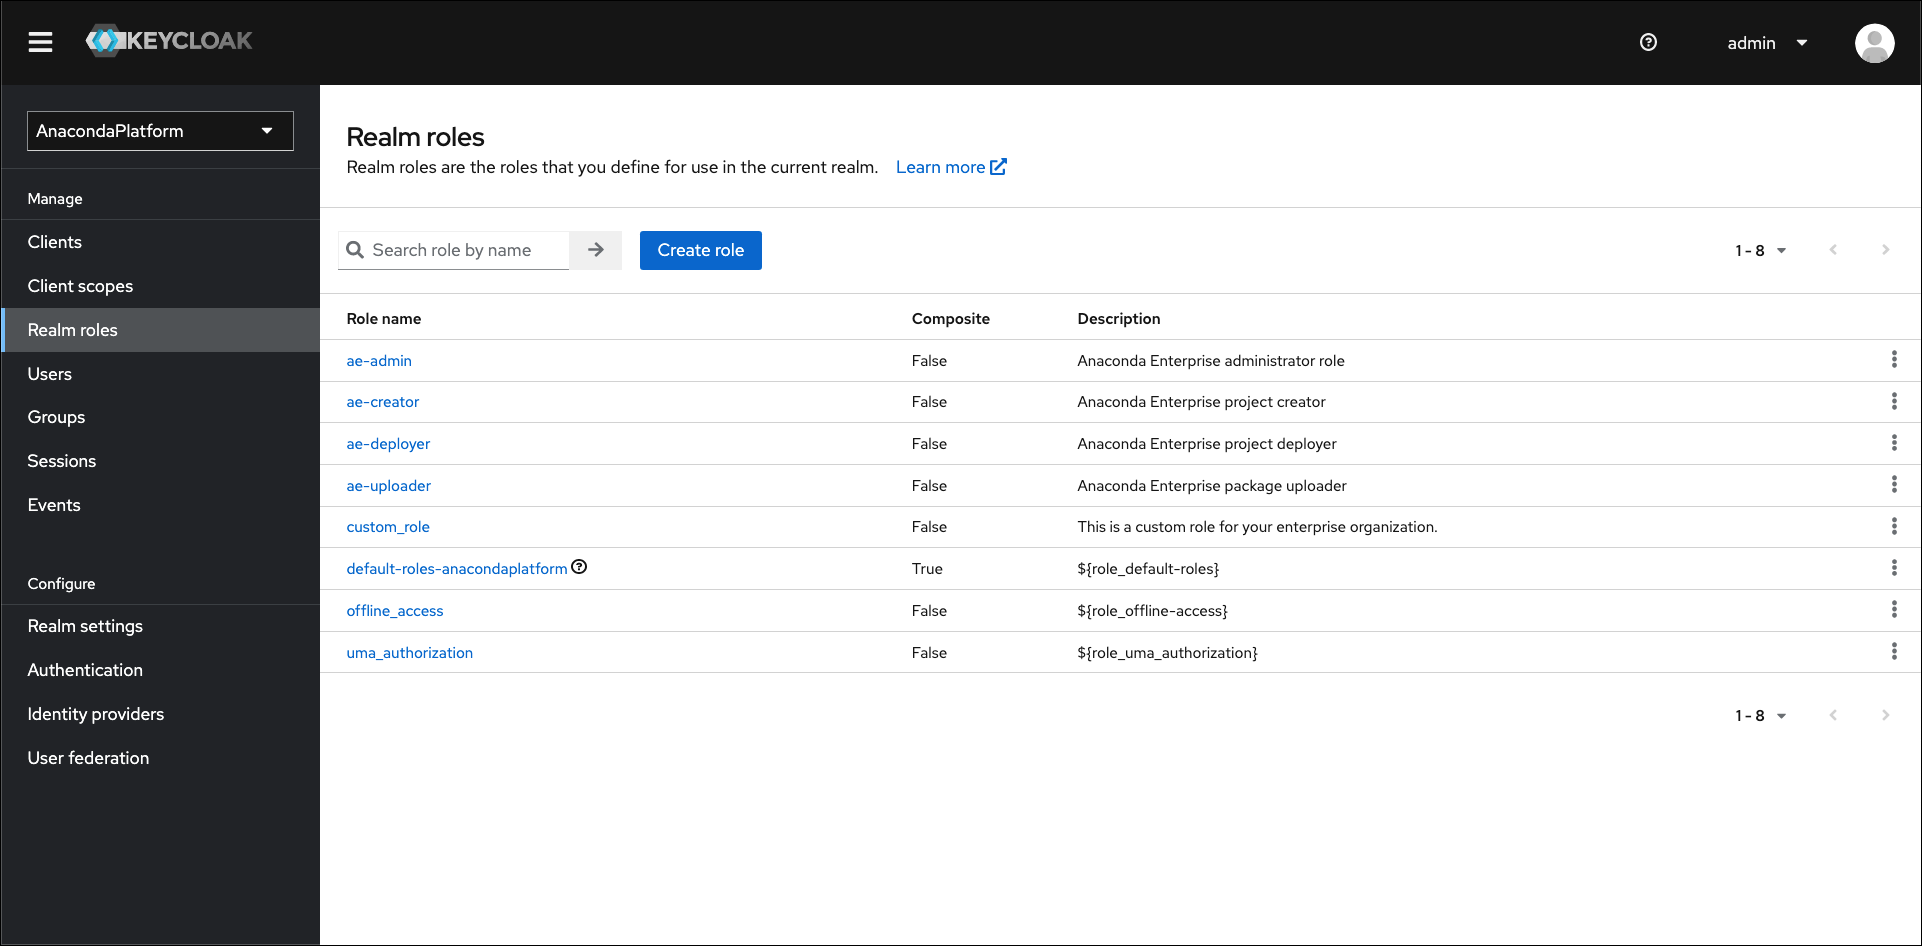
**Roles**
Use the left-hand navigation to view **Realm roles** at any time.
### Viewing roles and groups
**Roles**
Use the left-hand navigation to view **Realm roles** at any time.
 **Groups**
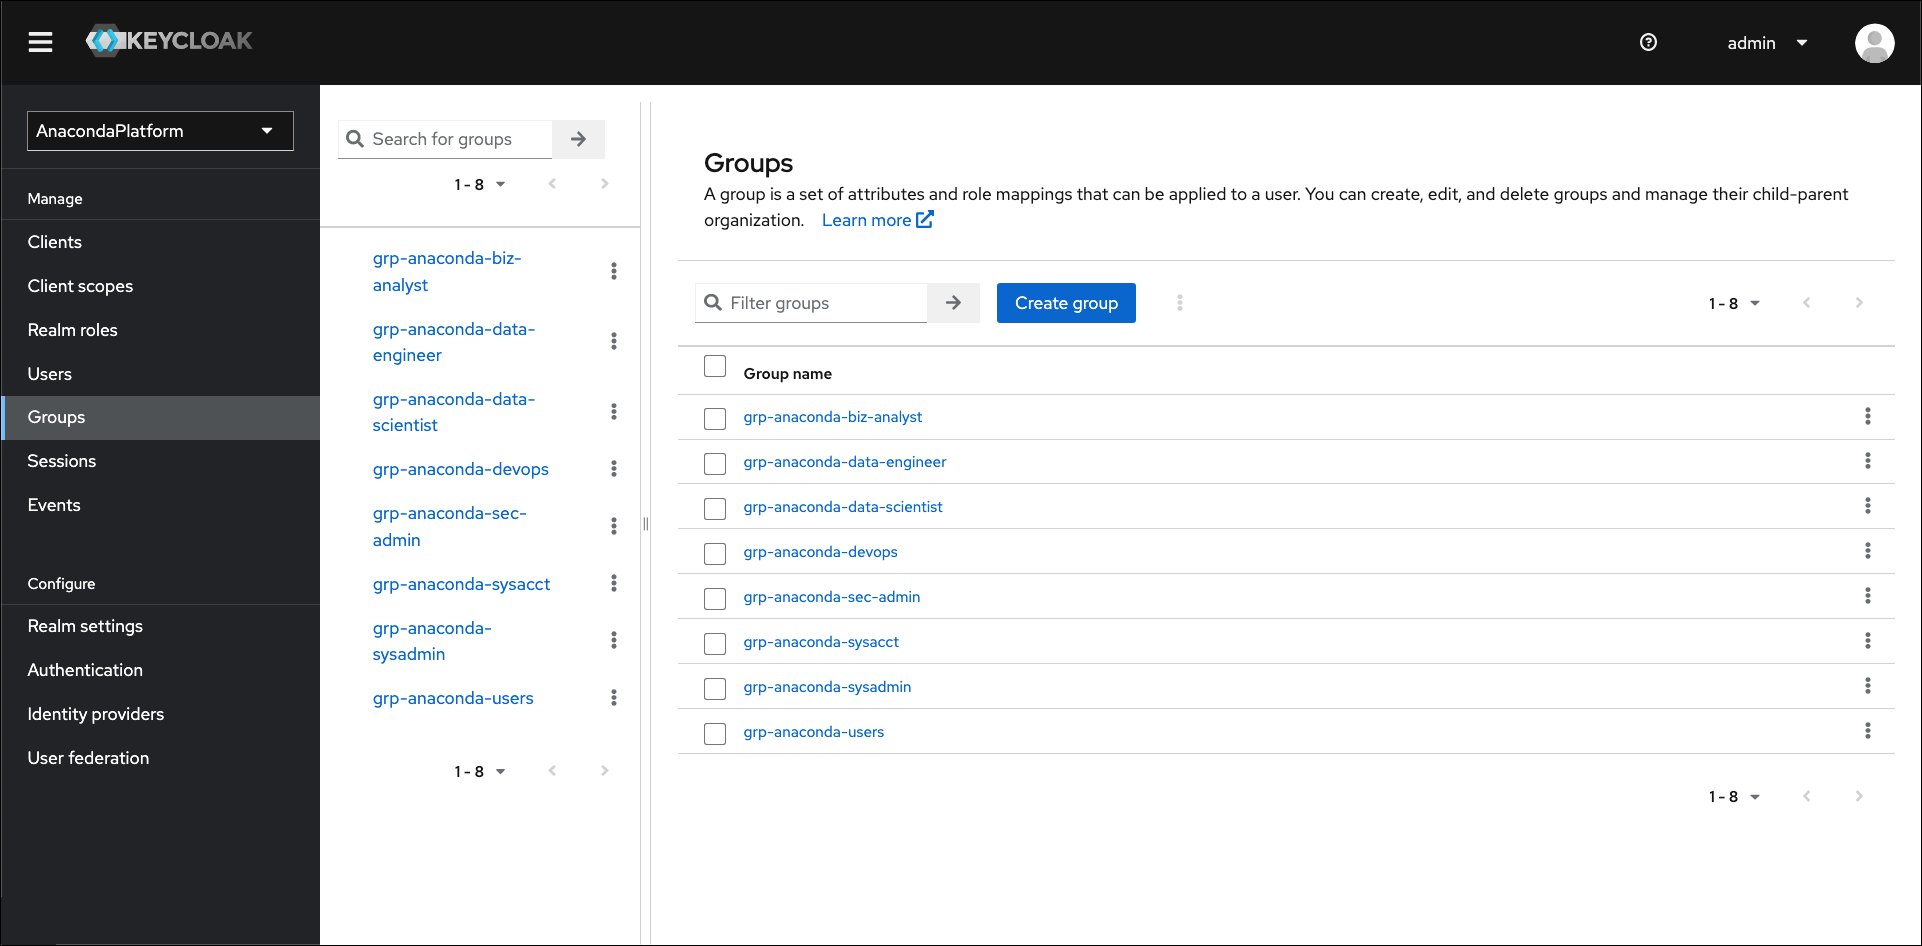
Likewise, use the left-hand navigation to view Groups at any time. If you are importing groups from an external identity server (such as [LDAP](./ldap-setup) or Active Directory), you will be able to view your imported groups here.
**Groups**
Likewise, use the left-hand navigation to view Groups at any time. If you are importing groups from an external identity server (such as [LDAP](./ldap-setup) or Active Directory), you will be able to view your imported groups here.
 ### Creating custom roles
To create a custom role for use in Anaconda:
1. From the **Realm roles** page, select **Create role**.
2. Enter a unique name and a brief description for your role.
### Creating custom roles
To create a custom role for use in Anaconda:
1. From the **Realm roles** page, select **Create role**.
2. Enter a unique name and a brief description for your role.
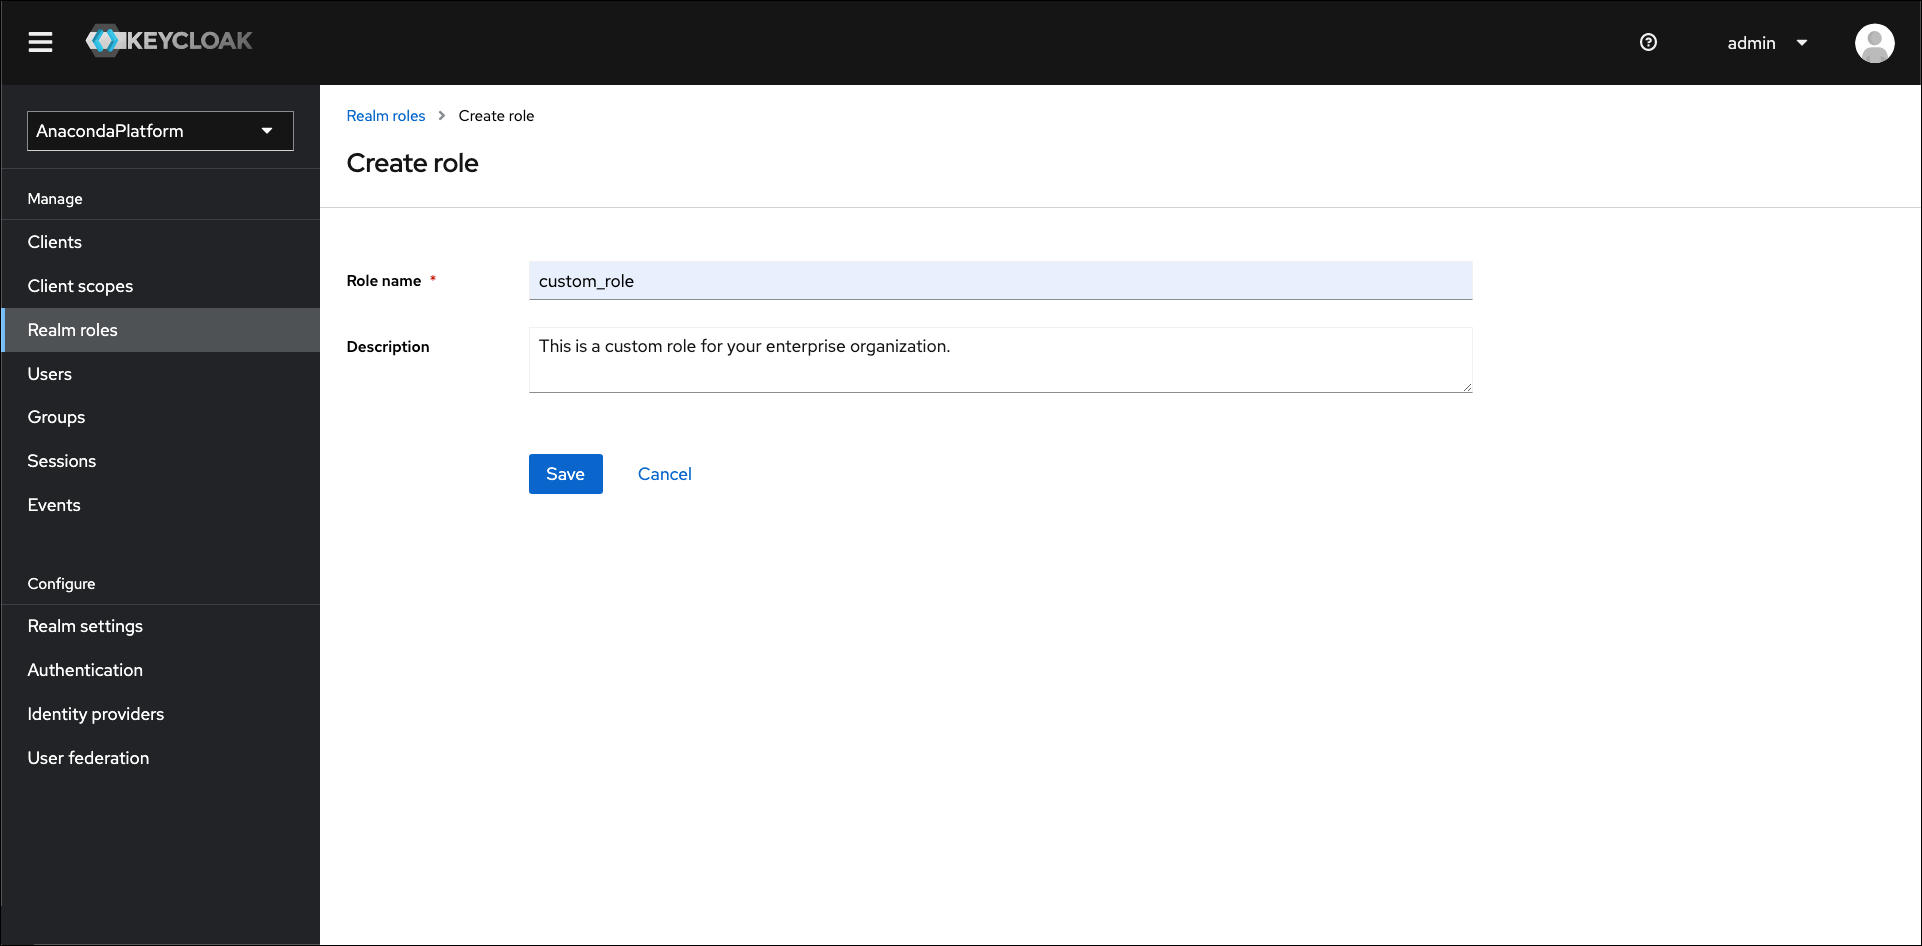 3. Click **Save**. A notification will appear to inform you that your role has been created successfully.
### Assigning permissions for custom roles
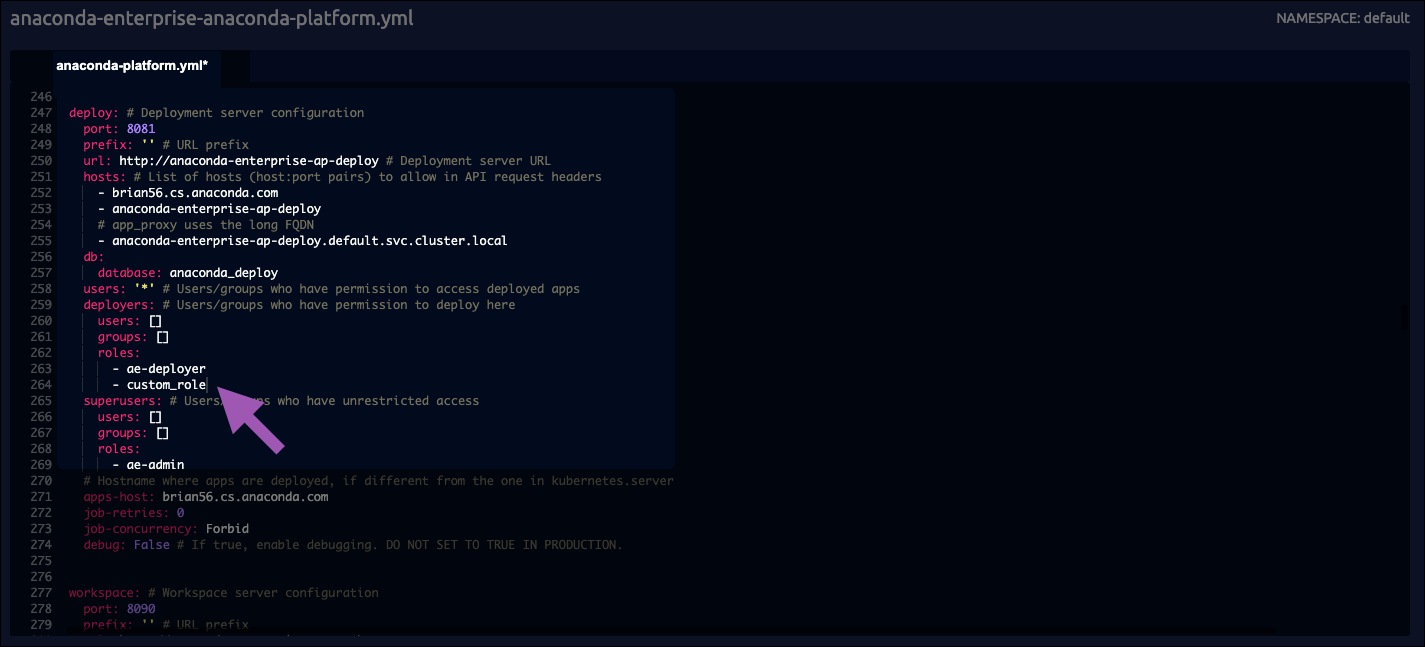
Custom roles do not grant permissions upon creation. You must define the permissions for your custom role in your `anaconda-enterprise-anaconda-platform.yml` config map file.
Assign permissions to your custom role by completing the following steps:
1. Navigate to your Kubernetes cluster admin UI, or access your cluster using `kubectl` commands at the CLI.
2. Find your `anaconda-enterprise-anaconda-platform.yml` config map file.
3. Create and save a copy of this file before you begin assigning permissions for your custom role.
The changes you’re about to make will impact how Workbench functions. The
backup you’ve just created is a failsafe, in case you need to restore the
previous configurations.
4. Open your `anaconda-enterprise-anaconda-platform.yml` config map file. 5. Locate
the following sections of the file and add your role as needed to assign the correct
level of permissions: \* `admin: users:` - Add your role here to provide it with full
access to the platform and the administrative console. \* `deploy: deployers:` - Add
your role here to allow it to create deployments from projects. \* `workspace: users:`
* Add your role here to allow it to open project sessions. \* `storage: creators:`
* Add your role here to allow it to create projects. \* `repository: uploaders:` -
Add your role here to allow it to upload packages to the Workbench repository.
Roles listed in the `admin: users:` section of the
`anaconda-enterprise-anaconda-platform.yml` file must also be listed in each
instance of `superusers:` and in `ui: admin-links: admin: acl:` to grant
administrator level permissions.
3. Click **Save**. A notification will appear to inform you that your role has been created successfully.
### Assigning permissions for custom roles
Custom roles do not grant permissions upon creation. You must define the permissions for your custom role in your `anaconda-enterprise-anaconda-platform.yml` config map file.
Assign permissions to your custom role by completing the following steps:
1. Navigate to your Kubernetes cluster admin UI, or access your cluster using `kubectl` commands at the CLI.
2. Find your `anaconda-enterprise-anaconda-platform.yml` config map file.
3. Create and save a copy of this file before you begin assigning permissions for your custom role.
The changes you’re about to make will impact how Workbench functions. The
backup you’ve just created is a failsafe, in case you need to restore the
previous configurations.
4. Open your `anaconda-enterprise-anaconda-platform.yml` config map file. 5. Locate
the following sections of the file and add your role as needed to assign the correct
level of permissions: \* `admin: users:` - Add your role here to provide it with full
access to the platform and the administrative console. \* `deploy: deployers:` - Add
your role here to allow it to create deployments from projects. \* `workspace: users:`
* Add your role here to allow it to open project sessions. \* `storage: creators:`
* Add your role here to allow it to create projects. \* `repository: uploaders:` -
Add your role here to allow it to upload packages to the Workbench repository.
Roles listed in the `admin: users:` section of the
`anaconda-enterprise-anaconda-platform.yml` file must also be listed in each
instance of `superusers:` and in `ui: admin-links: admin: acl:` to grant
administrator level permissions.
 ### Creating groups
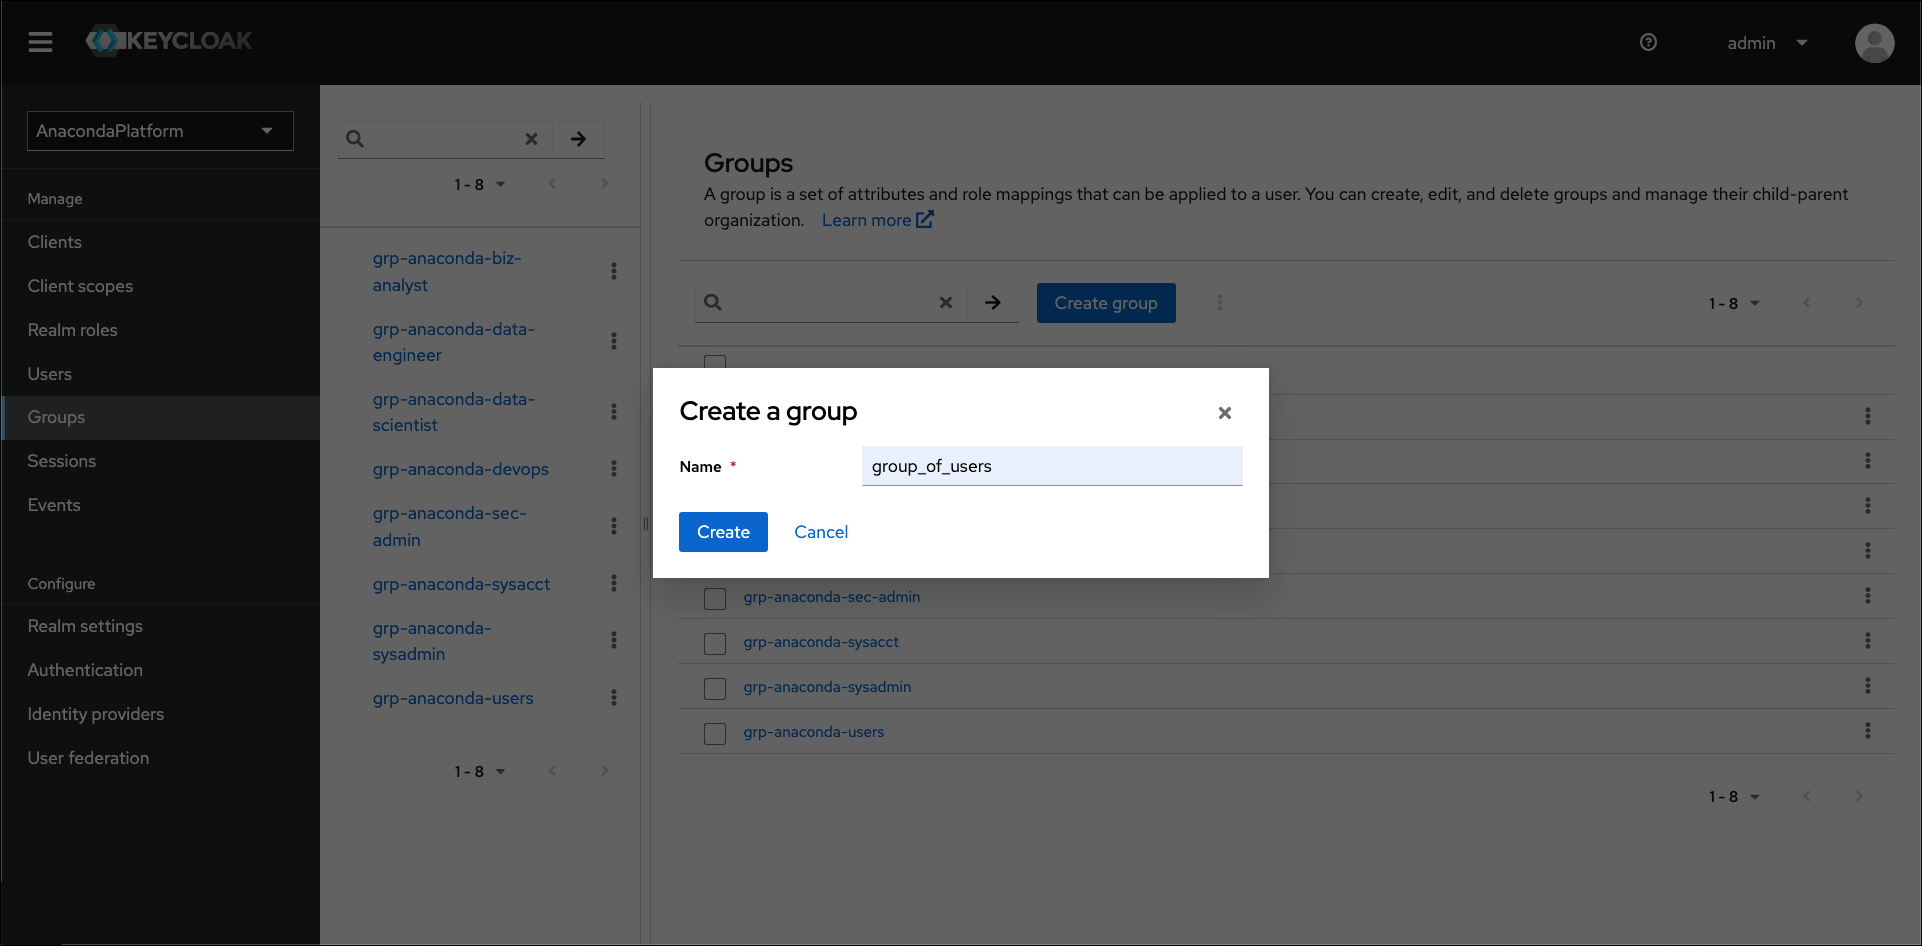
You can create as many groups as your organization needs. To create a new group, complete the following steps:
1. From the **Groups** page, select **Create group**.
2. Enter a unique name for your group.
3. Click **Create**.
### Creating groups
You can create as many groups as your organization needs. To create a new group, complete the following steps:
1. From the **Groups** page, select **Create group**.
2. Enter a unique name for your group.
3. Click **Create**.
 Creating a group here will not add it to an externally connected server (such
as LDAP).
### Assigning roles to groups
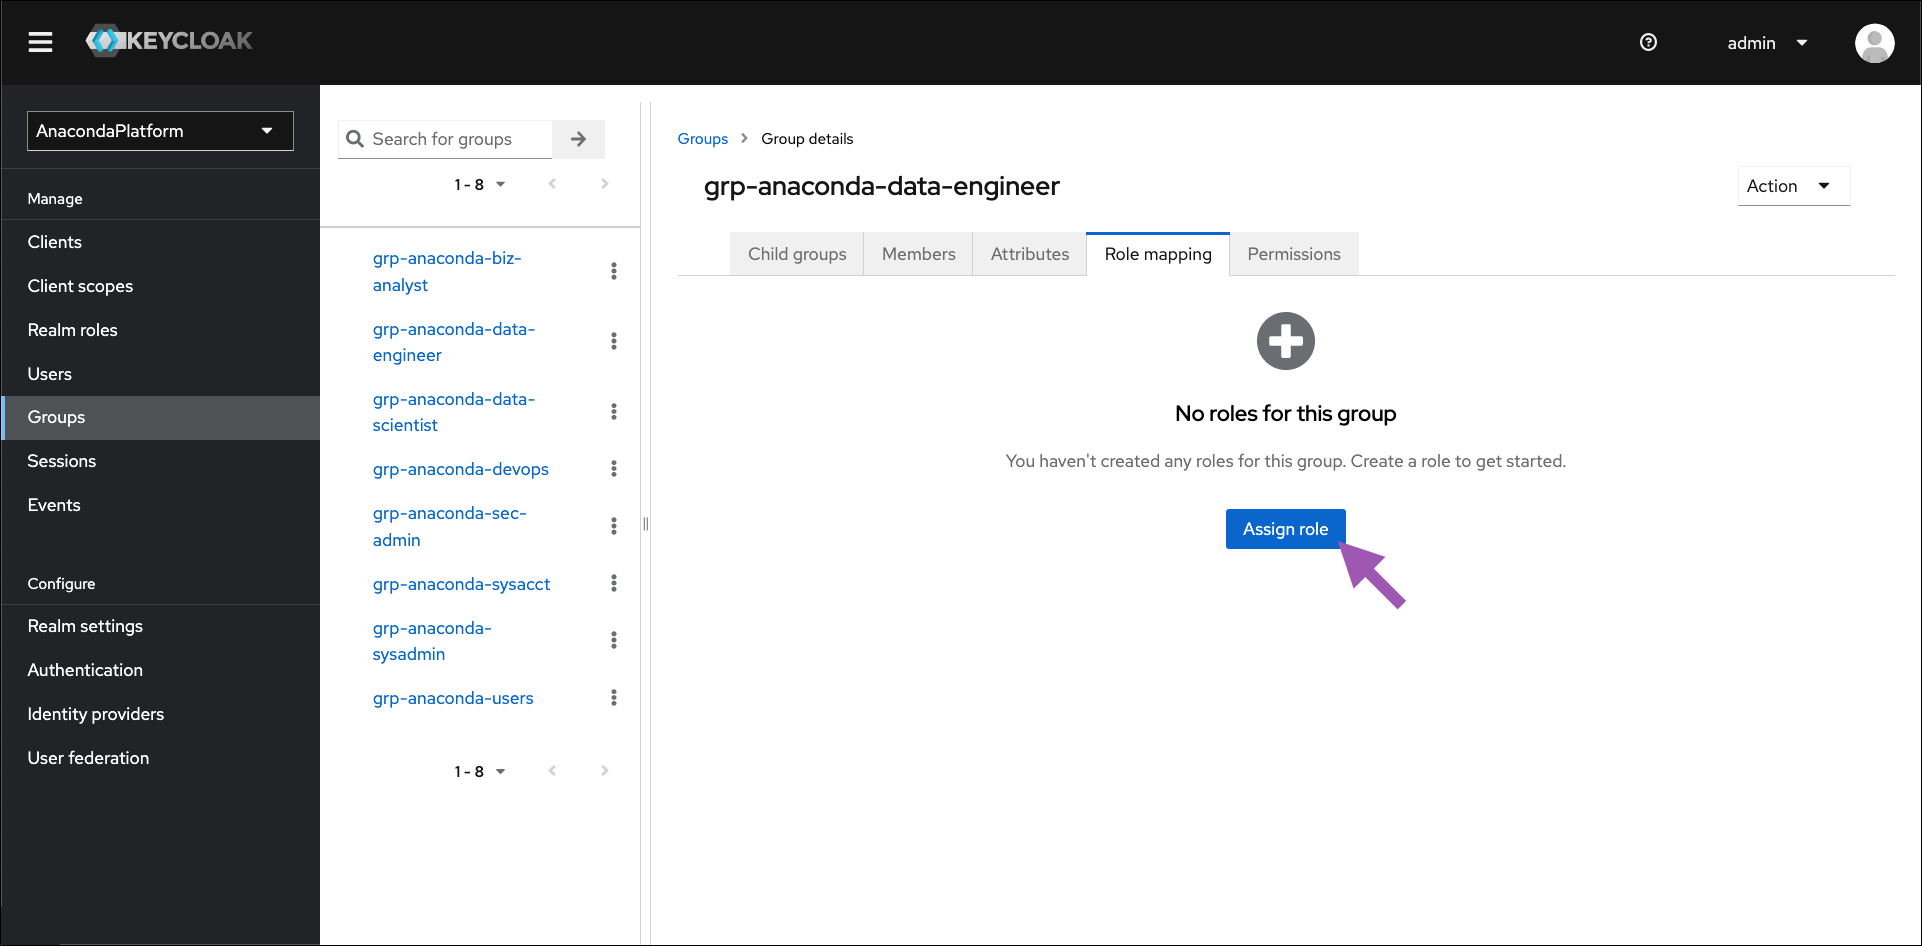
Assigning a role to a group provides all group members with the permissions granted by the role. To assign a role to a group, complete the following steps:
1. Navigate to the groups page and select a group to assign roles.
2. Select the **Role mapping** tab.
3. Click **Assign role**.
Creating a group here will not add it to an externally connected server (such
as LDAP).
### Assigning roles to groups
Assigning a role to a group provides all group members with the permissions granted by the role. To assign a role to a group, complete the following steps:
1. Navigate to the groups page and select a group to assign roles.
2. Select the **Role mapping** tab.
3. Click **Assign role**.
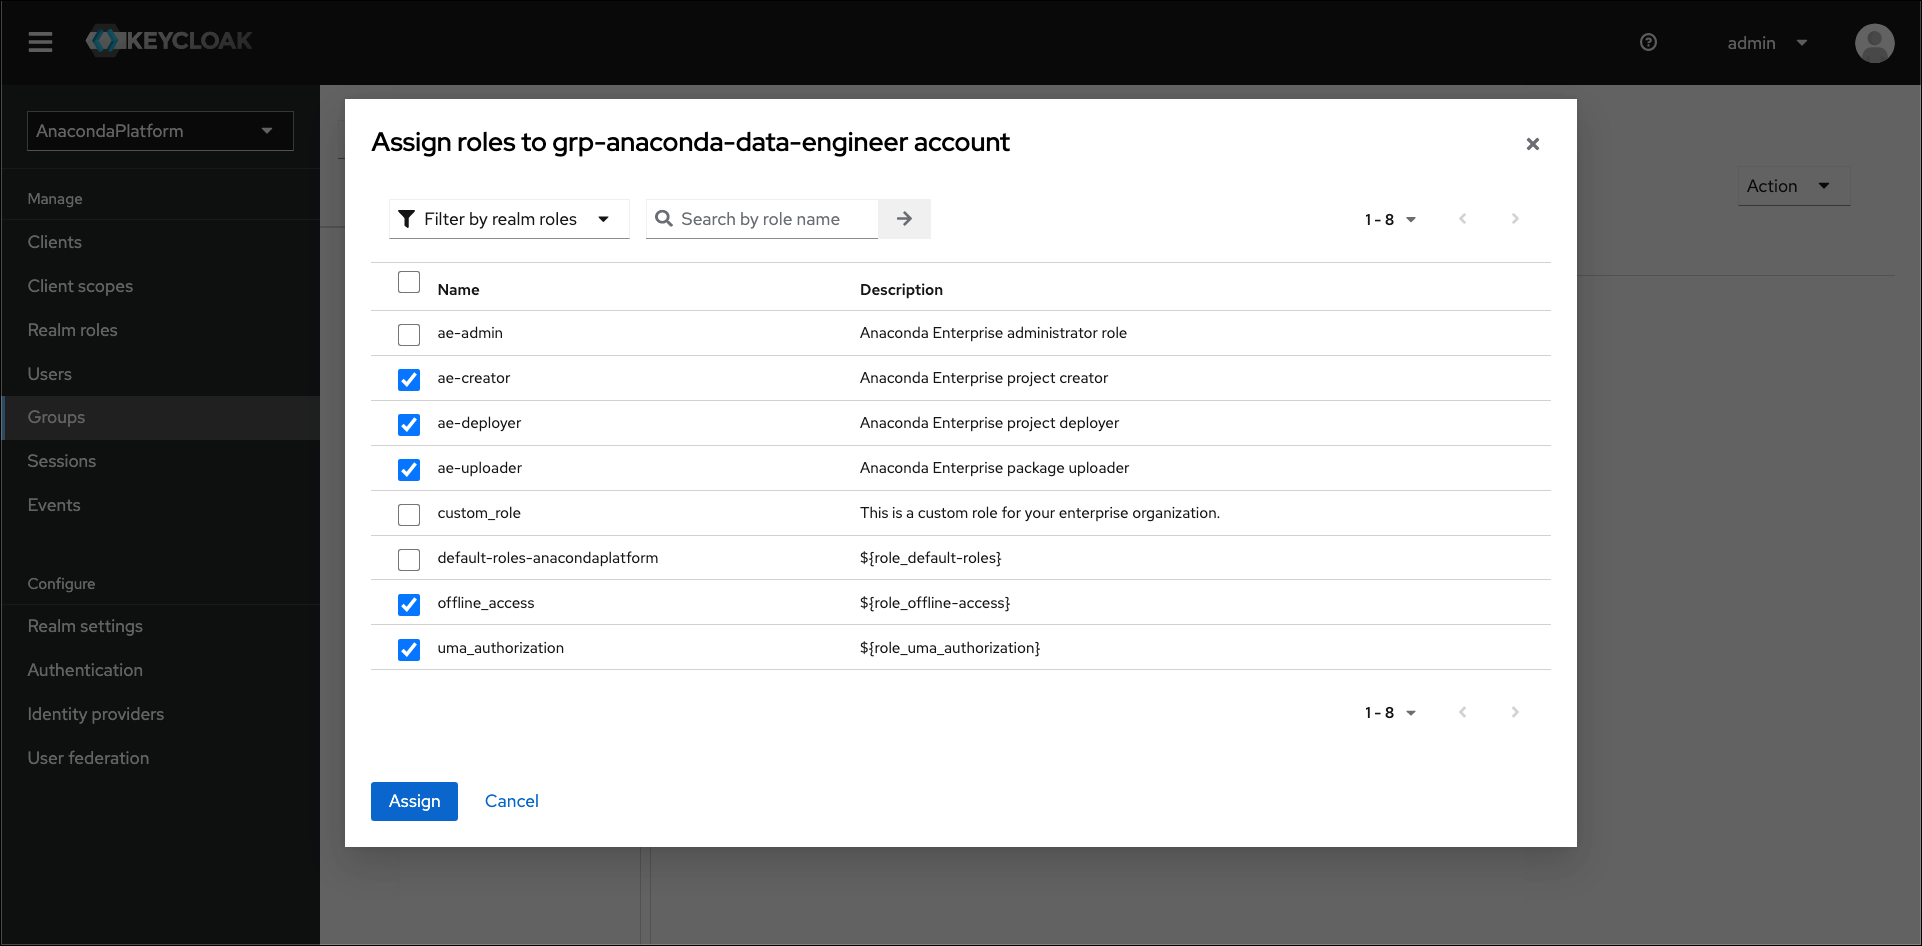
 4. Select roles you want to assign to the group, then click **Assign**.
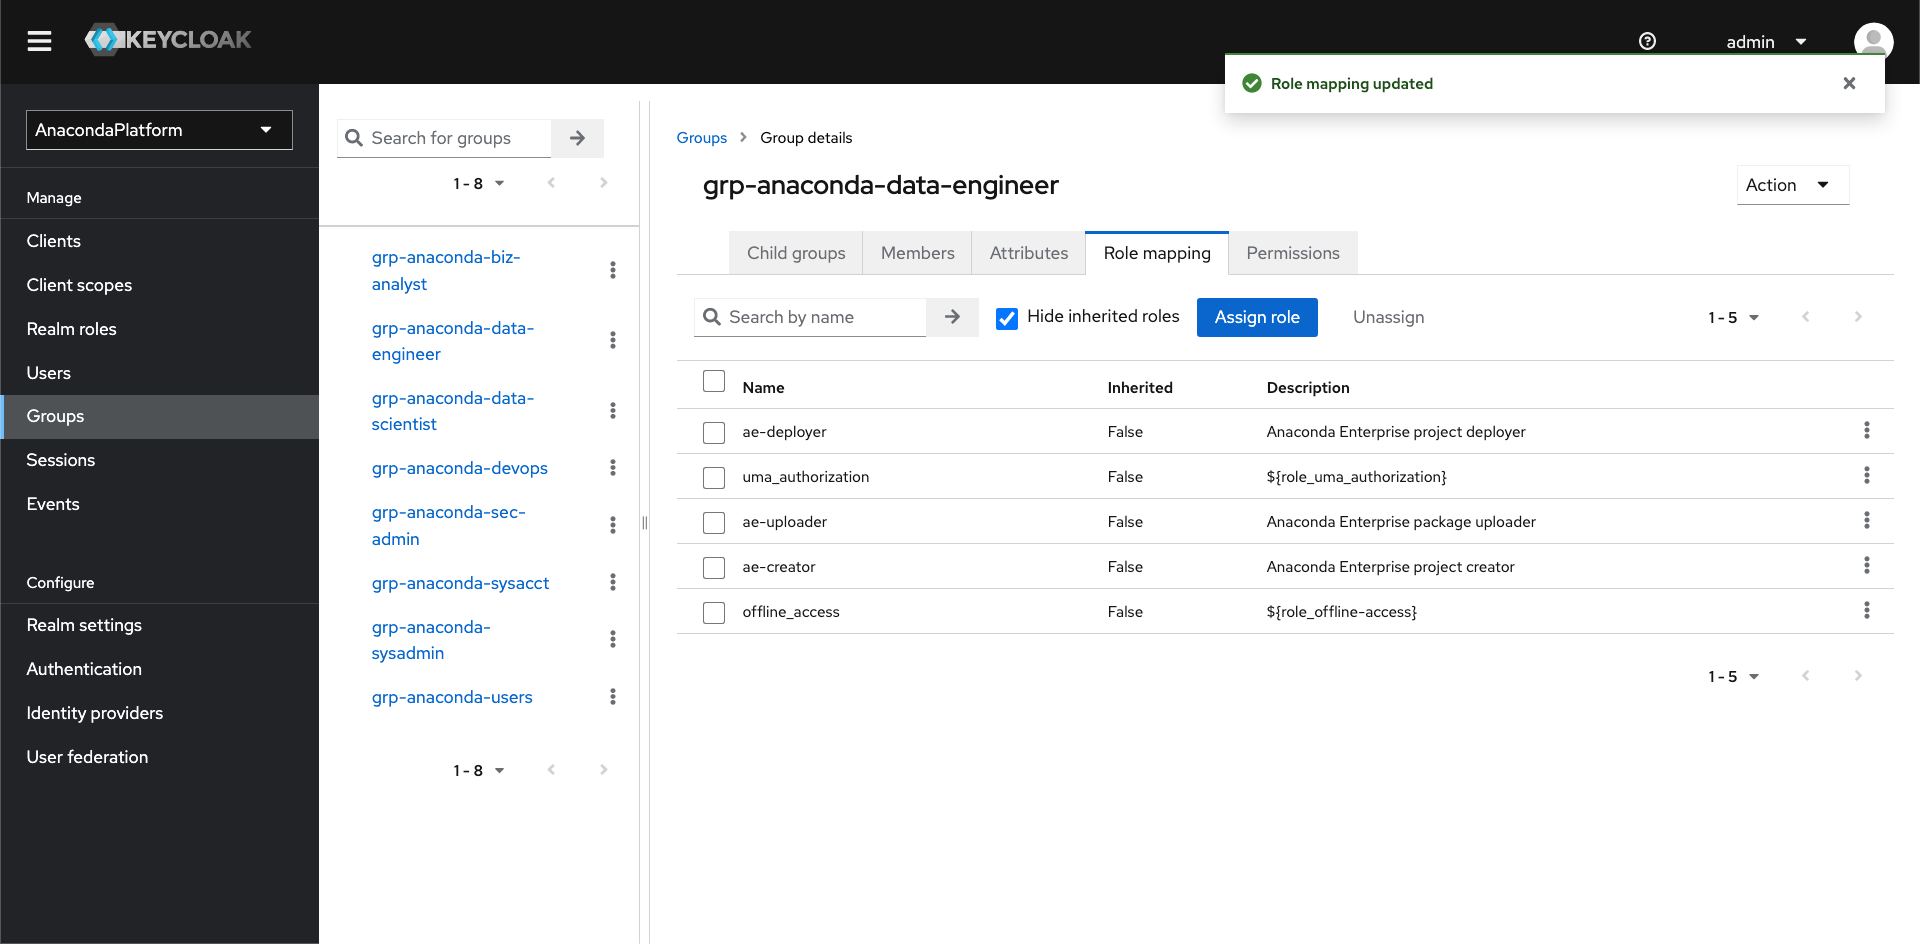
 5. Your newly assigned roles will appear in the **Role mapping** tab.
 ### Default roles and groups
**Roles**
Default roles allow you to automatically assign user role mappings whenever a user is newly created or imported. By default, Workbench assigns the following roles to newly created and imported users:
* ae-deployer
* ae-uploader
* ae-creator
* offline\_access
* uma\_authorization
You can disable these roles, if necessary, with the exception of the `offline_access` and `uma_authorization` roles. These are system configuration requirements.
### Default roles and groups
**Roles**
Default roles allow you to automatically assign user role mappings whenever a user is newly created or imported. By default, Workbench assigns the following roles to newly created and imported users:
* ae-deployer
* ae-uploader
* ae-creator
* offline\_access
* uma\_authorization
You can disable these roles, if necessary, with the exception of the `offline_access` and `uma_authorization` roles. These are system configuration requirements.
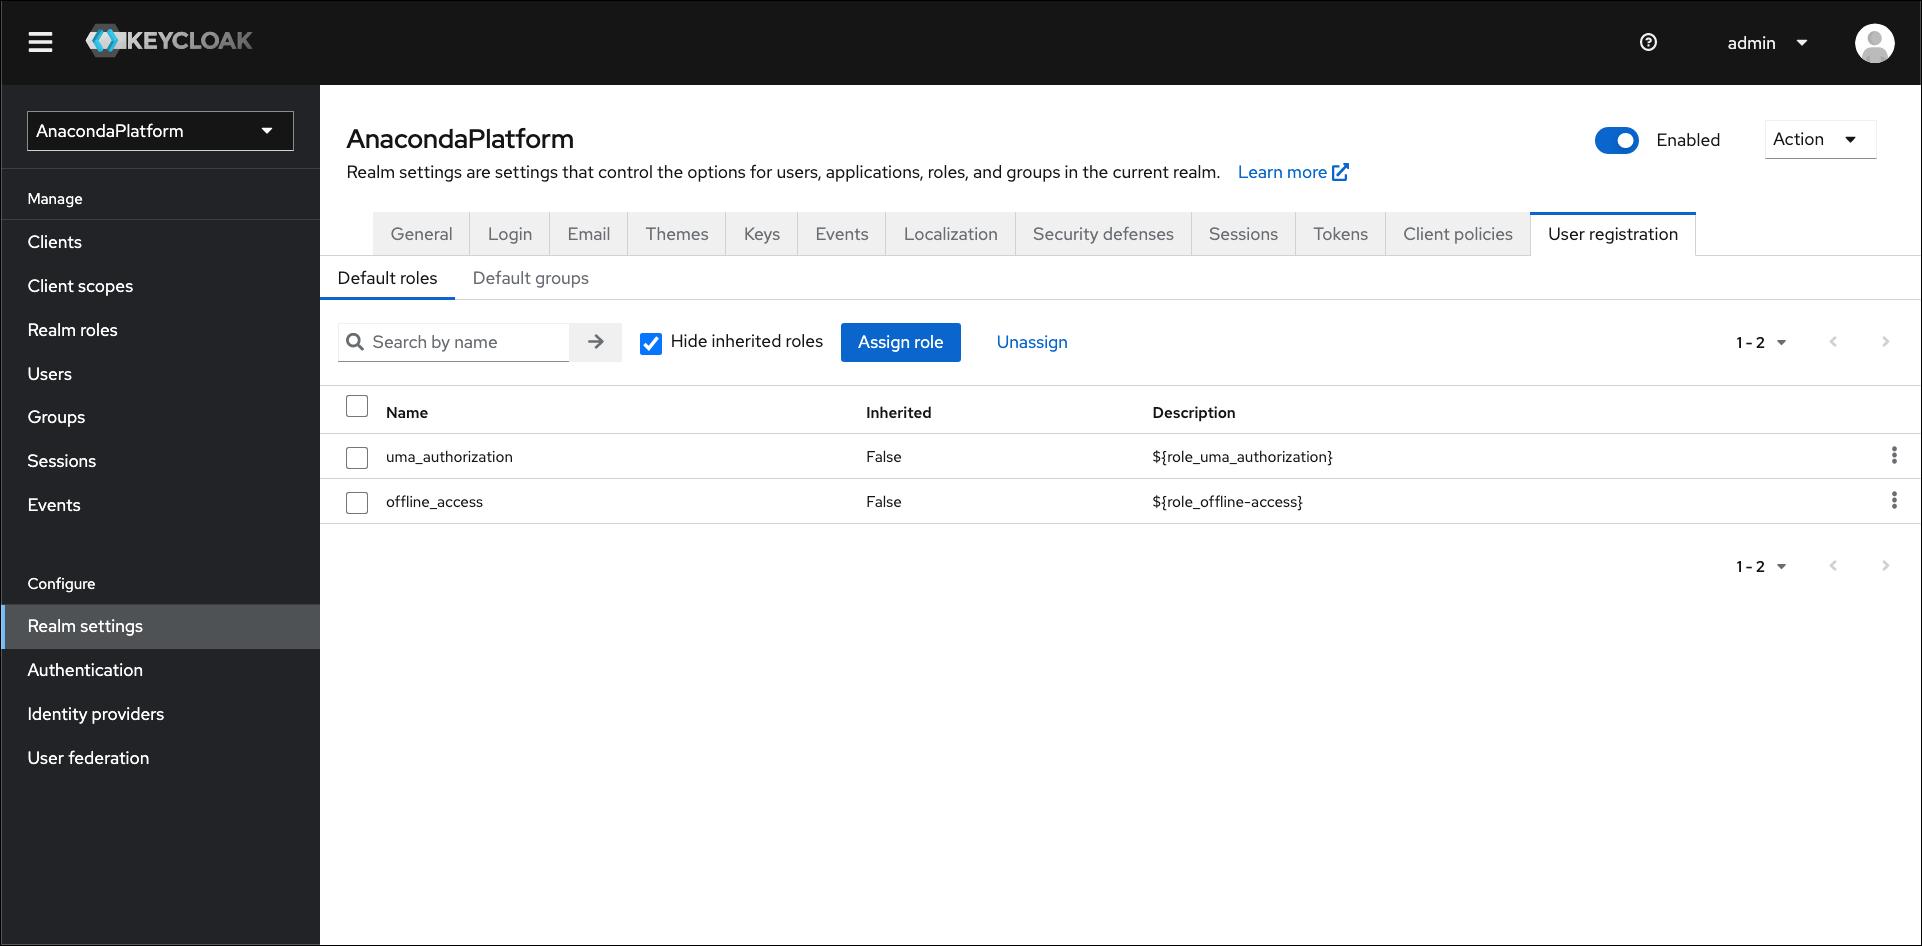 To assign default roles, complete the following steps:
1. Select **Realm settings** from the left-hand navigation.
2. Select the **User registration** tab.
3. Select the **Default roles** tab.
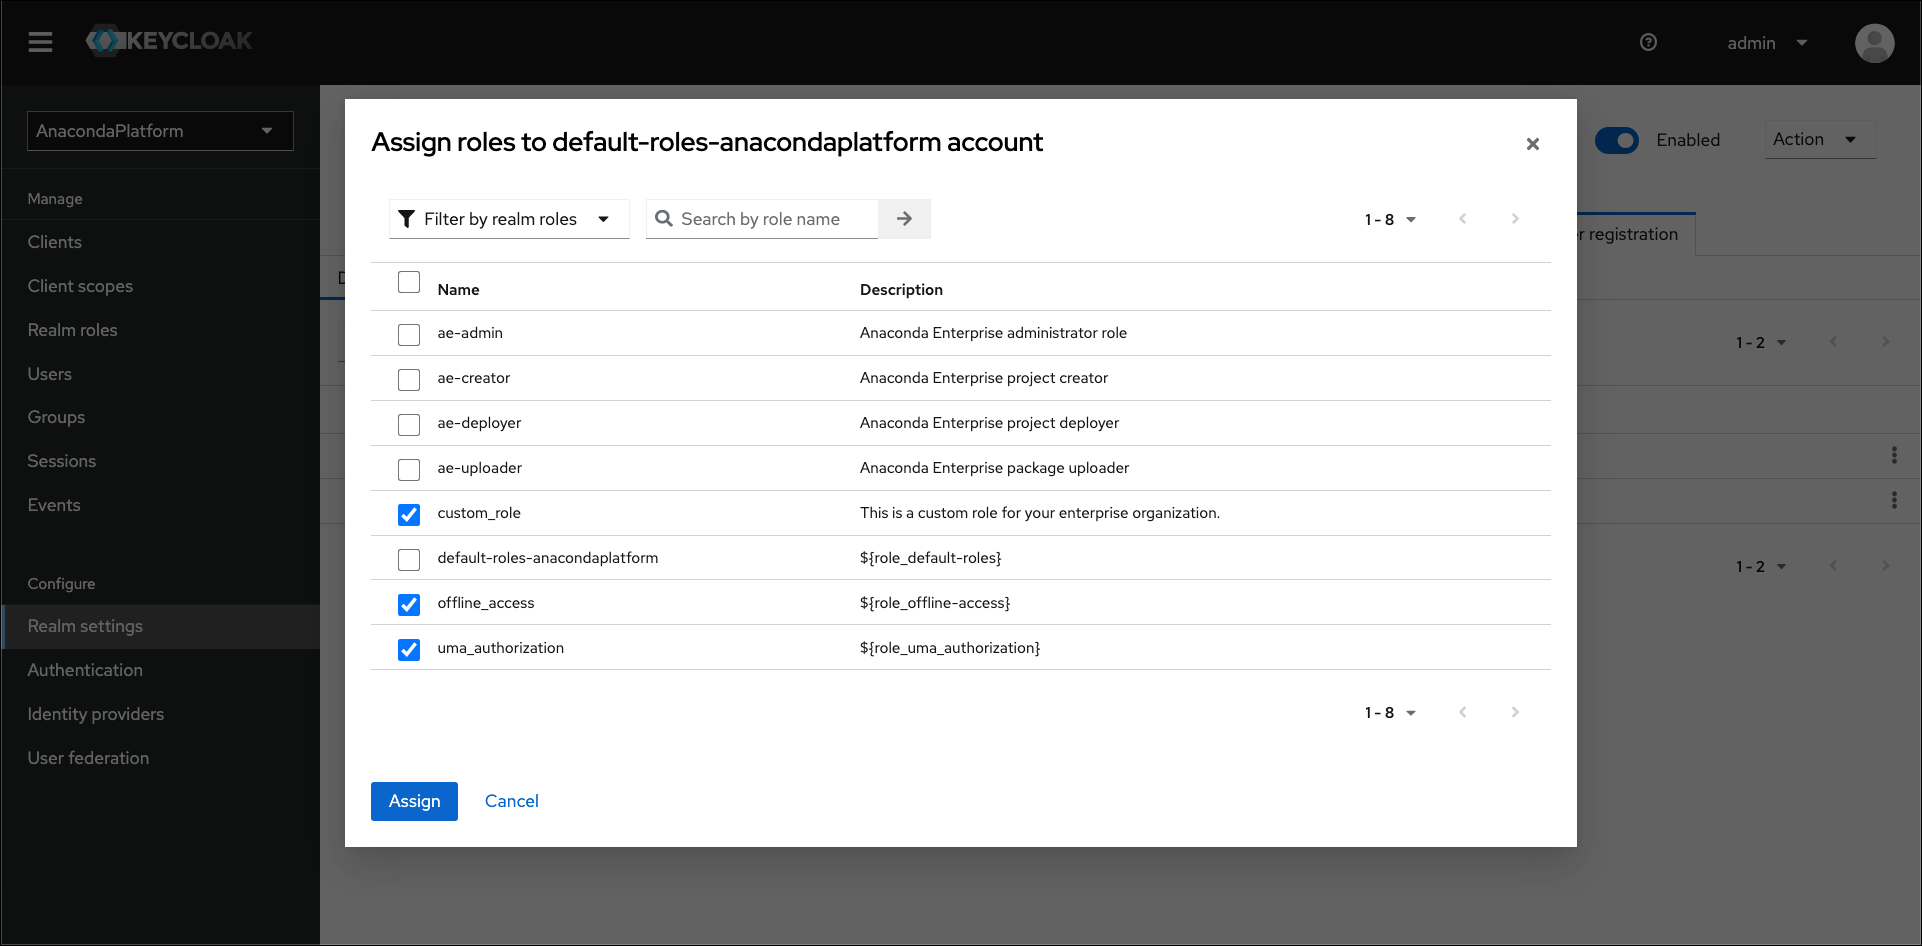
4. Click **Assign role**.
5. Select the roles you would like to assign users by default, then click **Assign**.
To assign default roles, complete the following steps:
1. Select **Realm settings** from the left-hand navigation.
2. Select the **User registration** tab.
3. Select the **Default roles** tab.
4. Click **Assign role**.
5. Select the roles you would like to assign users by default, then click **Assign**.
 **Groups**
Default groups allow you to automatically assign group membership whenever a new user is created or imported. By default, Anaconda adds all new users to the **everyone** group.
**Groups**
Default groups allow you to automatically assign group membership whenever a new user is created or imported. By default, Anaconda adds all new users to the **everyone** group.
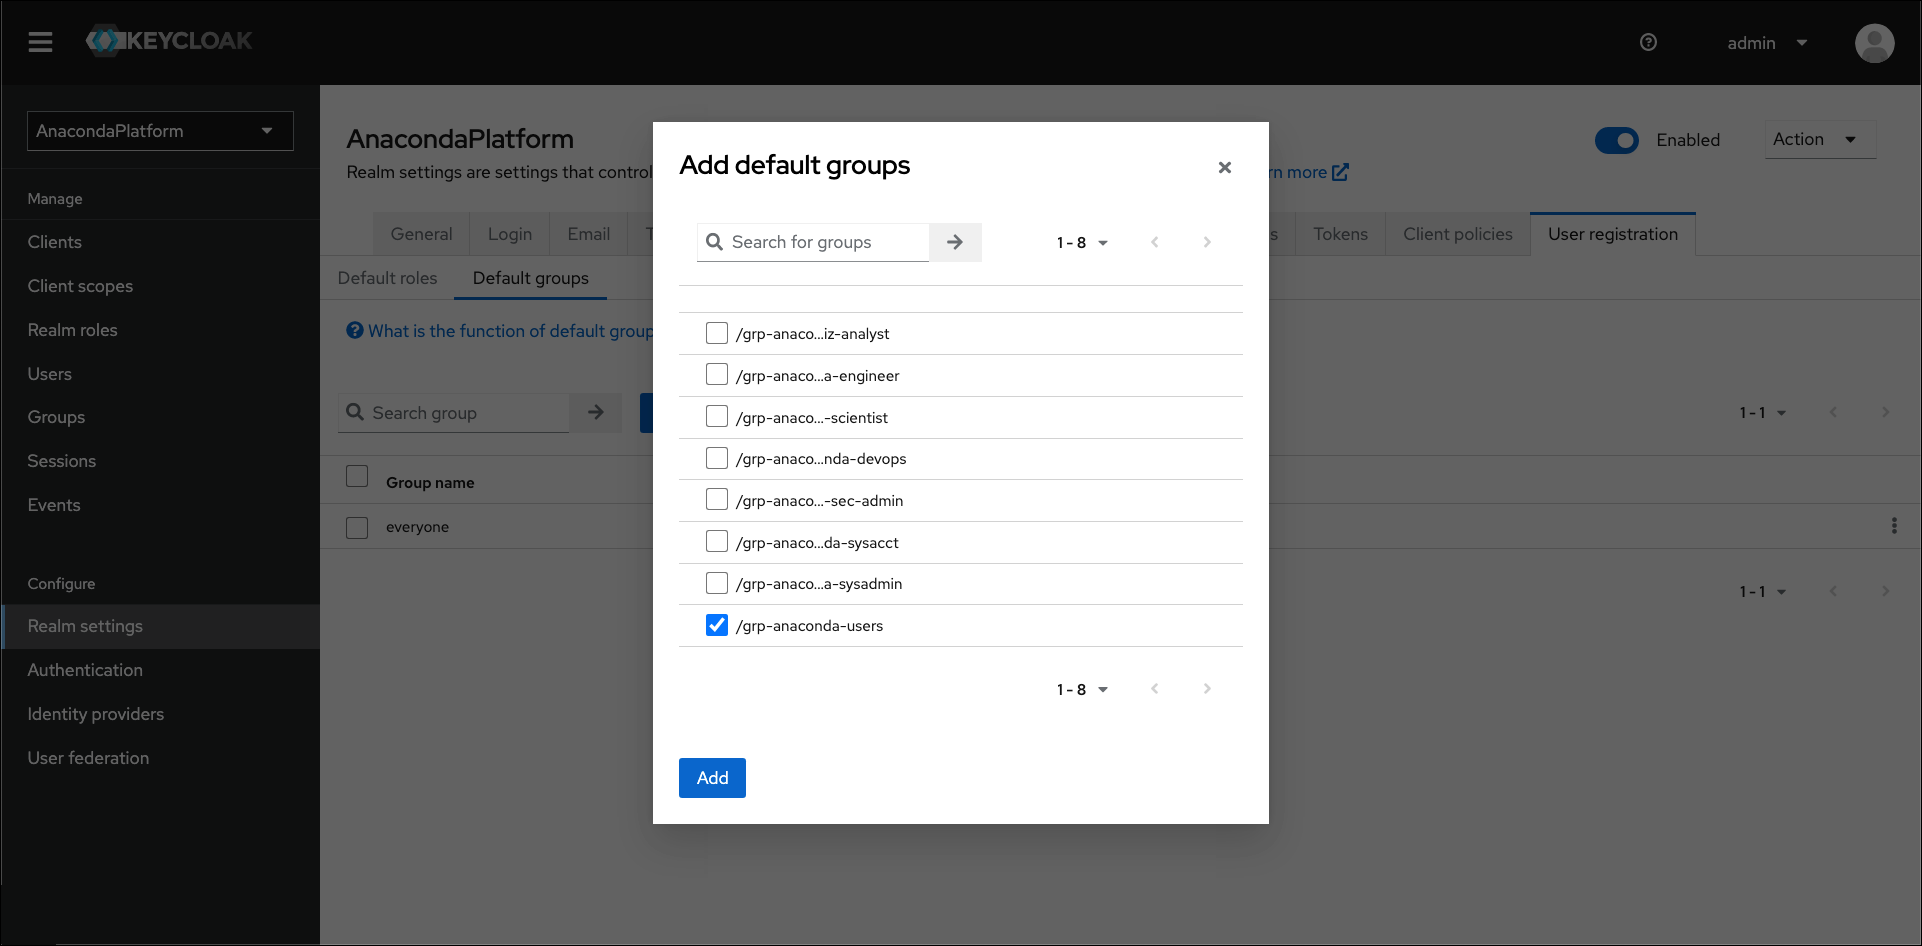
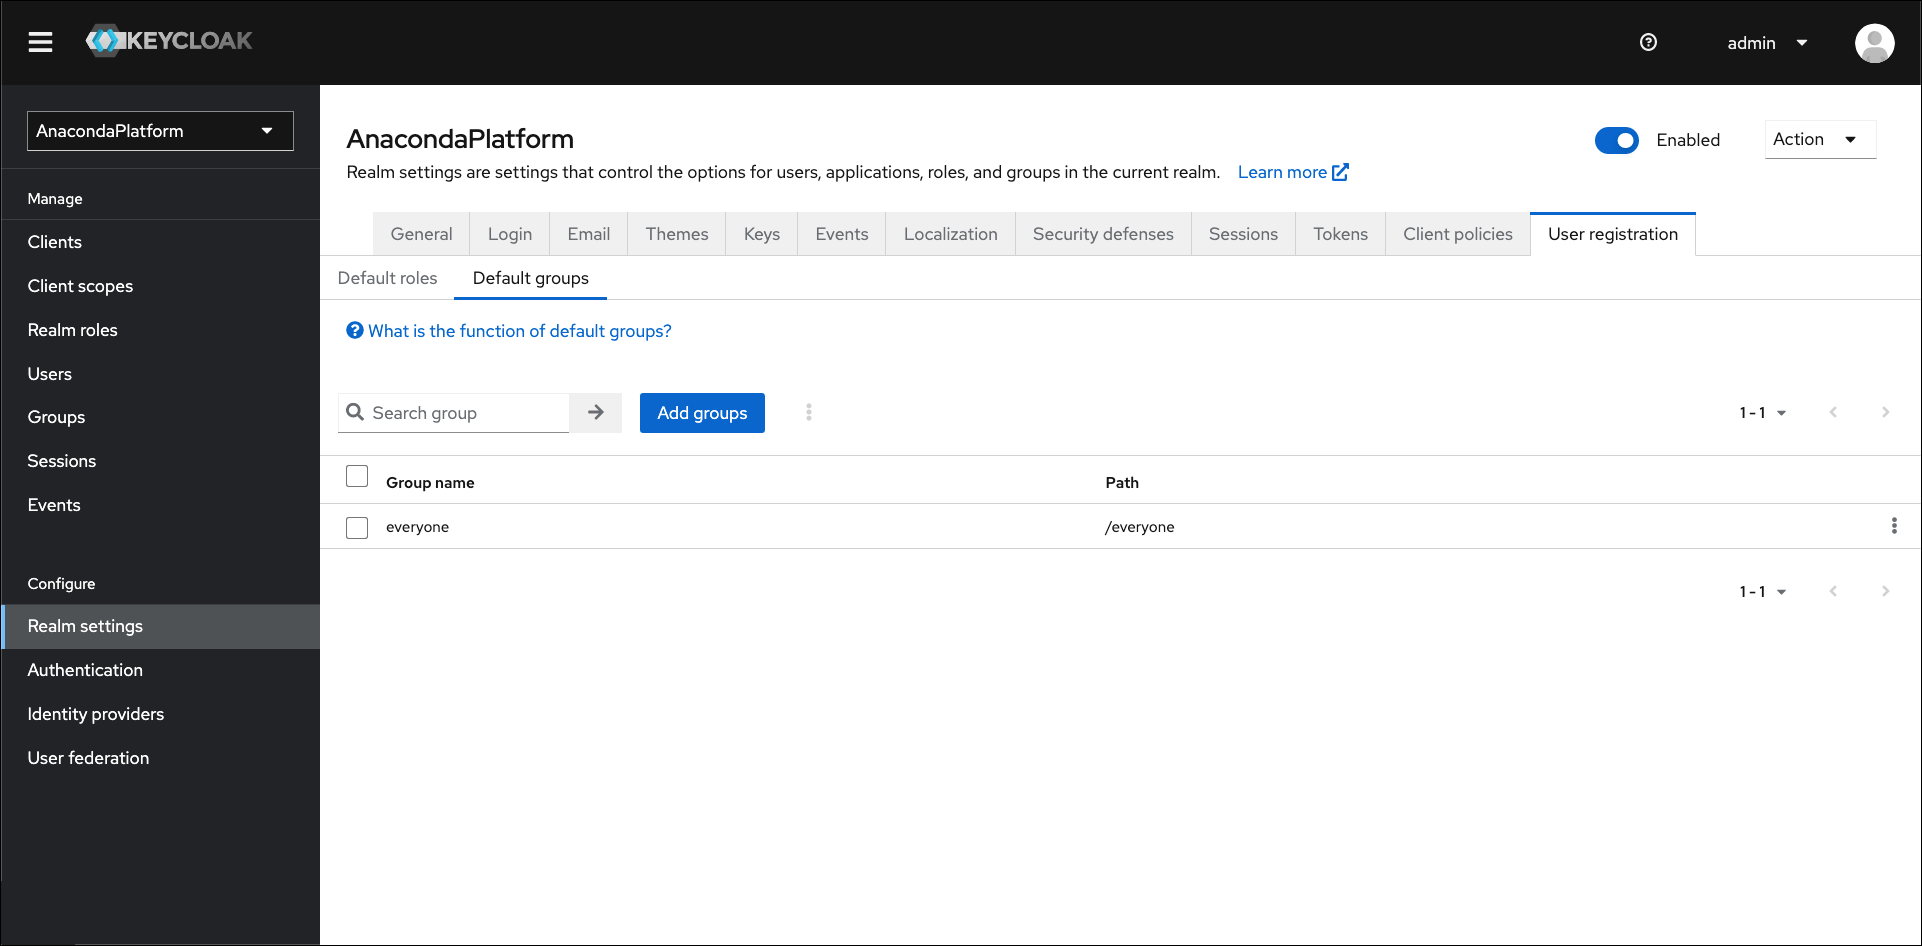 To assign default groups, complete the following steps:
1. Select **Realm settings** from the left-hand navigation.
2. Select the **User registration** tab.
3. Select the **Default groups** tab.
4. Click **Add groups**.
5. Select the groups you would like to add users to by default, then click **Add**.
To assign default groups, complete the following steps:
1. Select **Realm settings** from the left-hand navigation.
2. Select the **User registration** tab.
3. Select the **Default groups** tab.
4. Click **Add groups**.
5. Select the groups you would like to add users to by default, then click **Add**.