> ## Documentation Index
> Fetch the complete documentation index at: https://anaconda.com/docs/llms.txt
> Use this file to discover all available pages before exploring further.
# Upgrading Anaconda Enterprise 5 on Gravity
export const Danger = ({children}) => {
return ;
};
[Contact the Anaconda implementation team](https://anaconda.zendesk.com/hc/en-us/requests/new) before you begin for assistance upgrading your version of Anaconda Enterprise 5. Follow along with these instructions as an Anaconda implementation team member guides you through the upgrade process.
* [Prerequisites](#prerequisites)
* [Upgrading](#upgrading)
* [In-place upgrade](#in-place-upgrade)
* [Fresh reinstallation upgrade](#fresh-reinstallation-upgrade)
* [Verifying your installation](#verify-your-installation)
* [Additional configurations](#additional-configurations)
* [TLS/SSL certificates](#tls-ssl-certificates)
* [External git repository](#external-git-repository)
* [Spark/Hadoop](#spark-hadoop)
* [Cleaning up](#cleaning-up)
## Prerequisites
* You must have a service account with `sudo` access on your Kubernetes (K8s) master node.
* Your K8s master node must be configured with a DNS A record. The A record sets the domain name you use for your Anaconda Enterprise instance.
* If you are upgrading Anaconda Enterprise on a system with multiple nodes, you must verify the clock on each node is in sync with the others. Anaconda recommends using Network Time Protocol (NTP) to synchronize computer system clocks automatically over your network. For more information on installing and using `Chrony` to manage the NTP, see the instructions provided [here](https://www.tecmint.com/synchronize-time-with-ntp-in-linux/).
* You must have the `ae-preflight` package installed. For more information, see [Anaconda Enterprise pre-flight check](../pre-flight).
* Create a backup of your `anaconda-enterprise-anaconda-platform.yml` ConfigMap by running the following command:
```
kubectl get cm anaconda-enterprise-anaconda-platform.yml -o json | jq -r '.data["anaconda-platform.yml"]' > configmap-backup.yml
```
Anaconda recommends the use of [managed persistence](/docs/data-science/5.6.1/reference/understanding-ae5#managed-persistence) to ensure open sessions and deployments are captured by the upgrade process. If you are not using managed persistence, have all users save their work, stop any open sessions and deployments, and log out of the platform during the upgrade process.
## Upgrading
After you have verified that your system meets all of the installation requirements, you’re ready to upgrade the cluster.
There are two basic types of upgrades for Gravity users: in-place upgrades and fresh reinstallation upgrades. Follow along with the instructions here as your Anaconda implementation team member guides you through upgrading your software.
* Project sessions are terminated during the upgrade process! Because of this, it is important to stop all sessions prior to upgrading. If you do not, sessions that are terminated as part of the upgrade process must be restarted manually post upgrade.
* Sessions can be stopped programmatically using `ae5-tools` by running the following command in a terminal that has access your Workbench cluster over the network:
```
ae5 session list --columns=id --no-header | xargs -n1 ae5 session stop --yes
```
### In-place upgrade
In-place upgrades of Anaconda Enterprise are not supported for versions that are moving from Gravity 6 to Gravity 7. Instead, you must perform a fresh reinstallation to upgrade your software. If you do not, your installation will break. Check your version of Gravity before you begin, and choose the upgrade process that best suits your needs.
In-place upgrades are performed while the software is still running. To perform an in-place upgrade:
1. Log in to a service account with `sudo` access on the master node running your Anaconda Enterprise software.
2. Download the installer file by running the following command:
```
# Replace with the provided location of the installer file
curl -O
```
3. Decompress the installer file by running the following command:
```
# Replace with the installer file you just downloaded
tar xvzf
```
4. Enter the installer directory by running the following command:
```
# Replace with the version of your installer
cd
```
5. Run the following command to verify your environment is properly prepared:
```
ae-preflight
```
If the check returns an overall result of WARN, you can view the results of the check by running the following command:
```
cat results.txt
```
If necessary, make applicable corrections to properly prepare your environment to meet the [Installation requirements](../reqs). Once you’ve verified that your environment is properly configured, you can begin the upgrade process.
6. To start the upload and upgrade process, run the following commands:
```
sudo ./upload
sudo ./gravity upgrade
```
The upgrade process can take up to an hour or more to complete, primarily due to the upload step. You can view the status of the upgrade process at any time by running the following command:
```
sudo watch ./gravity plan
```
Once the upgrade process is complete, the pods will start to come up on their own, but this process also takes some time to finish. Monitor the pods status by running the following command:
```
sudo watch kubectl get pods
```
If you encounter errors while doing your in-place upgrade, you can view which phase of the upgrade failed by running the following command:
```
sudo ./gravity plan
```
You can return to any phase of the upgrade process by running the rollback command against the name of the phase as it’s listed in the **Phase** column of the `./gravity plan` commands’ return:
```
# Replace with the name listed in the Phase column
sudo ./gravity plan rollback --phase=/
```
After addressing any errors, resume the upgrade by running the following command:
```
sudo ./gravity upgrade --resume --force
```
Once you have resolved your errors, or if no errors have occurred, it’s time to [verify your installation](#verify-your-installation).
### Fresh reinstallation upgrade
A fresh reinstallation upgrade backs up your current Anaconda Enterprise software configurations and settings, then uninstalls and reinstalls the software. After installation is complete, you can apply your saved configurations and settings to the new software version.
To perform a fresh reinstallation upgrade:
#### Backup your configurations
1. Log in to a service account with `sudo` access on the master node running your Anaconda Enterprise software.
2. Download the installer file by running the following command:
```
# Replace with the provided location of the installer file
curl -O
```
3. Decompress the installer file by running the following command:
```
# Replace with the installer file you just downloaded
tar xvzf
```
4. Enter the installer directory by running the following command:
```
# Replace with the installer file you just decompressed
cd
```
The installer bundle contains the `extract_config.sh` script, which retains the following files when run:
* `anaconda-enterprise-certs.yaml`
* `anaconda-enterprise-keycloak.yaml`
* `helm_values.yaml`
* `gravity_values.yaml`
5. Create a directory to contain the configuration data extracted by the script and name it “reinstall”:
```
mkdir reinstall
```
6. Enter the directory you just created:
```
cd reinstall
```
7. Run the `extract_config.sh` script by running the following command:
```
sudo bash extract_config.sh
```
Once the script has completed, you will need to manually save some additional configurations and secrets to your `reinstall` directory.
8. Export your configmap to a `.yaml` file by running the following command:
```
sudo kubectl get cm -o yaml --export > configmap.yaml
```
9. Export your SSL certifications to `.yaml` files by running the following command:
```
sudo kubectl get secret anaconda-enterprise-certs anaconda-enterprise-wildcard -o yaml --export > certs.yaml
```
10. Export your user credentials and user secrets to `.yaml` files by running the following command:
```
sudo kubectl get secrets | grep user-creds | cut -d ' ' -f 1 | xargs sudo kubectl get secret -o yaml > user-secrets.yaml
```
#### Uninstall
[Uninstall Anaconda Enterprise](./uninstall) on all nodes and reboot your instance.
Do not run the command `sudo rm -rf /opt/anaconda/storage` on the master node as part of your uninstall process. If you do you, will lose your configuration settings and user data.
#### Reinstall and apply your saved settings
1. Run the following command to verify your environment is properly prepared:
```
ae-preflight
```
If the check returns an overall result of WARN, you can view the results of the check by running the following command:
```
cat results.txt
```
If necessary, make applicable corrections to properly prepare your environment to meet the [Installation requirements](../reqs). Once you’ve verified that your environment is properly configured, you can begin the upgrade process.
2. [Install the AE5 cluster](../on-prem). Use the `gravity_values.yaml` file stored in the reinstall directory you created earlier instead of creating a new file during installation.
3. Replace your SSL certificate by running the following command:
```
sudo kubectl replace -f certs.yaml
```
4. Replace your user secrets by running the following command:
```
sudo kubectl create -f user-secrets.yaml
```
The `configmap.yaml` file that you created earlier contains settings that need to be restored to the `anaconda-enterprise-anaconda-platform.yml` file manually.
5. Open a web browser and log in to Anaconda Enterprise as an Administrator.
6. Open the **User** dropdown menu and select **Admin Console**.
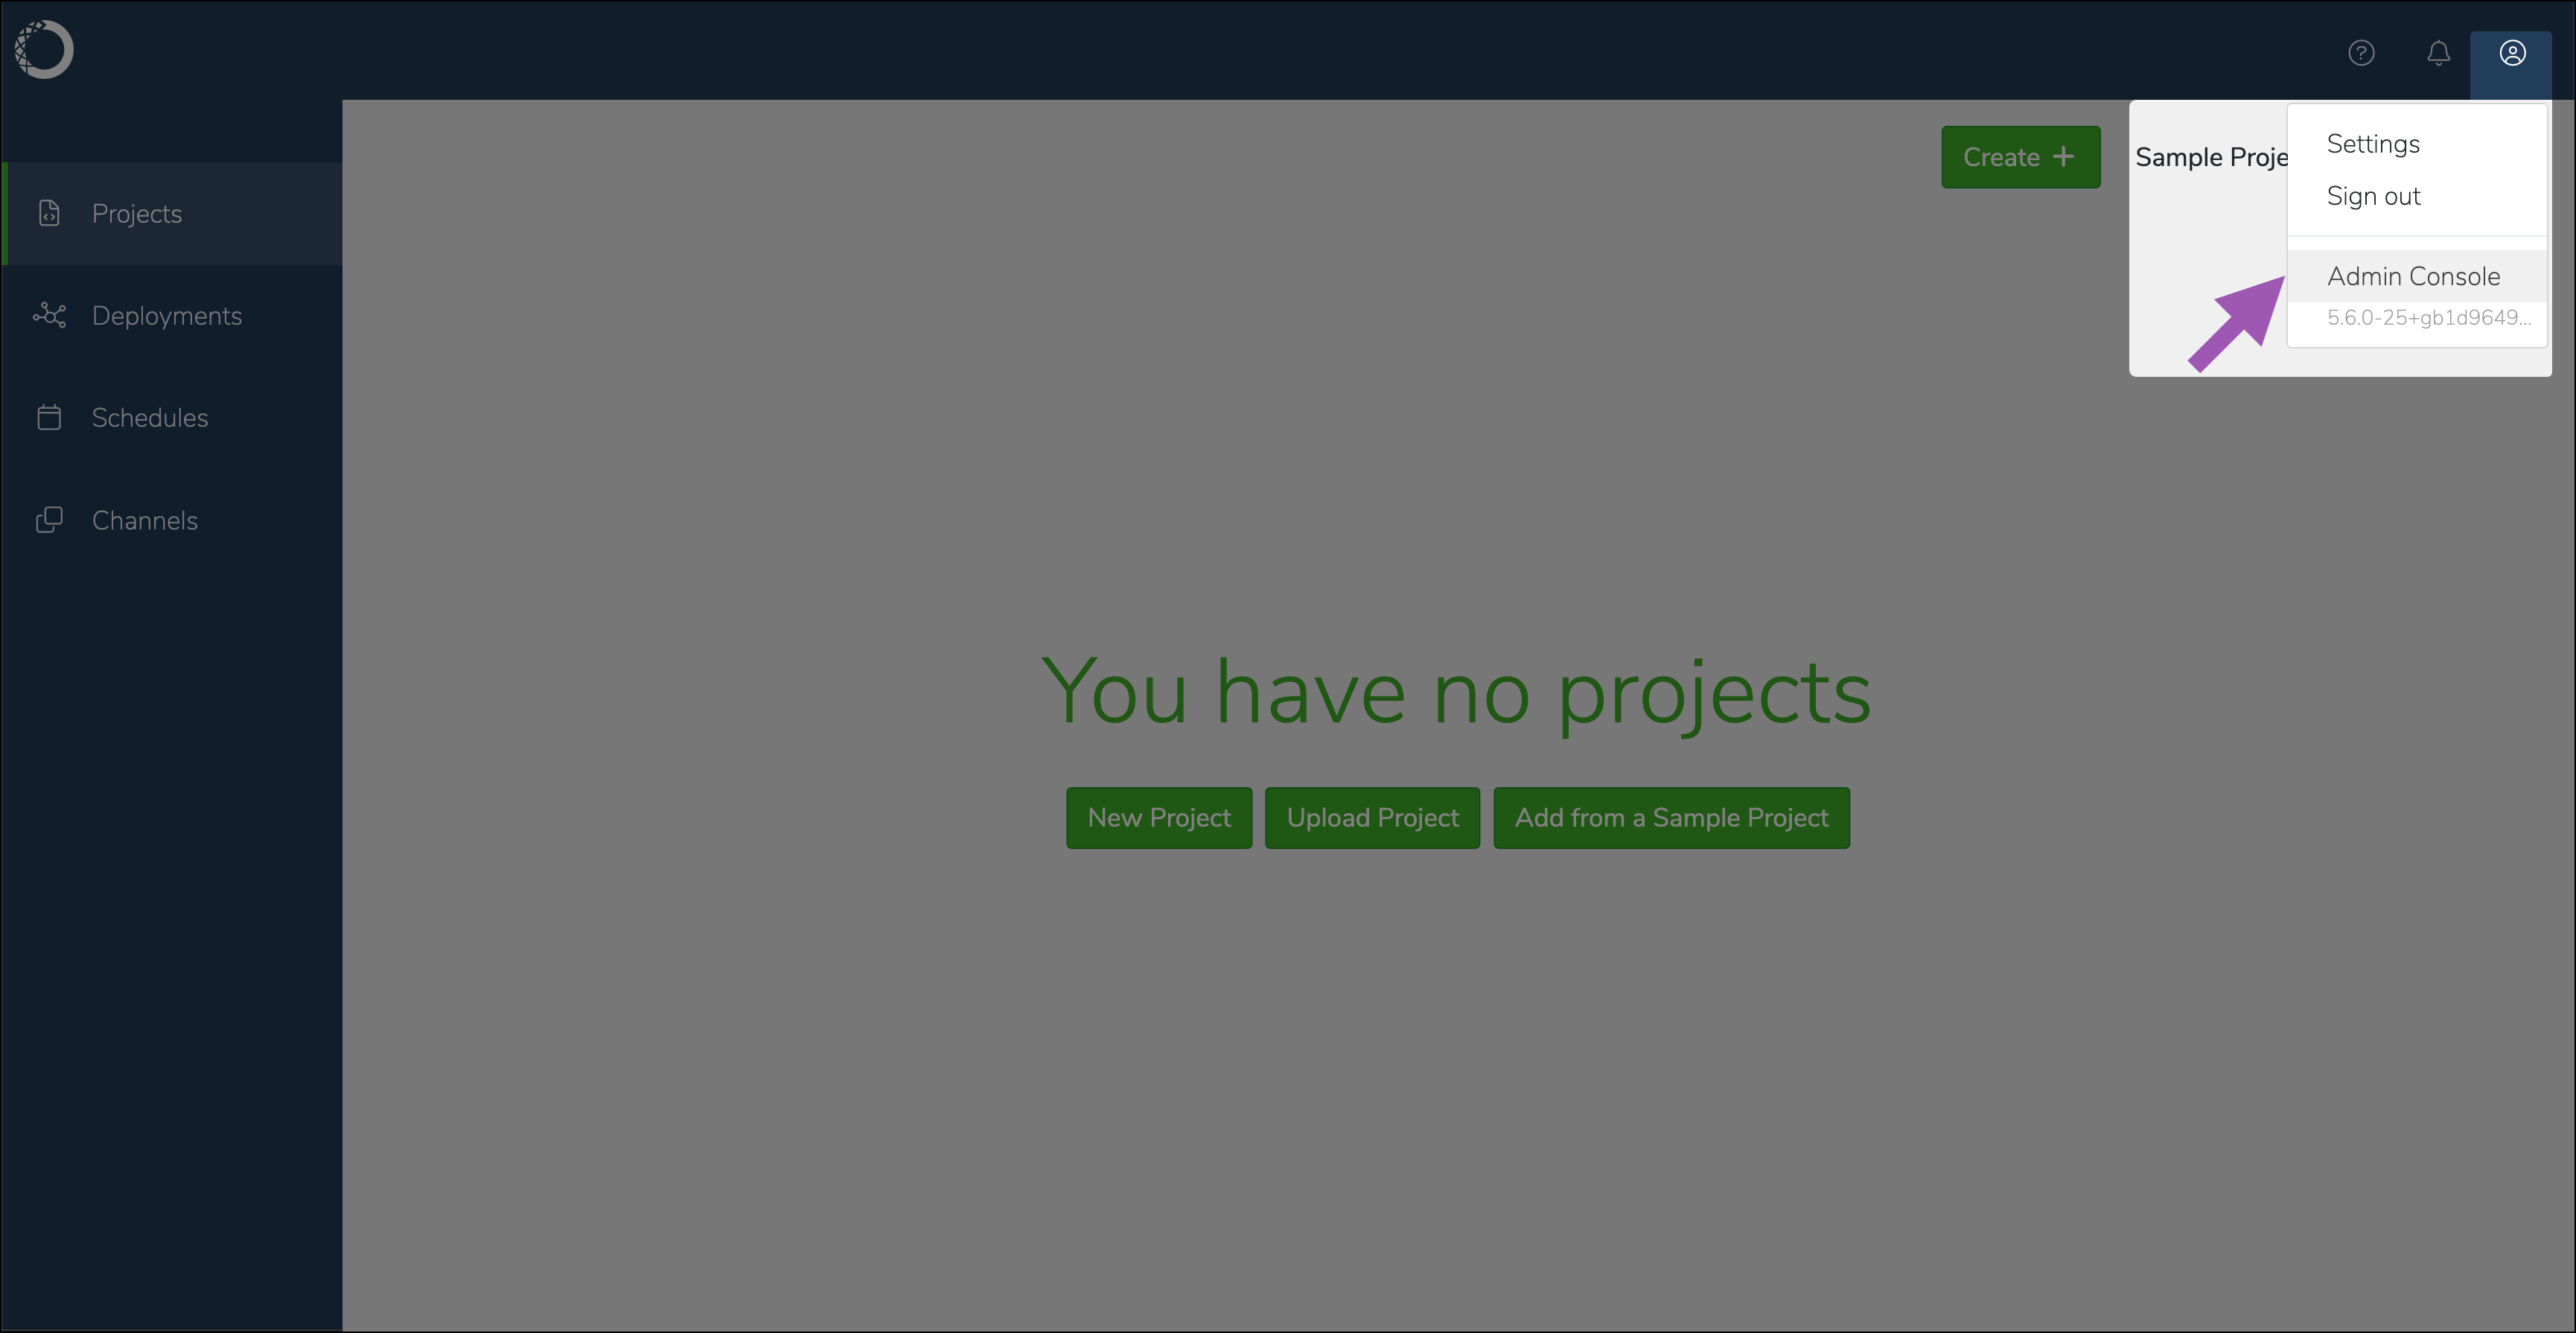 7. Select **Manage Resources** to open your Gravity Ops Center.
8. Log in to your Gravity Ops Center. Contact your Gravity systems administrator if you need access.
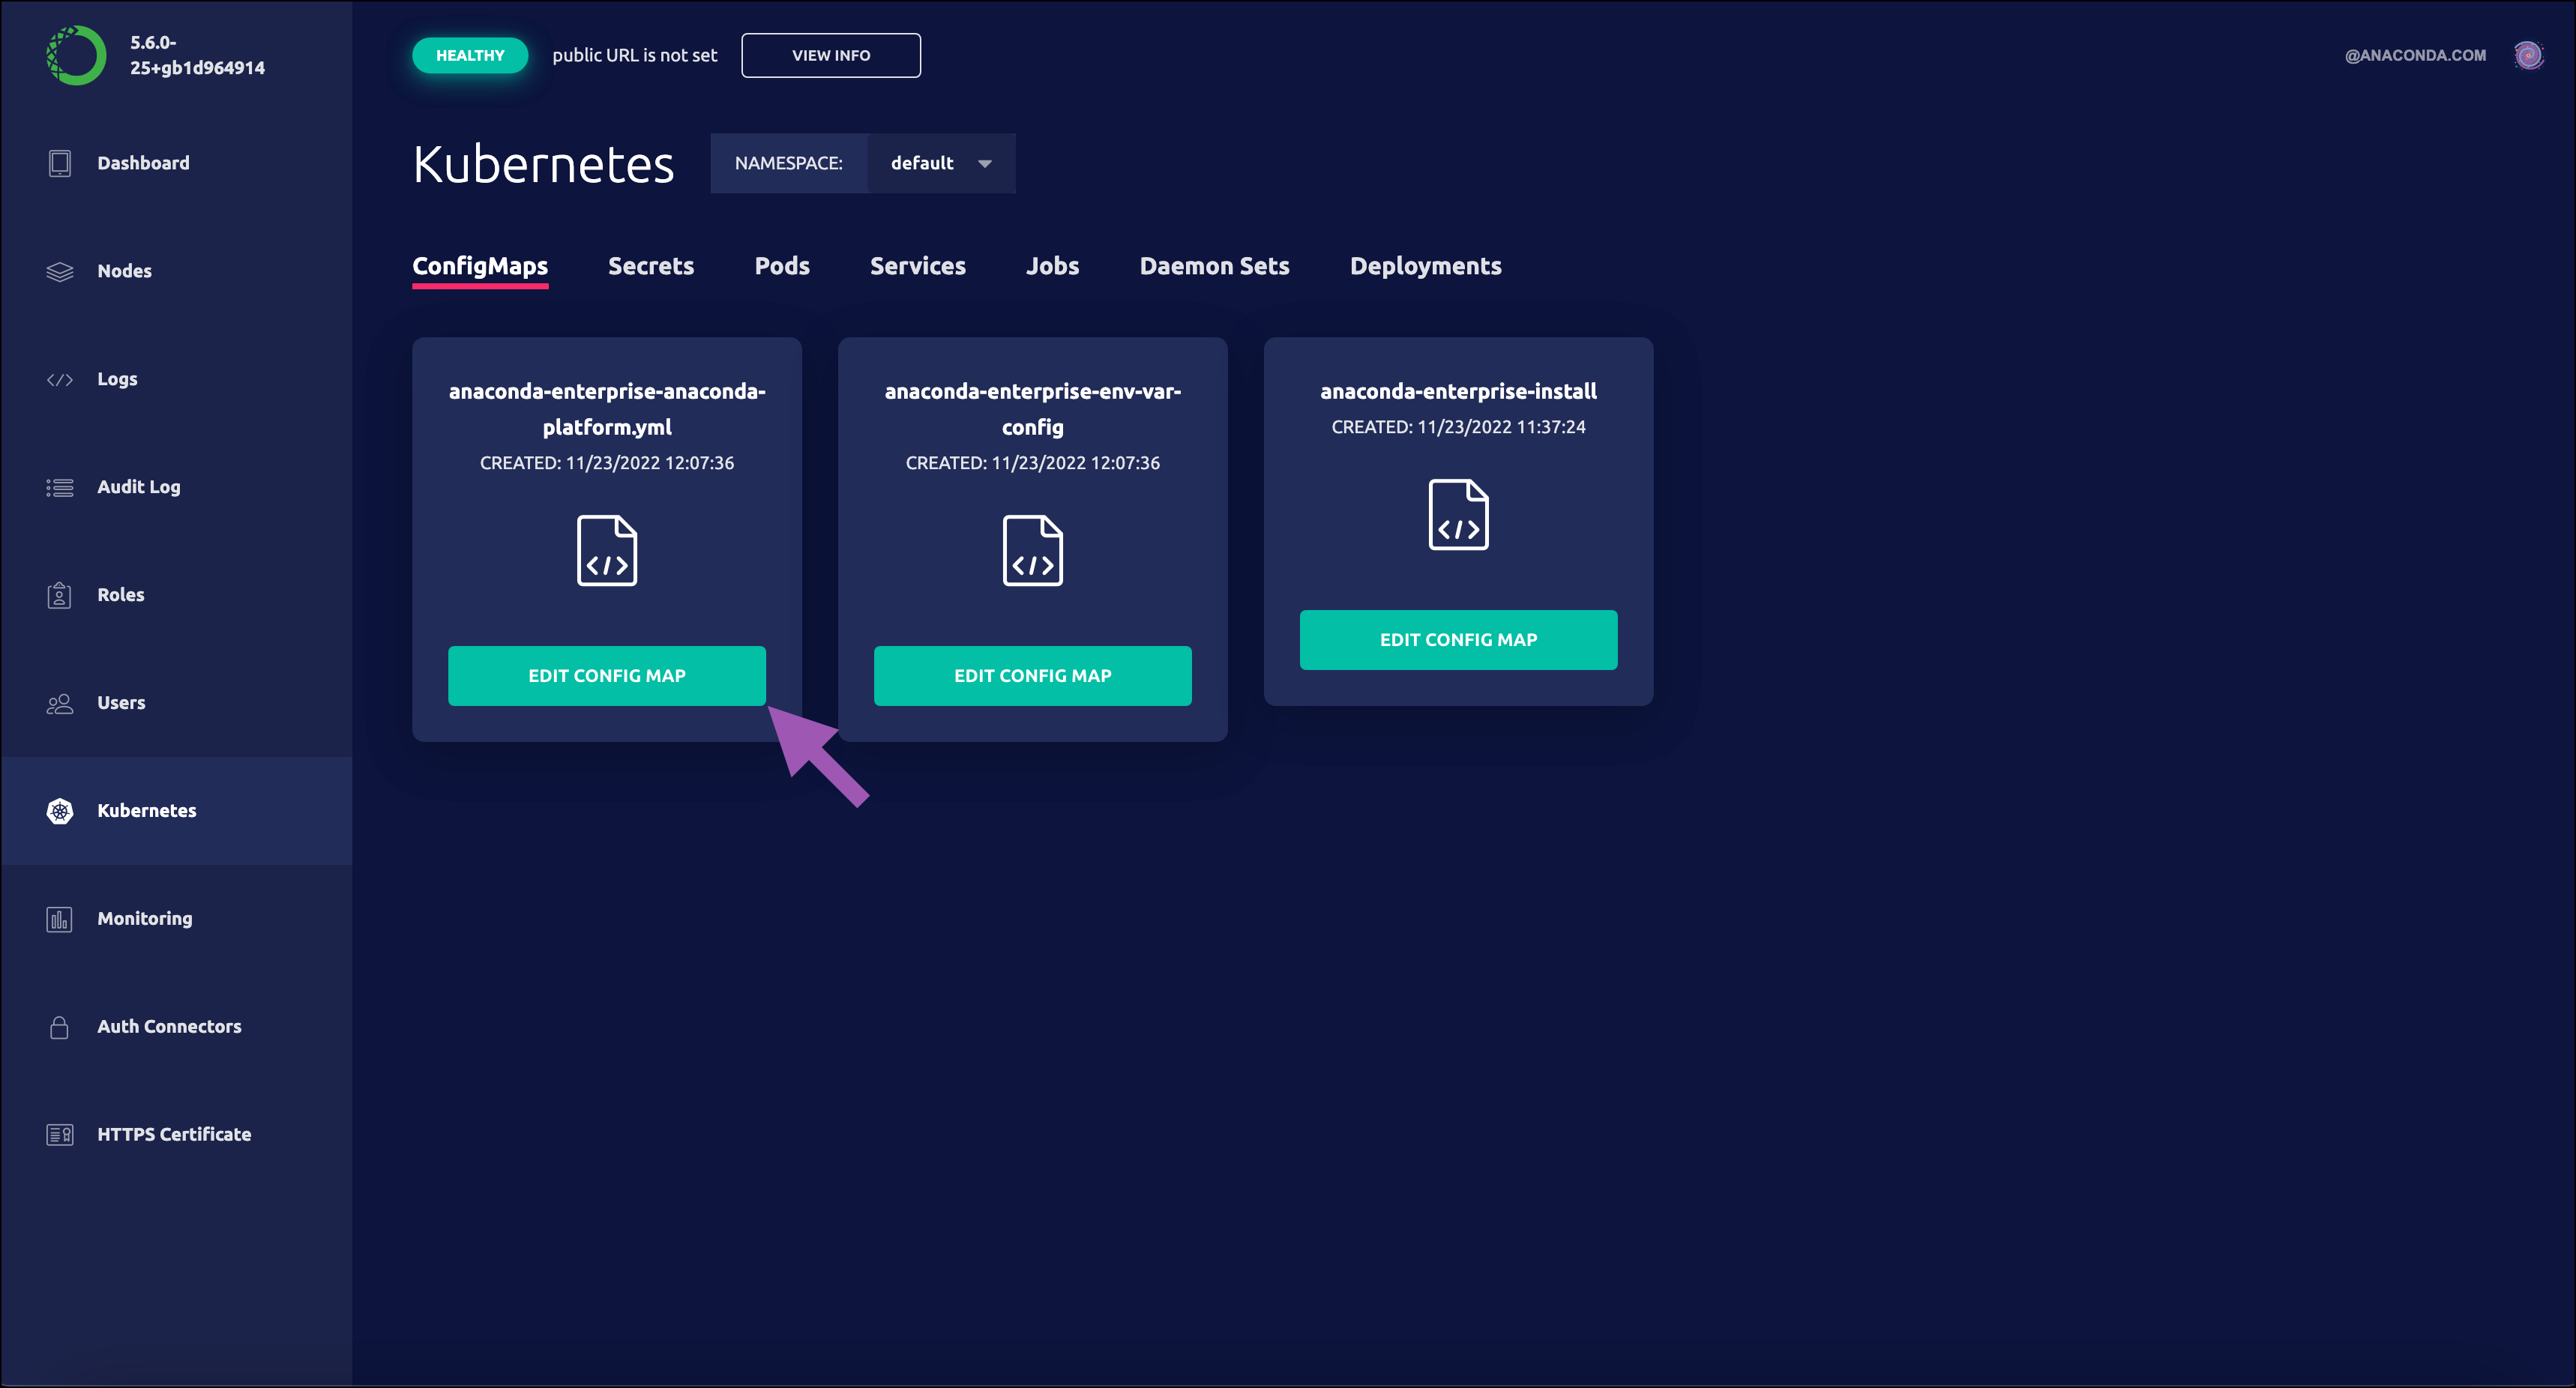
9. Select **Kubernetes** from the left-hand navigation menu.
10. Select **Edit config map** under `anaconda-enterprise-anaconda-platform.yml` to open the file. Leave this browser open for now.
7. Select **Manage Resources** to open your Gravity Ops Center.
8. Log in to your Gravity Ops Center. Contact your Gravity systems administrator if you need access.
9. Select **Kubernetes** from the left-hand navigation menu.
10. Select **Edit config map** under `anaconda-enterprise-anaconda-platform.yml` to open the file. Leave this browser open for now.
 11. Return to your terminal and view the contents of your `configmap.yaml` file by running the following command:
```
cat configmap.yaml
```
12. Replace the applicable sections of the `anaconda-enterprise-anaconda-platform.yml` file with the saved configurations in your `configmap.yaml` file. Commonly saved configurations include resource profiles, affinity settings, shared volumes, conda settings, and git settings. It is important to replace only the specific sections of the `anaconda-enterprise-anaconda-platform.yml` file that were saved in the `configmap.yaml` file.
13. Save your changes to the `anaconda-enterprise-anaconda-platform.yml` file.
14. Restart the Anaconda platform pods by running the following command:
```
kubectl get pods | grep ap- | cut -d ' ' -f 1 | xargs kubectl delete pods
```
15. [Add the worker nodes to the cluster](../../admin/resources/add-remove-node).
Once the upgrade process is complete, it’s time to [verify your installation](#verify-your-installation).
11. Return to your terminal and view the contents of your `configmap.yaml` file by running the following command:
```
cat configmap.yaml
```
12. Replace the applicable sections of the `anaconda-enterprise-anaconda-platform.yml` file with the saved configurations in your `configmap.yaml` file. Commonly saved configurations include resource profiles, affinity settings, shared volumes, conda settings, and git settings. It is important to replace only the specific sections of the `anaconda-enterprise-anaconda-platform.yml` file that were saved in the `configmap.yaml` file.
13. Save your changes to the `anaconda-enterprise-anaconda-platform.yml` file.
14. Restart the Anaconda platform pods by running the following command:
```
kubectl get pods | grep ap- | cut -d ' ' -f 1 | xargs kubectl delete pods
```
15. [Add the worker nodes to the cluster](../../admin/resources/add-remove-node).
Once the upgrade process is complete, it’s time to [verify your installation](#verify-your-installation).
Verifying your installation
1. Verify all pods are running by running the following command:
```
sudo kubectl get pods
```
2. Open a web browser and navigate to your Authentication Center.
```
# Replace with the fully qualified domain name of your Anaconda Enterprise server
https:///auth/admin
```
3. Select **Users** from the **Manage** menu, then click **View all users** and verify your users’ data is present.
4. Open a web browser and navigate to your Anaconda Enterprise URL. Log in using the same credentials you used for your previous installation.
5. Review the **Projects** list to verify that all project data has been restored.
## Additional configurations
TLS/SSL certificates
If you did not configure SSL certificates as part of the post-install configuration, do so now. For more information, see [Updating TLS/SSL certificates](../certs).
### External git repository
Anaconda Enterprise 5 uses configurable parameters in the **External git** section of the `anaconda-enterprise-anaconda-platform.yml` file to connect to external git repositories. Verify your parameters are mapped correctly, [as described here](../../admin/advanced/config-repo).
Spark/Hadoop
After verifying your installation, run the following command on the *master node* of the Anaconda Enterprise server:
```
sudo kubectl replace -f
```
To verify that your configuration upgraded correctly:
1. Log in to Anaconda Enterprise.
2. If your configuration uses Kerberos authentication, open a Hadoop terminal and authenticate yourself through Kerberos using the same credentials you used previously. For example, `kinit `.
3. Open a Jupyter Notebook that uses Sparkmagic and verify that it behaves as expected by running the `sc` command to connect to Sparkmagic and start Spark.
## Cleaning up
As part of the upgrade process, the script you run automatically removes the unused packages and images from the previous installation and repopulates the registry to include only those images required by the current installation. This helps prevent the cluster from running out of disk space on the master node.