> ## Documentation Index
> Fetch the complete documentation index at: https://anaconda.com/docs/llms.txt
> Use this file to discover all available pages before exploring further.
# Migrating from AE 4 to AE 5
The process of migrating from AE 4 to AE 5 involves the following tasks:
**For Administrators:**
* [Export all packages](#exporting-packages) and package info. from your AE 4 Repository.
* [Import the packages](#importing-packages) into Anaconda Enterprise 5.
**For Notebook users:**
* [Export each project environment](#exporting-your-project) to a `.yml` file.
* [Convert each project into a format compatible with AE 5](#converting-your-project).
* [Upload each project into AE 5](#uploading-your-project-to-ae-5).
Due to architectural changes between versions of the platform, there are some additional steps you might need to follow to [migrate code](#migrating-code) between AE4 and AE5. These steps vary, based your current and new platform configurations.
## Exporting packages
Anaconda Enterprise enables you to create a site dump of all packages used by your organization, including the owners and permissions associated with each package.
1. Log in to the AE 4 Repo and switch to the `anaconda-server` user.
2. To export your packages, run the following command on the server hosting your Anaconda Repository:
```
anaconda-server-admin export-site
```
Running this command creates a directory structure containing all files and user information from your Anaconda Repository. For example:
```
site-dump/
├── anaconda-user-1
│ ├── 59921152446b5703f430383f--moto
│ ├── 5992115f446b5703fa30383e--pysocks
│ └── meta.json
├── anaconda-organization
│ ├── 5989fbd1446b575b99032652--future
│ ├── 5989fc1d446b575b99032786--iso8601
│ ├── 5989fc1f446b575b990327a8--simplejson
│ ├── 5989fc26446b575b99032802--six
│ ├── 5989fc31446b575b990328b0--xz
│ ├── 5989fc35446b575b990328c6--zlib
│ └── meta.json
└── anaconda-user-2
└── meta.json
```
Each subdirectory of `site-dump` contains the contents of the Repository *as it pertains to a particular user*. For example `anaconda-user-1` has two packages, `moto` and `pysocks`. The `meta.json` file in each user directory contains information about any groups of end users that user belongs to, as well as their organizations.
Package directories contain the package files, prefixed with the id of the database. The `meta.json` file in each package directory contains metadata about the packages, including version, build number, dependencies, and build requirements.
Other files included in the site-dump—such as projects and environments—are NOT imported by the package import tool. That’s why users have to [export their Notebook projects](#exporting-your-project) separately.
## Importing packages
You can choose whether to import packages into Anaconda Enterprise 5 by username or organization, or import all packages.
**Before you begin:**
* Anaconda recommends you compare the import options before proceeding, so you can choose the option that most closely aligns with the preferred outcome for your organization.
* You’ll be using the Anaconda Enterprise command line interface (CLI) to import the packages you exported, so be sure to [install the AE CLI](./ae-cli) if you haven’t already.
1. Log in to the command line interface using the following command:
```
anaconda-enterprise-cli login
```
2. Follow the instructions below for the method you want to use to import packages.
**To import packages by username or organization:**
As you saw in the example above, the packages for each user are put in a separate directory in the site-dump. This means that the import process is the same whether you specify a directory based on a username or organization.
Import a single directory from the `site-dump` using the following command:
```
anaconda-enterprise-cli admin import site-dump/name
```
Replacing `name` with the actual name of the directory you want to import.
You can also pass a list of directories to import.
**To import all packages:**
Run the following command to import all packages in the site dump:
```
anaconda-enterprise-cli admin import site-dump/*
```
**How channels of imported packages are named**
*When you import packages by username*, a new channel is created for each unique label the user has applied to their packages, using the username as a prefix. (The default package label “main” is not included in channel names.)
For example, if `anaconda-user-1` has the following packages:
* `moto-0.4.31-2.tar.bz2` with label `main`
* `pysocks-1.6.6-py35_0.tar.bz2` with label `test`
The following channels are created:
* `anaconda-user-1` containing the package file `moto-0.4.31-2.tar.bz2`
* `anaconda-user-1/test` containing the package file `pysocks-1.6.6-py35_0.tar.bz2`
*When you import all packages in an organization*, a new channel is created for each organization, group, and label. The script appends any groups associated with the organization to the channel name it creates. (The default package label “main” and default organization label “Owner” are not included in channel names.)
For example, if `anaconda-organization` includes a group called `Devs`, and the site dump for `anaconda-organization` contains a package file named `xz-5.2.2-1.tar.bz2` with the label `Test`, running the script will create the following channels:
* `anaconda-organization`: This channel contains all packages that the organization owner can access.
* `anaconda-organization/Devs`: This channel contains all packages that the `Dev` group can access.
* `anaconda-organization/Devs/Test`: This channel contains all packages labeled `Test` that the `Dev` group can access.
**Granting access to channels and packages**
After everything is uploaded, each channel created as part of the import process is shared with the appropriate users and groups. In the case of the example above,`anaconda-user-1` is granted *read-write* access to the `anaconda-user-1` and `anaconda-user-1/test` channels, and all members of the `Devs` group will have *read* permission for everything in the `Devs` channel.
You can change these access permissions as needed using the Anaconda Enterprise UI or CLI. See [Managing channels and packages](../admin/chan-pkg/manage) for more information.
## Migrating AE 4 Notebook Projects
**Before you begin:**
* If your project refers to channels in your on-premises repository or other channels in anaconda.org, ask you System Administrator to [mirror those channels](../admin/chan-pkg/mirror) and make them available to you in AE 5.
* If your project use non-conda packages, you’ll need to [upload those packages](../data-science-workflows/packages/main) to AE 5.
* If your notebook refers to multiple kernels or environments, set the kernel to a single environment.
* If your project contains several notebooks, verify that they all are using the same kernel or environment.
## Exporting your project
Exporting a project creates a yml file that includes all the environment information for the project.
1. Log in to your Anaconda Enterprise Notebooks server.
2. Open a terminal window and activate conda environment 2.6 for your project.
3. Install `anaconda project` in the environment:
```
conda install anaconda-project=0.6.0
```
If you get a `not found` message, install it from anaconda.org:
```
conda install -c anaconda anaconda-project=0.6.0
```
4. Export your environment to a file:
```
conda env export -n default -f _env.yml
```
`` is the name of the environment where the notebook runs.
5. Verify that the format of the environment file looks similar to the following, and that the dependencies for each notebook in the project are listed:
```
yaml
channels:
- wakari
- r
- https://conda.anaconda.org/wakari
- defaults
- anaconda-adam
prefix: /projects/anaconda/MigrationExample/envs/default
dependencies:
- _license=1.1=py27_1
- accelerate=2.3.1=np111py27_0
- accelerate_cudalib=2.0=0
- alabaster=0.7.9=py27_0
# ... etc ...
```
If it contains any warning messages, run this script to modify the encoding and remove the warnings:
```
import ruamel_yaml
with open("_env.yml") as env_fd:
env = ruamel_yaml.load(env_fd)
with open("environment.yml", "w") as env_fd:
ruamel_yaml.dump(env, env_fd, Dumper=ruamel_yaml.RoundTripDumper)
```
## Converting your project
To create a project that’s compatible with Anconda Enterprise 5, perform these steps:
1. Run the following command from an interactive shell:
```
anaconda-project init
```
2. AE 4 supports Linux only, so run the following command to remove the Windows and macOS platforms from the project’s `anaconda-project.yml` configuration file:
```
anaconda-project remove-platforms win-64 osx-64
```
3. Run the following command to verify the platforms were removed:
```
anaconda-project list-platforms
```
4. Add `/.indexer.pid` and `.git` to the `.projectignore` file.
5. Run the following command to compress your project:
```
anaconda-project archive FILENAME.tar.gz
```
There is a 1GB file size limit for project files, and project names cannot contain spaces or special characters.
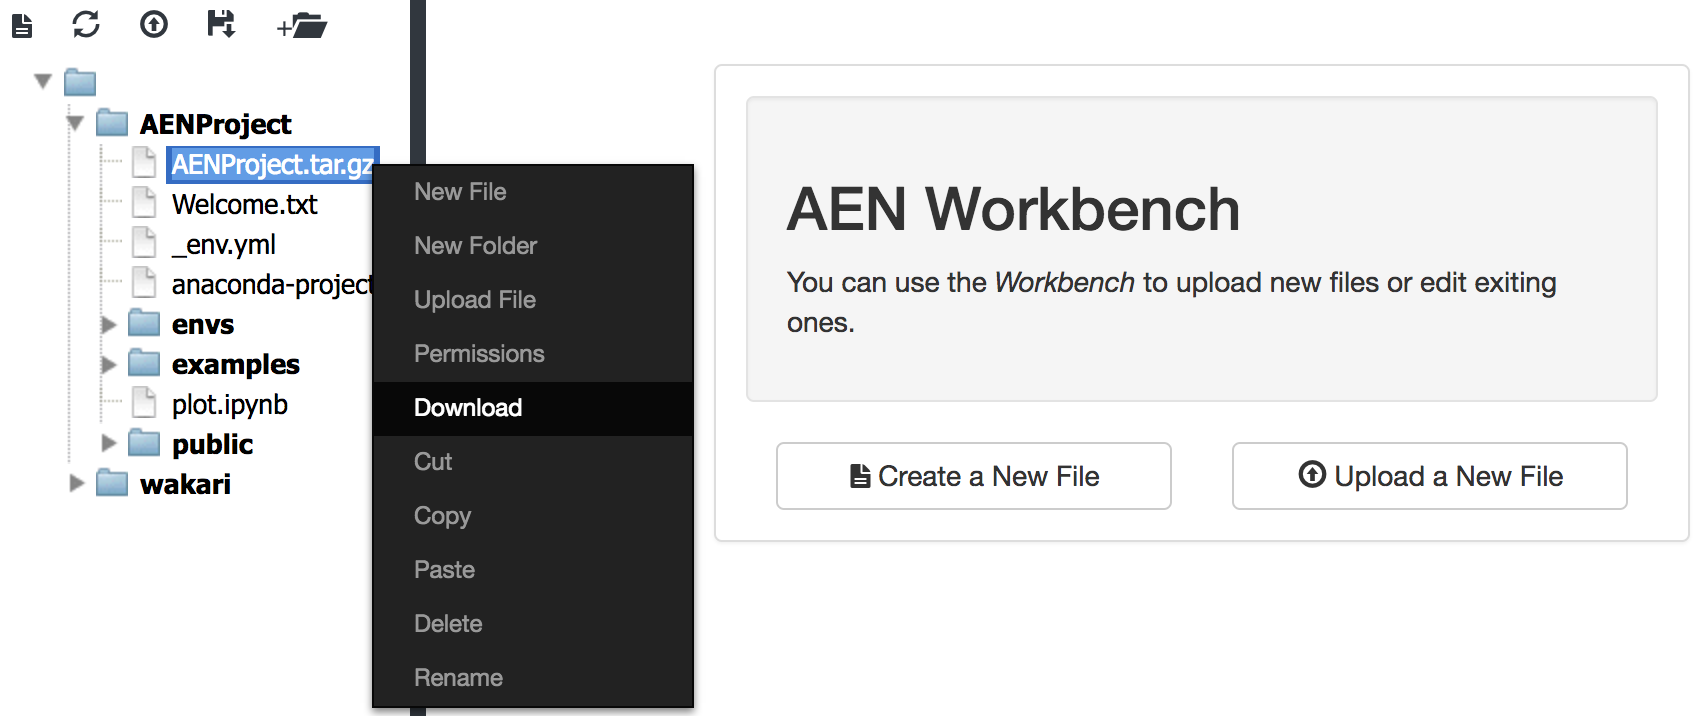
6. In Anaconda Enterprise Notebooks, from your project home page, open the Workbench. Locate your project file (for example, `AENProject.tar.gz` in the image below) in the file list, right-click and select **Download**.
 Now your project is ready to be uploaded into Anaconda Enterprise 5.
## Uploading your project to AE 5
Log in to the Enterprise v5 interface and upload your project file `FILENAME.tar.gz`. See [Working with projects](../data-science-workflows/projects/main) for help.
To maintain performance, there is a 1GB file size limit for project files you upload. Anaconda Enterprise projects are based on Git, so Anaconda recommends you commit only text-based files relevant to a project, and keep them under 100MB. Binary files are difficult for version control systems to manage, so Anaconda recommends using storage solutions designed for that type of data, and connecting to those data sources from within your Anaconda Enterprise sessions.
## Migrating code
AE4 and AE5 are based on a different architecture, therefore some code inside your AE4 notebooks might not run as expected in AE5. AE4 sessions ran directly on the host filesystem, where the libraries, drivers, packages, and connectors required to run them were available. AE5 sessions run in isolated containers with their own independent file system, so they don’t necessarily have access to everything on the host.
This difference in architecture primarily impacts the following:
### Connecting to external data sources
If you currently rely on ODBC/JDBC drivers to connect to specific databases such as Oracle and Impala, Anaconda recommends you use services that support this, such as Apache Impala and Apache Hive, instead. Additionally, using a language and platform agnostic connector such as Thrift allows you to create reproducible code that is more portable.
For best practices on how to connect to different external systems inside AE5, see [Connecting to the Hadoop and Spark ecosystem](../data-science-workflows/templates/spark-hadoop).
| Service/System | Recommended |
| :------------- | :------------------------------------------- |
| Apache Impala | [impyla](https://github.com/cloudera/impyla) |
| Apache Hive | [pyhive](https://github.com/dropbox/PyHive) |
| Oracle | build conda package with their driver |
If this is not possible, Anaconda recommendsed you obtain or [build conda packages](../data-science-workflows/packages/build) for the connectors and drivers you need. This enables you to [add them as package dependencies for your project](../data-science-workflows/projects/dependencies) that will be installed when you start a Notebook session or deploy the project.
This has the added benefit of enabling you to update dependencies on connectors on a per-project basis.
### Sharing custom Python libraries
It’s quite common to share custom libraries by adding them to a location in the filesystem where all users can access the libraries they need. AE5 sessions and deployments run in isolated containers, so users cannot use this method to access shared libraries.
Instead, Anaconda recommends you [create a conda package for each library](../data-science-workflows/packages/build). This enables you to control access to each package library and version it—both essential to managing software at the enterprise level.
After you create the package, [upload it to the internal AE5 repository](../data-science-workflows/packages/upload), where it can be [shared with users](../data-science-workflows/packages/share) and [included as a dependency](../data-science-workflows/projects/dependencies) in user sessions and deployments.
### Installing external dependencies
If you typically install dependencies using system package managers such as `apt` and `yum`, you can continue to do so in Anaconda Enterprise 5. Dependencies installed from the command line are available during the current session only, however.
If you want them to persist across project sessions and deployments, add them as packages in the project’s `anaconda-project.yml` configuration file. See [Configuring project settings](../data-science-workflows/projects/dependencies) for more information.
If your project depends on package that is not available in your internal Anaconda Enterprise repository, search [anaconda.org](https://anaconda.org) or build your own conda package using [conda-build](https://docs.conda.io/docs/user-guide/tasks/build-packages/recipe.html) then [upload the conda package](../data-science-workflows/packages/upload) to the AE5 repository.
If you don’t have the expertise required to build the custom packages your organization needs, consider [engaging our professional services team](https://www.anaconda.com/professional-services) to make your mission-critical analytics libraries available as conda packages.
Now your project is ready to be uploaded into Anaconda Enterprise 5.
## Uploading your project to AE 5
Log in to the Enterprise v5 interface and upload your project file `FILENAME.tar.gz`. See [Working with projects](../data-science-workflows/projects/main) for help.
To maintain performance, there is a 1GB file size limit for project files you upload. Anaconda Enterprise projects are based on Git, so Anaconda recommends you commit only text-based files relevant to a project, and keep them under 100MB. Binary files are difficult for version control systems to manage, so Anaconda recommends using storage solutions designed for that type of data, and connecting to those data sources from within your Anaconda Enterprise sessions.
## Migrating code
AE4 and AE5 are based on a different architecture, therefore some code inside your AE4 notebooks might not run as expected in AE5. AE4 sessions ran directly on the host filesystem, where the libraries, drivers, packages, and connectors required to run them were available. AE5 sessions run in isolated containers with their own independent file system, so they don’t necessarily have access to everything on the host.
This difference in architecture primarily impacts the following:
### Connecting to external data sources
If you currently rely on ODBC/JDBC drivers to connect to specific databases such as Oracle and Impala, Anaconda recommends you use services that support this, such as Apache Impala and Apache Hive, instead. Additionally, using a language and platform agnostic connector such as Thrift allows you to create reproducible code that is more portable.
For best practices on how to connect to different external systems inside AE5, see [Connecting to the Hadoop and Spark ecosystem](../data-science-workflows/templates/spark-hadoop).
| Service/System | Recommended |
| :------------- | :------------------------------------------- |
| Apache Impala | [impyla](https://github.com/cloudera/impyla) |
| Apache Hive | [pyhive](https://github.com/dropbox/PyHive) |
| Oracle | build conda package with their driver |
If this is not possible, Anaconda recommendsed you obtain or [build conda packages](../data-science-workflows/packages/build) for the connectors and drivers you need. This enables you to [add them as package dependencies for your project](../data-science-workflows/projects/dependencies) that will be installed when you start a Notebook session or deploy the project.
This has the added benefit of enabling you to update dependencies on connectors on a per-project basis.
### Sharing custom Python libraries
It’s quite common to share custom libraries by adding them to a location in the filesystem where all users can access the libraries they need. AE5 sessions and deployments run in isolated containers, so users cannot use this method to access shared libraries.
Instead, Anaconda recommends you [create a conda package for each library](../data-science-workflows/packages/build). This enables you to control access to each package library and version it—both essential to managing software at the enterprise level.
After you create the package, [upload it to the internal AE5 repository](../data-science-workflows/packages/upload), where it can be [shared with users](../data-science-workflows/packages/share) and [included as a dependency](../data-science-workflows/projects/dependencies) in user sessions and deployments.
### Installing external dependencies
If you typically install dependencies using system package managers such as `apt` and `yum`, you can continue to do so in Anaconda Enterprise 5. Dependencies installed from the command line are available during the current session only, however.
If you want them to persist across project sessions and deployments, add them as packages in the project’s `anaconda-project.yml` configuration file. See [Configuring project settings](../data-science-workflows/projects/dependencies) for more information.
If your project depends on package that is not available in your internal Anaconda Enterprise repository, search [anaconda.org](https://anaconda.org) or build your own conda package using [conda-build](https://docs.conda.io/docs/user-guide/tasks/build-packages/recipe.html) then [upload the conda package](../data-science-workflows/packages/upload) to the AE5 repository.
If you don’t have the expertise required to build the custom packages your organization needs, consider [engaging our professional services team](https://www.anaconda.com/professional-services) to make your mission-critical analytics libraries available as conda packages.