> ## Documentation Index
> Fetch the complete documentation index at: https://anaconda.com/docs/llms.txt
> Use this file to discover all available pages before exploring further.
# Managing roles and groups
Assigning access and permissions to individual users can be too fine-grained and cumbersome for organizations to manage, so Anaconda Enterprise enables you to assign access permissions to specific *roles*, then use *groups* to assign one or more roles to sets of users. Users inherit the attributes and role mappings assigned to each group they are members of—whether multiple or none.
The use of groups to assign permissions is entirely optional, so you can rely solely on roles to assign users permission to perform certain actions in Anaconda Enterprise.
* You’ll use the Admin Console’s Authentication Center to [create and manage roles and groups](#to-manage-roles). This includes creating new roles and groups, configuring defaults for each, and assigning roles to groups.
* You’ll use the Admin Console’s Operations Center to [configure permissions for any roles you create](#to-configure-permissions-for-roles), and optionally the default system roles provided by Anaconda Enterprise.
When *naming* users and groups that you create, consider that Anaconda Enterprise users can add collaborators by user or group name when [sharing their projects](../../data-science-workflows/projects/collaborate) and [deployments](../../data-science-workflows/deployments/share), as well as [packages and channels](../../data-science-workflows/packages/share).
## To access the Authentication Center
1. Login to Anaconda Enterprise, click the **Menu** icon in the top right corner, then click the **Administrative Console** link in the bottom of the slideout menu.
2. Click **Manage Users**.
3. Login to the Authentication Center using the Administrator credentials [configured after installation](../../install/config).
To manage roles
Use roles to authorize individual or groups of users to perform specific actions within Anaconda Enterprise. Default roles allow you to automatically assign user role mappings when any user is newly created or imported (for example, through [LDAP](./external-id-prov).
You’ll use the Authentication Center to configure new roles and specify default roles to be automatically added to all new user accounts.
1. In the Configure menu on the left, click **Roles** to display a list of roles configured for use with Anaconda Enterprise.
To get you started, Anaconda Enterprise provides a set of “realm” roles. You can use these system roles as is, or as a basis for creating your own.
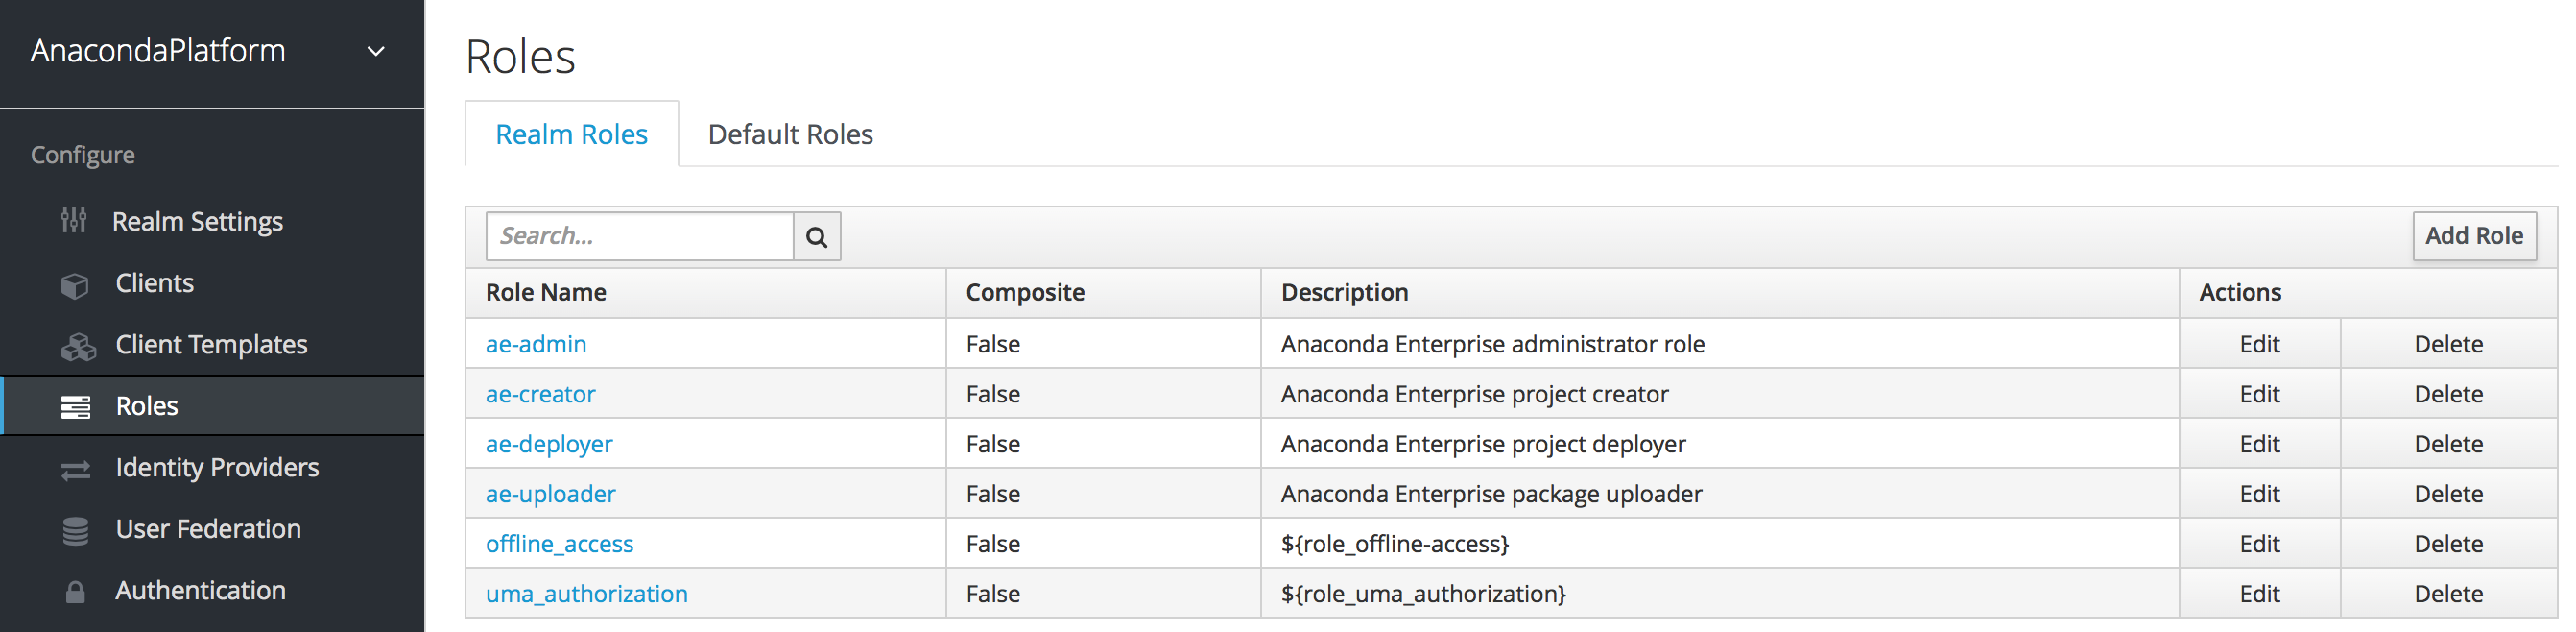 Allows a user to access the [Administrative console](../consoles#the-administrative-console).
Allows a user to [create new projects](../../data-science-workflows/projects/main).
Allows a user to [create new deployments from projects](../../data-science-workflows/deployments/main).
Allows a user to [upload packages](../../data-science-workflows/packages/upload).
2. To create a new role, click **Add Role** on the **Realm Roles** tab.
3. Enter a name and description of the role, and click **Save**.
Roles can be assigned to users automatically or require an explicit request. If a user has to explicitly request a realm role, enable the **Scope Param Required** switch. The role must then be specified using the `scope` parameter when requesting a token.
The new role is now available to be used as a default role, or [to be assigned to groups of users](#to-manage-groups).
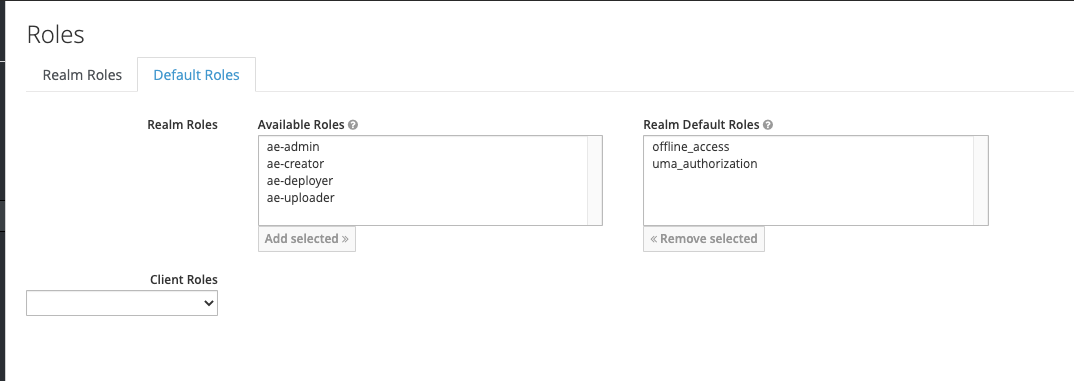
4. To configure default roles, click the **Default Roles** tab.
When working with the **AnacondaPlatform** realm, you can configure default roles *for Anaconda Enterprise users* using the list of available and default **Realm Roles**.
You’ll want to disable default roles (except for `offline_access` and `uma_auth`, as those are system config requirements) before mapping out specific roles, as not doing so may prevent your role mapping from working. The roles should look like the following when you’ve finished disabling those roles:
Allows a user to access the [Administrative console](../consoles#the-administrative-console).
Allows a user to [create new projects](../../data-science-workflows/projects/main).
Allows a user to [create new deployments from projects](../../data-science-workflows/deployments/main).
Allows a user to [upload packages](../../data-science-workflows/packages/upload).
2. To create a new role, click **Add Role** on the **Realm Roles** tab.
3. Enter a name and description of the role, and click **Save**.
Roles can be assigned to users automatically or require an explicit request. If a user has to explicitly request a realm role, enable the **Scope Param Required** switch. The role must then be specified using the `scope` parameter when requesting a token.
The new role is now available to be used as a default role, or [to be assigned to groups of users](#to-manage-groups).
4. To configure default roles, click the **Default Roles** tab.
When working with the **AnacondaPlatform** realm, you can configure default roles *for Anaconda Enterprise users* using the list of available and default **Realm Roles**.
You’ll want to disable default roles (except for `offline_access` and `uma_auth`, as those are system config requirements) before mapping out specific roles, as not doing so may prevent your role mapping from working. The roles should look like the following when you’ve finished disabling those roles:
 ## To manage groups
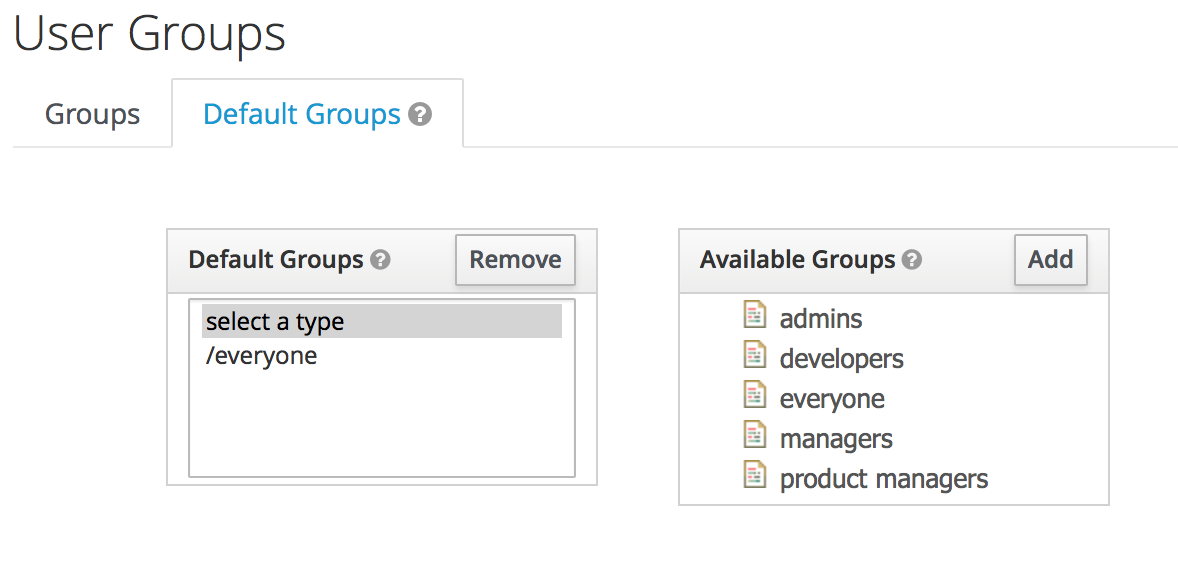
1. In the Manage menu on the left, click **Groups** to display a list of groups configured for use with Anaconda Enterprise.
To get you started, Anaconda Enterprise provides a set of default groups, with different role mappings for each. You can use these defaults as is, or as a basis for creating your own. Default groups allow you to automatically assign group membership whenever a new user is created or imported.
## To manage groups
1. In the Manage menu on the left, click **Groups** to display a list of groups configured for use with Anaconda Enterprise.
To get you started, Anaconda Enterprise provides a set of default groups, with different role mappings for each. You can use these defaults as is, or as a basis for creating your own. Default groups allow you to automatically assign group membership whenever a new user is created or imported.
 2. Double-click the name of a group to view information about the group and modify it:
* Use the **Role Mappings** tab to assign roles to the group from the list of available **Realm Roles** and **Client Roles**. See [managing roles](#to-manage-roles) for information on how to create new roles. Permission to perform certain actions in Anaconda Enterprise are based on a user’s *role*, so you can grant permissions to a group of users by mapping the associated role(s) with the group. See the section below for the steps to [configure permissions by role](#to-configure-permissions-for-roles).
* Use the **Members** tab to view all users who currently belong to the group. You add users to groups *at the user level* using the **Groups** tab *for the user*. See [managing users](./users) for more information.
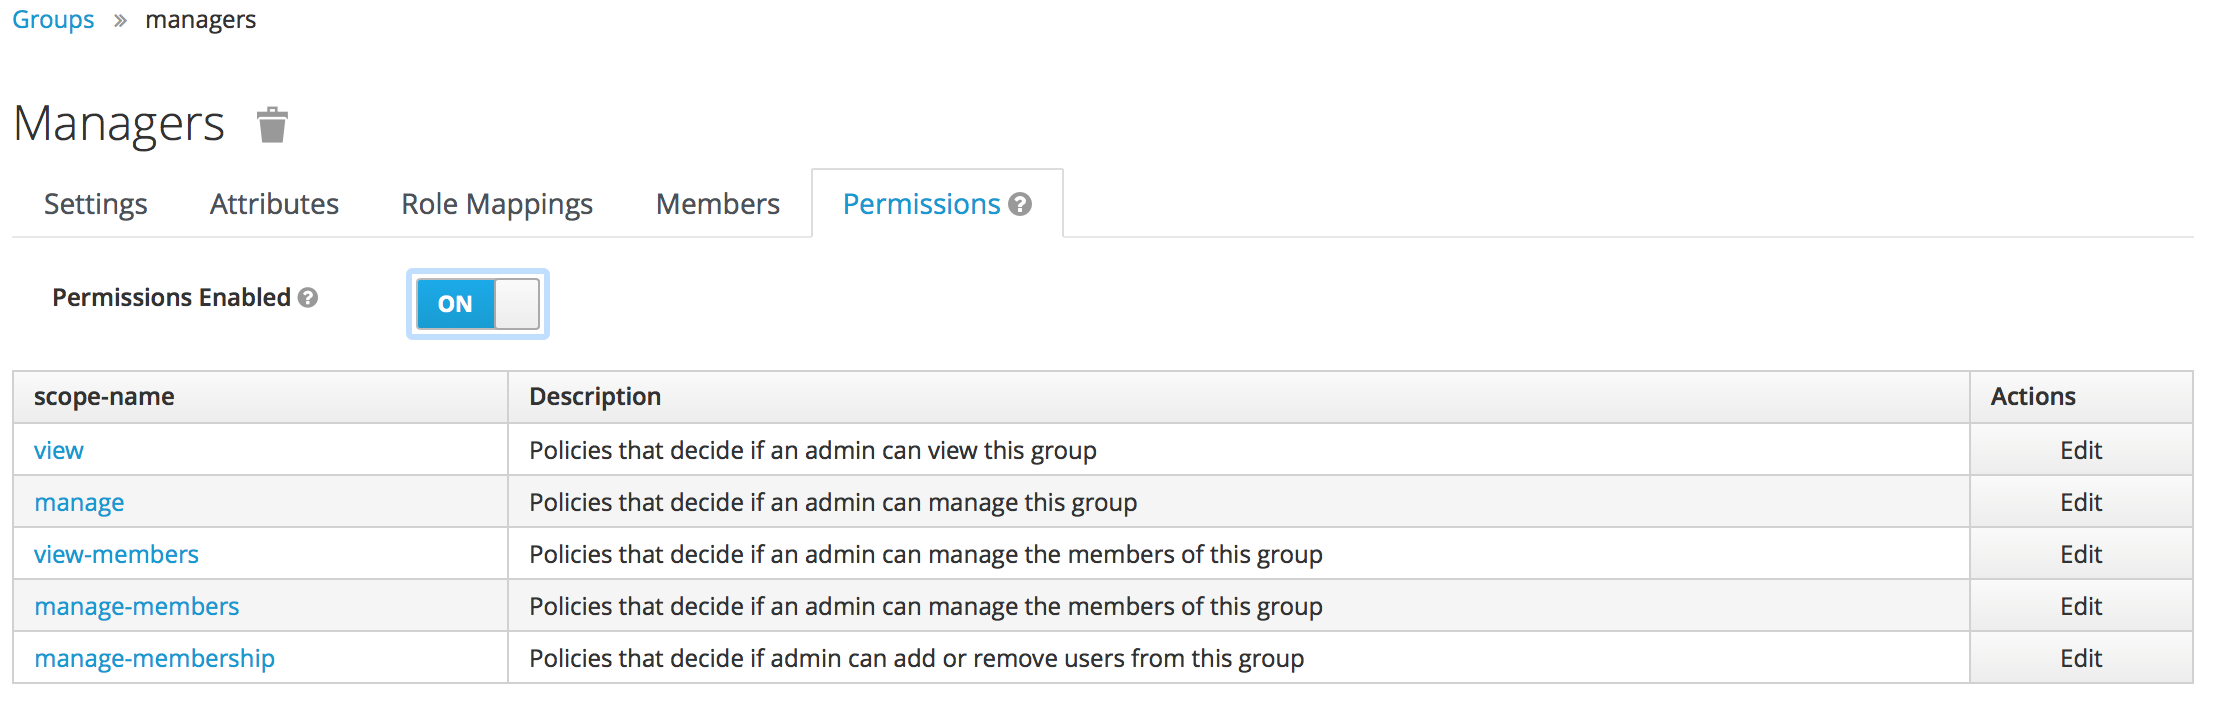
* Use the **Permissions** tab to enable a set of fine grain permissions to use to *define policies* for allowing Admin users to manage the group. See the section below to understand how to [configure permissions by role](#to-configure-permissions-for-roles).
2. Double-click the name of a group to view information about the group and modify it:
* Use the **Role Mappings** tab to assign roles to the group from the list of available **Realm Roles** and **Client Roles**. See [managing roles](#to-manage-roles) for information on how to create new roles. Permission to perform certain actions in Anaconda Enterprise are based on a user’s *role*, so you can grant permissions to a group of users by mapping the associated role(s) with the group. See the section below for the steps to [configure permissions by role](#to-configure-permissions-for-roles).
* Use the **Members** tab to view all users who currently belong to the group. You add users to groups *at the user level* using the **Groups** tab *for the user*. See [managing users](./users) for more information.
* Use the **Permissions** tab to enable a set of fine grain permissions to use to *define policies* for allowing Admin users to manage the group. See the section below to understand how to [configure permissions by role](#to-configure-permissions-for-roles).
 ## To configure permissions for roles
1. Log in to Anaconda Enterprise, select the **Menu** icon in the top right corner and click the **Administrative Console** link displayed at the bottom of the slide out window.
2. Click **Manage Resources**.
3. Log in to the Operations Center using the Administrator credentials [configured after installation](../../install/config).
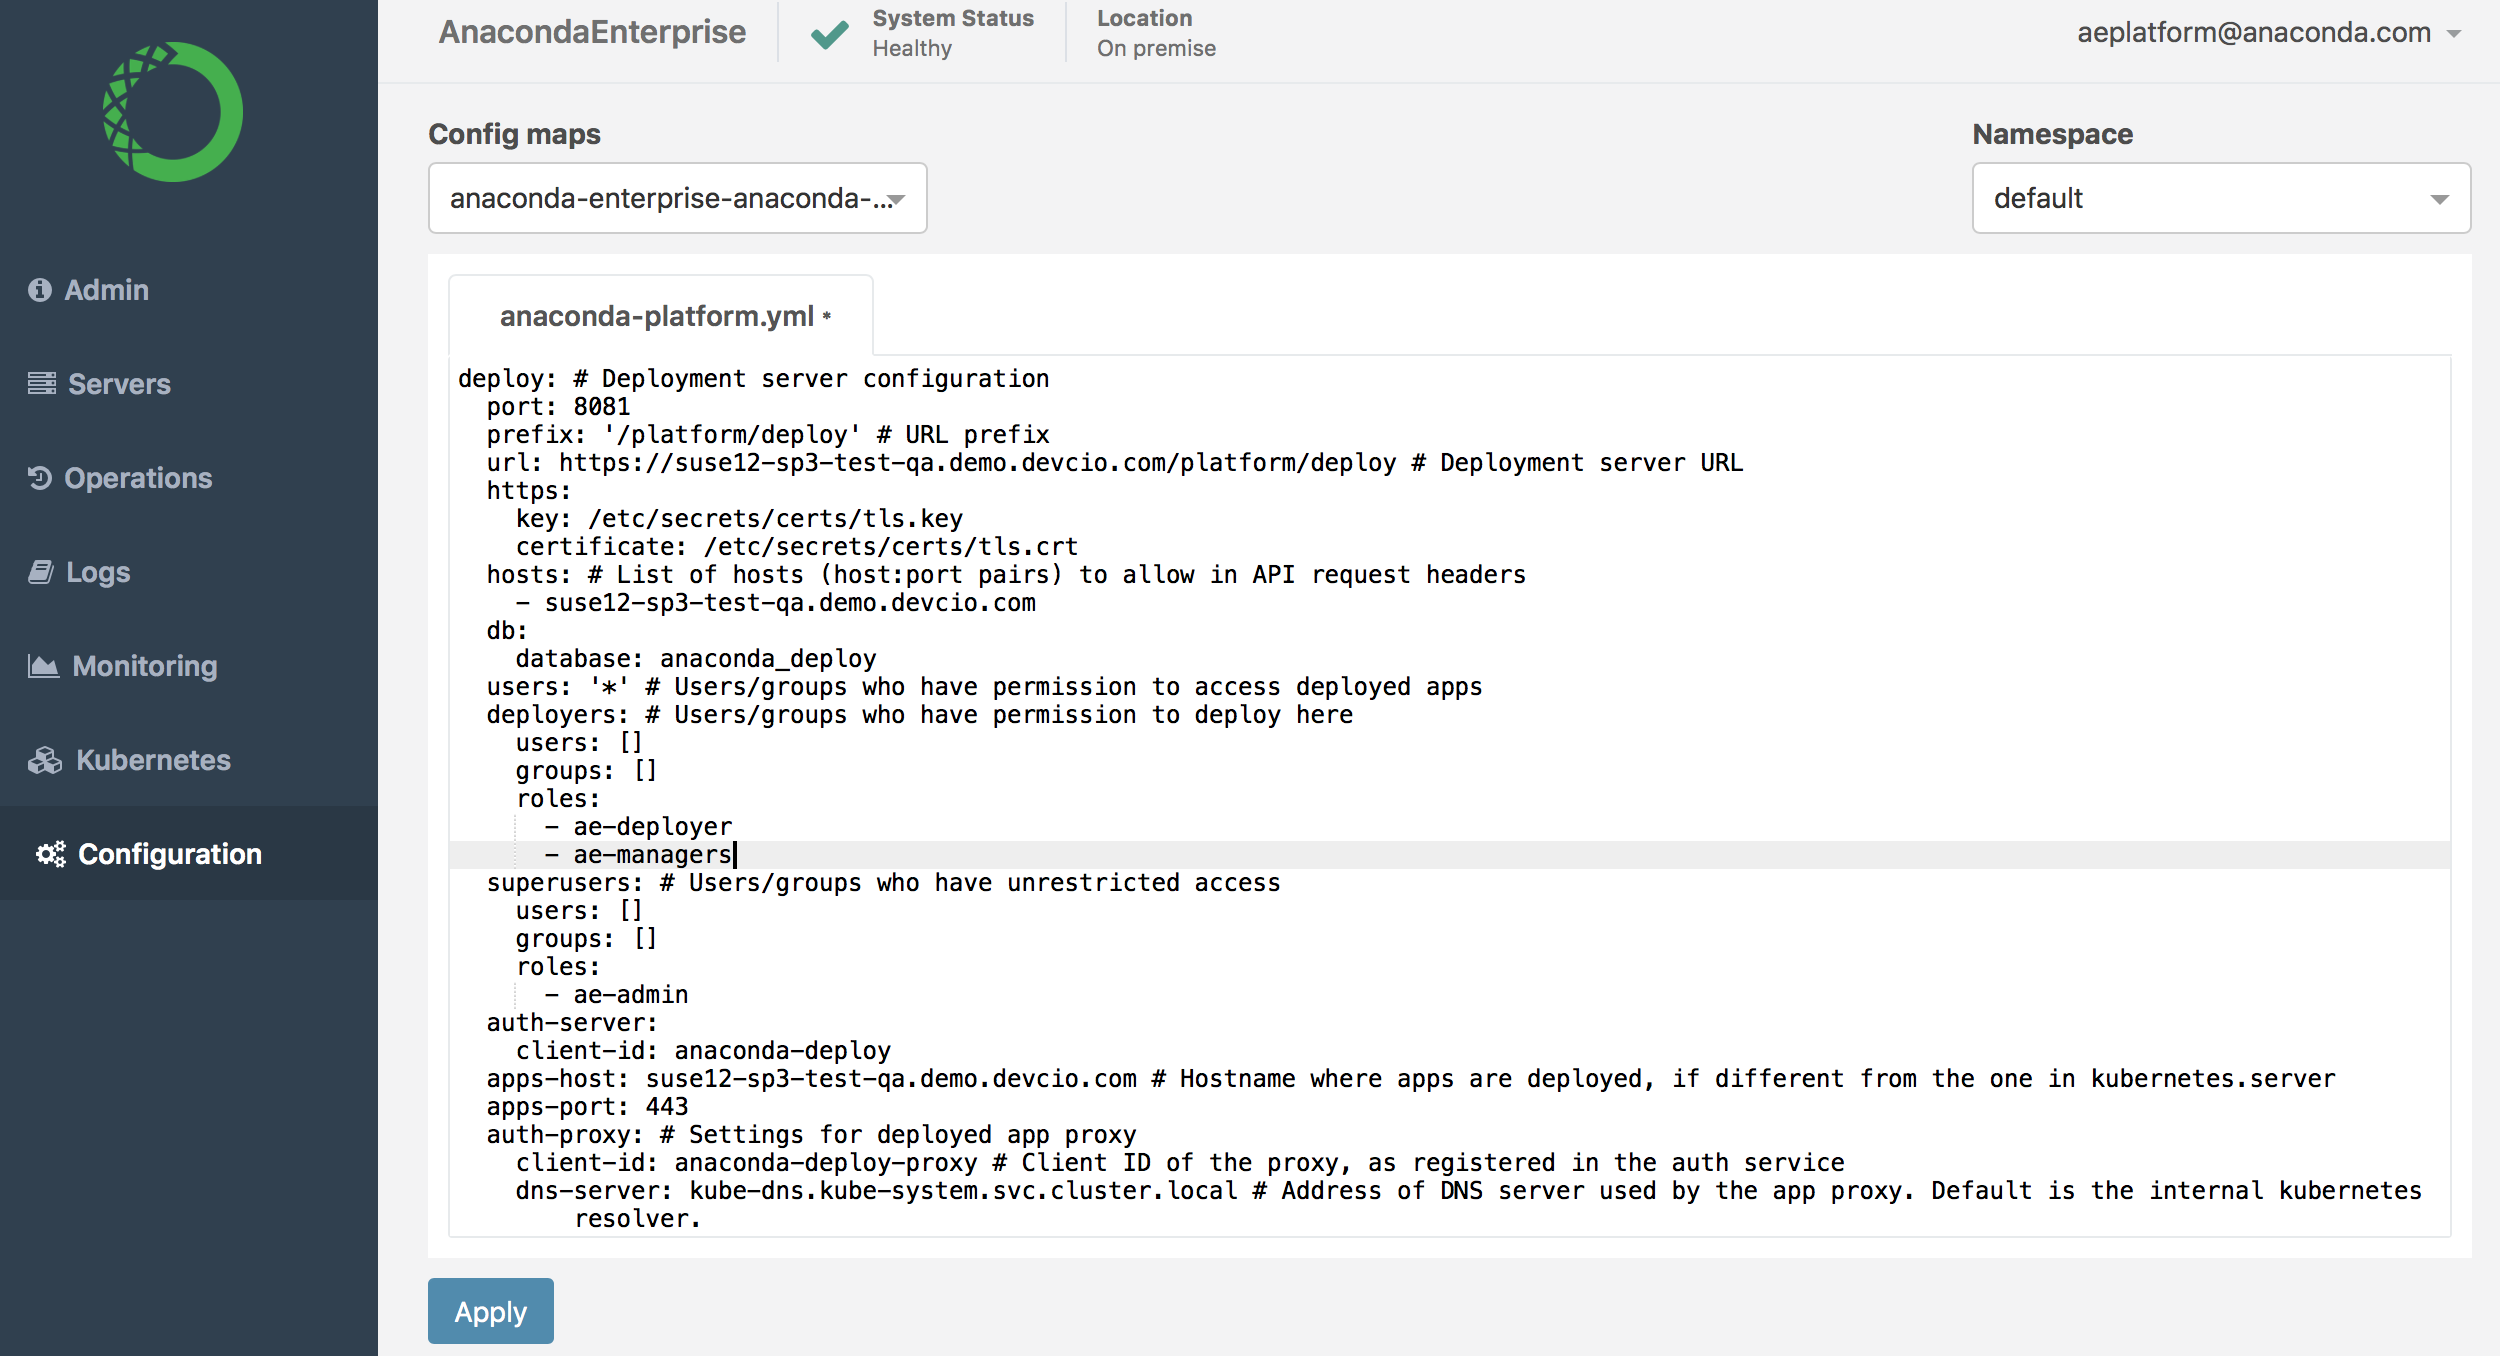
4. Select **Configuration** from the menu on the left to display the config map for Anaconda Enterprise.
If `anaconda-platform.yml` *is not* displayed, be sure `anaconda-enterprise-anaconda-platform.yml` is selected in the **Config maps** drop-down list.
## To configure permissions for roles
1. Log in to Anaconda Enterprise, select the **Menu** icon in the top right corner and click the **Administrative Console** link displayed at the bottom of the slide out window.
2. Click **Manage Resources**.
3. Log in to the Operations Center using the Administrator credentials [configured after installation](../../install/config).
4. Select **Configuration** from the menu on the left to display the config map for Anaconda Enterprise.
If `anaconda-platform.yml` *is not* displayed, be sure `anaconda-enterprise-anaconda-platform.yml` is selected in the **Config maps** drop-down list.
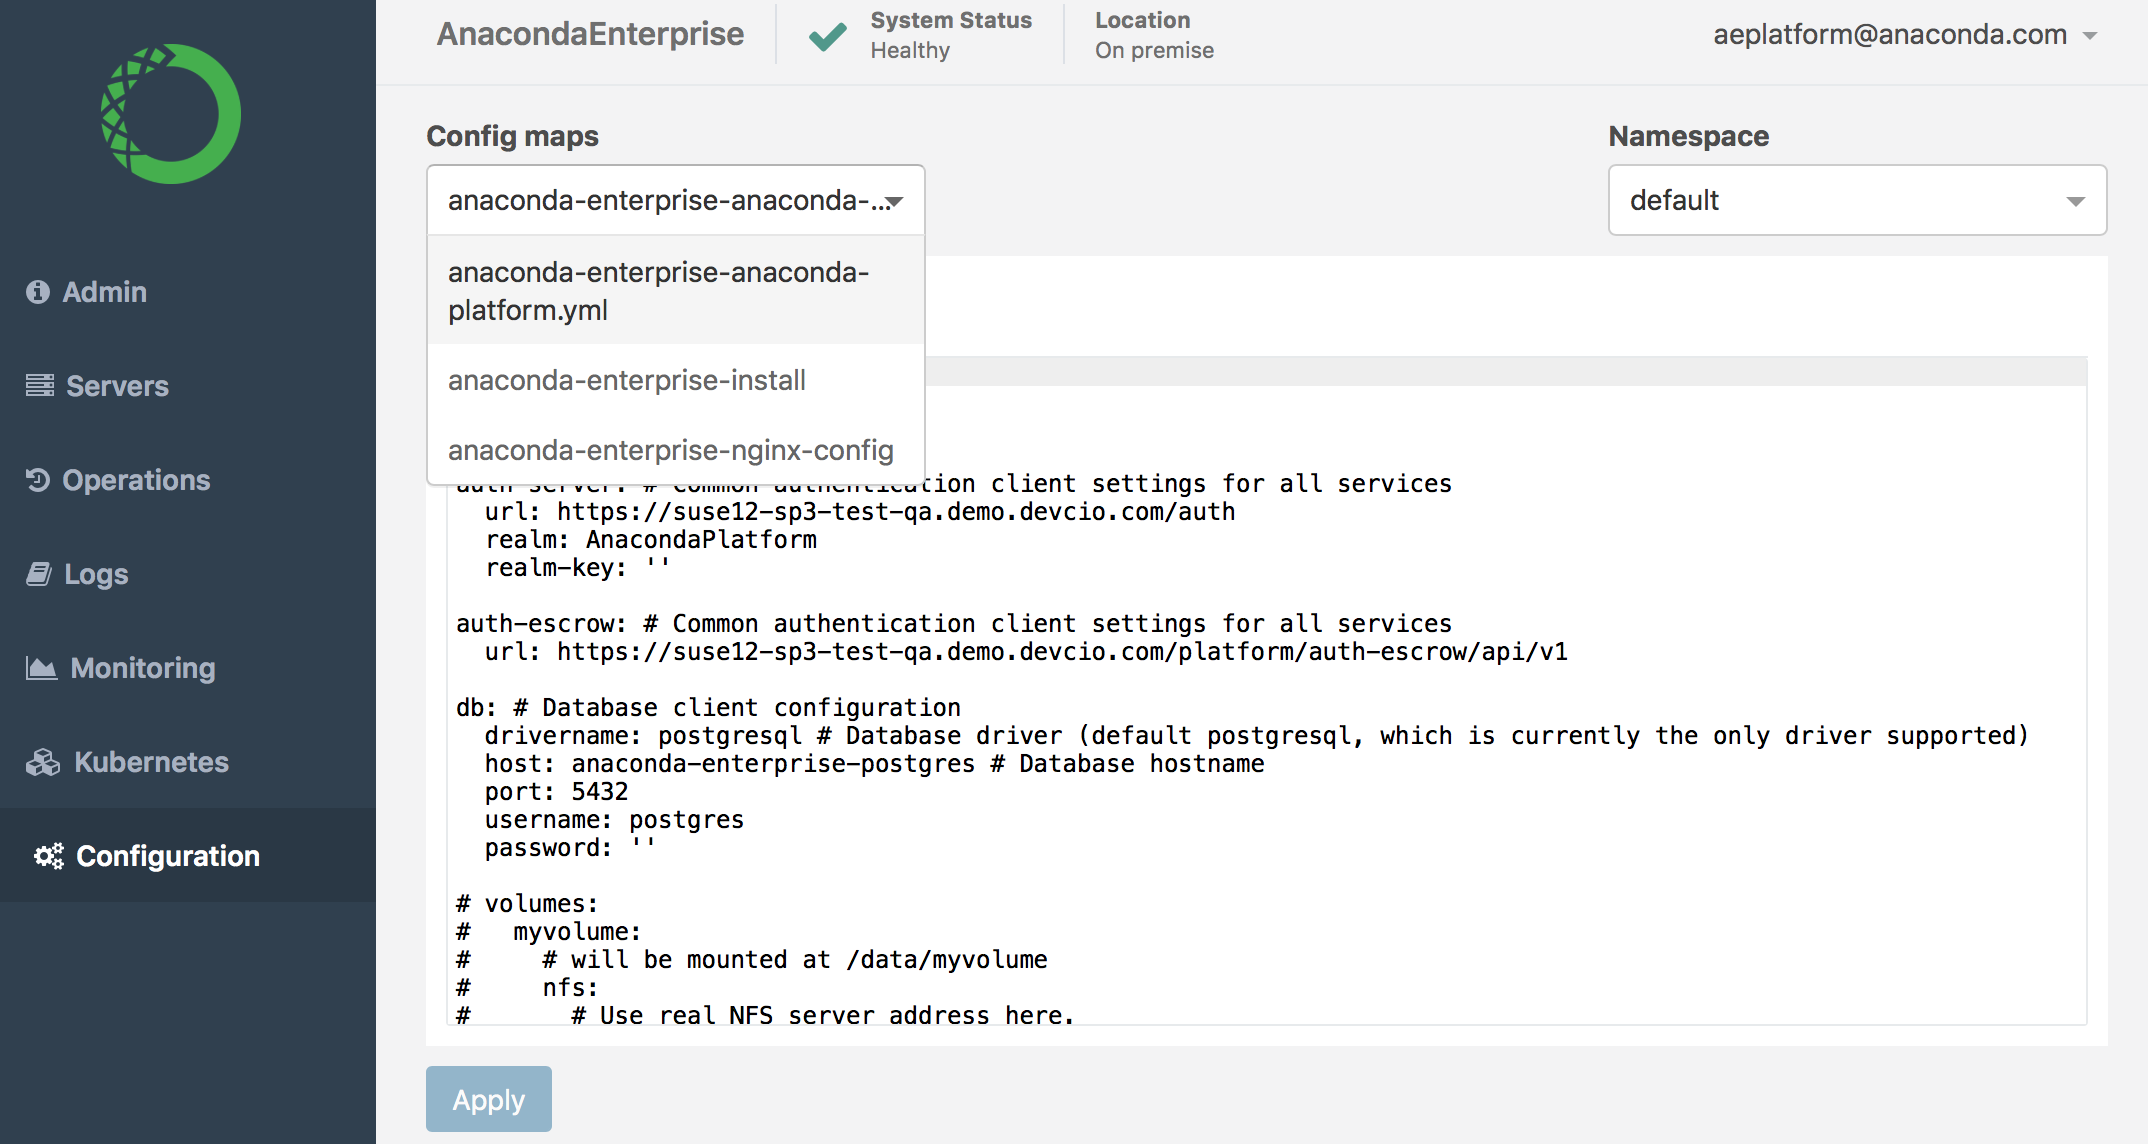 The following sections of the config map have permissions associated with them:
* **deploy:deployers**—used to configure which users can deploy projects
* **workspace:users**—used to configure which users can open project sessions
* **storage:creators**—used to configure which users can create projects
* **repository:uploaders**—used to configure which users can upload packages to the AE repository
5. **Save a copy of this file before making any changes** to `anaconda-platform.yml`. Any changes you make to the platform configuration will impact how Anaconda Enterprise functions, so you’ll want to have a backup if the need to restore a previous configuration arises.
6. Add each new role you create to the appropriate section—based on the permission you want to grant the role—and click **Apply** to save your changes.
For example, if you create a new role called `ae-managers`, and you want users with this role to be able to deploy applications, you need to add that role to the list of roles under `deploy:deployers` to map the permission to the role.
The following sections of the config map have permissions associated with them:
* **deploy:deployers**—used to configure which users can deploy projects
* **workspace:users**—used to configure which users can open project sessions
* **storage:creators**—used to configure which users can create projects
* **repository:uploaders**—used to configure which users can upload packages to the AE repository
5. **Save a copy of this file before making any changes** to `anaconda-platform.yml`. Any changes you make to the platform configuration will impact how Anaconda Enterprise functions, so you’ll want to have a backup if the need to restore a previous configuration arises.
6. Add each new role you create to the appropriate section—based on the permission you want to grant the role—and click **Apply** to save your changes.
For example, if you create a new role called `ae-managers`, and you want users with this role to be able to deploy applications, you need to add that role to the list of roles under `deploy:deployers` to map the permission to the role.