> ## Documentation Index
> Fetch the complete documentation index at: https://anaconda.com/docs/llms.txt
> Use this file to discover all available pages before exploring further.
# Policy management
export const DefinitionDescription = ({children}) => {children};
export const DefinitionTerm = ({children}) => {children};
export const DefinitionList = ({children}) => {children}
;
export const GCell = ({children, className}) =>
{children}
;
export const GTH = ({children, className}) =>
{children}
;
export const GRow = ({children}) => {children}
;
export const GBody = ({children}) => {children}
;
export const GHead = ({children}) => {children}
;
export const GTable = ({children, className, cols}) =>
{children}
;
Business or Custom plans only
Policies let you define and enforce security and compliance standards across your organization. There are two types of policies:
* **Channel policies** restrict which packages are available from a channel based on criteria like CVE score, license, or platform.
* **Environment policies** enforce compliance rules across all logged conda environments in your organization, with automated warning and blocking based on service level agreement (SLA) timelines.
## Channel policies
A channel policy is an additional security measure you can apply to a channel to restrict the available packages that can be sourced from it. Once configured, channel policies automatically ensure that only packages that meet your organization's security requirements are available from a given channel, eliminating the need for administrators to manually review or re-approve packages when new CVEs are reported.
Channel policies are currently managed from the **Channels** page. In a future release, channel policy management will move to the **Policies** page in the Platform UI.
Excludes packages with the specified license family.
Comparators
Options
`is`
`is not`
`AGPL`, `APACHE`, `BSD`, `CC`, `GPL`, `GPL2`, `GPL3`, `LGPL`, `MIT`, `MOZILLA`, `None`, `OTHER`, `PSF`, `Public-Domain`
Excludes packages with CVE scores in the specified range. For more information, see [CVE scores](/docs/anaconda-platform/admin/cve/#cve-scores).
Comparators
Options
`Greater than`
`Greater than or equal to`
`1`-`10`
Excludes packages that are associated with a CVE that has the specified status.
Comparators
Options
`is`
`is not`
`Active`, `Reported`, `Mitigated`, `Cleared`, `Disputed`
Keep in mind that packages can be associated with multiple CVEs.
Excludes packages with the specified package age.
The package age is calculated based on the date the package was last updated.
Comparators
Options
`Greater than`
`Greater than or equal to`
**Value:** Enter a number
**Unit:** `days`, `months`, or `years`
Excludes packages with the specified platform.
Comparators
Options
`is`
`is not`
`linux-32`, `linux-64`, `linux-armv6l`, `linux-armv7l`, `linux-ppc64`, `linux-ppc64le`, `linux-s390x`, `noarch`, `osx-64`, `win-32`, `win-64`, `zos-z`
Excludes packages with the specified [conda spec](https://docs.conda.io/projects/conda-build/en/latest/resources/package-spec.html#package-match-specifications).
### Creating a channel policy
1. From the **Channels** page, click **Create** under **POLICIES**.
2. Provide a unique name for your policy. Anaconda recommends naming it something descriptive.
3. In the **Exclude package if** section, click **Add filter**.
4. In the **FILTER GROUP** section that appears, set filter parameters for packages you want to *exclude*.
5. Click **Add Filter to Group** to include additional parameters for this filter group, or click **Add filter** to add a separate filter for this policy.
Filters can be applied using either `and` or `or` logic. Click the operator to toggle between the two options.
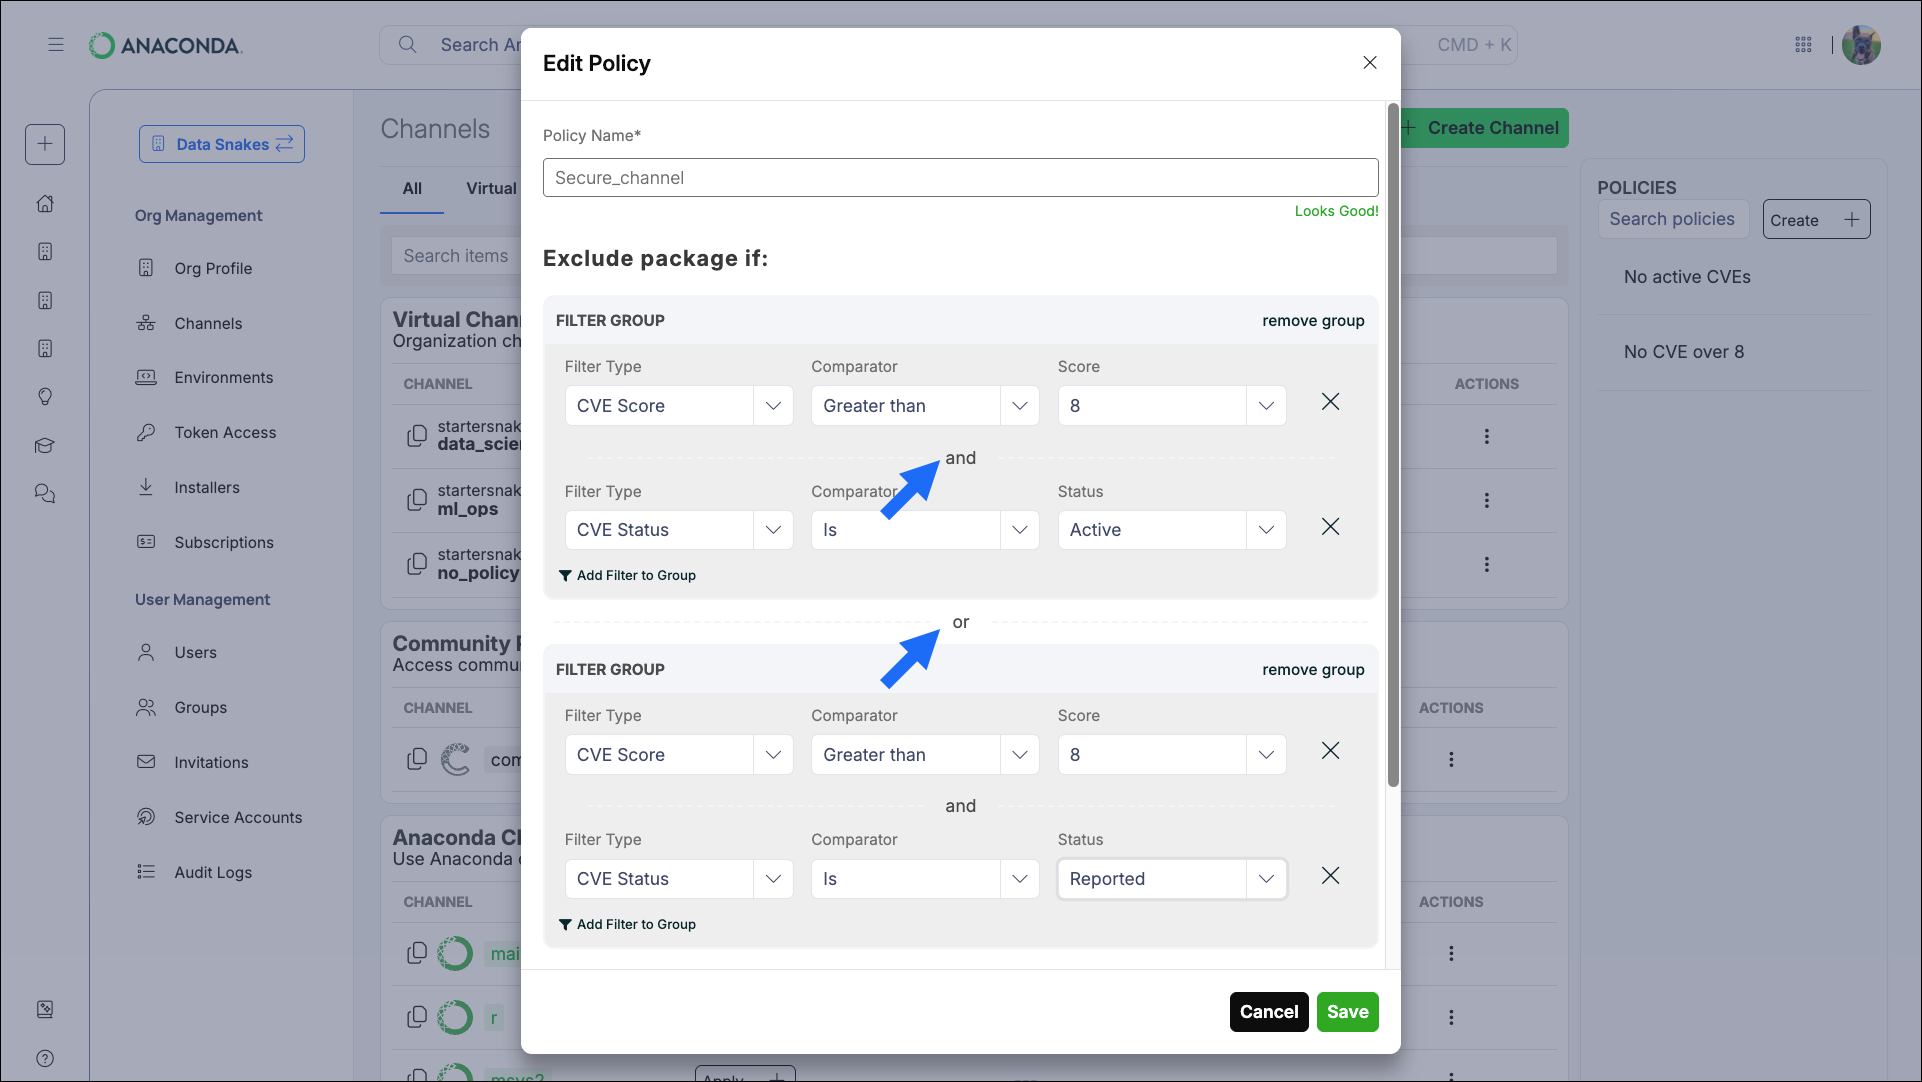 This operator can greatly impact which packages are excluded:
* `and`: All filter parameters must be met by a package for it to be excluded.
* `or`: Only one filter parameter needs to be met by a package for it to be excluded.
For example, setting a filter to exclude packages with a CVE score greater than 7 `and` a Platform of linux-64 excludes linux-64 packages that have a CVE score greater than 7.
However, a filter that excludes packages with a CVE score greater than 7 `or` a Platform of linux-64 excludes:
* All packages that have a CVE score greater than 7
* All linux-64 packages
6. Repeat this process to apply further package filtering preferences.
7. If necessary, in the **Override exclusions and include a package if** section, click **Add filter**.
In some cases, the exclusion parameters of a policy filter might inadvertently remove packages (or dependencies) that are critical for production projects. The *override* filter allows administrators to add these specific packages back to the channel.
You can apply overrides using [conda spec](https://docs.conda.io/projects/conda-build/en/latest/resources/package-spec.html#package-match-specifications) and CVE Status.
Be cautious when using overrides based on CVE Status! Packages contain multiple files, and each file can be associated with different CVEs. For example, let's say you've set up a policy that excludes packages with a CVE Score of 8 or higher, or that have an Active CVE Status.
Now, suppose that there is a package that contains a file that's associated with an active CVE that has a score of 9.0, while another file in the same package is associated with a different CVE that has been cleared.
If you override the policy to allow packages with a cleared CVE status to be pulled back into the channel, *all* files for that package are added back to the channel, even though one of the files is associated with an active CVE and the score exceeds the CVE score threshold you set for the policy. Because most packages contain files that are associated with CVEs that have been cleared, this can result in files that are not compliant with your security policy being added back to the channel.
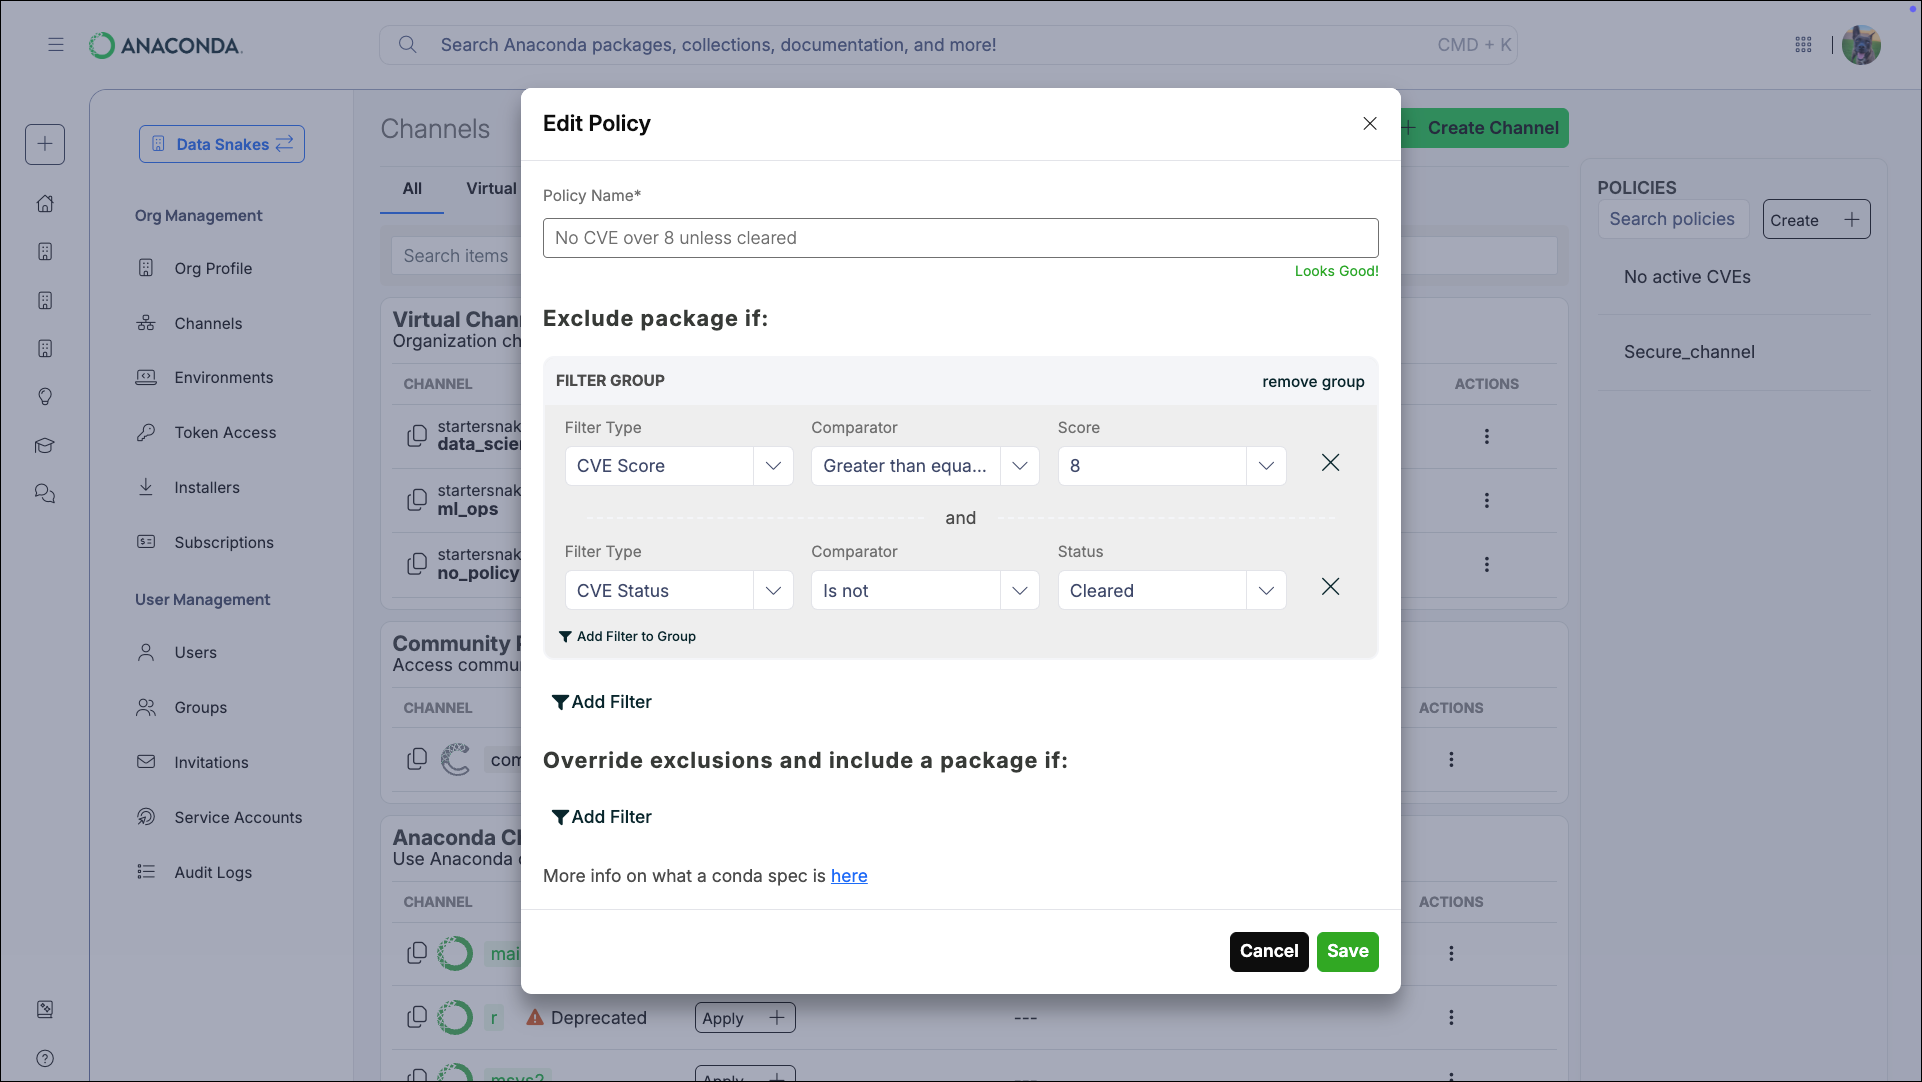
Let's say you want to exclude packages that have a CVE score greater than 8, unless the package file is associated with a CVE that has a **Cleared** status. Your policy filter would look like this:
This operator can greatly impact which packages are excluded:
* `and`: All filter parameters must be met by a package for it to be excluded.
* `or`: Only one filter parameter needs to be met by a package for it to be excluded.
For example, setting a filter to exclude packages with a CVE score greater than 7 `and` a Platform of linux-64 excludes linux-64 packages that have a CVE score greater than 7.
However, a filter that excludes packages with a CVE score greater than 7 `or` a Platform of linux-64 excludes:
* All packages that have a CVE score greater than 7
* All linux-64 packages
6. Repeat this process to apply further package filtering preferences.
7. If necessary, in the **Override exclusions and include a package if** section, click **Add filter**.
In some cases, the exclusion parameters of a policy filter might inadvertently remove packages (or dependencies) that are critical for production projects. The *override* filter allows administrators to add these specific packages back to the channel.
You can apply overrides using [conda spec](https://docs.conda.io/projects/conda-build/en/latest/resources/package-spec.html#package-match-specifications) and CVE Status.
Be cautious when using overrides based on CVE Status! Packages contain multiple files, and each file can be associated with different CVEs. For example, let's say you've set up a policy that excludes packages with a CVE Score of 8 or higher, or that have an Active CVE Status.
Now, suppose that there is a package that contains a file that's associated with an active CVE that has a score of 9.0, while another file in the same package is associated with a different CVE that has been cleared.
If you override the policy to allow packages with a cleared CVE status to be pulled back into the channel, *all* files for that package are added back to the channel, even though one of the files is associated with an active CVE and the score exceeds the CVE score threshold you set for the policy. Because most packages contain files that are associated with CVEs that have been cleared, this can result in files that are not compliant with your security policy being added back to the channel.
Let's say you want to exclude packages that have a CVE score greater than 8, unless the package file is associated with a CVE that has a **Cleared** status. Your policy filter would look like this:
 ### Applying a channel policy
Applying a channel policy to a channel restricts the packages that are able to be sourced from it.
1. From the **Channels** page, click **Apply** beside a channel's name.
2. Select a policy to apply to the channel.
3. Click **Apply** to confirm.
Once the policy is applied, the status beneath the policy transitions through the following phases:
* In Queue
* In Progress
* Completed
* Scheduled
The **Scheduled** status indicates the channel is set to auto-update. This means the filter will be reapplied to the channel every four hours and will update the channel's contents accordingly.
Remove the policy filter by clicking **Remove Policy** beside the policy name in the channel list.
Package files that have been removed from a channel due to a policy filter display the specific reasons they were excluded.
### Applying a channel policy
Applying a channel policy to a channel restricts the packages that are able to be sourced from it.
1. From the **Channels** page, click **Apply** beside a channel's name.
2. Select a policy to apply to the channel.
3. Click **Apply** to confirm.
Once the policy is applied, the status beneath the policy transitions through the following phases:
* In Queue
* In Progress
* Completed
* Scheduled
The **Scheduled** status indicates the channel is set to auto-update. This means the filter will be reapplied to the channel every four hours and will update the channel's contents accordingly.
Remove the policy filter by clicking **Remove Policy** beside the policy name in the channel list.
Package files that have been removed from a channel due to a policy filter display the specific reasons they were excluded.
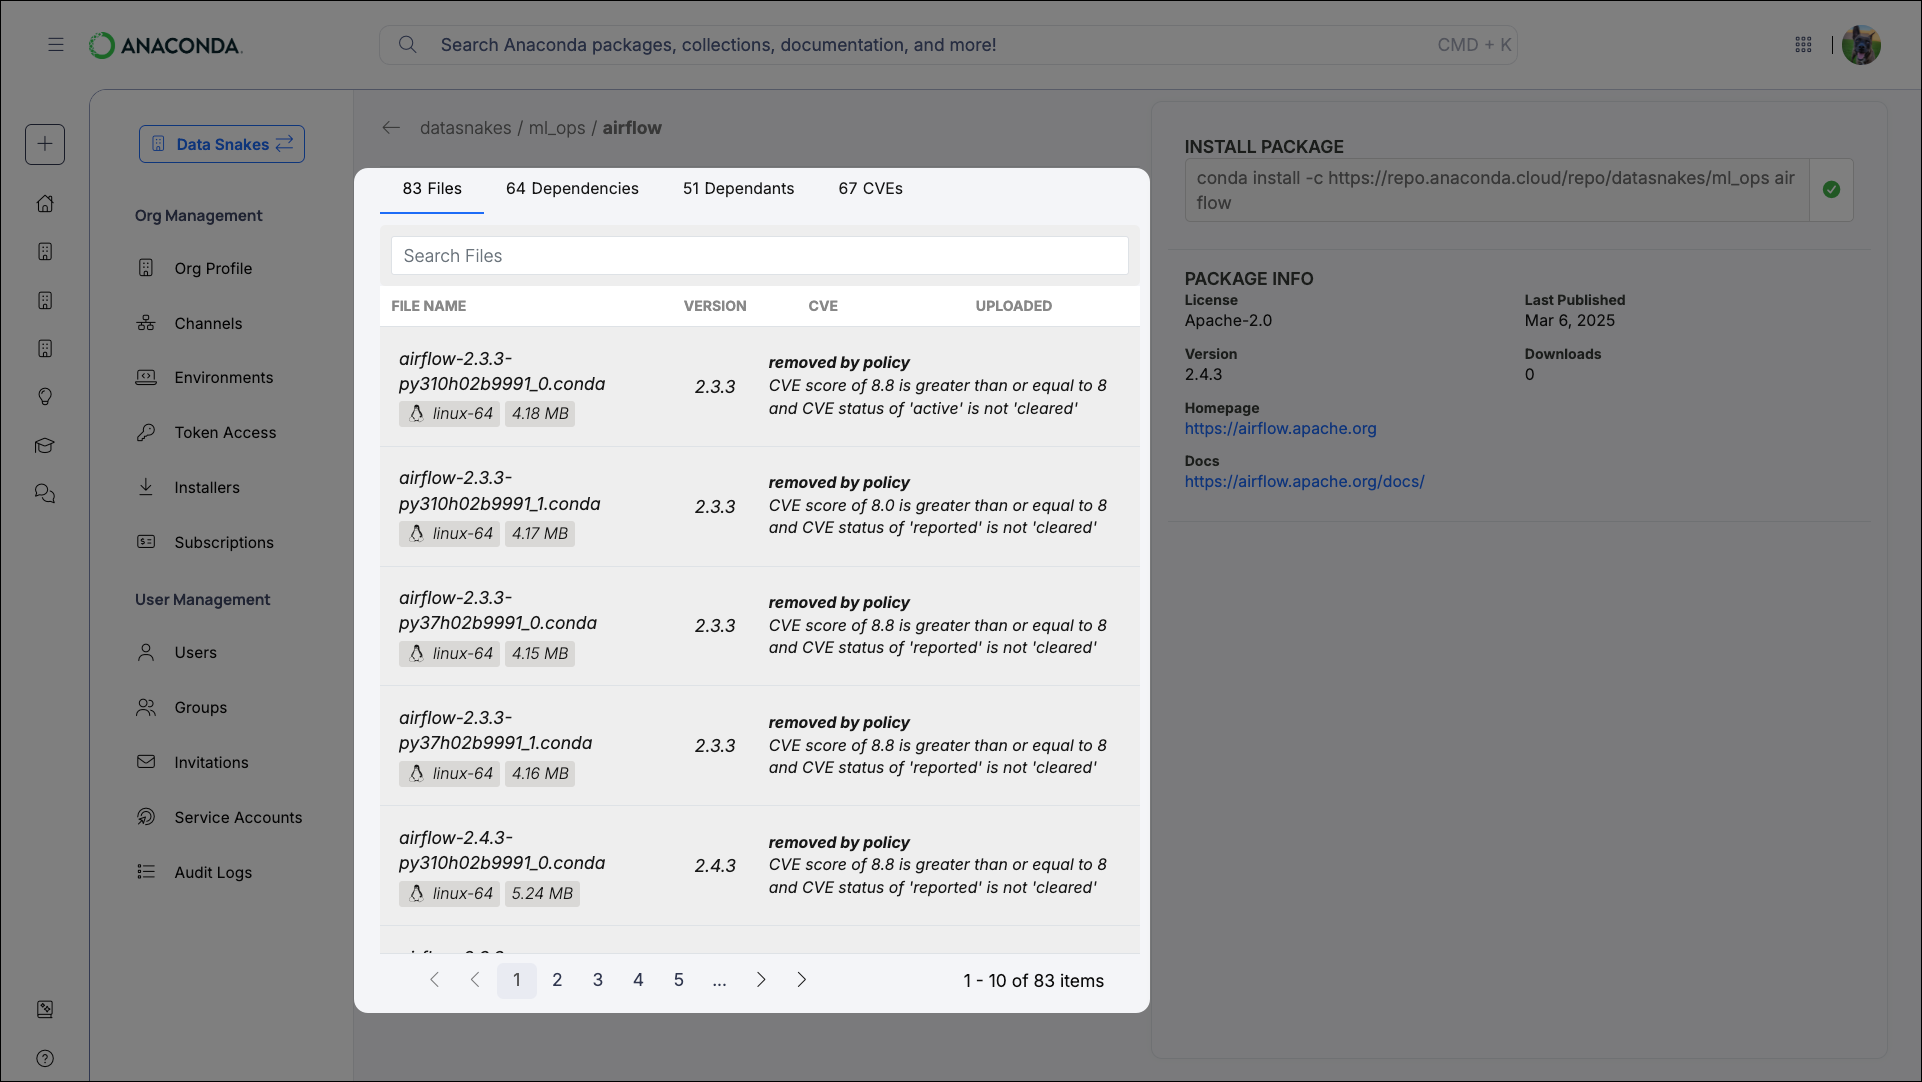 Removed files are not grouped, and some packages have multiple pages of files. For packages with many files, it is best to use the search box to narrow results.
### Editing a channel policy
Policies that are currently in use cannot be edited.
1. Select the policy name from the **POLICIES** list.
2. Change the parameters of the filter as if you were creating a policy.
3. Click **Save**.
A warning displayed beside your filter indicates that it has become deprecated. Deprecated filters still work, but Anaconda recommends you update your policies to no longer use these filters.
### Viewing the policy report
Once you have applied a channel policy to a channel, view the **Policy Report** to see a breakdown of the number of package files across various platforms that have been removed, and how many remain.
From the **Channels** page, click the **POLICY RESULTS** for any channel to open the **Policy Report**.
Removed files are not grouped, and some packages have multiple pages of files. For packages with many files, it is best to use the search box to narrow results.
### Editing a channel policy
Policies that are currently in use cannot be edited.
1. Select the policy name from the **POLICIES** list.
2. Change the parameters of the filter as if you were creating a policy.
3. Click **Save**.
A warning displayed beside your filter indicates that it has become deprecated. Deprecated filters still work, but Anaconda recommends you update your policies to no longer use these filters.
### Viewing the policy report
Once you have applied a channel policy to a channel, view the **Policy Report** to see a breakdown of the number of package files across various platforms that have been removed, and how many remain.
From the **Channels** page, click the **POLICY RESULTS** for any channel to open the **Policy Report**.
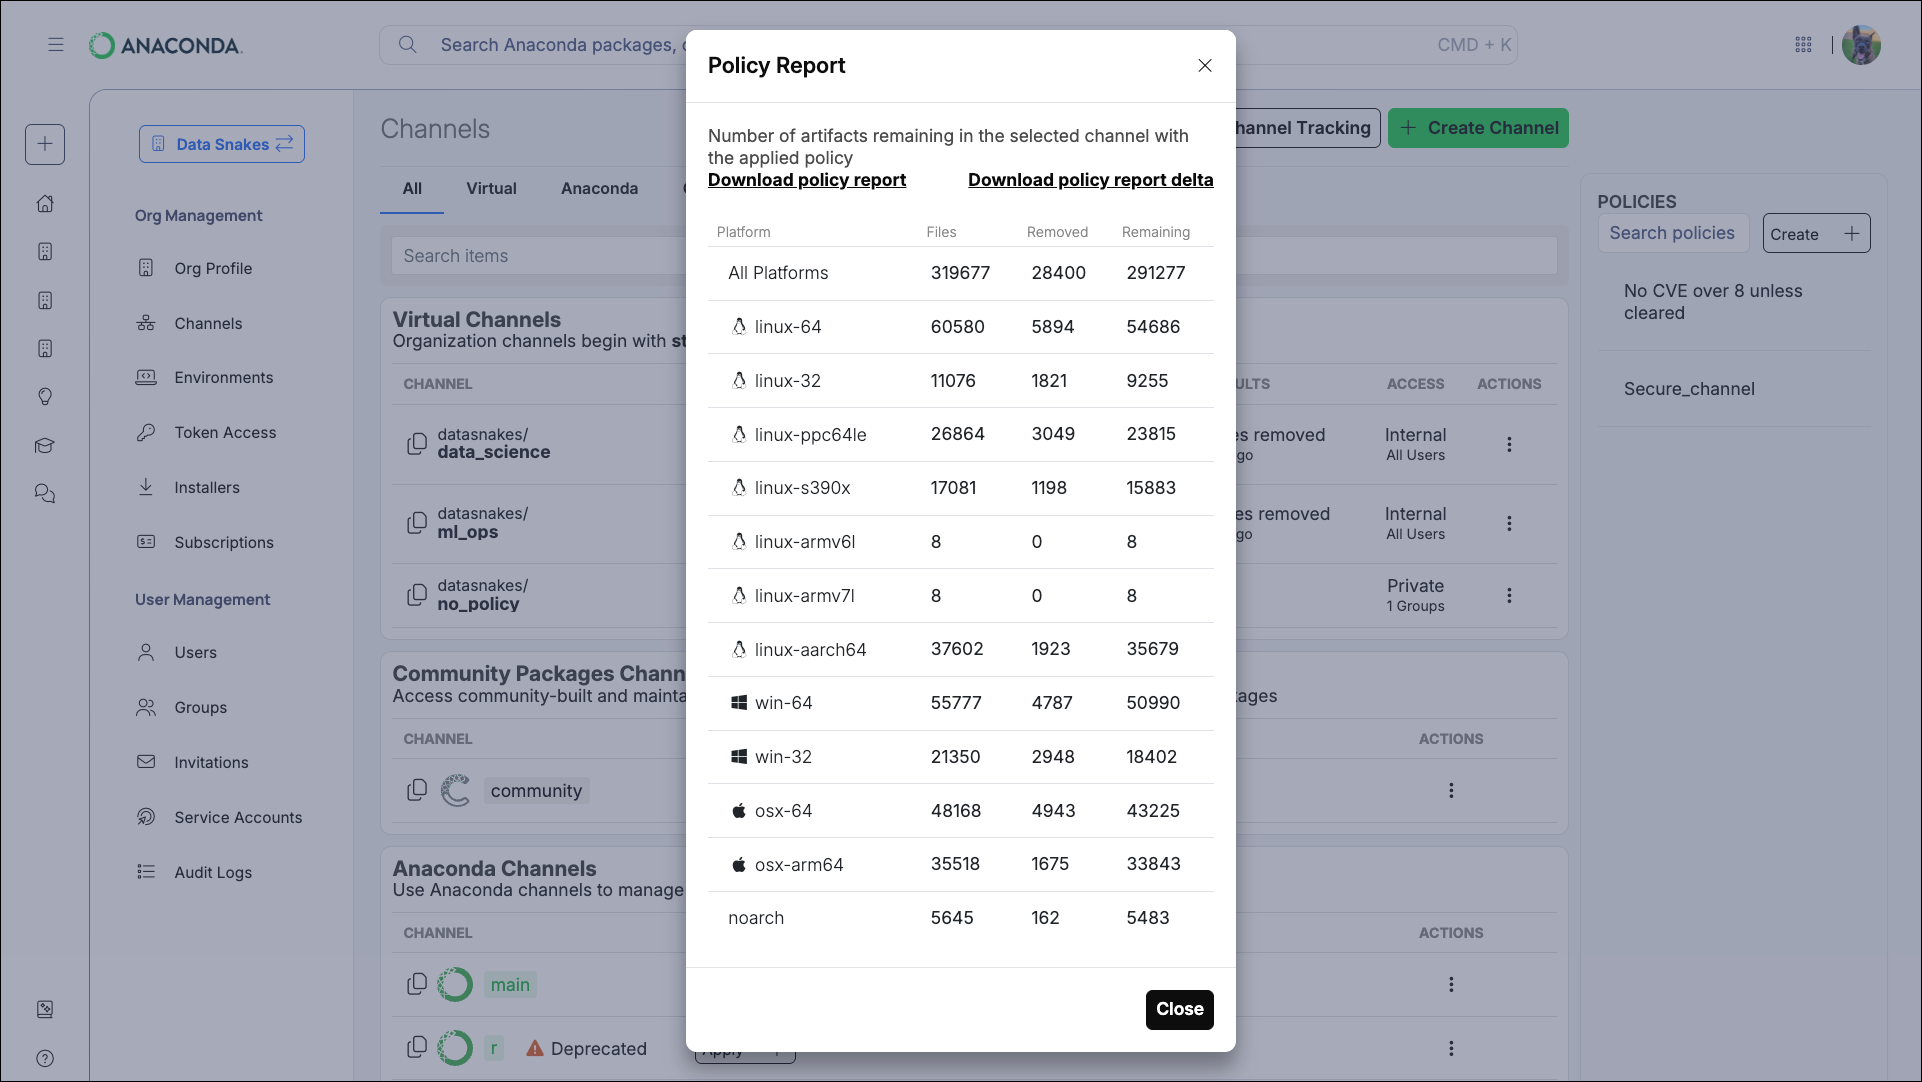 From here, you can download the policy report or the [policy report delta](#policy-deltas) in `.csv` format.
### Policy deltas
Sometimes, due to newly reported CVEs or an updated CVE score or status, the contents of your channel will change when the filter performs its scheduled run. A package may become available that was not available previously, or you could find that a package you've been using is removed from your channel!
From the channel details page, click **View Policy Deltas** to view a list of deltas. Deltas are the recorded changes to your channel's contents. Policy delta history begins from the first change that occurs after you start tracking the channel. Once the policy is removed from the channel (if you need to edit it, for example) the policy delta history is lost. A new policy delta history is established once the policy is reapplied to the channel. Use the **Start** and **End** date filters to narrow your timeline to locate a specific delta, if necessary. Click the count under either **FILES ADDED** or **FILES REMOVED** to see a list of package files from a specific run.
From here, you can download the policy report or the [policy report delta](#policy-deltas) in `.csv` format.
### Policy deltas
Sometimes, due to newly reported CVEs or an updated CVE score or status, the contents of your channel will change when the filter performs its scheduled run. A package may become available that was not available previously, or you could find that a package you've been using is removed from your channel!
From the channel details page, click **View Policy Deltas** to view a list of deltas. Deltas are the recorded changes to your channel's contents. Policy delta history begins from the first change that occurs after you start tracking the channel. Once the policy is removed from the channel (if you need to edit it, for example) the policy delta history is lost. A new policy delta history is established once the policy is reapplied to the channel. Use the **Start** and **End** date filters to narrow your timeline to locate a specific delta, if necessary. Click the count under either **FILES ADDED** or **FILES REMOVED** to see a list of package files from a specific run.
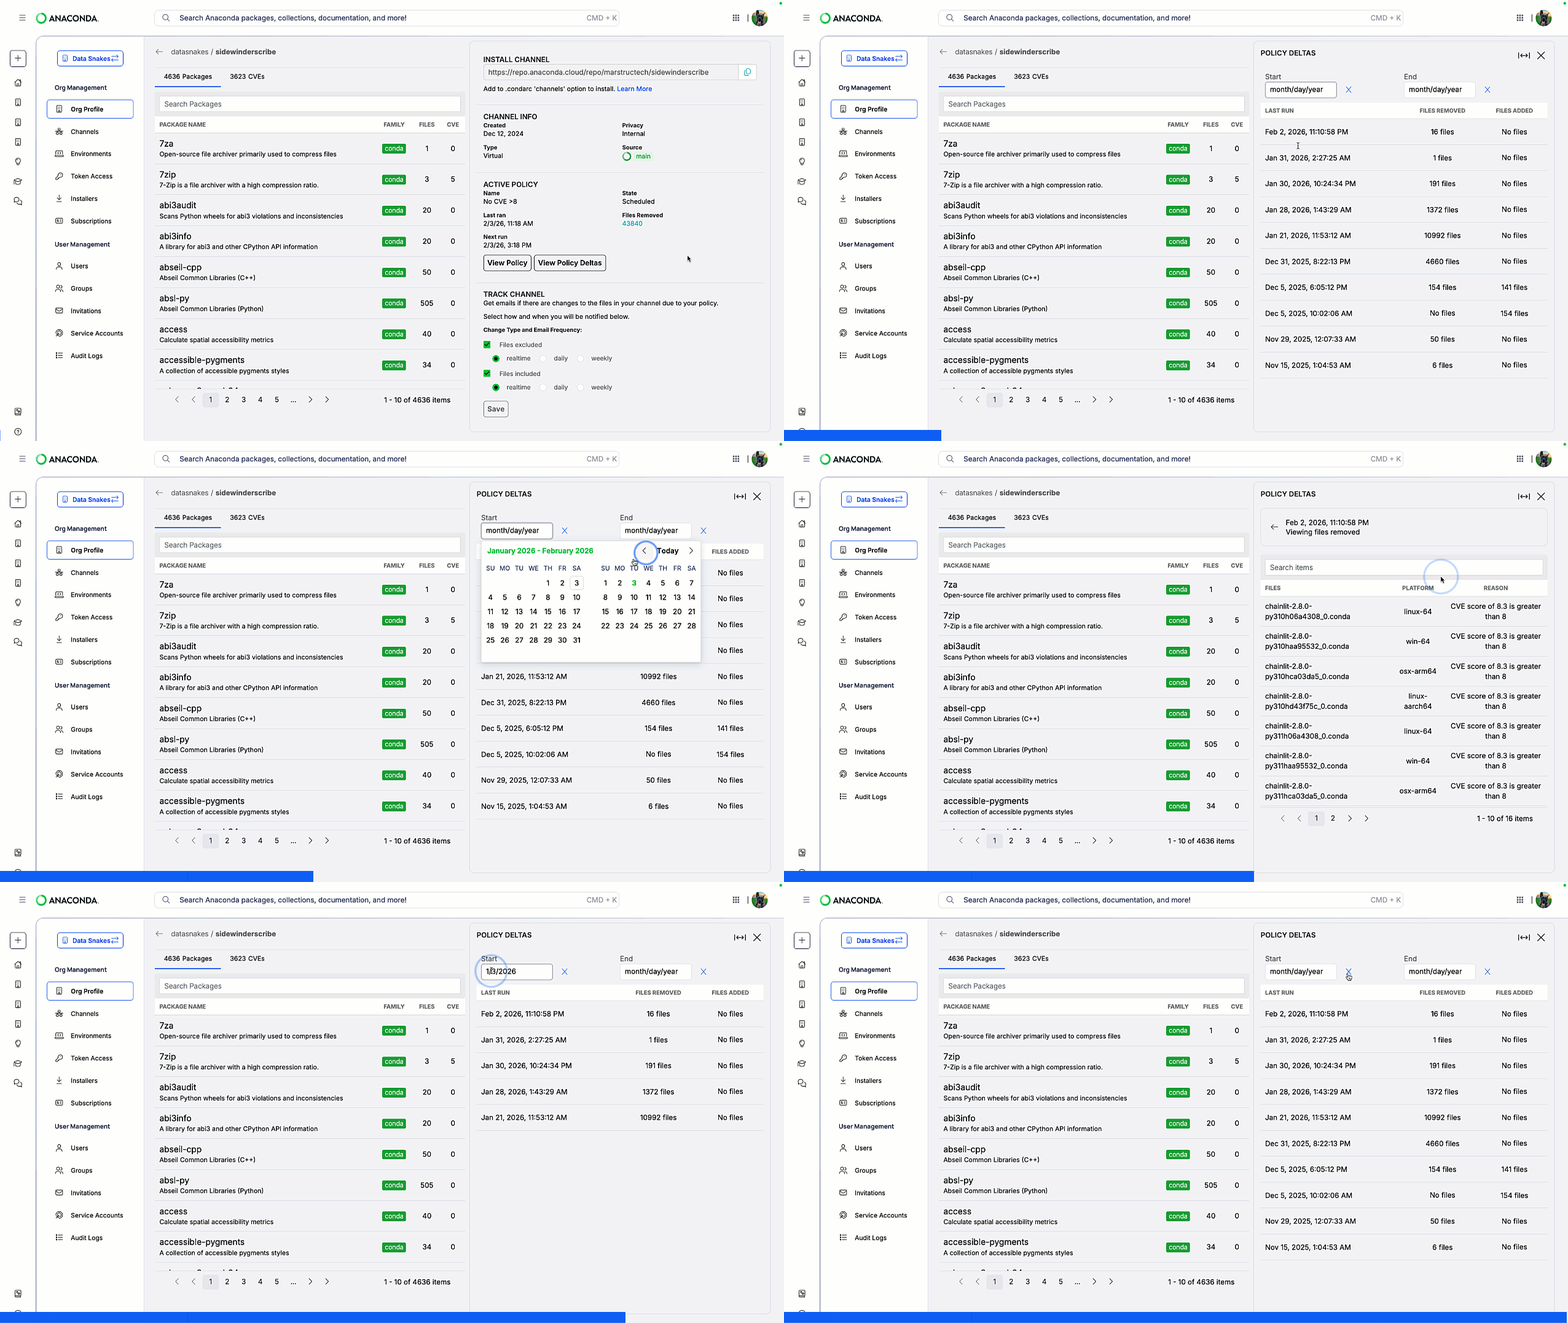 Click the arrow at the top of the file list to return to your channel policy deltas.
## Environment policy
Closed Beta - Contact your CSM to participate
An environment policy defines compliance rules that are automatically enforced across all conda environments that are logged in your organization. Environments that violate the policy receive a warning and enter a remediation period where members have time to remediate per your organization's established Service Level Agreement (SLA). If violations remain unresolved past the SLA period, the environment is blocked from use.
Only one environment policy can be active per organization.
### Compliance lifecycle
Environments are evaluated against the policy each time they are logged. This means compliance is checked whenever a member performs a `create`, `install`, `remove`, `rename`, or `update` action with conda.
The compliance lifecycle follows this sequence:
```mermaid theme={null}
graph LR
A[Compliant] -->|Violation detected| B[Warning]
B -->|SLA expires| C[Blocked]
B -->|Violation resolved| A
C -->|Violation resolved| A
```
### What members experience
When a member attempts to activate an environment in a warning or blocked state, they are notified of the compliance status with guidance:
Warning
The member sees a warning indicating the violation and how much time remains before the environment is blocked. They can still proceed with activation.
Blocked
The member cannot activate the environment. They see a message indicating which policy rules are violated and what needs to be resolved.
### Creating an environment policy
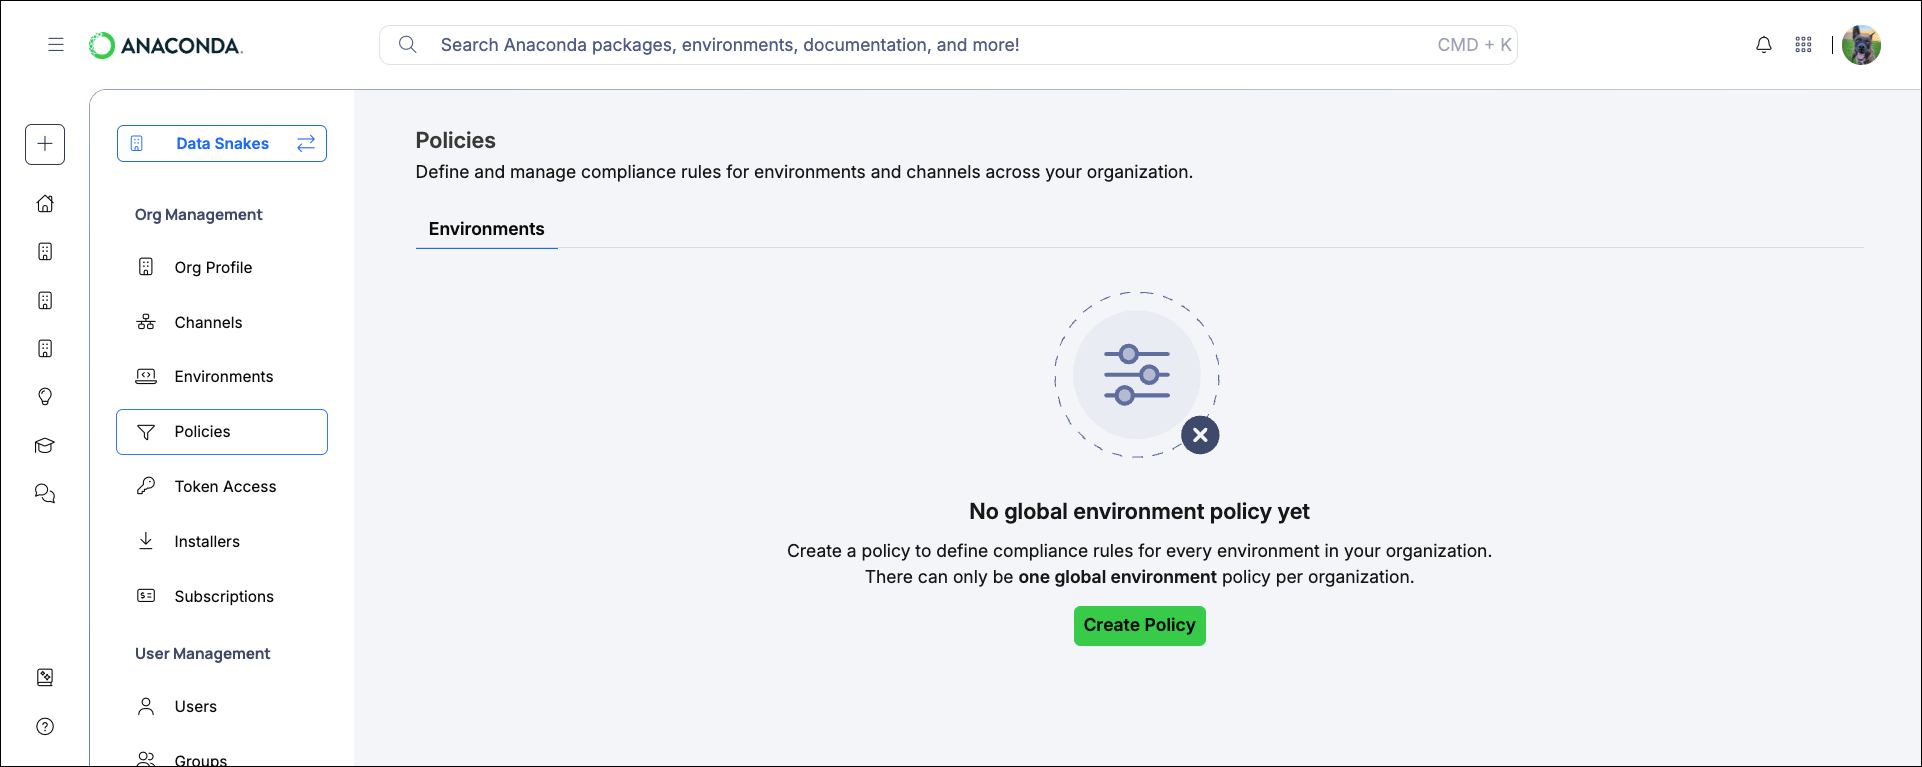
The policy wizard provides a step-by-step process to building a policy for your organization's environments. To create an environment policy, select **Policies**, then click **Create Policy**.
Click the arrow at the top of the file list to return to your channel policy deltas.
## Environment policy
Closed Beta - Contact your CSM to participate
An environment policy defines compliance rules that are automatically enforced across all conda environments that are logged in your organization. Environments that violate the policy receive a warning and enter a remediation period where members have time to remediate per your organization's established Service Level Agreement (SLA). If violations remain unresolved past the SLA period, the environment is blocked from use.
Only one environment policy can be active per organization.
### Compliance lifecycle
Environments are evaluated against the policy each time they are logged. This means compliance is checked whenever a member performs a `create`, `install`, `remove`, `rename`, or `update` action with conda.
The compliance lifecycle follows this sequence:
```mermaid theme={null}
graph LR
A[Compliant] -->|Violation detected| B[Warning]
B -->|SLA expires| C[Blocked]
B -->|Violation resolved| A
C -->|Violation resolved| A
```
### What members experience
When a member attempts to activate an environment in a warning or blocked state, they are notified of the compliance status with guidance:
Warning
The member sees a warning indicating the violation and how much time remains before the environment is blocked. They can still proceed with activation.
Blocked
The member cannot activate the environment. They see a message indicating which policy rules are violated and what needs to be resolved.
### Creating an environment policy
The policy wizard provides a step-by-step process to building a policy for your organization's environments. To create an environment policy, select **Policies**, then click **Create Policy**.
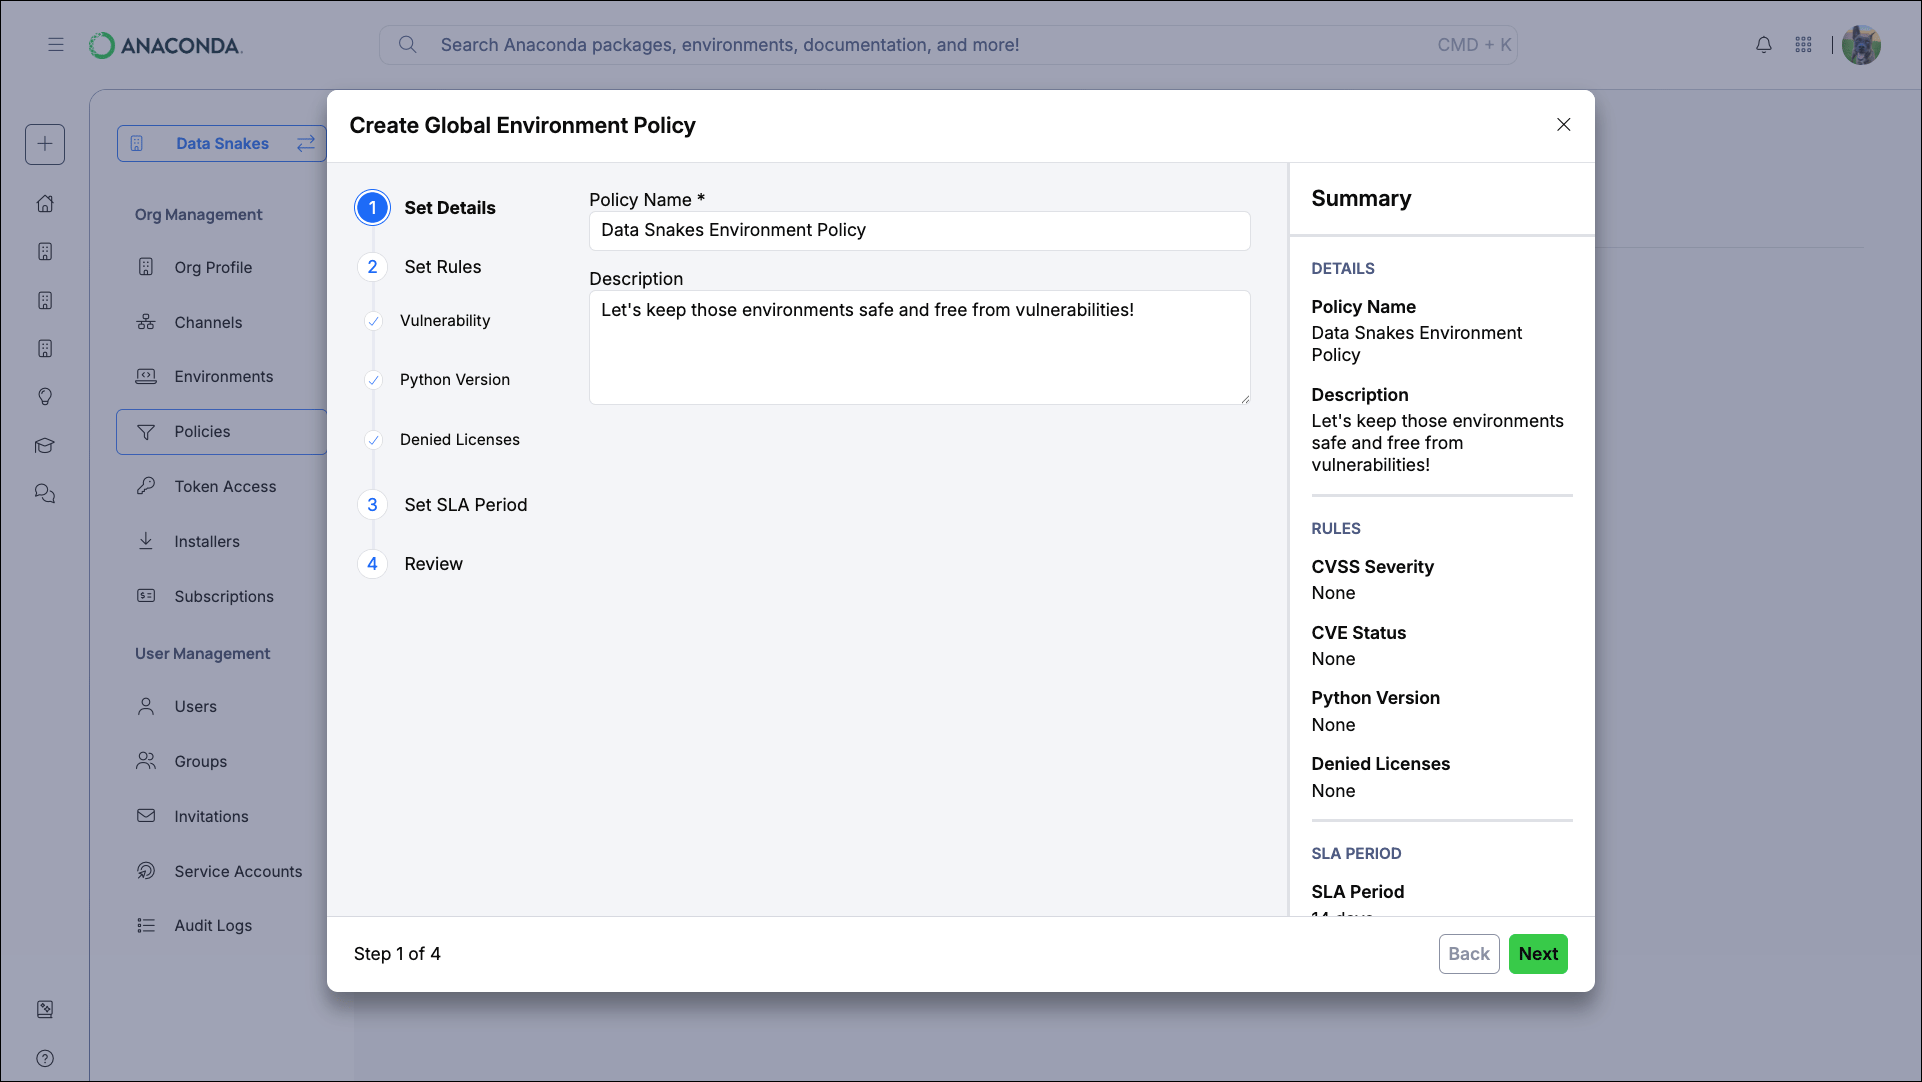
 Provide a name and optional description for your policy.
 Rules define what makes an environment non-compliant. You can configure any combination of the three rule types below. Each rule is independently optional, but you must configure at least one to enable the policy.
Use this rule to flag environments containing packages with known security vulnerabilities. This is typically the most impactful rule, as it directly addresses your organization's exposure to exploitable software.
Rules define what makes an environment non-compliant. You can configure any combination of the three rule types below. Each rule is independently optional, but you must configure at least one to enable the policy.
Use this rule to flag environments containing packages with known security vulnerabilities. This is typically the most impactful rule, as it directly addresses your organization's exposure to exploitable software.
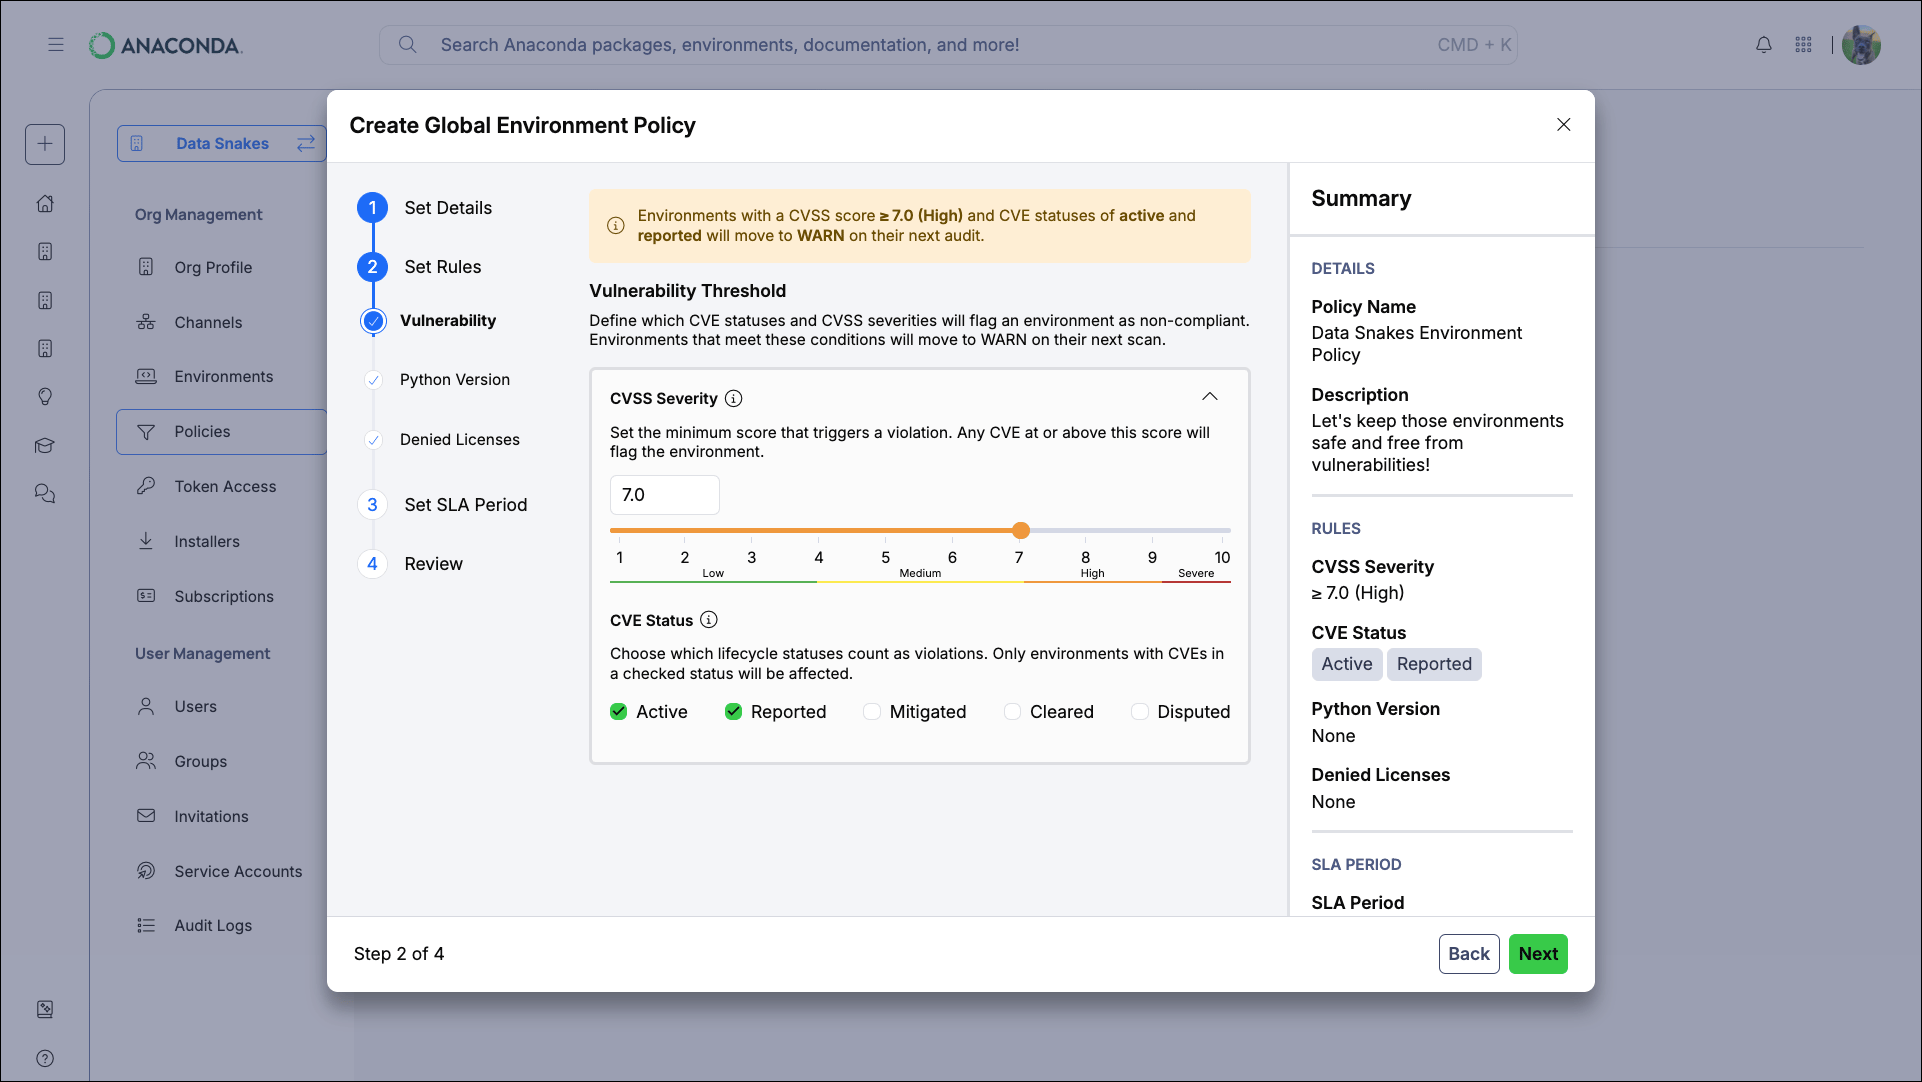 Set a minimum CVSS score and select one or more vulnerability statuses.
A common starting configuration is a CVSS threshold of `7.0` with `Active` and `Reported` statuses selected. This catches confirmed high-severity vulnerabilities without generating excessive noise from lower-risk or already-resolved issues.
***
Packages must meet both parameters to trigger a warning for an environment. For example, a package with a CVSS score of `9.0` and a `Cleared` status would not trigger a violation for the policy configuration above.
CVSS score threshold
Set the minimum severity score (1.0 to 10.0) that triggers a violation. Any package with a CVE at or above this score is considered a violation.
Severity
Score range
Guidance
Low
0.1 - 3.9
Minimal risk. Flagging at this level generates many violations and is best suited for high-security environments.
Medium
4.0 - 6.9
Moderate risk. A common starting point for organizations beginning to enforce vulnerability policies.
High
7.0 - 8.9
Significant risk. Recommended for most organizations as a balance between security and workflow disruption.
Critical
9.0 - 10.0
Severe risk. Only flags the most dangerous vulnerabilities. Use this if you want minimal disruption while still catching the worst exposures.
CVE status
Select which vulnerability statuses count as violations. This lets you control whether your policy reacts to all reported vulnerabilities or only those that have been confirmed.
Status
What it means
**Active**
The vulnerability is confirmed and unresolved. Most organizations should include this status.
**Reported**
The vulnerability has been reported but not yet confirmed by Anaconda's curation team. Include this for a more cautious posture.
**Mitigated**
A workaround or partial fix is available. Typically excluded from policies since the risk is reduced.
**Cleared**
The vulnerability has been fully resolved or determined not to affect this package. Typically excluded.
**Disputed**
The validity of the vulnerability is contested. Include this only if your organization requires strict precautionary enforcement.
Use this rule to enforce a standard Python version range across your organization. This helps prevent compatibility issues and ensures teams are running supported versions.
Python version violations always produce a **Warning** and never escalate to a **Block**, regardless of the SLA period.
Set a minimum CVSS score and select one or more vulnerability statuses.
A common starting configuration is a CVSS threshold of `7.0` with `Active` and `Reported` statuses selected. This catches confirmed high-severity vulnerabilities without generating excessive noise from lower-risk or already-resolved issues.
***
Packages must meet both parameters to trigger a warning for an environment. For example, a package with a CVSS score of `9.0` and a `Cleared` status would not trigger a violation for the policy configuration above.
CVSS score threshold
Set the minimum severity score (1.0 to 10.0) that triggers a violation. Any package with a CVE at or above this score is considered a violation.
Severity
Score range
Guidance
Low
0.1 - 3.9
Minimal risk. Flagging at this level generates many violations and is best suited for high-security environments.
Medium
4.0 - 6.9
Moderate risk. A common starting point for organizations beginning to enforce vulnerability policies.
High
7.0 - 8.9
Significant risk. Recommended for most organizations as a balance between security and workflow disruption.
Critical
9.0 - 10.0
Severe risk. Only flags the most dangerous vulnerabilities. Use this if you want minimal disruption while still catching the worst exposures.
CVE status
Select which vulnerability statuses count as violations. This lets you control whether your policy reacts to all reported vulnerabilities or only those that have been confirmed.
Status
What it means
**Active**
The vulnerability is confirmed and unresolved. Most organizations should include this status.
**Reported**
The vulnerability has been reported but not yet confirmed by Anaconda's curation team. Include this for a more cautious posture.
**Mitigated**
A workaround or partial fix is available. Typically excluded from policies since the risk is reduced.
**Cleared**
The vulnerability has been fully resolved or determined not to affect this package. Typically excluded.
**Disputed**
The validity of the vulnerability is contested. Include this only if your organization requires strict precautionary enforcement.
Use this rule to enforce a standard Python version range across your organization. This helps prevent compatibility issues and ensures teams are running supported versions.
Python version violations always produce a **Warning** and never escalate to a **Block**, regardless of the SLA period.
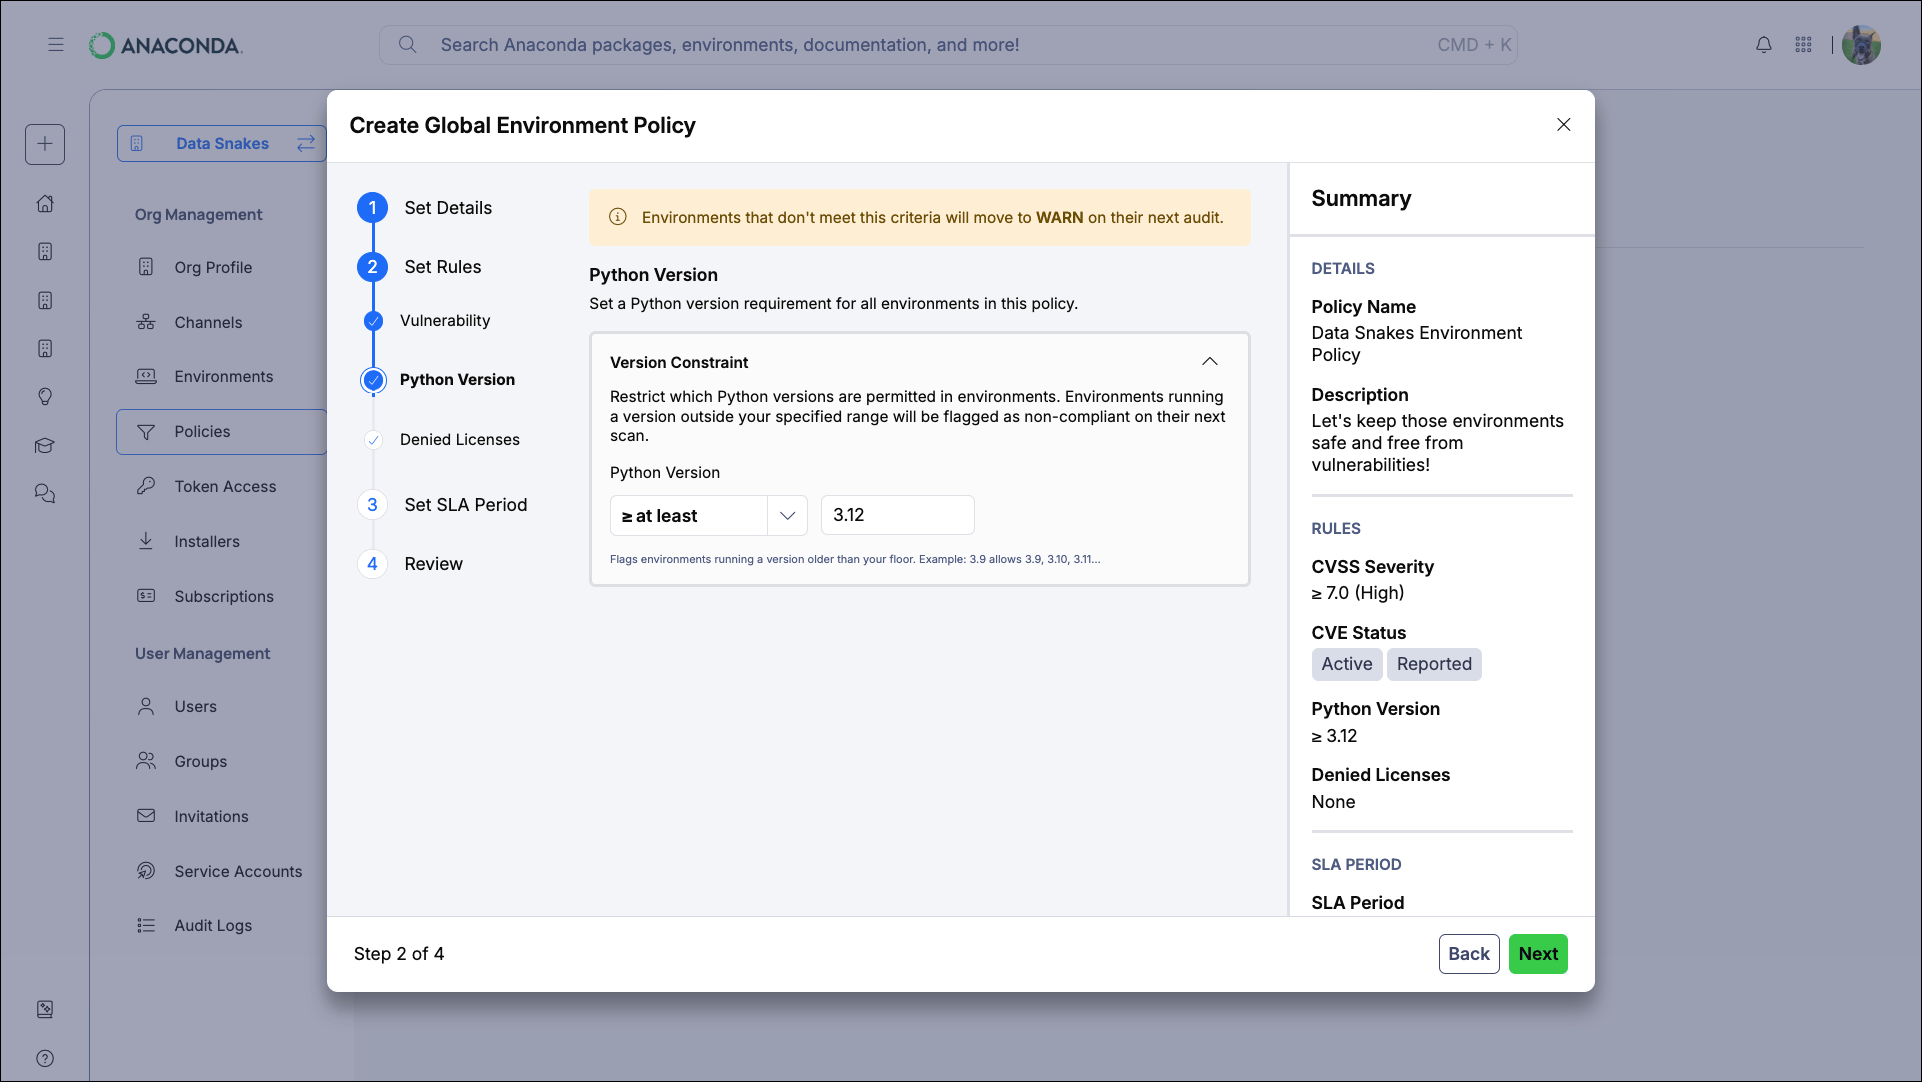 Select a comparator and specify a version number:
Comparator
Example
Effect
**At least**
At least 3.10
Flags environments running Python below 3.10
**No more than**
No more than 3.12
Flags environments running Python above 3.12
**Exactly**
Exactly 3.11.4
Flags any environment not running Python at 3.11.4
**Between**
Between 3.12 and 3.14
Flags environments running Python below 3.12 or above 3.14
Use the **At least** comparator to set a minimum supported version (for example, **At least 3.10**) rather than pinning to an exact version. This gives teams flexibility while ensuring no one is running end-of-life Python releases.
Use this rule to prevent environments from containing packages with license types that conflict with your organization's legal or compliance requirements.
Select a comparator and specify a version number:
Comparator
Example
Effect
**At least**
At least 3.10
Flags environments running Python below 3.10
**No more than**
No more than 3.12
Flags environments running Python above 3.12
**Exactly**
Exactly 3.11.4
Flags any environment not running Python at 3.11.4
**Between**
Between 3.12 and 3.14
Flags environments running Python below 3.12 or above 3.14
Use the **At least** comparator to set a minimum supported version (for example, **At least 3.10**) rather than pinning to an exact version. This gives teams flexibility while ensuring no one is running end-of-life Python releases.
Use this rule to prevent environments from containing packages with license types that conflict with your organization's legal or compliance requirements.
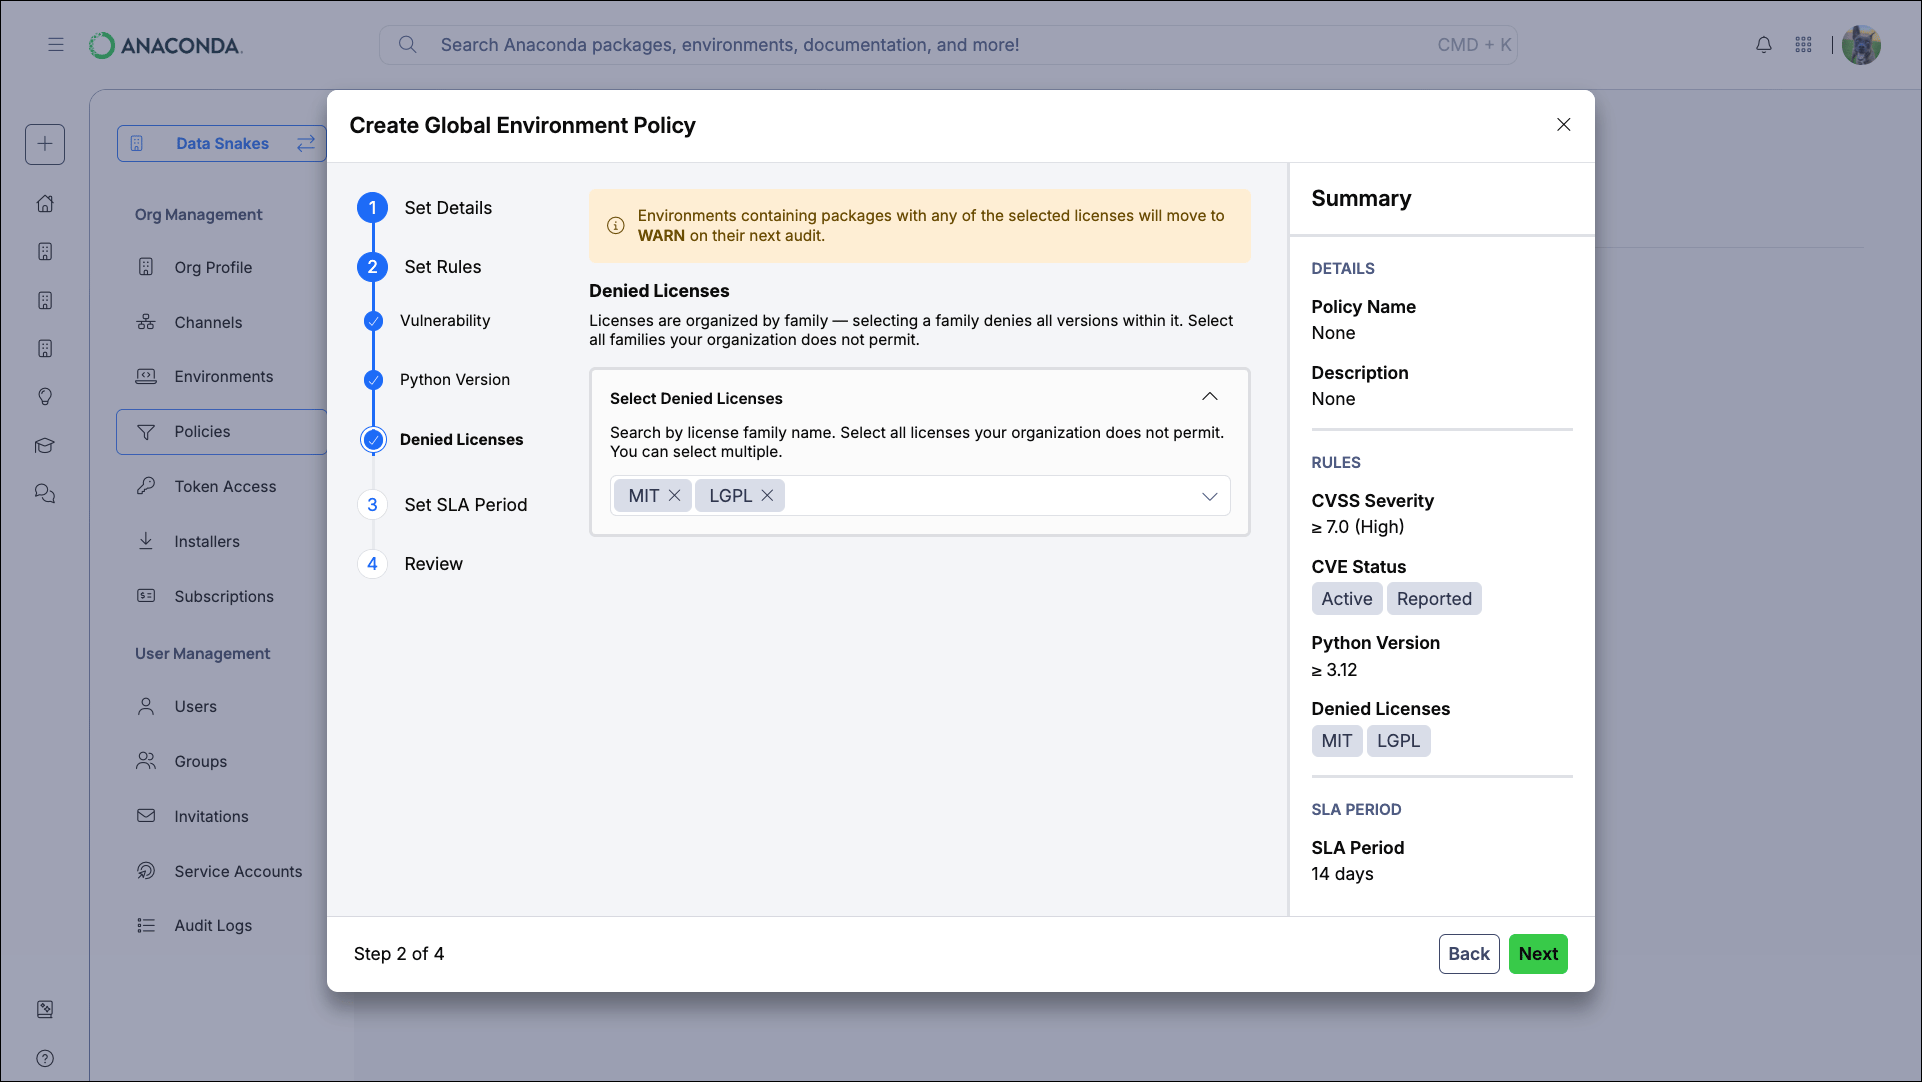 Select one or more license families to deny. Any environment containing a package associated with a denied license family is flagged as non-compliant.
Available license families:
`AGPL`, `APACHE`, `BSD`, `CC`, `GPL`, `GPL2`, `GPL3`, `LGPL`, `MIT`, `MOZILLA`, `None`, `OTHER`, `PSF`, `Public-Domain`
Consult your legal team before configuring this rule. Common restrictions include denying **AGPL** (requires source disclosure for network use) and **GPL** families (copyleft requirements may conflict with proprietary distribution).
***
Packages with a license of **None** have no declared license, which may also pose a compliance risk.
The SLA period is the remediation window between when a violation is detected and when the environment is blocked.
Select one or more license families to deny. Any environment containing a package associated with a denied license family is flagged as non-compliant.
Available license families:
`AGPL`, `APACHE`, `BSD`, `CC`, `GPL`, `GPL2`, `GPL3`, `LGPL`, `MIT`, `MOZILLA`, `None`, `OTHER`, `PSF`, `Public-Domain`
Consult your legal team before configuring this rule. Common restrictions include denying **AGPL** (requires source disclosure for network use) and **GPL** families (copyleft requirements may conflict with proprietary distribution).
***
Packages with a license of **None** have no declared license, which may also pose a compliance risk.
The SLA period is the remediation window between when a violation is detected and when the environment is blocked.
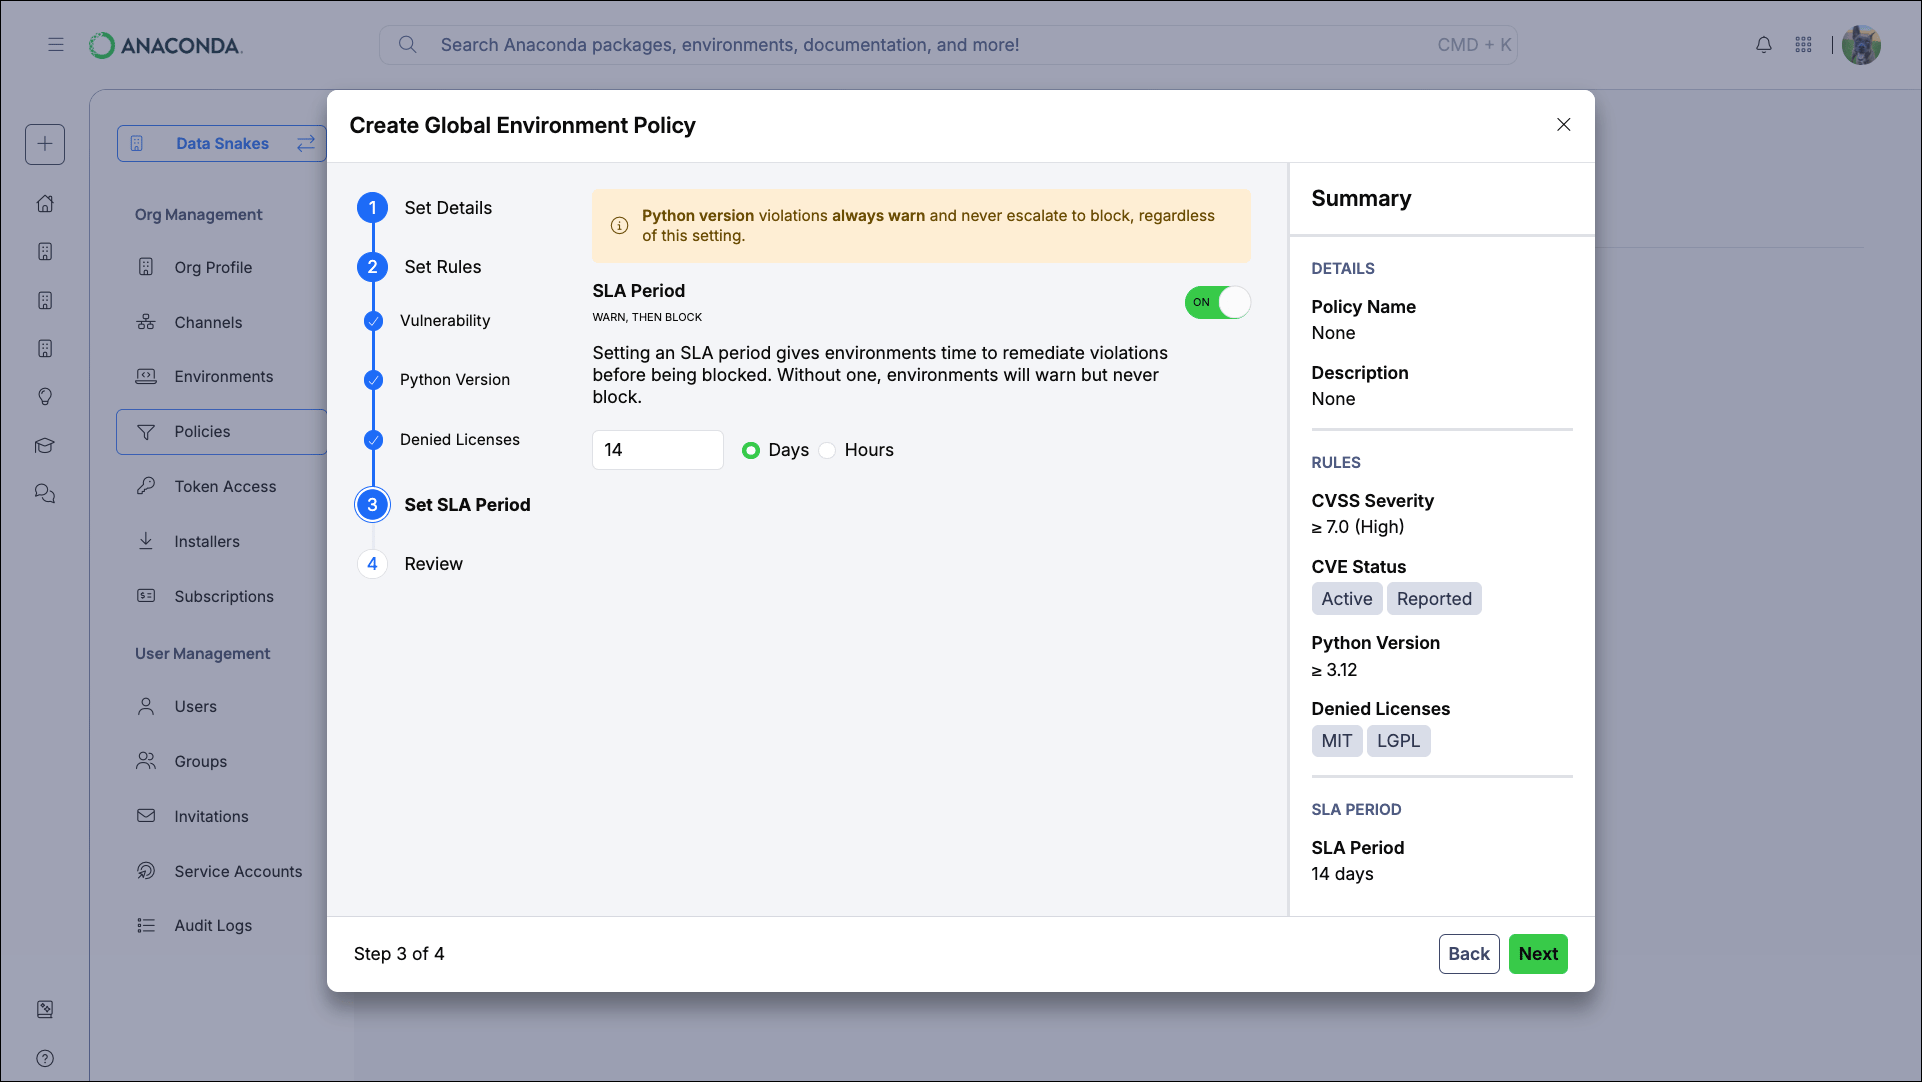 Setting
Description
**SLA enforcement**
Toggle the SLA period on or off.
Setting
Description
**SLA enforcement**
Toggle the SLA period on or off.
When off, the policy operates in warn-only mode: violations generate warnings but environments are never blocked.
**Duration**
The remediation window before the environment is blocked. The default SLA period duration is 14 days.
**Days:** 1-365
**Hours:** 1-23
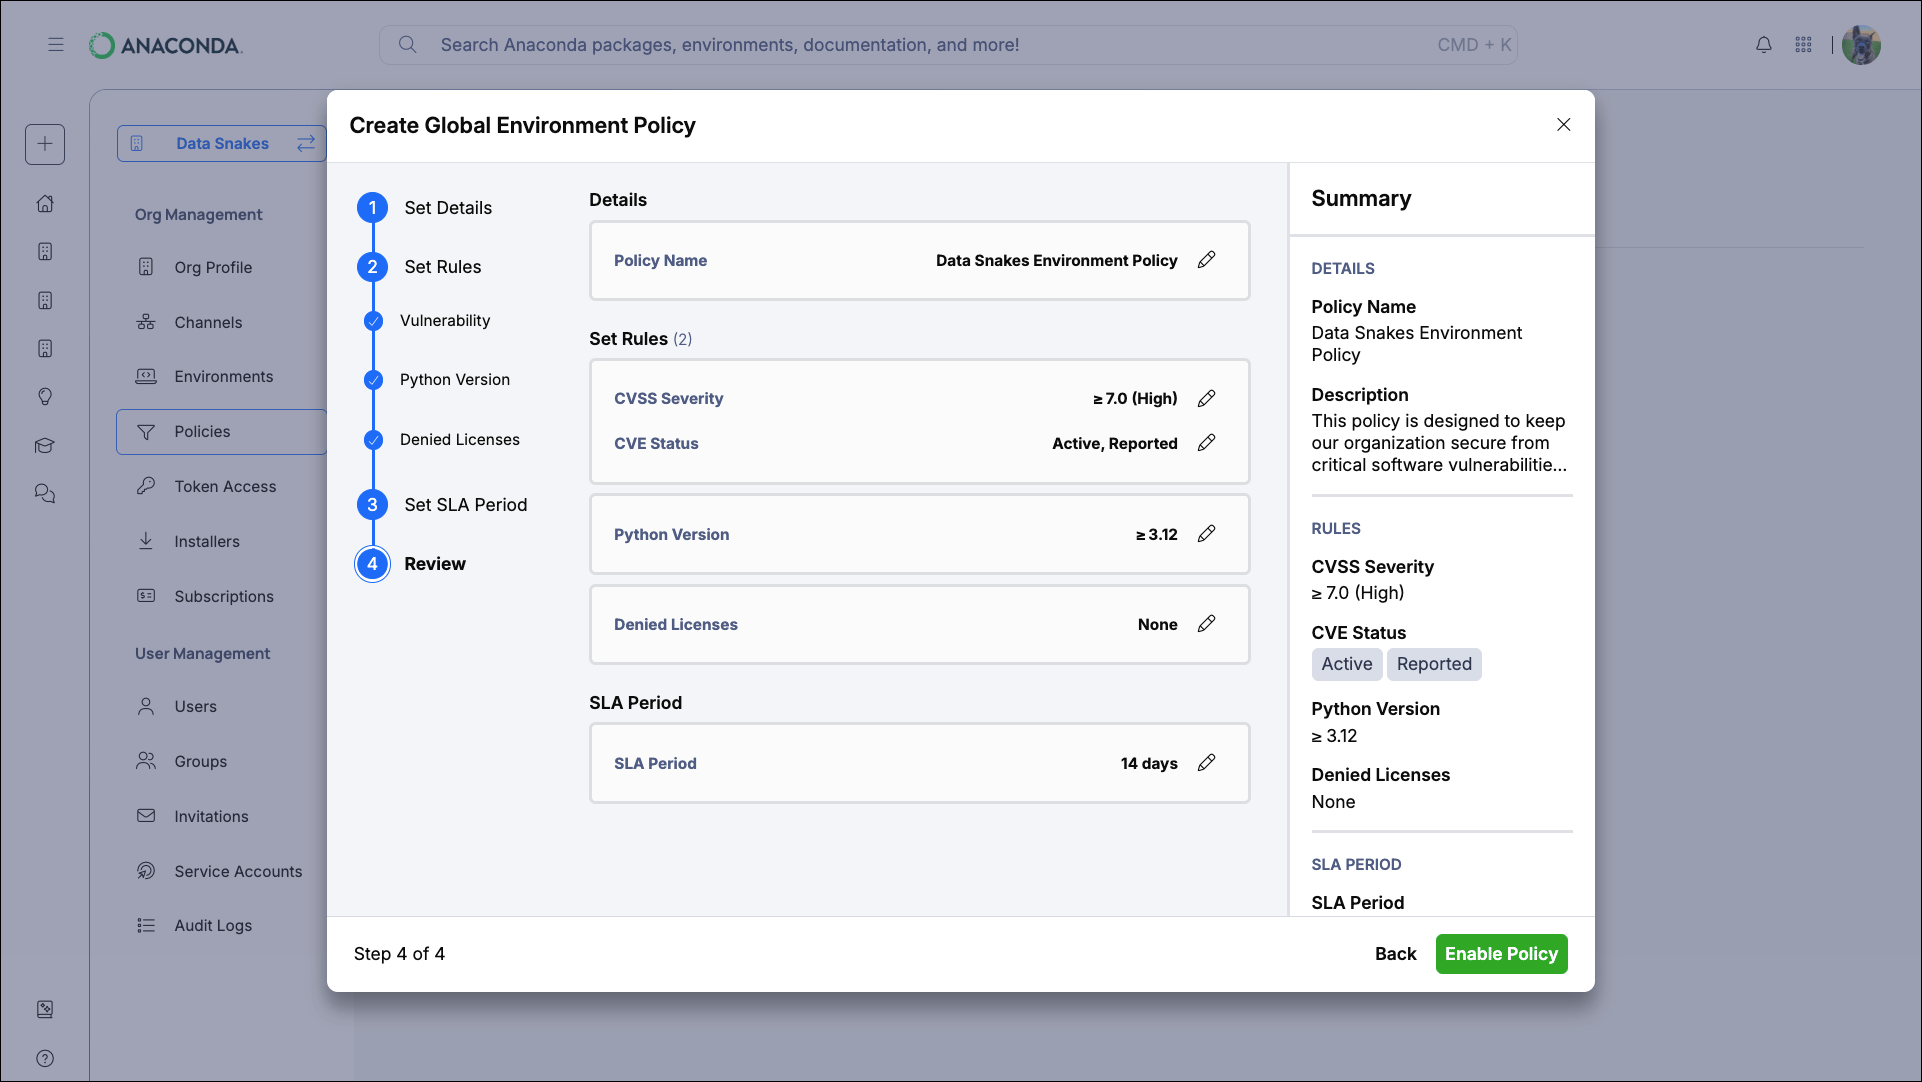
The review step displays a summary of your policy configuration. *Verify your settings before enabling.* If you need to make changes, click the icon beside any section to return to that step. When ready, click **Enable Policy** to save and activate the policy.
 ### Enabling and disabling an environment policy
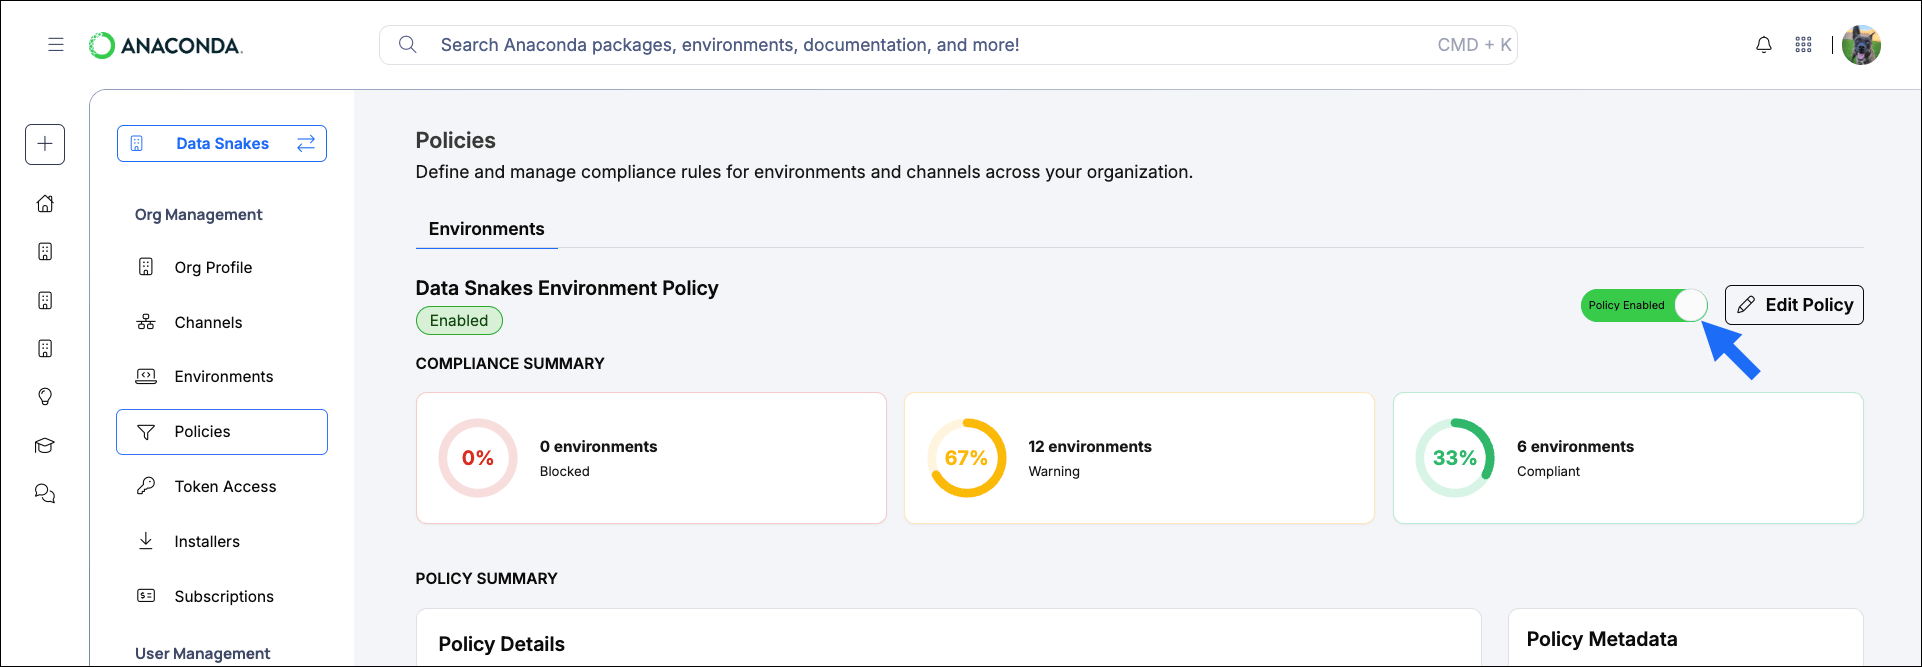
Disabling a policy pauses enforcement but retains existing compliance states. Your existing environment policy configurations are preserved, and you can re-enable the policy at any time. When re-enabled, environments are re-evaluated against the policy and compliance states are updated accordingly.
### Enabling and disabling an environment policy
Disabling a policy pauses enforcement but retains existing compliance states. Your existing environment policy configurations are preserved, and you can re-enable the policy at any time. When re-enabled, environments are re-evaluated against the policy and compliance states are updated accordingly.
 ### Editing an environment policy
To edit an existing policy, select **Policies** from the left-hand navigation, then click **Edit Policy**.
The wizard opens your current environment policy configurations. Make changes as necessary, then go to **Review** and click **Save** to update and apply your new environment policy.
Editing a policy can change the compliance state of environments across your organization. For example, lowering the CVSS threshold may cause previously compliant environments to enter a warning state on their next audit. Communicate with your teams and review the potential impact before tightening policy thresholds.
### Recommended rollout approach
For organizations enabling a policy for the first time, consider a phased approach:
Warn-only mode
Create the policy with the SLA period turned off. This lets you observe which environments would be affected without blocking anyone.
Review impact
Use the [environment dashboard](/docs/anaconda-platform/admin/environments#environment-dashboard) to understand how many environments are non-compliant and communicate with affected teams.
Enable SLA enforcement
Once teams are aware and have had time to begin remediation, edit the policy to turn on the SLA period with a generous duration (for example, 14 days or longer).
Tighten over time
As your organization's compliance posture improves, consider adjusting thresholds or shortening the SLA period.
### Editing an environment policy
To edit an existing policy, select **Policies** from the left-hand navigation, then click **Edit Policy**.
The wizard opens your current environment policy configurations. Make changes as necessary, then go to **Review** and click **Save** to update and apply your new environment policy.
Editing a policy can change the compliance state of environments across your organization. For example, lowering the CVSS threshold may cause previously compliant environments to enter a warning state on their next audit. Communicate with your teams and review the potential impact before tightening policy thresholds.
### Recommended rollout approach
For organizations enabling a policy for the first time, consider a phased approach:
Warn-only mode
Create the policy with the SLA period turned off. This lets you observe which environments would be affected without blocking anyone.
Review impact
Use the [environment dashboard](/docs/anaconda-platform/admin/environments#environment-dashboard) to understand how many environments are non-compliant and communicate with affected teams.
Enable SLA enforcement
Once teams are aware and have had time to begin remediation, edit the policy to turn on the SLA period with a generous duration (for example, 14 days or longer).
Tighten over time
As your organization's compliance posture improves, consider adjusting thresholds or shortening the SLA period.